2014 NISSAN TEANA engine coolant
[x] Cancel search: engine coolantPage 2236 of 4801
![NISSAN TEANA 2014 Service Manual
EM-238
< UNIT DISASSEMBLY AND ASSEMBLY >[VQ35DE]
CYLINDER BLOCK
• : Engine front
• Piston Grade No. (A)
• Piston front mark (B)
• Oil hole (C)
• Connecting rod front mark (D)
• Cylind NISSAN TEANA 2014 Service Manual
EM-238
< UNIT DISASSEMBLY AND ASSEMBLY >[VQ35DE]
CYLINDER BLOCK
• : Engine front
• Piston Grade No. (A)
• Piston front mark (B)
• Oil hole (C)
• Connecting rod front mark (D)
• Cylind](/manual-img/5/57390/w960_57390-2235.png)
EM-238
< UNIT DISASSEMBLY AND ASSEMBLY >[VQ35DE]
CYLINDER BLOCK
• : Engine front
• Piston Grade No. (A)
• Piston front mark (B)
• Oil hole (C)
• Connecting rod front mark (D)
• Cylinder No. (E)
• Pin Grade No. (F)
Service parts apply only to grade 0.
Unit: mm (in)
CYLINDER BLOCK DISTORTION
• Using a scraper, remove any old gasket material on the cylinder block surface, and remove any oil, scale, carbon, or other contami-
nation.
CAUTION:
Be careful not to allow gasket fl akes to enter the oil or coolant
passages.
• Measure the distortion on the block upper face at different points in six directions.
• If out of specification, resurfac e the cylinder block. The allowable
amount of resurfacing is dependent on the amount of any cylinder
head resurfacing. The resurfacing limit is [amount of cylinder head resurfacing] + [amount of cylinder head
resurfacing] = 0.2 mm (0.008 in).
INNER DIAMETER OF MAIN BEARING HOUSING
• Install the main bearing caps with the main bearings removed, and tighten the bolts to the specified torque.
• Using a bore gauge, measure the inner diameter of the main bear-
ing housing (A).
• If out of the standard, replace the cylinder block and main bearing caps as an assembly.
NOTE:
These components cannot be replaced as a single unit, because
they were processed together.
PISTON-TO-CYLINDER BORE CLEARANCE
1. Using a bore gauge, measure cylinder bore for wear, out -of-round and taper at (A), (B) and (C). The X axis
is in the longitudinal direction of the engine.
AWBIA0027ZZ
Grade 0 1
Connecting rod bushing inner diameter
222.000 - 22.006
(0.8661 - 0.8664) 22.006 - 22.012
(0.8664 - 0.8666)
Piston pin outer diameter 21.989 - 21.995
(0.8657 - 0.8659) 21.995 - 22. 001
(0.8659 - 0.8662)
Piston pin hole diameter 21.993 - 21.999
(0.8659 - 0.8661) 21.999 - 22.005
(0.8661 - 0.8663)
Distortion limit : 0.10 mm (0.0039 in)
Cylinder block height : 214.95 - 215.05 mm (8.4626 - 8.4665 in)
SEM123C
Standard : 63.993 - 64.017 mm (2.5194 - 2.5203 in)
SEM845E
Revision: November 20132014 Altima NAM
Page 2388 of 4801
EXL-122
< PERIODIC MAINTENANCE >
HEADLAMP
PERIODIC MAINTENANCE
HEADLAMP
Aiming AdjustmentINFOID:0000000009463617
PREPARATION BEFORE ADJUSTING
Before performing aiming adjustment, check the following:
• Ensure all tires are inflated to correct pressure.
• Place vehicle and screen on level surface.
• Ensure there is no load in vehicle other than the driver (or equivalent weight placed in driver's position).
• Coolant and engine oil filled to correct level, and fuel tank full.
• Remove cargo and/or luggage to maintain an unloaded vehicle condition.
• Confirm spare tire, jack and tools are properly stowed.
• Carefully wipe off any dirt from headlamp lens. CAUTION:
Do not use organic solvent (thinner, gasoline etc.)
• Place a driver or equivalent weight of 68.5 kg (150 lb) on the driver seat.
• By hand, bounce the front and rear of the vehicle to settle the suspension and eliminate any static load.
• Place the front tires in the straight ahead position.
• Aim each headlamp individually and ensure other headlamp beam pattern is blocked from screen.
NOTE:
• For headlamp aiming details, refer to regulations in your area.
• By regulation, no means for horizontal aim adjustment is provided from the factory; only vertical aim is
adjustable.
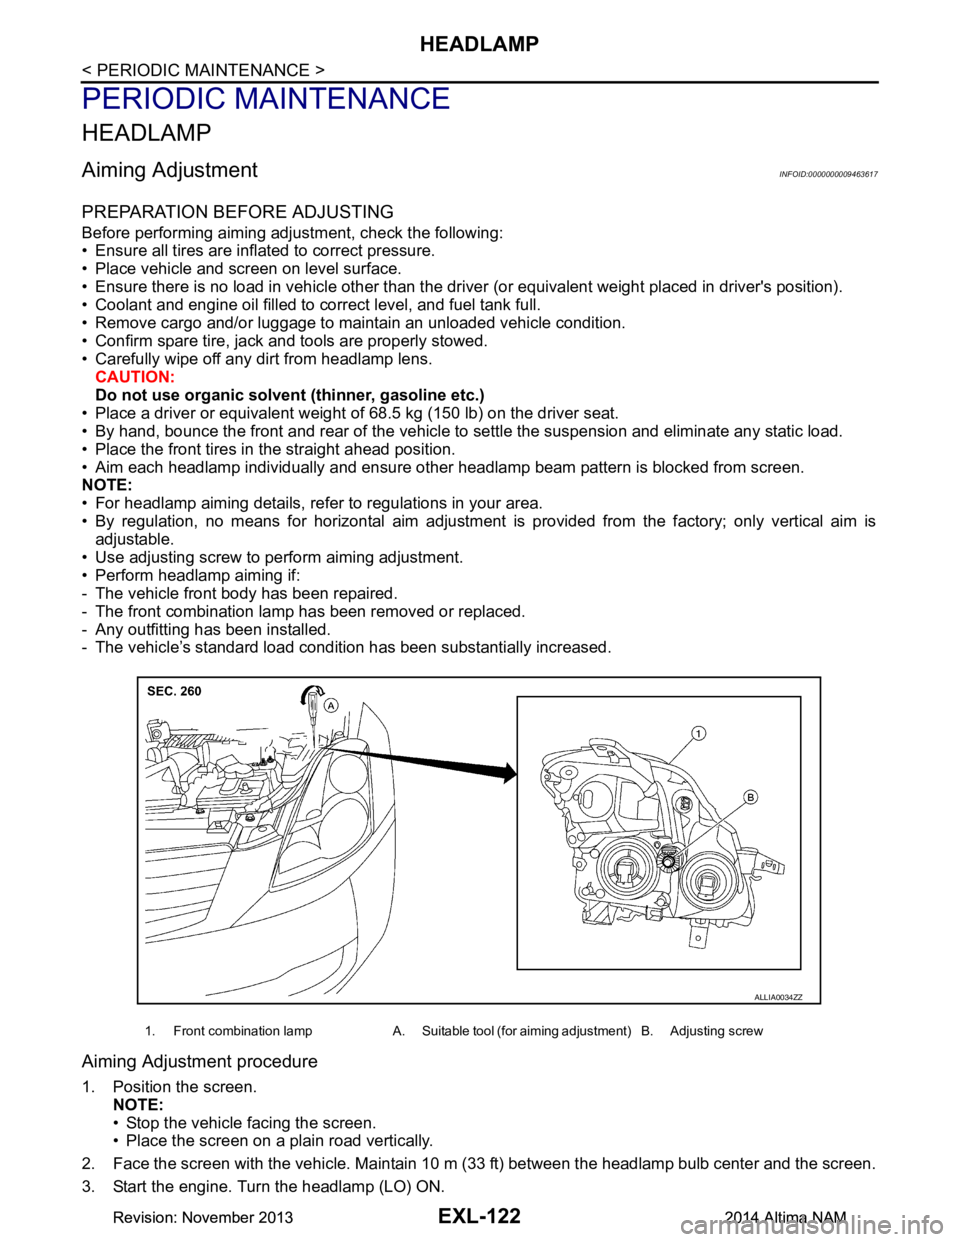
• Use adjusting screw to perform aiming adjustment.
• Perform headlamp aiming if:
- The vehicle front body has been repaired.
- The front combination lamp has been removed or replaced.
- Any outfitting has been installed.
- The vehicle’s standard load condition has been substantially increased.
Aiming Adjustment procedure
1. Position the screen.
NOTE:
• Stop the vehicle facing the screen.
• Place the screen on a plain road vertically.
2. Face the screen with the vehicle. Maintain 10 m (33 ft) between the headlamp bulb center and the screen.
3. Start the engine. Turn the headlamp (LO) ON.
1. Front combination lamp A. Suitable tool (for aiming adjustment) B. Adjusting screw
ALLIA0034ZZ
Revision: November 20132014 Altima NAMRevision: November 20132014 Altima NAM
Page 2390 of 4801
EXL-124
< PERIODIC MAINTENANCE >
FRONT FOG LAMP
FRONT FOG LAMP
Aiming AdjustmentINFOID:0000000009463618
PREPARATION BEFORE ADJUSTING
The fog lamp is a semi-sealed beam type which uses a replaceable halogen bulb. Before performing aiming
adjustment procedure, check the following:
• Ensure all tires are inflated to correct pressure.
• Place vehicle and screen on level surface.
• Ensure there is no load in vehicle other than the driver (or equivalent weight placed in driver's position).
• Coolant and engine oil filled to correct level, and fuel tank full.
• Remove cargo and/or luggage to maintain an unloaded vehicle condition.
• Confirm spare tire, jack and tools are properly stowed.
• Carefully wipe off any dirt from headlamp lens. CAUTION:
Do not use organic solvent (thinner, gasoline etc.)
• Place a driver or equivalent weight of 68.5 kg (150 lb) on the driver seat.
• By hand, bounce the front and rear of the vehicle to settle the suspension and eliminate any static load.
• Place the front tires in the straight ahead position.
• Aim each headlamp individually and ensure other headlamp beam pattern is blocked from screen.
NOTE:
• For headlamp aiming details, refer to regulations in your area.
• By regulation, no means for horizontal aim adjustment is provided from the factory; only vertical aim is
adjustable.
• Use adjusting screw to perform aiming adjustment.
• Perform headlamp aiming if:
- The vehicle front body has been repaired.
- The front combination lamp has been removed or replaced.
- Any outfitting has been installed.
- The vehicle’s standard load condition has been substantially increased.
Aiming Adjustment Procedure
1. Place the screen. NOTE:
• Stop the vehicle facing the wall.
• Place the board on a plain road vertically.
2. Face the vehicle with the screen. Maintain 7.62 m (25.0 ft) between the front fog lamp center and the
screen.
3. Start the engine. Turn the front fog lamp ON. NOTE:
Shut off the headlamp light with the board to prevent from illuminating the adjustment screen.
CAUTION:
Do not cover the lens surface with a tape etc. The lens is made of resin.
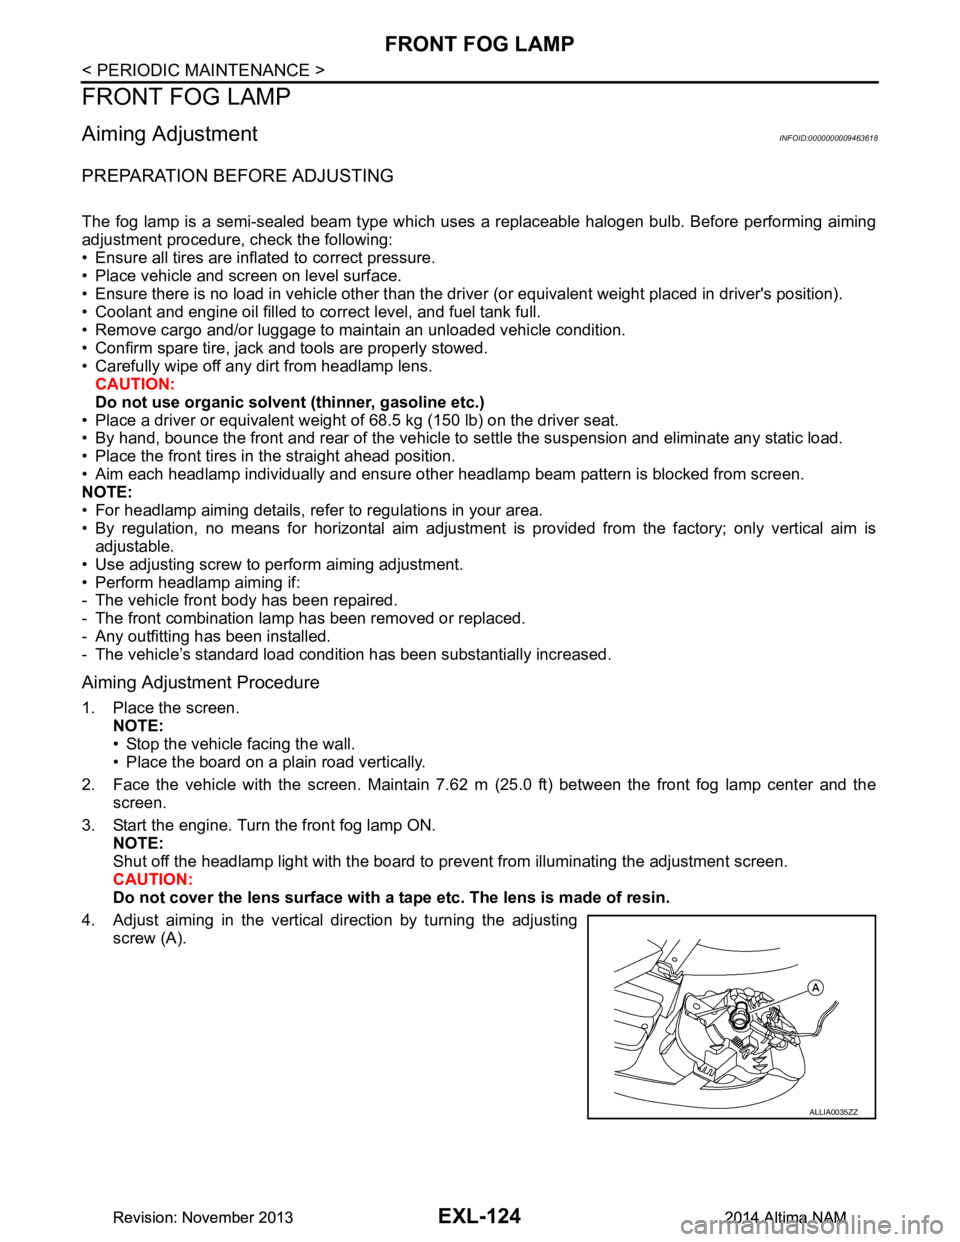
4. Adjust aiming in the vertical direction by turning the adjusting screw (A).
ALLIA0035ZZ
Revision: November 20132014 Altima NAMRevision: November 20132014 Altima NAM
Page 2503 of 4801
FSU-2
< PRECAUTION >
PRECAUTIONS
PRECAUTION
PRECAUTIONS
Precaution for Supplemental Restraint System (SRS) "AIR BAG" and "SEAT BELT
PRE-TENSIONER"
INFOID:0000000009951705
The Supplemental Restraint System such as “A IR BAG” and “SEAT BELT PRE-TENSIONER”, used along
with a front seat belt, helps to reduce the risk or severi ty of injury to the driver and front passenger for certain
types of collision. Information necessary to service the system safely is included in the SR and SB section of
this Service Manual.
WARNING:
• To avoid rendering the SRS inopera tive, which could increase the risk of personal injury or death in
the event of a collision which would result in air bag inflation, all maintenance must be performed by
an authorized NISS AN/INFINITI dealer.
• Improper maintenance, including in correct removal and installation of the SRS, can lead to personal
injury caused by unintent ional activation of the system. For re moval of Spiral Cable and Air Bag
Module, see the SR section.
• Do not use electrical test equipmen t on any circuit related to the SRS unless instructed to in this
Service Manual. SRS wiring harn esses can be identified by yellow and/or orange harnesses or har-
ness connectors.
PRECAUTIONS WHEN USING POWER TOOLS (AIR OR ELECTRIC) AND HAMMERS
WARNING:
• When working near the Airbag Diagnosis Sensor Unit or other Airbag System sensors with the Igni-
tion ON or engine running, DO NOT use air or electri c power tools or strike near the sensor(s) with a
hammer. Heavy vibration could activate the sensor( s) and deploy the air bag(s), possibly causing
serious injury.
• When using air or electric power tools or hammers , always switch the Ignition OFF, disconnect the
battery and wait at least three minutes before performing any service.
General PrecautionsINFOID:0000000009460620
• When installing rubber bushings, the final tightening mu st be carried out under unladen conditions with tires
on ground. Oil might shorten the life of rubber bushings. Be sure to wipe off any spilled oil.
- Unladen conditions mean that fuel, engine coolant and lubricant are full. Spare tire, jack, hand tools and mats are in designated positions.
• After servicing suspension parts, be sure to check wheel alignment.
• Self-lock nuts are not reusable. Always use new ones when installing. Since new self-lock nuts are pre-oiled,
tighten as they are.
Precaution for Procedure without Cowl Top CoverINFOID:0000000009460621
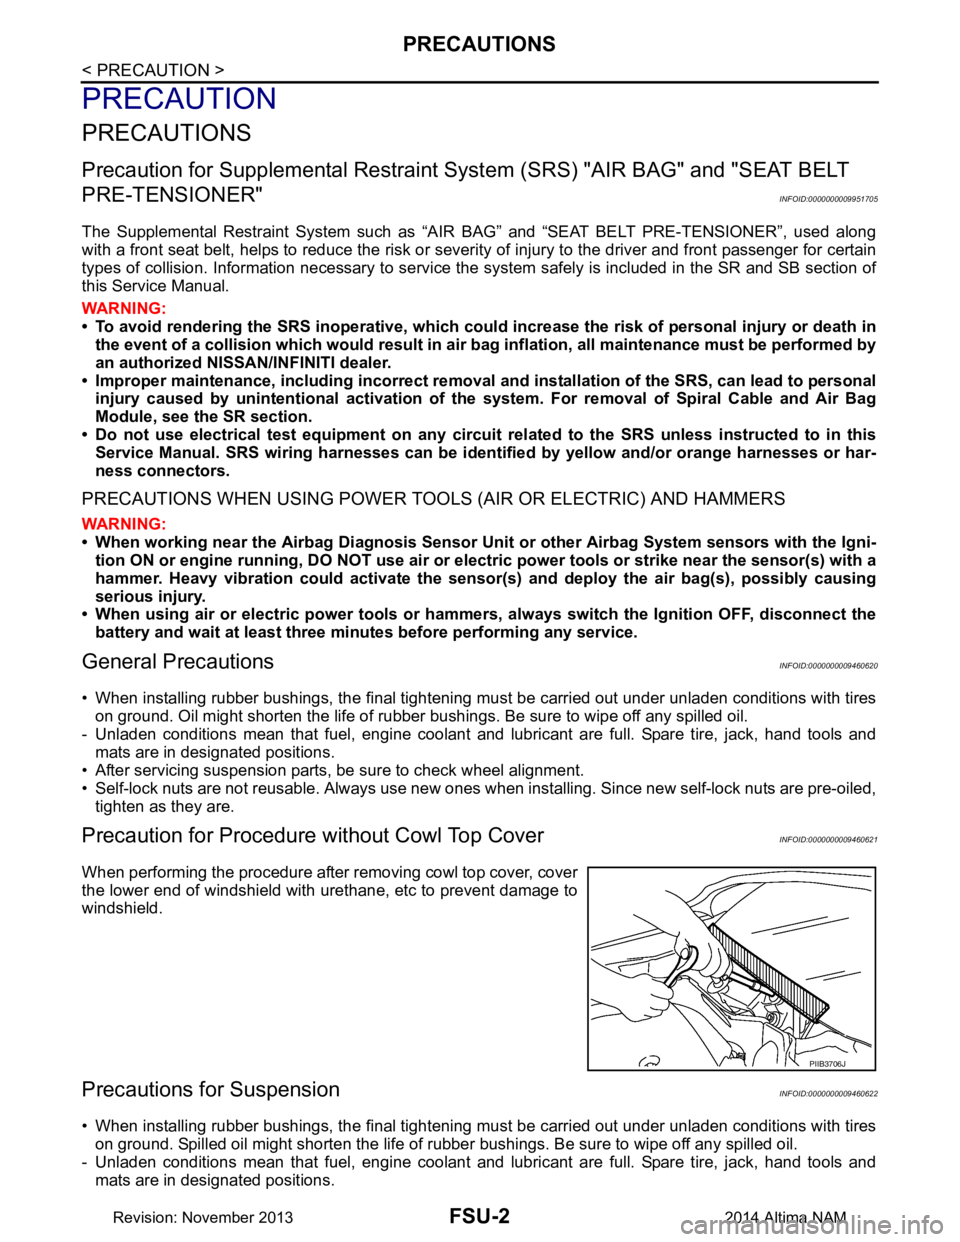
When performing the procedure after removing cowl top cover, cover
the lower end of windshield with urethane, etc to prevent damage to
windshield.
Precautions for SuspensionINFOID:0000000009460622
• When installing rubber bushings, the final tightening mu st be carried out under unladen conditions with tires
on ground. Spilled oil might shorten the life of rubber bushings. Be sure to wipe off any spilled oil.
- Unladen conditions mean that fuel, engine coolant and lubricant are full. Spare tire, jack, hand tools and mats are in designated positions.
PIIB3706J
Revision: November 20132014 Altima NAM
Page 2508 of 4801
FRONT SUSPENSION ASSEMBLYFSU-7
< PERIODIC MAINTENANCE >
C
D
F
G H
I
J
K L
M A
B
FSU
N
O P
PERIODIC MAINTENANCE
FRONT SUSPENSION ASSEMBLY
Inspection and AdjustmentINFOID:0000000009460626
INSPECTION
Make sure the mounting conditions (looseness, back lash) of each component and component conditions
(wear, damage) are normal.
LOWER BALL JOINT END PLAY
1. Set front wheels in a straight-ahead position. Do not depress brake pedal.
2. Place an iron bar or similar tool between upper link and steering knuckle.
3. Measure axial end play by prying it up and down.Refer to FSU-26, "Ball Joint"
.
CAUTION:
Be careful not to damage ball joint boot. Do not damage the installation position by applying
excessive force.
SHOCK ABSORBER
Check for oil leakage, damage and repl ace if malfunction is detected.
WHEEL ALIGNMENT
Description
Measure wheel alignment under unladen conditions.
NOTE:
"Unladen conditions" means that fuel, engine coolant, and lubricant are full. Spare tire, jack, hand tools and
mats are in designated positions.
General Information and Recommendations
• A four-wheel thrust alignment should be performed.
- This type of alignment is re commended for any NISSAN vehicle.
- The four-wheel "thrust" process helps ensure that t he vehicle is properly aligned and the steering wheel is
centered.
- The alignment rack itself should be capable of accepting any NISSAN vehicle.
- The rack should be checked to ensure that it is level.
• Make sure the machine is properly calibrated.
- Your alignment equipment should be regularly ca librated in order to give correct information.
- Check with the manufacturer of your specific equi pment for their recommended Service/Calibration Sched-
ule.
Preliminary Check
Check the following:
1. Tires for improper air pressure and wear.
2. Road wheels for runout. Refer to WT-60, "Road Wheel"
.
3. Wheel bearing axial end play. Refer to FAX-27, "Wheel Bearing"
.
4. Transverse link ball joint axial end play. Refer to FSU-11, "Removal and Installation"
.
5. Shock absorber operation.
6. Each mounting part of axle and suspension for looseness and deformation.
7. Each of suspension member, shock absorber, upper link and transverse link for cracks, deformation and other damage.
8. Vehicle height (posture).
Alignment Process
IMPORTANT:
Use only the alignment specificati ons listed in this Service Manual.
• When displaying the alignment settings, m any alignment machines use "indicators" Do not use these indi-
cators. : (Green/red, plus or minus, Go/No Go).
- The alignment specifications programmed into your machine that operate these indicators may not be cor-
rect.
Revision: November 20132014 Altima NAM
Page 2526 of 4801
SERVICE DATA AND SPECIFICATIONS (SDS)FSU-25
< SERVICE DATA AND SPECIFICATIONS (SDS)
C
D
F
G H
I
J
K L
M A
B
FSU
N
O P
SERVICE DATA AND SPECIFICATIONS (SDS)
SERVICE DATA AND SPECIFICATIONS (SDS)
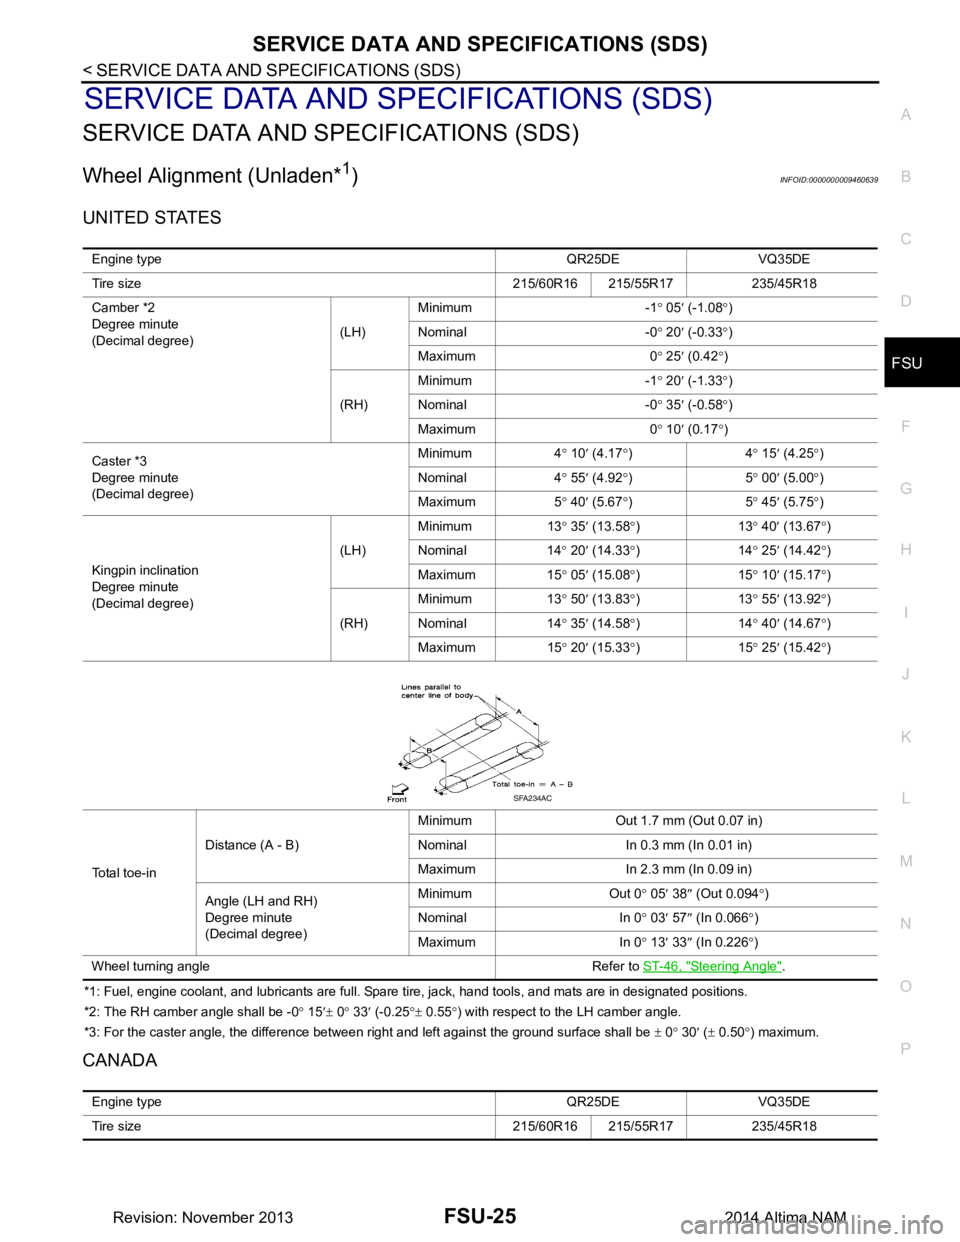
Wheel Alignment (Unladen*1)INFOID:0000000009460639
UNITED STATES
*1: Fuel, engine coolant, and lubricants are full. Spare tire, jack, hand tools, and mats are in designated positions.
*2: The RH camber angle shall be -0 ° 15 ′± 0 ° 33 ′ (-0.25 °± 0.55 °) with respect to the LH camber angle.
*3: For the caster angle, the difference between right and left against the ground surface shall be ± 0 ° 30 ′ ( ± 0.50 °) maximum.
CANADA
Engine type QR25DE VQ35DE
Tire size 215/60R16 215/55R17 235/45R18
Camber *2
Degree minute
(Decimal degree) (LH)Minimum -1
° 05 ′ (-1.08 °)
Nominal -0 ° 20 ′ (-0.33 °)
Maximum 0 ° 25 ′ (0.42 °)
(RH) Minimum -1
° 20 ′ (-1.33 °)
Nominal -0 ° 35 ′ (-0.58 °)
Maximum 0 ° 10 ′ (0.17 °)
Caster *3
Degree minute
(Decimal degree) Minimum 4
° 10 ′ (4.17 °)4 ° 15 ′ (4.25 °)
Nominal 4 ° 55 ′ (4.92 °)5 ° 00 ′ (5.00 °)
Maximum 5 ° 40 ′ (5.67 °)5 ° 45 ′ (5.75 °)
Kingpin inclination
Degree minute
(Decimal degree) (LH)
Minimum 13
° 35 ′ (13.58 °)13 ° 40
′ (13.67 °)
Nominal 14 ° 20 ′ (14.33 °)14 ° 25 ′ (14.42 °)
Maximum 15 ° 05 ′ (15.08 °)15 ° 10 ′ (15.17 °)
(RH) Minimum 13
° 50 ′ (13.83 °)13 ° 55 ′ (13.92 °)
Nominal 14 ° 35 ′ (14.58 °)14 ° 40 ′ (14.67 °)
Maximum 15 ° 20 ′ (15.33 °)15 ° 25 ′ (15.42 °)
To t a l t o e - i n Distance (A - B)
Minimum Out 1.7 mm (Out 0.07 in)
Nominal In 0.3 mm (In 0.01 in)
Maximum In 2.3 mm (In 0.09 in)
Angle (LH and RH)
Degree minute
(Decimal degree) Minimum Out 0
° 05 ′ 38 ″ (Out 0.094 °)
Nominal In 0 ° 03 ′ 57 ″ (In 0.066 °)
Maximum In 0 ° 13 ′ 33 ″ (In 0.226 °)
Wheel turning angle Refer to ST-46, "Steering Angle"
.
SFA234AC
Engine type QR25DE VQ35DE
Tire size 215/60R16 215/55R17 235/45R18
Revision: November 20132014 Altima NAM
Page 2527 of 4801
FSU-26
< SERVICE DATA AND SPECIFICATIONS (SDS)
SERVICE DATA AND SPECIFICATIONS (SDS)
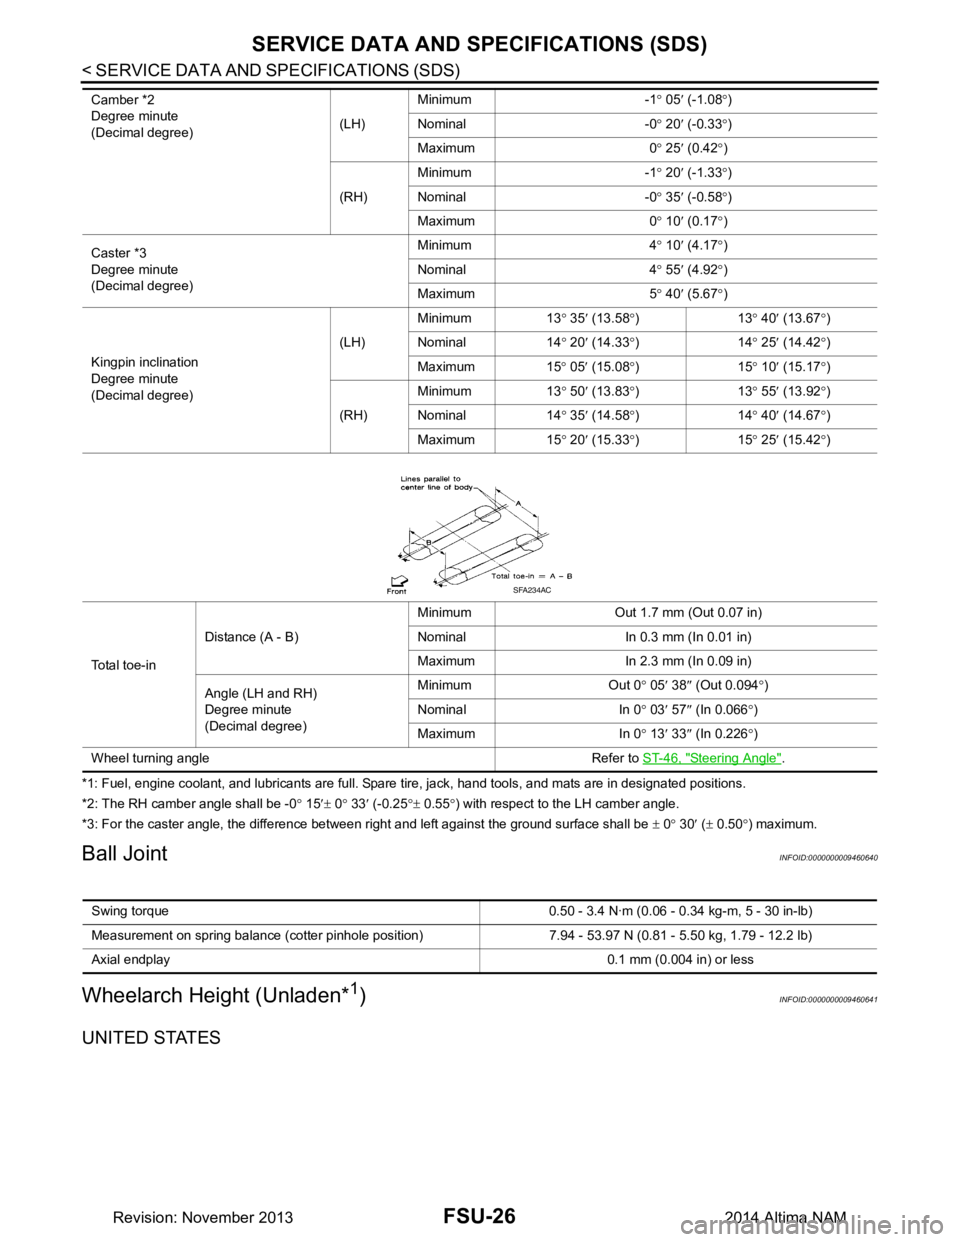
*1: Fuel, engine coolant, and lubricants are full. Spare tire, jack, hand tools, and mats are in designated positions.
*2: The RH camber angle shall be -0 ° 15 ′± 0 ° 33 ′ (-0.25 °± 0.55 °) with respect to the LH camber angle.
*3: For the caster angle, the difference between right and left against the ground surface shall be ± 0 ° 30 ′ ( ± 0.50 °) maximum.
Ball JointINFOID:0000000009460640
Wheelarch Height (Unladen*1)INFOID:0000000009460641
UNITED STATES
Camber *2
Degree minute
(Decimal degree) (LH)Minimum -1
° 05 ′ (-1.08 °)
Nominal -0 ° 20 ′ (-0.33 °)
Maximum 0 ° 25 ′ (0.42 °)
(RH) Minimum -1
° 20 ′ (-1.33 °)
Nominal -0 ° 35 ′ (-0.58 °)
Maximum 0 ° 10 ′ (0.17 °)
Caster *3
Degree minute
(Decimal degree) Minimum 4
° 10 ′ (4.17 °)
Nominal 4 ° 55 ′ (4.92 °)
Maximum 5 ° 40 ′ (5.67 °)
Kingpin inclination
Degree minute
(Decimal degree) (LH)
Minimum 13
° 35 ′ (13.58 °)13 ° 40 ′ (13.67 °)
Nominal 14 ° 20 ′ (14.33 °)14 ° 25 ′ (14.42 °)
Maximum 15 ° 05 ′ (15.08 °)15 ° 10 ′ (15.17 °)
(RH) Minimum 13
° 50 ′ (13.83 °)13 ° 55 ′ (13.92 °)
Nominal 14 ° 35 ′ (14.58 °)14 ° 40 ′ (14.67 °)
Maximum 15 ° 20 ′ (15.33 °)15 ° 25 ′ (15.42 °)
Total toe-in Distance (A - B)
Minimum Out 1.7 mm (Out 0.07 in)
Nominal In 0.3 mm (In 0.01 in)
Maximum In 2.3 mm (In 0.09 in)
Angle (LH and RH)
Degree minute
(Decimal degree) Minimum Out 0
° 05 ′ 38 ″ (Out 0.094 °)
Nominal In 0 ° 03 ′ 57 ″ (In 0.066 °)
Maximum In 0 ° 13 ′ 33 ″ (In 0.226 °)
Wheel turning angle Refer to ST-46, "Steering Angle"
.
SFA234AC
Swing torque 0.50 - 3.4 N·m (0 .06 - 0.34 kg-m, 5 - 30 in-lb)
Measurement on spring balance (cotter pinhole position) 7.94 - 53.97 N (0.81 - 5.50 kg, 1.79 - 12.2 lb)
Axial endplay 0.1 mm (0.004 in) or less
Revision: November 20132014 Altima NAM
Page 2528 of 4801
SERVICE DATA AND SPECIFICATIONS (SDS)FSU-27
< SERVICE DATA AND SPECIFICATIONS (SDS)
C
D
F
G H
I
J
K L
M A
B
FSU
N
O P
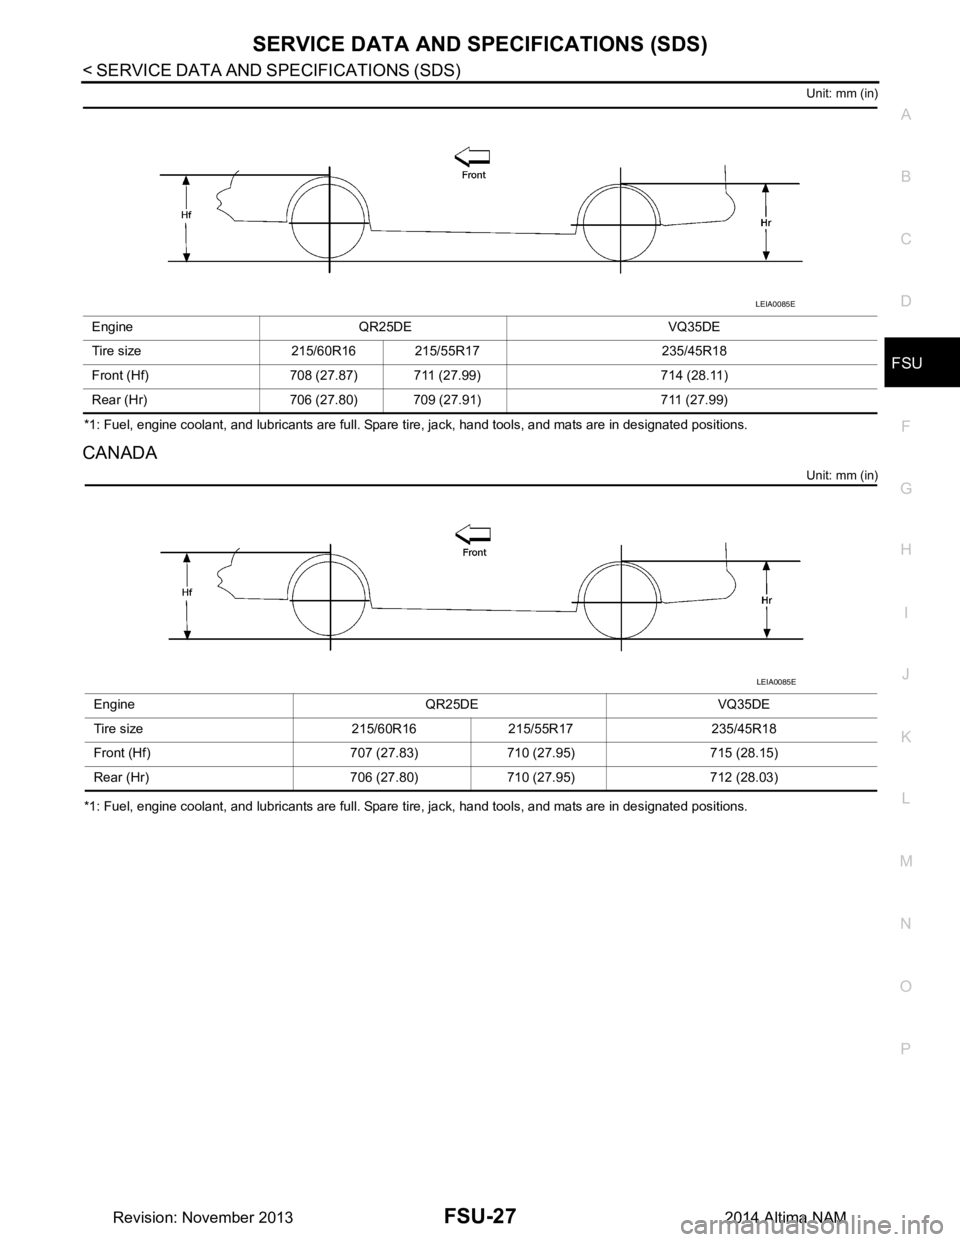
Unit: mm (in)
*1: Fuel, engine coolant, and lubricants are full. Spare tire, jack, hand tools, and mats are in designated positions.
CANADA
Unit: mm (in)
*1: Fuel, engine coolant, and lubricants are full. Spare tire, jack, hand tools, and mats are in designated positions. Engine QR25DE VQ35DE
Tire size 215/60R16 215/55R17 235/45R18
Front (Hf) 708 (27.87) 711 (27.99) 714 (28.11)
Rear (Hr) 706 (27.80) 709 (27.91) 711 (27.99)
LEIA0085E
Engine QR25DE VQ35DE
Tire size 215/60R16 215/55R17 235/45R18
Front (Hf) 707 (27.83) 710 (27.95) 715 (28.15)
Rear (Hr) 706 (27.80) 710 (27.95) 712 (28.03)
LEIA0085E
Revision: November 20132014 Altima NAM