2014 NISSAN TEANA wiring diagram
[x] Cancel search: wiring diagramPage 905 of 4801

DOOR LOCK ACTUATORDLK-137
< DTC/CIRCUIT DIAGNOSIS >
C
D E
F
G H
I
J
L
M A
B
DLK
N
O P
Is the inspection result normal?
YES >> Replace front door lock actuator RH.
NO >> Repair or replace harness.
3.CHECK INTERMITTENT INCIDENT
Refer to GI-43, "Intermittent Incident"
.
>> Inspection End.
REAR LH
REAR LH : DescriptionINFOID:0000000009461879
Locks/unlocks the door with the signal from BCM.
REAR LH : Component Function CheckINFOID:0000000009461880
1.CHECK FUNCTION
1. Use CONSULT to perform Active Test (“DOOR LOCK”).
2. Touch “ALL LOCK” or “ALL UNLOCK” to check that it works normally.
Is the inspection result normal?
YES >> Door lock actuator is OK.
NO >> Refer to DLK-137, "REAR LH : Diagnosis Procedure"
.
REAR LH : Diagnosis ProcedureINFOID:0000000009461881
Regarding Wiring Diagram information, refer to DLK-51, "Wiring Diagram".
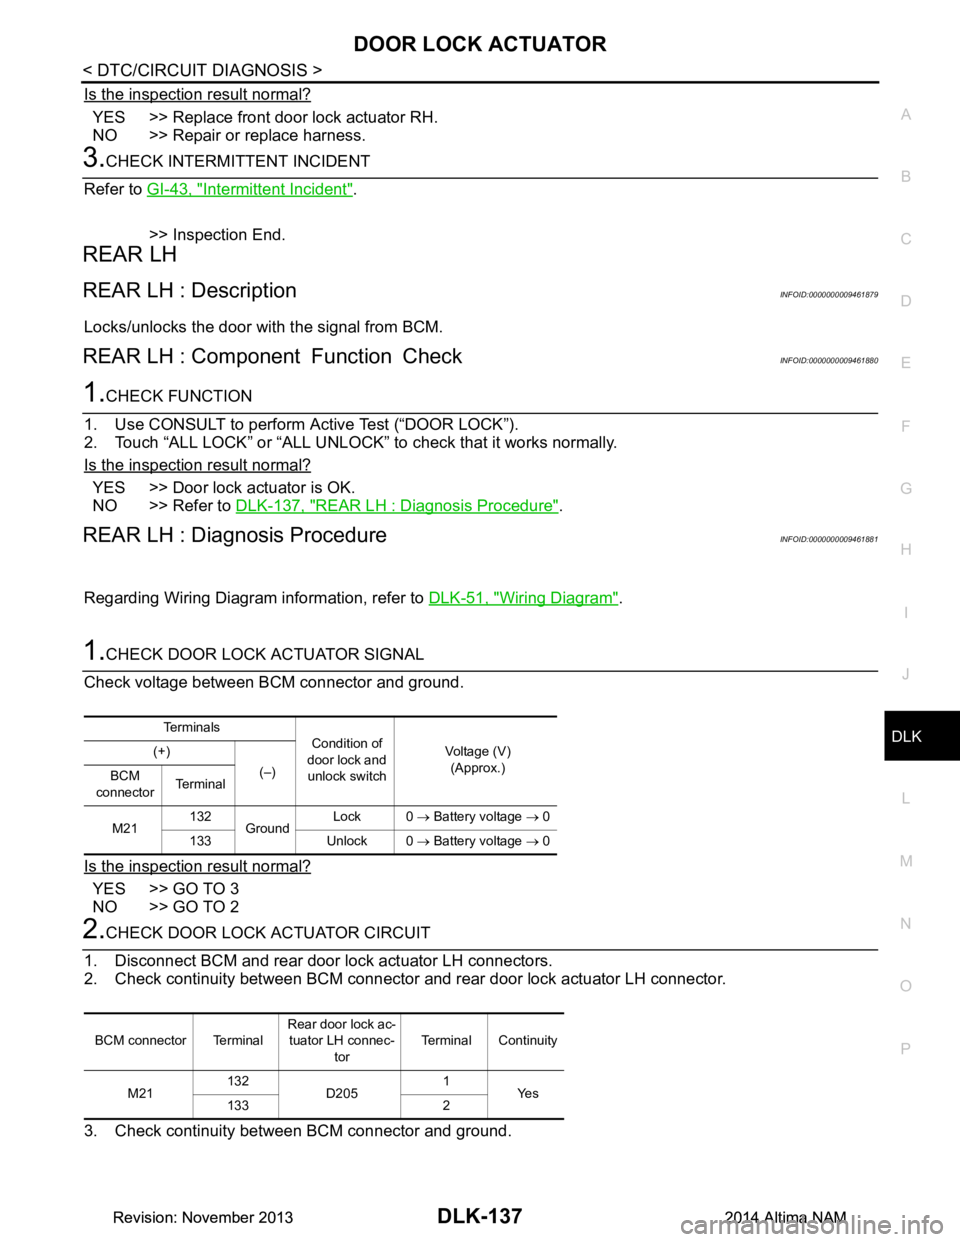
1.CHECK DOOR LOCK ACTUATOR SIGNAL
Check voltage between BCM connector and ground.
Is the inspection result normal?
YES >> GO TO 3
NO >> GO TO 2
2.CHECK DOOR LOCK ACTUATOR CIRCUIT
1. Disconnect BCM and rear door lock actuator LH connectors.
2. Check continuity between BCM connector and rear door lock actuator LH connector.
3. Check continuity between BCM connector and ground.
Te r m i n a l s
Condition of
door lock and unlock switch Voltage (V)
(Approx.)
(+)
(–)
BCM
connector Te r m i n a l
M21 132
Ground Lock 0
→ Battery voltage → 0
133 Unlock 0 → Battery voltage → 0
BCM connector Terminal Rear door lock ac-
tuator LH connec- tor Terminal Continuity
M21 132
D205 1
Ye s
133 2
Revision: November 20132014 Altima NAMRevision: November 20132014 Altima NAM
Page 906 of 4801

DLK-138
< DTC/CIRCUIT DIAGNOSIS >
DOOR LOCK ACTUATOR
Is the inspection result normal?
YES >> Replace rear door lock actuator LH.
NO >> Repair or replace harness.
3.CHECK INTERMITTENT INCIDENT
Refer to GI-43, "Intermittent Incident"
.
>> Inspection End.
REAR RH
REAR RH : DescriptionINFOID:0000000009461882
Locks/unlocks the door with the signal from BCM.
REAR RH : Component Function CheckINFOID:0000000009461883
1.CHECK FUNCTION
1. Use CONSULT to perform Active Test (“DOOR LOCK”).
2. Touch “ALL LOCK” or “ALL UNLOCK” to check that it works normally.
Is the inspection result normal?
YES >> Door lock actuator is OK.
NO >> Refer to DLK-138, "REAR RH : Diagnosis Procedure"
.
REAR RH : Diagnosis ProcedureINFOID:0000000009461884
Regarding Wiring Diagram information, refer to DLK-51, "Wiring Diagram".
1.CHECK DOOR LOCK ACTUATOR SIGNAL
Check voltage between BCM connector and ground.
Is the inspection result normal?
YES >> GO TO 3
NO >> GO TO 2
2.CHECK DOOR LOCK ACTUATOR CIRCUIT
1. Disconnect BCM and rear door lock actuator RH connectors.
2. Check continuity between BCM connector and rear door lock actuator RH connector.
BCM connector Terminal Continuity
M21 132
Ground No
133
Te r m i n a l s
Condition of
door lock and unlock switch Voltage (V)
(Approx.)
(+)
(–)
BCM
connector Te r m i n a l
M21 132
Ground Lock 0
→ Battery voltage → 0
133 Unlock 0 → Battery voltage → 0
Revision: November 20132014 Altima NAMRevision: November 20132014 Altima NAM
Page 908 of 4801

DLK-140
< DTC/CIRCUIT DIAGNOSIS >
TRUNK LID OPENER ACTUATOR
TRUNK LID OPENER ACTUATOR
DescriptionINFOID:0000000009461885
Performs trunk lid open with signal from BCM.
Component Function CheckINFOID:0000000009461886
1.CHECK FUNCTION
1. Perform Active Test TRUNK/GLASS HATCH with CONSULT.
2. Touch “OPEN” and check that trunk lid opens.
Is the inspection result normal?
YES >> Trunk lid opener actuator is OK.
NO >> Refer to DLK-140, "Diagnosis Procedure"
.
Diagnosis ProcedureINFOID:0000000009461887
Regarding Wiring Diagram information, refer to DLK-77, "Wiring Diagram".
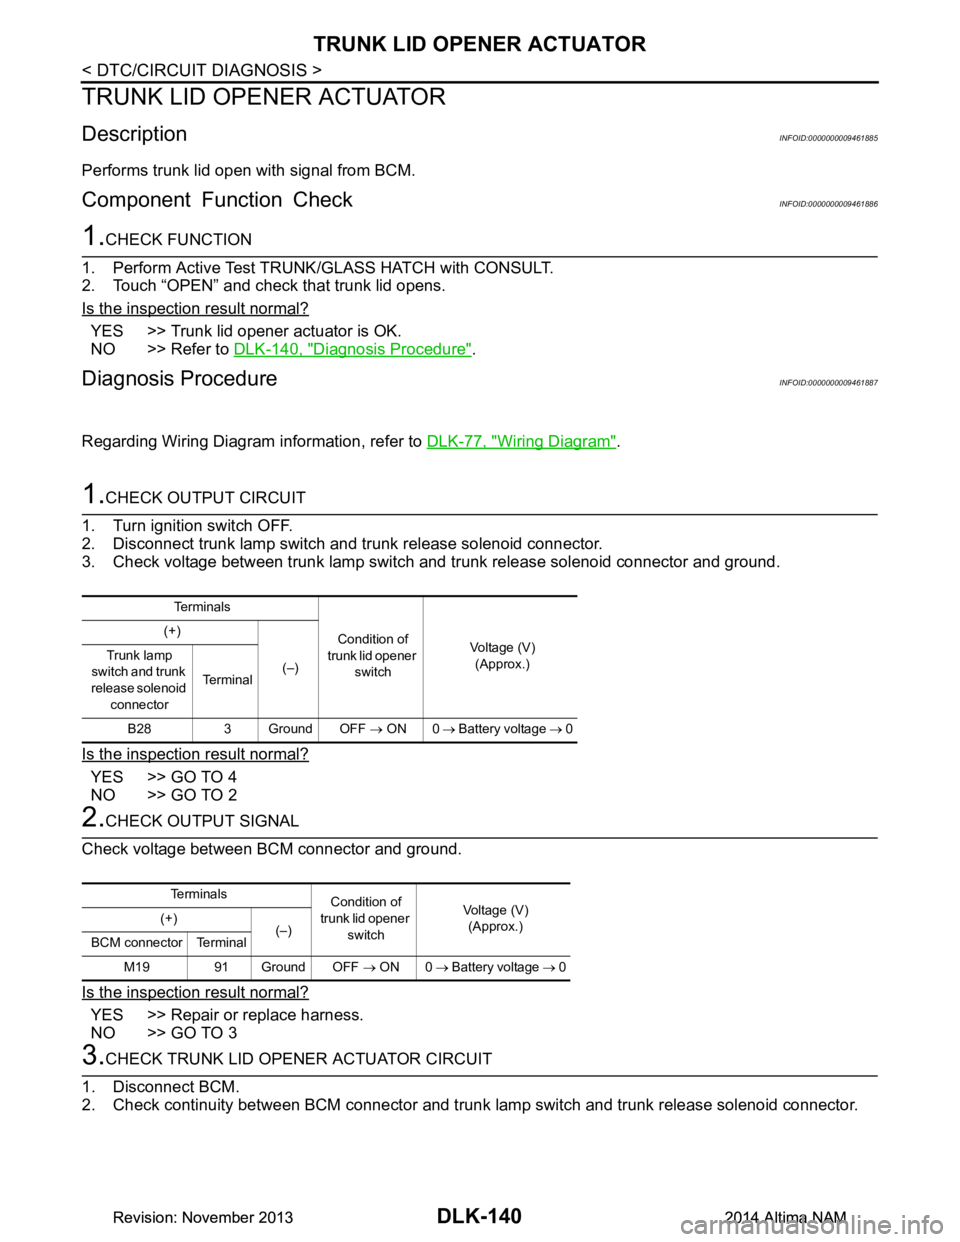
1.CHECK OUTPUT CIRCUIT
1. Turn ignition switch OFF.
2. Disconnect trunk lamp switch and trunk release solenoid connector.
3. Check voltage between trunk lamp switch and trunk release solenoid connector and ground.
Is the inspection result normal?
YES >> GO TO 4
NO >> GO TO 2
2.CHECK OUTPUT SIGNAL
Check voltage between BCM connector and ground.
Is the inspection result normal?
YES >> Repair or replace harness.
NO >> GO TO 3
3.CHECK TRUNK LID OPENER ACTUATOR CIRCUIT
1. Disconnect BCM.
2. Check continuity between BCM connector and trunk la mp switch and trunk release solenoid connector.
Te r m i n a l s
Condition of
trunk lid opener switch Voltage (V)
(Approx.)
(+)
(–)
Trunk lamp
switch and trunk
release solenoid connector Te r m i n a l
B28 3 Ground OFF → ON 0 → Battery voltage → 0
Te r m i n a l s
Condition of
trunk lid opener switch Voltage (V)
(Approx.)
(+)
(–)
BCM connector Terminal
M19 91 Ground OFF → ON 0 → Battery voltage → 0
Revision: November 20132014 Altima NAMRevision: November 20132014 Altima NAM
Page 910 of 4801

DLK-142
< DTC/CIRCUIT DIAGNOSIS >
INTELLIGENT KEY WARNING BUZZER
INTELLIGENT KEY WARNING BUZZER
DescriptionINFOID:0000000009461888
Answers back and warns for an inappropriate operation.
Component Function CheckINFOID:0000000009461889
1.CHECK FUNCTION
With CONSULT
Check Intelligent Key warning buzzer OUTSIDE BUZZER in Active Test mode.
Is the inspection result normal?
YES >> Intelligent Key warning buzzer (engine room) is OK.
NO >> Refer to DLK-142, "Diagnosis Procedure"
.
Diagnosis ProcedureINFOID:0000000009461890
Regarding Wiring Diagram information, refer to DLK-61, "Wiring Diagram".
1.CHECK INTELLIGENT KEY WARNING BUZZER
Check voltage between BCM connector and ground.
Is the inspection result normal?
YES >> GO TO 5
NO >> GO TO 2
2.CHECK INTELLIGENT KEY WARNING BUZZER POWER SUPPLY CIRCUIT
1. Turn ignition switch OFF.
2. Disconnect Intelligent Key warning buzzer connector.
3. Check voltage between Intelligent Key warning buzzer connector and ground.
Is the inspection result normal?
YES >> GO TO 3
NO >> Repair or replace Intelligent Key warning buzzer power supply circuit.
3.CHECK INTELLIGENT KEY WARNING BUZZER CIRCUIT
1. Disconnect BCM connector.
2. Check continuity between BCM connector and Intelligent Key warning buzzer connector.
Te r m i n a l s
Warning buzzer op-
eration condition Voltage (V)
(Approx.)
(+)
(–)
BCM connector Terminal
M18 64 Ground ON 0
OFF Battery voltage
Te r m i n a l s
Voltage (V)(Approx.)
(+)
(–)
Intelligent Key
warning buzzer connector Te r m i n a l
E74 1 Ground Battery voltage
Revision: November 20132014 Altima NAMRevision: November 20132014 Altima NAM
Page 912 of 4801

DLK-144
< DTC/CIRCUIT DIAGNOSIS >
REMOTE KEYLESS ENTRY RECEIVER
REMOTE KEYLESS ENTRY RECEIVER
DescriptionINFOID:0000000009461892
Receives Intelligent Key operation and transmits to BCM.
Component Function CheckINFOID:0000000009461893
1.CHECK FUNCTION
1. Select “INTELLIGENT KEY” of “BCM” using CONSULT.
2. Select “RKE OPE COUN1” in “DATA MONITOR” mode.
3. Check that the function operates normall y according to the following conditions.
Is the inspection result normal?
YES >> Remote keyless entry receiver is OK.
NO >> Refer to DLK-144, "Diagnosis Procedure"
.
Diagnosis ProcedureINFOID:0000000009461894
Regarding Wiring Diagram information, refer to DLK-61, "Wiring Diagram".
1.CHECK REMOTE KEYLESS ENTRY RECEIVER OUTPUT SIGNAL
1. Turn ignition switch OFF.
2. Check signal between BCM harness connector and ground using oscilloscope.
Is the inspection result normal?
YES >> Replace BCM. Refer to BCS-80, "Removal and Installation".
NO >> GO TO 2.
2.CHECK REMOTE K EYLESS ENTRY RECEIVER CIRCUIT 1
1. Disconnect BCM and remote keyless entry receiver connectors.
2. Check continuity between BCM harness connector and remote keyless entry receiver harness connector.
Monitor item Condition
RKE OPE COUN1 Checks whether value changes when operating Intelligent Key
(+) (–) Condition Signal
(Reference value)
BCM
Connector Terminal
M20 119 Ground Standby state
Press the Intelligent
Key lock or unlock
button
OCC3881D
OCC3880D
Revision: November 20132014 Altima NAMRevision: November 20132014 Altima NAM
Page 917 of 4801

HAZARD FUNCTIONDLK-149
< DTC/CIRCUIT DIAGNOSIS >
C
D E
F
G H
I
J
L
M A
B
DLK
N
O P
HAZARD FUNCTION
DescriptionINFOID:0000000009461901
Perform answer-back for each oper ation with number of blinks.
Component Function CheckINFOID:0000000009461902
1.CHECK FUNCTION
Check hazard warning lamp (“FLASHER”) in Active Test.
Is the inspection result normal?
YES >> Hazard warning lamp circuit is OK.
NO >> Refer to EXL-60, "Wiring Diagram"
.
Diagnosis ProcedureINFOID:0000000009461903
1.CHECK HAZARD SWITCH CIRCUIT
Operate the hazard lights by turni ng ON the hazard warning switch.
Is the inspection result normal?
YES >> GO TO 2
NO >> Repair or replace hazard warning switch circuit. Refer to EXL-86, "Work Flow"
.
2.CHECK INTERMITTENT INCIDENT
Refer to GI-43, "Intermittent Incident"
.
>> Inspection End.
Revision: November 20132014 Altima NAMRevision: November 20132014 Altima NAM
Page 918 of 4801

DLK-150
< DTC/CIRCUIT DIAGNOSIS >
HOMELINK UNIVERSAL TRANSCEIVER
HOMELINK UNIVERSAL TRANSCEIVER
DescriptionINFOID:0000000009461904
Homelink universal transceiver can store and transmit a maximum of 3 radio signals.
Allows operation of garage doors, gates, home and office lighting, entry door locks and security system, etc.
Homelink universal transceiver power supply uses vehicl e battery, which enables it to maintain every program
in case battery is discharged or removed.
Component Function CheckINFOID:0000000009461905
1.CHECK FUNCTION
Check that system receiver (garage door opener, et c.) operates with original hand-held transmitter.
Is the inspection result normal?
YES >> GO TO 2
NO >> Receiver or hand-held transmitter is malfunctioning.
2.CHECK ILLUMINATE
1. Turn ignition switch “OFF”.
2. Press each of the transmitter buttons and watch for the red light to illuminate with each button.
Is the inspection result normal?
YES >> GO TO 3
NO >> Refer to DLK-150, "Diagnosis Procedure"
.
3.CHECK TRANSMITTER
Check transmitter with Tool*.
*:For details, refer to Technical Service Bulletin.
Is the inspection result normal?
YES >> Receiver or hand-held transmitter malfunction, not vehicle related.
NO >> Replace auto anti-dazzling inside mirror (homelink universal transceiver). Refer to MIR-19,
"Removal and Installation".
Diagnosis ProcedureINFOID:0000000009461906
Regarding Wiring Diagram information, refer to DLK-49, "Wiring Diagram".
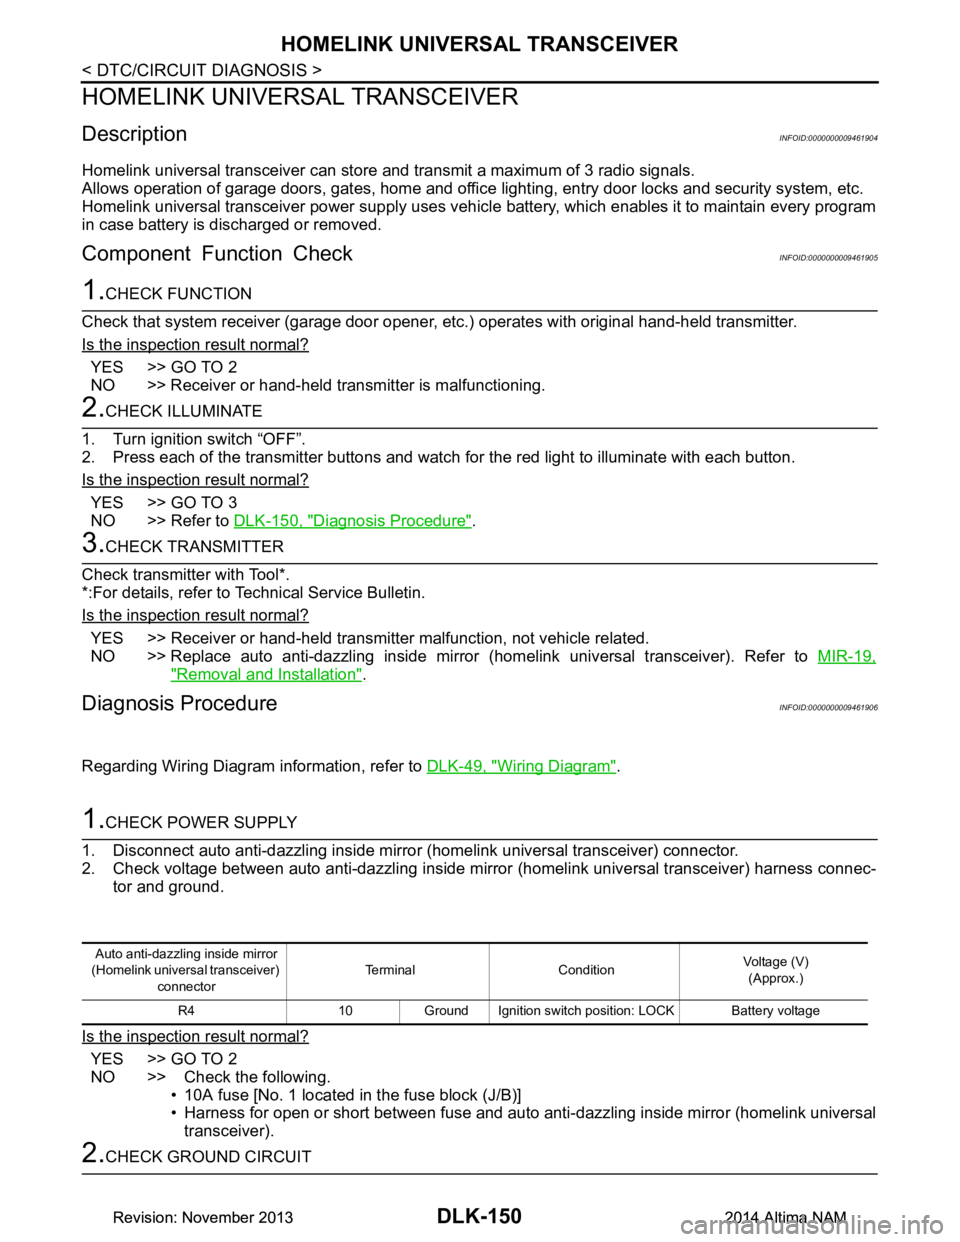
1.CHECK POWER SUPPLY
1. Disconnect auto anti-dazzling inside mirror (homelink universal transceiver) connector.
2. Check voltage between auto anti-dazzling inside mirror (homelink universal transceiver) harness connec-
tor and ground.
Is the inspection result normal?
YES >> GO TO 2
NO >> Check the following. • 10A fuse [No. 1 located in the fuse block (J/B)]
• Harness for open or short between fuse and auto anti-dazzling inside mirror (homelink universal
transceiver).
2.CHECK GROUND CIRCUIT
Auto anti-dazzling inside mirror
(Homelink universal transceiver) connector Terminal Condition
Voltage (V)
(Approx.)
R4 10 Ground Ignition switch position: LOCK Battery voltage
Revision: November 20132014 Altima NAMRevision: November 20132014 Altima NAM
Page 1002 of 4801

EC-2
INTAKE VALVE TIMING CONTROL ........................49
INTAKE VALVE TIMING CONTROL : System De-
scription ............................................................... ...
49
EXHAUST VALVE TIMING CONTROL ................. ...52
EXHAUST VALVE TIMING CONTROL : System
Description ........................................................... ...
52
INTAKE MANIFOLD RUNNER CONTROL ........... ...53
INTAKE MANIFOLD RUNNER CONTROL : Sys-
tem Description .................................................... ...
53
INTAKE MANIFOLD TUNING SYSTEM ...................54
INTAKE MANIFOLD TUNI NG SYSTEM : System
Description ........................................................... ...
54
ENGINE PROTECTION CONTROL AT LOW EN-
GINE OIL PRESSURE ....... .......................................
55
ENGINE PROTECTION CONTROL AT LOW EN-
GINE OIL PRESSURE : S ystem Description .........
55
FUEL FILLER CAP WARNING SYSTEM .............. ...55
FUEL FILLER CAP WARNING SYSTEM : System
Description ........................................................... ...
56
AIR CONDITIONING CUT CONTROL ................... ...56
AIR CONDITIONING CUT CONTROL : System
Description (with automatic air conditioner) ......... ...
56
AIR CONDITIONING CUT CONTROL : System
Description (with manual air conditioner) ................
57
COOLING FAN CONTROL .................................... ...58
COOLING FAN CONTROL : System Description
(with automatic air condit ioner) ...............................
59
COOLING FAN CONTROL : System Description
(with manual air conditio ner) ..................................
60
EVAPORATIVE EMISSION SYSTEM .................... ...61
EVAPORATIVE EMISSION SYSTEM : System
Description ........................................................... ...
62
AUTOMATIC SPEED CONTROL DEVICE (ASCD) ...63
AUTOMATIC SPEED CONTROL DEVICE (AS-
CD) : System Description .................................... ...
63
CAN COMMUNICATION ........................................ ...64
CAN COMMUNICATION : System Description ......64
OPERATION ................................................... ...65
AUTOMATIC SPEED CONTROL DEVICE (ASCD) ...65
AUTOMATIC SPEED CONTROL DEVICE (AS-
CD) : Switch Name and Function ........................ ...
65
ON BOARD DIAGNOSTIC (OBD) SYSTEM .....66
Diagnosis Description .......................................... ...66
GST (Generic Scan Tool) .......................................66
DIAGNOSIS SYSTEM (ECM) ............................67
DIAGNOSIS DESCRIPTION .................................. ...67
DIAGNOSIS DESCRIPTION : 1st Trip Detection
Logic and Two Trip Detection Logic .................... ...
67
DIAGNOSIS DESCRIPTION : DTC and Freeze
Frame Data .......................................................... ...
67
DIAGNOSIS DESCRIPTION : Counter System ......68
DIAGNOSIS DESCRIPTION : Driving Pattern ........71
DIAGNOSIS DESCRIPTION : System Readiness
Test (SRT) Code .................................................. ...
72
DIAGNOSIS DESCRIPTION : Permanent Diag-
nostic Trouble Code (Permanent DTC) ............... ...
73
DIAGNOSIS DESCRIPTION : Malfunction Indica-
tor Lamp (MIL) ..................................................... ...
74
On Board Diagnosis Function .................................74
CONSULT Function ................................................77
ECU DIAGNOSIS INFORMATION .............88
ECM ...................................................................88
Reference Value .................................................. ...88
Fail Safe ...............................................................101
DTC Inspection Priority Chart .............................104
DTC Index ............................................................105
Test Value and Test Limit .....................................109
WIRING DIAGRAM ...................................117
ENGINE CONTROL SYSTEM ........................ ..117
Wiring Diagram .................................................... .117
BASIC INSPECTION .................................165
DIAGNOSIS AND REPAIR WORKFLOW ...... ..165
Work Flow ............................................................ .165
Diagnostic Work Sheet .........................................168
BASIC INSPECTION ...................................... ..170
Work Procedure ................................................... .170
ADDITIONAL SERVICE WHEN REPLACING
ECM ................................................................ ..
174
Description ........................................................... .174
Work Procedure ....................................................174
VIN REGISTRATION ........................................176
Description ........................................................... .176
Work Procedure ....................................................176
ACCELERATOR PEDAL RELEASED POSI-
TION LEARNING ............................................ ..
177
Description ........................................................... .177
Work Procedure ....................................................177
THROTTLE VALVE CLOSED POSITION
LEARNING ..................................................... ..
178
Description ........................................................... .178
Work Procedure ....................................................178
IDLE AIR VOLUME LEARNING .......................179
Description ........................................................... .179
Work Procedure ....................................................179
MIXTURE RATIO SELF-LEARNING VALUE
CLEAR ............................................................ ..
181
Revision: November 20132014 Altima NAMRevision: November 20132014 Altima NAM