Page 943 of 4801
HOOD
DLK-175
< REMOVAL AND INSTALLATION >
C
D E
F
G H
I
J
L
M A
B
DLK
N
O P
• After installation, perform hood assem bly adjustment procedure. Refer to DLK-172, "HOOD ASSEM-
BLY : Adjustment".
HOOD SUPPORT ROD
HOOD SUPPORT ROD : Removal and InstallationINFOID:0000000009461926
REMOVAL
1. Support hood assembly using a suitable tool.
WARNING:
Bodily injury may occur if hood assembly is not supported properly when removing hood support
rod.
2. Rotate and remove hood support rod from grommet.
3. Release tab and remove grommet from hood hinge, if necessary.
INSTALLATION
Installation is in the reverse order of removal.
HOOD LOCK CONTROL
HOOD LOCK CONTROL : Co mponent Parts LocationINFOID:0000000009461927
1. Hood lock assembly 2. Hood lock release cable 3. Hood lock/fuel filler door
release handle assembly
A. Hood lock release cable clip Clip
ALKIA2663ZZ
Revision: November 20132014 Altima NAMRevision: November 20132014 Altima NAM
Page 944 of 4801

DLK-176
< REMOVAL AND INSTALLATION >
HOOD
HOOD LOCK CONTROL : Re moval and Installation
INFOID:0000000009461928
REMOVAL
1. Release the radiator core support upper cover clips, then remove the radiator core support upper cover.
2. Remove the hoodledge finisher clips (LH), then remove the hoodledge finisher LH.
3. Disconnect the hood switch harness connector (A) (if equipped). : Front
4. Remove the hood lock assembly bolts ( ).
5. Disconnect the hood lock release cable from t he hood lock assembly and unclip from the hoodledge.
6. Remove the fender protector LH. Refer to EXT-26, "FENDER PROTECTOR : Removal and Installation"
.
7. Remove the bolts (A), then separate the hood lock/fuel filler door release handle assembly (1) from the hood lock release cable
(3) and fuel filler door release cable (2).
8. Remove the grommet from the upper dash assembly and pull the hood lock release cable into the passen- ger compartment.
CAUTION:
While pulling, be careful no t to damage (peel) the outsid e of the hood lock release cable.
INSTALLATION
1. Pull the hood lock release cable through the upper dash assembly into the engine compartment.
CAUTION:
Be careful not to bend the cable too much , keep the radius 100 mm (3.94 in) or more.
ALKIA2664ZZ
ALKIA0027GB
ALKIA2665ZZ
Revision: November 20132014 Altima NAMRevision: November 20132014 Altima NAM
Page 945 of 4801

HOOD
DLK-177
< REMOVAL AND INSTALLATION >
C
D E
F
G H
I
J
L
M A
B
DLK
N
O P
2. Attach the hood lock release cable (3) and the fuel filler door release cable (2) to the hood lock/fuel filler door release handle
assembly (1).
3. Place hood lock/fuel filler door release handle assembly in posi- tion and retain with bolts (A).
4. Check that the cable is not offset from the center of the grommet
and seat the grommet into the upper dash hole.
NOTE:
Make sure that the marked area (A) of the cable is located as
shown after mounting grommet to dash upper assembly.
Apply sealant around the grommet at * mark.
5. Position the hood lock release cable and clip it into place.
6. Install the hoodledge finisher (LH) and retain with clips.
7. Connect the hood lock release cable to the hood lock assembly.
8. Install the fender protector (LH). Refer to EXT-26, "FENDER PROTECTOR : Removal and Installation"
.
9. Perform hood fitting adjustment. Refer to DLK-172, "HOOD ASSEMBLY : Adjustment"
.
10. Perform the hood lock control inspection.
INSPECTION
NOTE:
If the hood lock release cable is bent or deformed, replace it.
1. Check that the secondary latch is properly engaged wi th the secondary striker and meets specification
provided (B) with hood's own weight.
ALKIA2665ZZ
ALKIA2139ZZ
PIIB5802E
PIIB5794E
Revision: November 20132014 Altima NAMRevision: November 20132014 Altima NAM
Page 946 of 4801
DLK-178
< REMOVAL AND INSTALLATION >
HOOD
2. While operating the hood lock release handle, carefully check that the front end of the hood assembly is
raised and meets the specification provided (A). Al so check that the hood lock release handle returns to
the original position.
3. Check that the hood lock release handle operating force is 49 N (5.0 kg-f, 11 lb-f) or less.
4. Install so the static closing force of the hood assembly is 254 – 490 N (25.9 – 50 kg-f, 57.1 - 110.2 lb-f).
5. Check the hood lock assembly lubrication condition. If neces- sary, apply a suitable multi-purpose grease as shown.
1. Hood striker 2. Primary latch 3. Secondary striker
4. Secondary latch A. 21 ± 1 mm (0.8 ± 0.04 in) B. 6.8 mm (0.27 in)
ALKIA0028GB
Revision: November 20132014 Altima NAMRevision: November 20132014 Altima NAM
Page 947 of 4801

RADIATOR CORE SUPPORTDLK-179
< REMOVAL AND INSTALLATION >
C
D E
F
G H
I
J
L
M A
B
DLK
N
O P
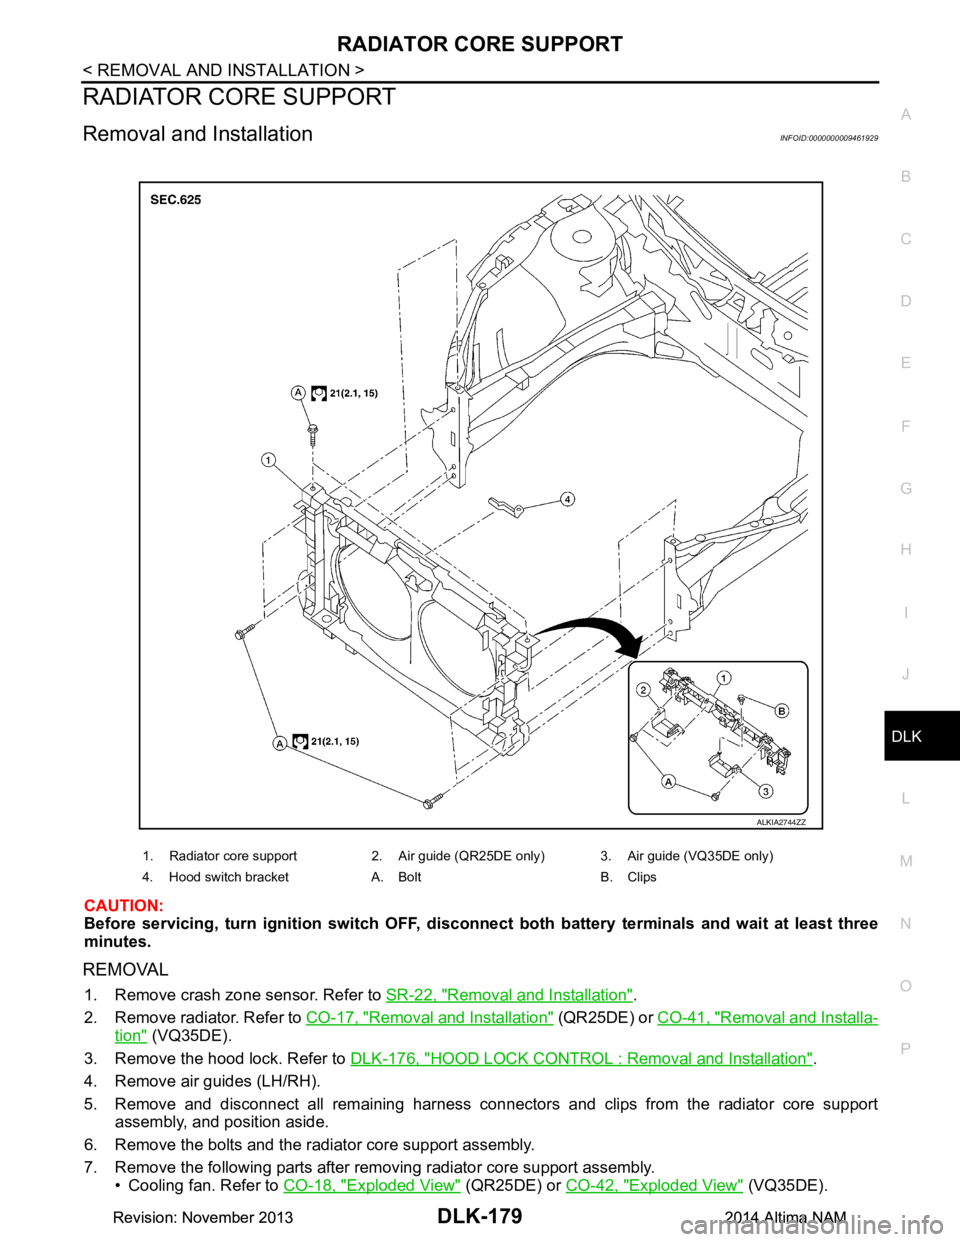
RADIATOR CORE SUPPORT
Removal and InstallationINFOID:0000000009461929
CAUTION:
Before servicing, turn igni tion switch OFF, disconnect both batt ery terminals and wait at least three
minutes.
REMOVAL
1. Remove crash zone sensor. Refer to SR-22, "Removal and Installation".
2. Remove radiator. Refer to CO-17, "Removal and Installation"
(QR25DE) or CO-41, "Removal and Installa-
tion" (VQ35DE).
3. Remove the hood lock. Refer to DLK-176, "HOOD LOCK CONTROL : Removal and Installation"
.
4. Remove air guides (LH/RH).
5. Remove and disconnect all remaining harness connectors and clips from the radiator core support assembly, and position aside.
6. Remove the bolts and the radiator core support assembly.
7. Remove the following parts after removing radiator core support assembly. • Cooling fan. Refer to CO-18, "Exploded View"
(QR25DE) or CO-42, "Exploded View" (VQ35DE).
1. Radiator core support 2. Air guide (QR25DE only) 3. Air guide (VQ35DE only)
4. Hood switch bracket A. Bolt B. Clips
ALKIA2744ZZ
Revision: November 20132014 Altima NAMRevision: November 20132014 Altima NAM
Page 953 of 4801
FRONT DOORDLK-185
< REMOVAL AND INSTALLATION >
C
D E
F
G H
I
J
L
M A
B
DLK
N
O P
5. Remove front door hinge nuts (A) (door side) and the door assembly (1).
INSTALLATION
Installation is in the reverse order of removal.
Tighten door hinge nuts to specified torque.
CAUTION:
• After installation, check front door open/close, lock/unlock operation.
• After installation, perf orm the front door adjustment procedure. Refer to DLK-186, "DOOR ASSEM-
BLY : Adjustment".
ALKIA2705ZZ
Front door hinge nuts 24.5 N·m (2.5 kg-m, 18 ft-lb)
Revision: November 20132014 Altima NAMRevision: November 20132014 Altima NAM
Page 956 of 4801

DLK-188
< REMOVAL AND INSTALLATION >
FRONT DOOR
DOOR STRIKER ADJUSTMENT
Adjust front door striker so that it becomes parallel with door lock insertion direction.
DOOR STRIKER
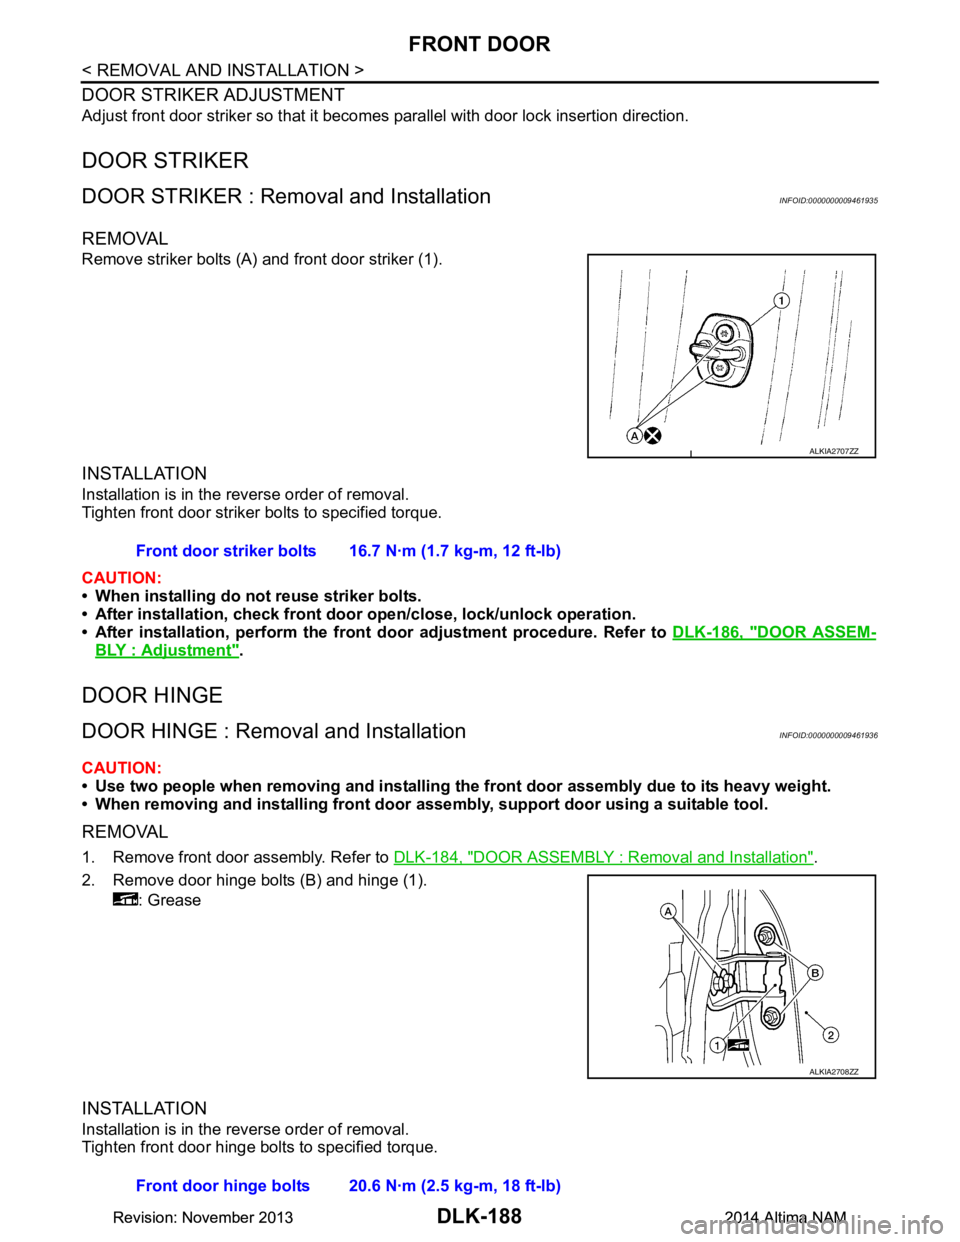
DOOR STRIKER : Removal and InstallationINFOID:0000000009461935
REMOVAL
Remove striker bolts (A) and front door striker (1).
INSTALLATION
Installation is in the reverse order of removal.
Tighten front door striker bolts to specified torque.
CAUTION:
• When installing do not reuse striker bolts.
• After installation, check front doo r open/close, lock/unlock operation.
• After installation, perform the front door adjustment procedure. Refer to DLK-186, "DOOR ASSEM-
BLY : Adjustment".
DOOR HINGE
DOOR HINGE : Removal and InstallationINFOID:0000000009461936
CAUTION:
• Use two people when removing and installing the front door assembly due to its heavy weight.
• When removing and installing front door assembly, support door using a suitable tool.
REMOVAL
1. Remove front door assembly. Refer to DLK-184, "DOOR ASSEMBLY : Removal and Installation".
2. Remove door hinge bolts (B) and hinge (1). : Grease
INSTALLATION
Installation is in the reverse order of removal.
Tighten front door hinge bolts to specified torque.
ALKIA2707ZZ
Front door striker bolts 16.7 N·m (1.7 kg-m, 12 ft-lb)
ALKIA2708ZZ
Front door hinge bolts 20.6 N·m (2.5 kg-m, 18 ft-lb)
Revision: November 20132014 Altima NAMRevision: November 20132014 Altima NAM
Page 957 of 4801

FRONT DOORDLK-189
< REMOVAL AND INSTALLATION >
C
D E
F
G H
I
J
L
M A
B
DLK
N
O P
CAUTION:
• Apply anticorrosive agent onto th e front door hinge mating surface.
• After installation, check front door open/close, lock/unlock operation.
• After installation, perf orm the front door adjustment procedure. Refer to DLK-186, "DOOR ASSEM-
BLY : Adjustment".
DOOR CHECK LINK
DOOR CHECK LINK : Removal and InstallationINFOID:0000000009461937
REMOVAL
1. Fully close the front door glass.
2. Remove front door speaker. Refer to AV-49, "Removal and Installation"
.
3. Remove door check link bolt from body.
4. Remove door check link bolts on door panel.
5. Remove door check link (1) through the hole in door panel (2).
INSTALLATION
Installation is in the reverse order of removal.
CAUTION:
• After installation, check front door open/close, lock/unlock operation.
• Check front door check link rotating point for poor lubrication. If necessary, apply a suitable multi-
purpose grease.
: Grease
JMKIA8073ZZ
JMKIA8074ZZ
Revision: November 20132014 Altima NAMRevision: November 20132014 Altima NAM