Page 9 of 28

7
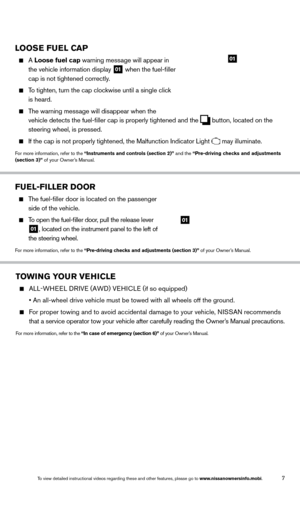
LOOSE FUEL CAP
A Loose fuel cap warning mess age will appear in
the vehicle information display
01 when the fuel-filler
cap is not tightened correctly.
To tighten, turn the cap clockwise until a single click
is heard.
The warning message will disappear when the
vehicle detects the fuel-filler cap is properly tightened and the
button, located on the
steering wheel, is pressed.
If the cap is not properly tightened, the Malfunction Indicator Light may illuminate.
For more information, refer to the “Instruments and controls (section 2)” and the “Pre-driving checks and adjustments
(section 3)” of your Owner’s Manual.
01
TOWING YOUR VEHICLE
ALL-WHEEL DRIVE (AWD) VEHICLE ( if so equipped)
• An all-wheel drive vehicle must be towed with all wheels off the groun\
d.
For proper towing and to avoid accidental damage to your vehicle, NISSAN recommends
that a service operator tow your vehicle after carefully reading the Own\
er
’s Manual precautions.
For more information, refer to the “In case of emergency (section 6)” of your Owner’s Manual.
FUEL-FILLER DOOR
The fuel-filler door is located on the passenger
side of the vehicle.
To open the fuel-filler door, pull the release lever
01, located on the instrument panel to the left of
the steering wheel.
For more information, refer to the “Pre-driving checks and adjustments (section 3)” of your Owner’s Manual.
01
1766904_14d_Rogue_QRG_062514.indd 76/25/14 3:29 PM
To view detailed instructional videos regarding these and other features, please go\
to www.nissanownersinfo.mobi.
Page 10 of 28

8
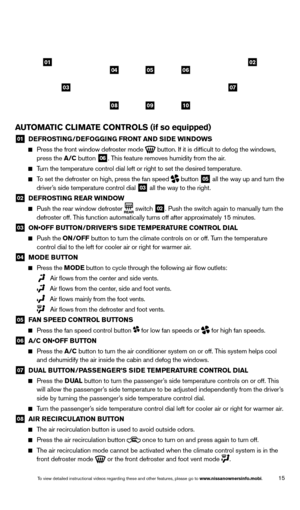
ESSE NTIAL I N FOR MATION
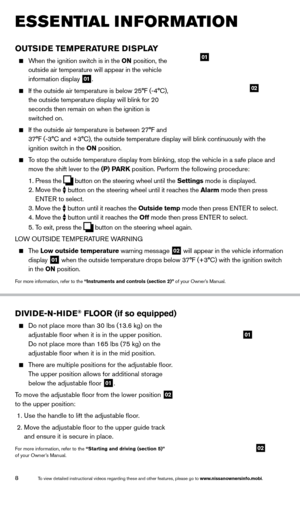
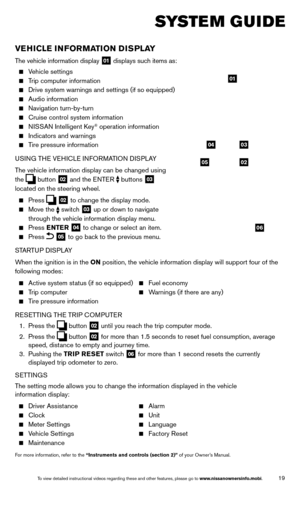
OUTSIDE TEMPERATURE DISPLAY
When the ignition switch is in the ON position, the
outside air temperature will appear in the vehicle
information display
01.
If the outside air temperature is below 25°F (-4°C),
the outside temperature display will blink for 20
seconds then remain on when the ignition is
switched on.
If the outside air temperature is between 27°F and
37°F (-3°C and +3°C), the outside temperature display will bli\
nk continuously with the
ignition switch in the ON position.
To stop the outside temperature display from blinking, stop the vehicle i\
n a safe place and
move the shift lever to the
(P) PARK position. Perform the following procedure:
1. Press the button on the steering wheel until the Settings mode is displayed.
2. Move the
button on the steering wheel until it reaches the Alarm mode then press
E NTE R to select.
3.
Move
the
button until it reaches the Outside temp mode then press E NTE R to select. 4. Move the
button until it reaches the Off mode then press E NTE R to select. 5. To exit, press the button on the steering wheel again.
LOW OUTSIDE TEMPERATURE WARNING
The Low outside temperature warning mess age 02 will appear in the vehicle information
display
01 when the outside temperature drops below 37°F (+3°C) with the ignition switch
in the ON position.
For more information, refer to the “Instruments and controls (section 2)” of your Owner’s Manual.
01
02
DIVIDE-N-HIDE® FLOOR (if so equipped)
Do not place more than 30 lbs (13.6 kg) on the
adjust able floor when it is in the upper position.
Do not place more than 165 lbs (75 kg) on the
adjustable floor when it is in the mid position.
There are multiple positions for the adjustable floor.
T he upper position allows for additional storage
below the adjustable floor
01.
To move the adjustable floor from the lower position
02
to the upper position:
1. Use the handle to lift the adjustable floor.
2.
Move the adjustable floor to the upper guide trac
k
and ensure it is secure in place.
For more information, refer to the “Starting and driving (section 5)”
of your Owner’s Manual.
01
02
1766904_14d_Rogue_QRG_062514.indd 86/25/14 3:29 PM
To view detailed instructional videos regarding these and other features, please go\
to www.nissanownersinfo.mobi.
Page 11 of 28

9
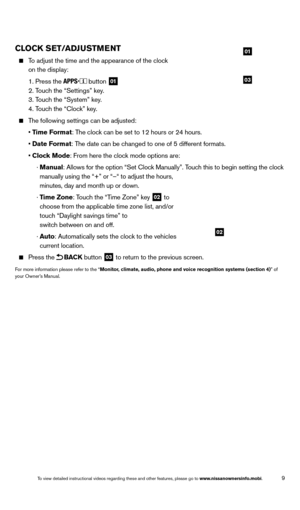
CLOCK SET/ADJUSTMENT
To adjust the time and the appearance of the clock
on the display:
1. Press the button 01
2. Touch the “Settings” key.
3. Touc
h the “System” key.
4. Touc
h the “Clock” key.
The following settings can be adjusted:
• T
ime Format: The clock can be set to 12 hours or 24 hours.
• Date
Format: The date can be changed to one of 5 different formats.
• Clock Mode
: From here the clock mode options are:
· Manual: Allows for the option “Set Cloc
k Manually”. Touch this to begin setting the clock
manually using the “+” or “–“ to adjust the hours,
minutes, day and month up or down.
· T
ime Zone: Touch the “Time Zone” key
02 to
choose from the applicable time zone list, and/or
touch “Daylight savings time” to
switch between on and off.
· Auto
: Automatically sets the clock to the vehicles
current location.
Press the BACK button 03 to return to the previous screen.
For more information please refer to the “Monitor, climate, audio, phone and voice recognition systems (section 4)” of
your Owner’s Manual.
03
01
02
1766904_14d_Rogue_QRG_062514.indd 96/25/14 3:29 PM
To view detailed instructional videos regarding these and other features, please go\
to www.nissanownersinfo.mobi.
Page 12 of 28

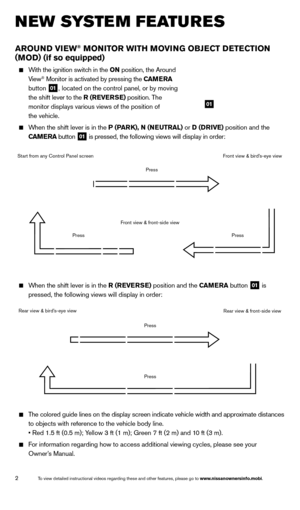
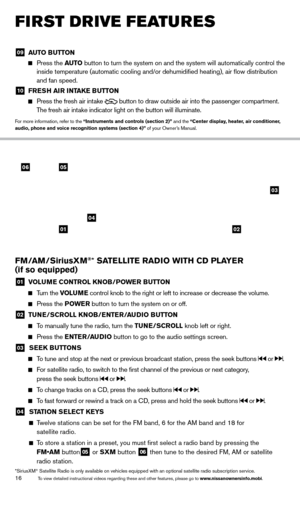
The NISSAN Intelligent Key® System allows you to lock or
unlock the vehicle, open your liftgate and start the engine. It
i")
10
FIRST DRIVE FEATURES
NISSAN INTELLIGENT KEY® SYSTEM (if so equipped)
The NISSAN Intelligent Key® System allows you to lock or
unlock the vehicle, open your liftgate and start the engine. It
is important to make sure the Intelligent Key is with you
(that is, in your pocket or purse).
The operating range of the Intelligent Key is within
31.5 in (8 0 cm) from each request switch.
To lock the vehicle, push either door handle request
switc h
01, push the liftgate opener switch 02
or press the
button 03 on the key fob.
To unlock the vehicle, perform one of the
following procedures:
• Push either door handle request switch 01 once
or the liftgate opener switch
02 once; the
corresponding door will unlock. Push the request
switch again within 5 seconds; all other doors
will unlock, or
• Press the button 04 on the key fob to unlock
the driver’s side door. Press the
button again; all
other doors will unlock.
LIFTGATE RELEASE
To open the rear liftgate, press the button 05 for longer than 1 second.
To close the rear liftgate, press the
button 05 again for longer than 1 second.
The Intelligent Key can also be used to activate the panic alarm by pressing and holding \
the
button 06 for more than 1 second. Once activated, the panic alarm and headlights \
will
stay on for a period of time.
INTELLIGENT KEY BATTERY DISCHARGE
If the battery of the Intelligent Key is disc harged, or environmental conditions interfere with
the Intelligent Key operation, start the engine according to the following procedure:
1. Move the shift lever to the P (P
ARK) position.
2. Firmly apply the foot brake.
3. Touc
h the ignition switch with the Intelligent Key and a chime will sound.
4. Within 1
0 seconds after the chime sounds, push the ignition switch while depressing the
brake pedal and the engine will start.
For more information, refer to the “Pre-driving checks and adjustments (section 3)” of your Owner’s Manual.
01
03
04
05
02
06
1766904_14d_Rogue_QRG_062514.indd 106/25/14 3:29 PM
To view detailed instructional videos regarding these and other features, please go\
to www.nissanownersinfo.mobi.
Page 13 of 28

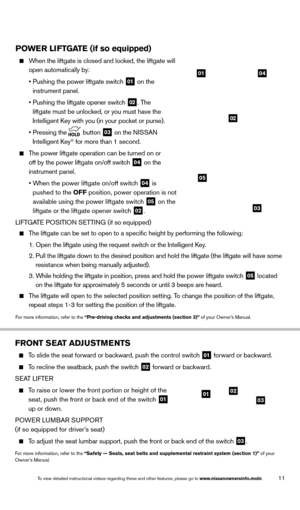
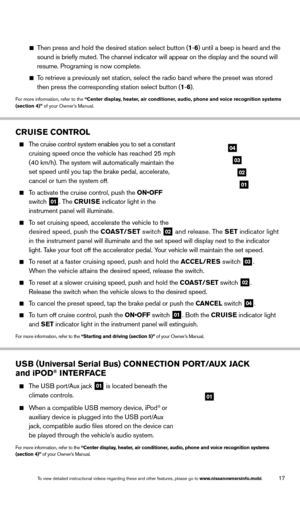
When the liftgate is closed and locked, the liftgate will
open automatically by:
•
Pushing the power liftgate switch 01 on the
instrument panel.
�")
11
POWER LIFTGATE (if so equipped)
When the liftgate is closed and locked, the liftgate will
open automatically by:
•
Pushing the power liftgate switch 01 on the
instrument panel.
• Pushing the liftgate opener switch 02. The
liftgate must be unlocked, or you must have the
Intelligent Key with you (in your pocket or purse).
• Pressing
the
button 03 on the NISSAN
Intelligent Key® for more than 1 second.
The power liftgate operation can be turned on or
off by the power liftgate on/off switc h
04 on the
instrument panel.
• When the power liftgate on/off switc
h
04 is
pushed to the OFF position, power operation is not
available using the power liftgate switch
05 on the
liftgate or the liftgate opener switch
02.
LIFTGATE POSITION SETTING (if so equipped)
The liftgate can be set to open to a specific height by performing the \
following:
1. Open the liftgate using the request switch or the Intelligent K
ey.
2. Pull the liftgate down to the desired position and hold the liftgate (t\
he liftgate will have some
resist
ance when being manually adjusted).
3. While holding the liftgate in position, press and hold the p
ower liftgate switch
05 located
on the liftgate for approximately 5 seconds or until 3 beeps are heard.
The liftgate will open to the selected position setting. To change the position of the liftgate,
repeat steps 1-3 for setting the position of the liftgate.
For more information, refer to the “Pre-driving checks and adjustments (section 3)” of your Owner’s Manual.
03
0401
02
05
FRONT SEAT ADJUSTMENTS
To slide the seat forward or backward, push the control switch 01 forward or backward.
To recline the seatback, push the switch 02 forward or backward.
SEAT LIFTER
To raise or lower the front portion or height of the
seat, push the front or bac k end of the switch
01
up or down.
POWER LUMBAR SUPPORT
(if so equipped for driver’s seat)
To adjust the seat lumbar support, push the front or back end of the switch 03.
For more information, refer to the “Safety — Seats, seat belts and supplemental restraint system (se\
ction 1)” of your
Owner’s Manual.
0102
03
1766904_14d_Rogue_QRG_062514.indd 116/25/14 3:29 PM
To view detailed instructional videos regarding these and other features, please go\
to www.nissanownersinfo.mobi.
Page 14 of 28

12
FIRST DRIVE FEATURES
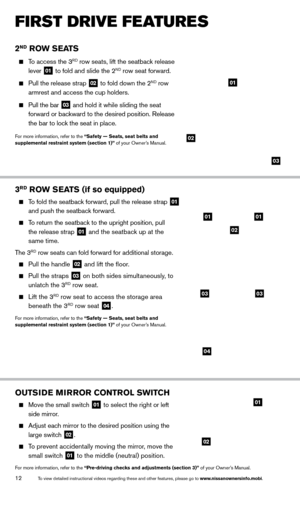
2ND ROW SEATS
To access the 3RD row seats, lift the seatback release
lever
01 to fold and slide the 2ND row seat forward.
Pull the release strap 02 to fold down the 2ND row
armrest and access the cup holders.
Pull the bar 03 and hold it while sliding the seat
forward or backward to the desired position. Release
the bar to lock the seat in place.
For more information, refer to the “Safety — Seats, seat belts and
supplemental restraint system (section 1)” of your Owner’s Manual.
01
OUTSIDE MIRROR CONTROL SWITCH
Move the small switch 01 to select the right or left
side mirror.
Adjust each mirror to the desired position using the
large switch
02.
To prevent accidentally moving the mirror, move the
small switc h
01 to the middle (neutral) position.
For more information, refer to the “Pre-driving checks and adjustments (section 3)” of your Owner’s Manual.
3RD ROW SEATS (if so equipped)
To fold the seatback forward, pull the release strap 01
and push the seatback forward.
To return the seatback to the upright position, pull
the release strap
01 and the seatback up at the
same time.
The 3
RD row seats can fold forward for additional storage.
Pull the handle 02 and lift the floor.
Pull the straps 03 on both sides simultaneously, to
unlatch the 3RD row seat.
Lift the 3RD row seat to access the storage area
beneath the 3RD row seat 04.
For more information, refer to the “Safety — Seats, seat belts and
supplemental restraint system (section 1)” of your Owner’s Manual.
01
02
02
03
0101
02
0303
04
1766904_14d_Rogue_QRG_062514.indd 126/25/14 3:29 PM
To view detailed instructional videos regarding these and other features, please go\
to www.nissanownersinfo.mobi.
Page 15 of 28

13
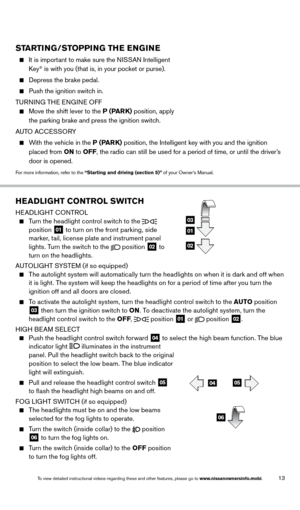
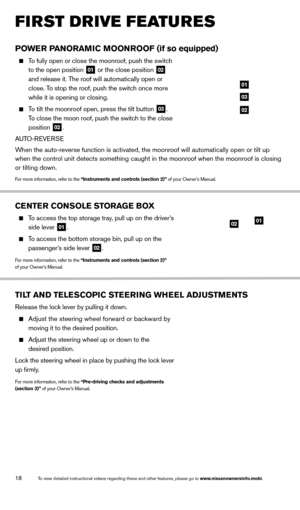
HEADLIGHT CONTROL SWITCH
HEADLIGHT CONTROL
Turn the headlight control switch to the
position 01 to turn on the front parking, side
marker, tail, license plate and instrument panel
lights. Turn the switch to the
position 02 to
turn on the headlights.
AUTOLIGHT SYSTEM (if so equipped)
The autolight system will automatically turn the headlights on when it is dark and off when
i
t is light. The system will keep the headlights on for a period of time after you turn the
ignition off and all doors are closed.
To activate the autolight system, turn the headlight control switch to the AUTO po sition 03 then turn the ignition switch to ON. To deactivate the autolight system, turn the
headlight control switch to the OFF ,
position
01 or
position 02.
HIGH BEAM SELECT
Push the headlight control switch forward 04 to select the high beam function. The blue
indicator light
illuminates in the instrument
panel. Pull the headlight switch back to the original
position to select the low beam. The blue indicator
light will extinguish.
Pull and release the headlight control switch 05
to flash the headlight high beams on and off.
FOG LIGHT SWITCH (if so equipped)
The headlights must be on and the low beams
s
elected for the fog lights to operate.
Turn the switch (inside collar) to the position 06 to turn the fog lights on.
Turn the switch (inside collar) to the OFF
po sition
to turn the fog lights off.
01
03
02
0405
06
STARTING/STOPPING THE ENGINE
It is important to make sure the N ISSAN Intelligent
Key® is with you (that is, in your pocket or purse).
Depress the brake pedal.
Push the ignition switch in.
T
URNING THE ENGINE OFF
Move the shift lever to the P (P ARK) position, apply
the parking brake and press the ignition switch.
AUTO ACCESSORY
With the vehicle in the P (PARK) position, the Intelligent key with you and the ignition
placed from ON to OFF, the radio can still be used for a period of time, or until the driver’s
door is opened.
For more information, refer to the “Starting and driving (section 5)” of your Owner’s Manual.
1766904_14d_Rogue_QRG_062514.indd 136/25/14 3:29 PM
To view detailed instructional videos regarding these and other features, please go\
to www.nissanownersinfo.mobi.
Page 16 of 28

14
FIRST DRIVE FEATURES
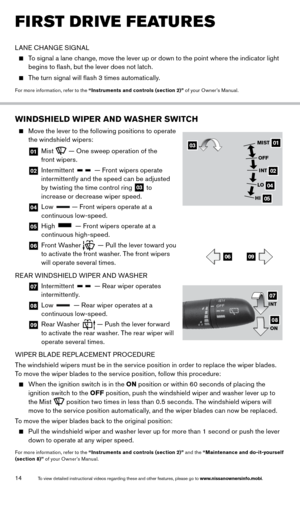
WINDSHIELD WIPER AND WASHER SWITCH
Move the lever to the following positions to operate
the windshield wipers:
01 Mist — One sweep operation of the
front wipers.
02 Intermittent — Front wipers operate
intermittently and the speed can be adjusted
by twisting the time control ring
03 to
increase or decrease wiper speed.
04 Low — Front wipers operate at a
continuous low-speed.
05 High — Front wipers operate at a
continuous high-speed.
06 Front Washer — Pull the lever toward you
to activate the front washer. The front wipers
will operate several times.
REAR WINDSHIELD WIPER AND WASHER
07 Intermittent — Rear wiper operates
intermittently.
08 Low — Rear wiper operates at a
continuous low-speed.
09 Rear Washer — Push the lever forward
to activate the rear washer. The rear wiper will
operate several times.
WIPER BLADE REPLACEMENT PROCEDURE
The windshield wipers must be in the service position in order to replace the wiper blades.
To move the wiper blades to the service position, follow this procedure:
When the ignition switch is in the ON p osition or within 60 seconds of placing the
ignition switch to the OFF position, push the windshield wiper and washer lever up to
the Mist
position two times in less than 0.5 seconds. The windshield wipers will
move to the service position automatically, and the wiper blades can now be replaced.
To move the wiper blades back to the original position:
Pull the windshield wiper and washer lever up for more than 1 second or push the lever
d own to operate at any wiper speed.
For more information, refer to the “Instruments and controls (section 2)” and the “Maintenance and do-it-yourself
(section 8)” of your Owner’s Manual.
0301
02
04
05
MIST
OFFINT
LO
HI
0609
INT
ON07
08
LANE CHANGE SIGNAL
To signal a lane change, move the lever up or down to the point where the indicator light
b egins to flash, but the lever does not latch.
The turn signal will flash 3 times automatically.
For more information, refer to the “Instruments and controls (section 2)” of your Owner’s Manual.
1766904_14d_Rogue_QRG_062514.indd 146/25/14 3:29 PM
To view detailed instructional videos regarding these and other features, please go\
to www.nissanownersinfo.mobi.