2014 NISSAN QASHQAI remove seats
[x] Cancel search: remove seatsPage 21 of 338
1Safety — seats, seat belts and supplemental
restraint systemSafety — seats, seat belts and supplemental
restraint system
Seats ....................................................................... 1-2
Front seats ......................................................... 1-3
Seat heater (where fitted) ................................... 1-4
Rear seats .......................................................... 1-5
Armrests (where fitted) ....................................... 1-5
Head restraints ........................................................ 1-6
Adjustable head restraint components................. 1-6
Non-adjustable head restraint components .......... 1-6
Remove .............................................................. 1-7
Install.................................................................. 1-7
Adjust ................................................................. 1-7
Seat belts ................................................................ 1-8
Precautions on seat belt usage ........................... 1-8
Child safety ........................................................ 1-9
Pregnant women ................................................ 1-10
Injured persons................................................... 1-10
Seat belt warnings .............................................. 1-10
Three-point type seat belt.................................... 1-11
Seat belt maintenance ........................................ 1-12Pre-tensioner seat belt system ................................. 1-13
Child safety ............................................................. 1-14
Infants ................................................................ 1-14
Small children ..................................................... 1-14
Larger children ................................................... 1-15
Legal requirements ............................................. 1-15
Child restraints ........................................................ 1-15
Precautions on child restraints ............................ 1-15
Child restraint and ISOFIX information ................ 1-16
ISOFIX child restraint system.............................. 1-21
Child restraint anchorage .................................... 1-22
Child restraint installation using ISOFIX .............. 1-23
Child restraint installation using three-point
type seat belt ...................................................... 1-25
Supplemental Restraint System (SRS) ..................... 1-29
Precautions on Supplemental Restraint
System (SRS)..................................................... 1-29
Supplemental air bag systems ............................ 1-33
Repair and replacement procedure ..................... 1-37
Page 23 of 338
FRONT SEATS
Manual seat adjustment
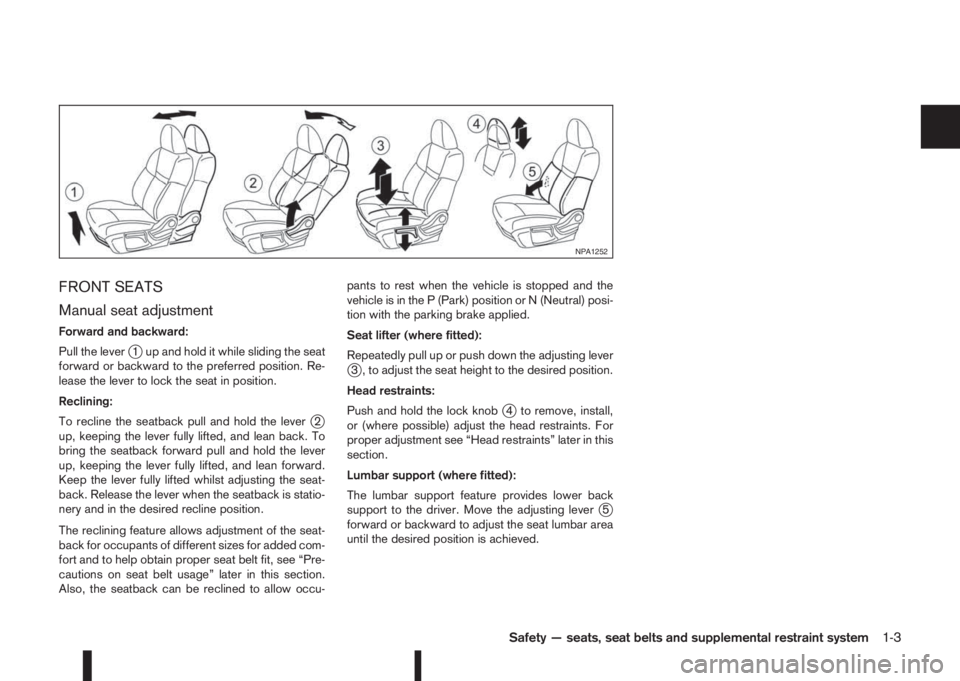
Forward and backward:
Pull the lever
j1 up and hold it while sliding the seat
forward or backward to the preferred position. Re-
lease the lever to lock the seat in position.
Reclining:
To recline the seatback pull and hold the lever
j2
up, keeping the lever fully lifted, and lean back. To
bring the seatback forward pull and hold the lever
up, keeping the lever fully lifted, and lean forward.
Keep the lever fully lifted whilst adjusting the seat-
back. Release the lever when the seatback is statio-
nery and in the desired recline position.
The reclining feature allows adjustment of the seat-
back for occupants of different sizes for added com-
fort and to help obtain proper seat belt fit, see “Pre-
cautions on seat belt usage” later in this section.
Also, the seatback can be reclined to allow occu-pants to rest when the vehicle is stopped and the
vehicle is in the P (Park) position or N (Neutral) posi-
tion with the parking brake applied.
Seat lifter (where fitted):
Repeatedly pull up or push down the adjusting lever
j3 , to adjust the seat height to the desired position.
Head restraints:
Push and hold the lock knob
j4 to remove, install,
or (where possible) adjust the head restraints. For
proper adjustment see “Head restraints” later in this
section.
Lumbar support (where fitted):
The lumbar support feature provides lower back
support to the driver. Move the adjusting lever
j5
forward or backward to adjust the seat lumbar area
until the desired position is achieved.
NPA1252
Safety — seats, seat belts and supplemental restraint system1-3
Page 26 of 338
WARNING
Head restraints supplement the other vehicle
safety systems. They may provide additional pro-
tection against injury in certain rear end colli-
sions. Adjust the head restraints properly, as
specified in this section. Check the adjustment
after someone else uses the seat. Do not attach
anything to the head restraint stalks or remove
the head restraint. Do not use the seat if the
head restraint has been removed. If the head
restraint was removed, reinstall and properly ad-
just the head restraint before an occupant uses
the seating position. Failure to follow these in-
structions can reduce the effectiveness of the
head restraints. This may increase the risk of se-
rious injury or death in a collision.
•Your vehicle is equipped with head restraints.
On the front seats they are adjustable. On the
rear seats, where fitted, they are non-adjustable
but have a lower storage position.
•Adjustable head restraints have multiple notches
along the stalk to lock them in a desired adjust-
ment position.
•The non-adjustable head restraints have a single
locking notch to secure them to the seat frame.
•Proper Adjustment:
– For the adjustable type, align the head re-
straint so the centre of your ear is approxi-
mately level with the centre of the head re-
straint.– If your ear position is still higher than the rec-
ommended alignment, place the head
restraint at the highest position.
– For the non-adjustable type, raise into lock-
ing position before use. The seat should not
be occupied with the head restraint in the
lower storage position.
•If the head restraint has been removed, ensure
that it is reinstalled and locked in place before
riding in that designated seating position.
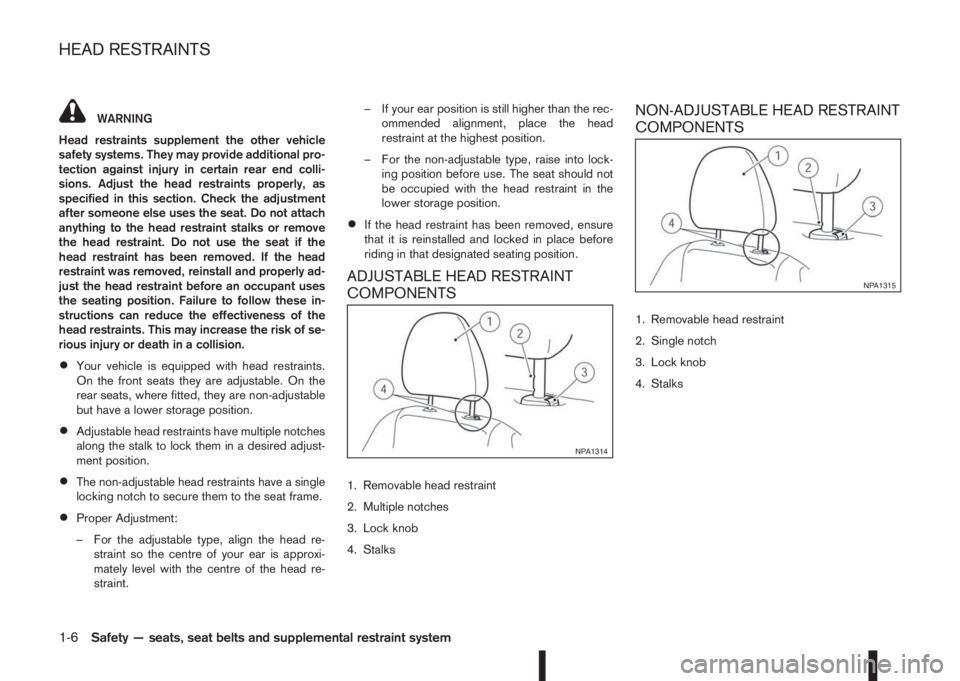
ADJUSTABLE HEAD RESTRAINT
COMPONENTS
1. Removable head restraint
2. Multiple notches
3. Lock knob
4. Stalks
NON-ADJUSTABLE HEAD RESTRAINT
COMPONENTS
1. Removable head restraint
2. Single notch
3. Lock knob
4. Stalks
NPA1314
NPA1315
HEAD RESTRAINTS
1-6Safety — seats, seat belts and supplemental restraint system
Page 27 of 338
REMOVE
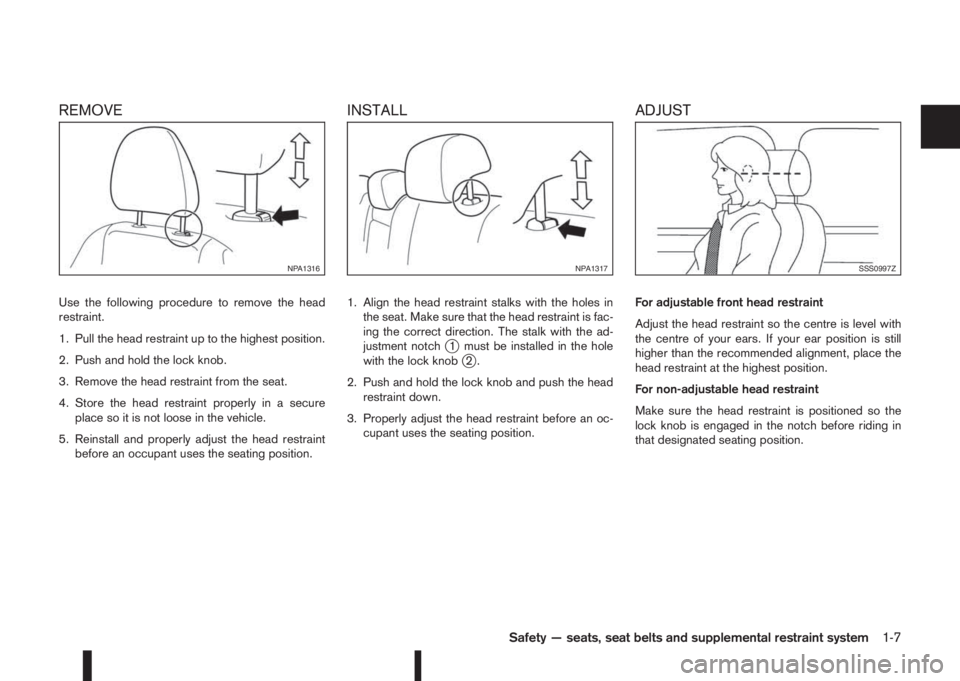
Use the following procedure to remove the head
restraint.
1. Pull the head restraint up to the highest position.
2. Push and hold the lock knob.
3. Remove the head restraint from the seat.
4. Store the head restraint properly in a secure
place so it is not loose in the vehicle.
5. Reinstall and properly adjust the head restraint
before an occupant uses the seating position.
INSTALL
1. Align the head restraint stalks with the holes in
the seat. Make sure that the head restraint is fac-
ing the correct direction. The stalk with the ad-
justment notch
j1 must be installed in the hole
with the lock knobj2.
2. Push and hold the lock knob and push the head
restraint down.
3. Properly adjust the head restraint before an oc-
cupant uses the seating position.
ADJUST
For adjustable front head restraint
Adjust the head restraint so the centre is level with
the centre of your ears. If your ear position is still
higher than the recommended alignment, place the
head restraint at the highest position.
For non-adjustable head restraint
Make sure the head restraint is positioned so the
lock knob is engaged in the notch before riding in
that designated seating position.
NPA1316NPA1317SSS0997Z
Safety — seats, seat belts and supplemental restraint system1-7
Page 29 of 338
•No modifications or additions should be made
by the user which will either prevent the seat
belt adjusting devices from operating to re-
move slack, or prevent the seat belt assembly
from being adjusted to remove slack.
•Seat belts should be adjusted as firmly as
possible, consistent with comfort, to provide
the protection for which they have been de-
signed. A slack belt will greatly reduce the
protection afforded to the wearer.
•Be sure the seat belt tongue is securely fas-
tened to the proper buckle.
•Do not wear the seat belt inside out or twisted.
Doing so may reduce its effectiveness.
•Do not allow more than one person to use the
same seat belt.
•Never carry more people in the vehicle than
there are seat belts.
•Each belt assembly must only be used by one
occupant; it is dangerous to put a belt around
a child being carried on the occupant’s lap.
•If the seat belt warning light illuminates con-
tinuously while the ignition switch is in the ON
position, with all doors closed, and all seat
belts fastened, it may indicate a malfunction
in the system. Have the system checked by a
NISSAN dealer or qualified workshop.
•No changes should be made to the seat belt
system. For example, do not modify the seat
belt, add material, or install devices that maychange the seat belt routing or tension. Doing
so may affect the operation of the seat belt
system. Modifying or tampering with the seat
belt system may result in serious personal in-
jury.
•Once a seat belt pre-tensioner has been acti-
vated, it cannot be reused and must be re-
placed together with the retractor. See a
NISSAN dealer or qualified workshop.
•Removal and installation of the pre-tensioner
seat belt system components should be done
by a NISSAN dealer or qualified workshop.
•All seat belt assemblies, including retractors
and attaching hardware, should be inspected
by a NISSAN dealer or qualified workshop af-
ter any collision. NISSAN recommends that
all seat belt assemblies in use during a colli-
sion be replaced unless the collision was mi-
nor and the belts show no damage and con-
tinue to operate properly. Seat belt assem-
blies not in use during a collision should also
be inspected and replaced if either damage
or improper operation is noted.
•All child restraints and attaching hardware
should be inspected after any collision. Al-
ways follow the restraint manufacturer’s in-
spection instructions and replacement rec-
ommendations. The child restraints should be
replaced if they are damaged.
•It is essential to replace the entire assembly
after it has been worn in a severe impact even
if damage to the assembly is not obvious.
•Care should be taken to avoid contamination
of the webbing with polishes, oils and chemi-
cals, and particularly battery acid. Cleaning
may safely be carried out using mild soap and
water. The belt should be replaced if webbing
becomes frayed, contaminated or damaged.
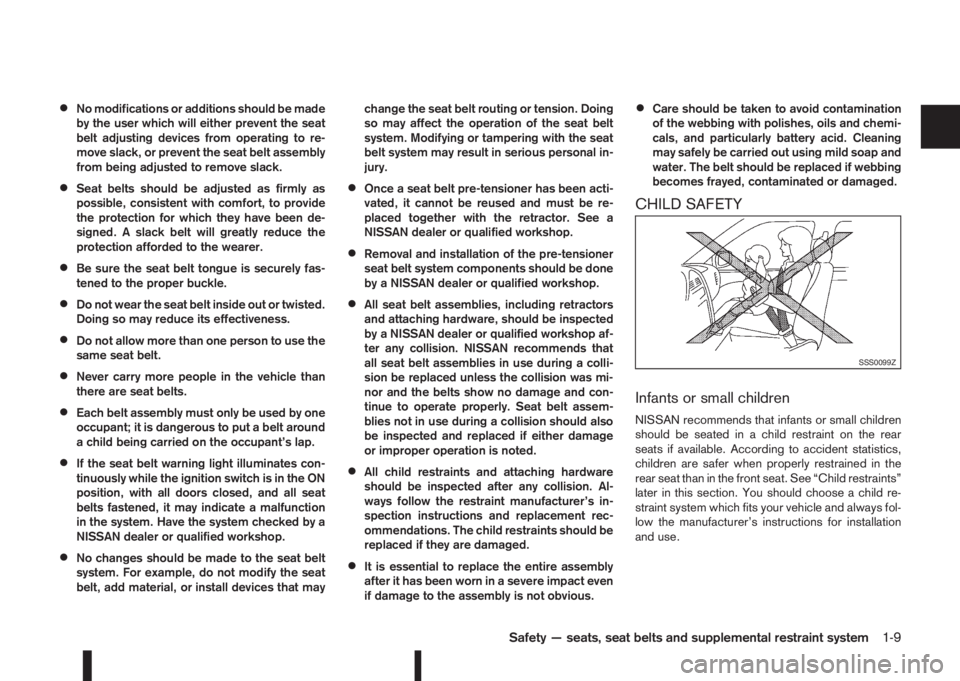
CHILD SAFETY
Infants or small children
NISSAN recommends that infants or small children
should be seated in a child restraint on the rear
seats if available. According to accident statistics,
children are safer when properly restrained in the
rear seat than in the front seat. See “Child restraints”
later in this section. You should choose a child re-
straint system which fits your vehicle and always fol-
low the manufacturer’s instructions for installation
and use.
SSS0099Z
Safety — seats, seat belts and supplemental restraint system1-9
Page 42 of 338
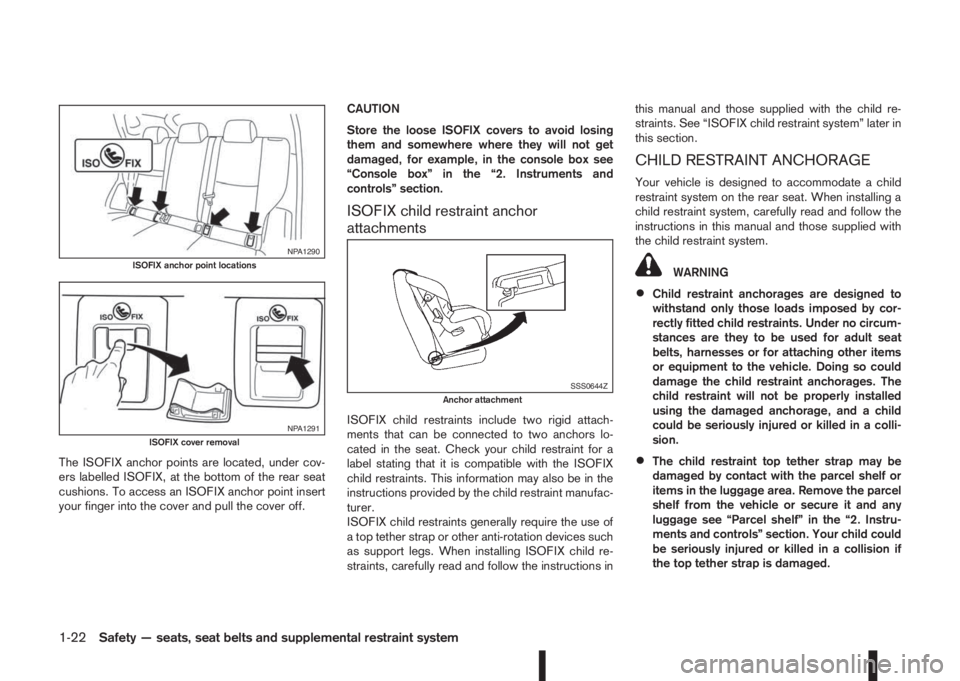
The ISOFIX anchor points are located, under cov-
ers labelled ISOFIX, at the bottom of the rear seat
cushions. To access an ISOFIX anchor point insert
your finger into the cover and pull the cover off.CAUTION
Store the loose ISOFIX covers to avoid losing
them and somewhere where they will not get
damaged, for example, in the console box see
“Console box” in the “2. Instruments and
controls” section.
ISOFIX child restraint anchor
attachments
ISOFIX child restraints include two rigid attach-
ments that can be connected to two anchors lo-
cated in the seat. Check your child restraint for a
label stating that it is compatible with the ISOFIX
child restraints. This information may also be in the
instructions provided by the child restraint manufac-
turer.
ISOFIX child restraints generally require the use of
a top tether strap or other anti-rotation devices such
as support legs. When installing ISOFIX child re-
straints, carefully read and follow the instructions inthis manual and those supplied with the child re-
straints. See “ISOFIX child restraint system” later in
this section.
CHILD RESTRAINT ANCHORAGE
Your vehicle is designed to accommodate a child
restraint system on the rear seat. When installing a
child restraint system, carefully read and follow the
instructions in this manual and those supplied with
the child restraint system.
WARNING
•Child restraint anchorages are designed to
withstand only those loads imposed by cor-
rectly fitted child restraints. Under no circum-
stances are they to be used for adult seat
belts, harnesses or for attaching other items
or equipment to the vehicle. Doing so could
damage the child restraint anchorages. The
child restraint will not be properly installed
using the damaged anchorage, and a child
could be seriously injured or killed in a colli-
sion.
•The child restraint top tether strap may be
damaged by contact with the parcel shelf or
items in the luggage area. Remove the parcel
shelf from the vehicle or secure it and any
luggage see “Parcel shelf” in the “2. Instru-
ments and controls” section. Your child could
be seriously injured or killed in a collision if
the top tether strap is damaged.
NPA1290ISOFIX anchor point locations
NPA1291ISOFIX cover removal
SSS0644ZAnchor attachment
1-22Safety — seats, seat belts and supplemental restraint system
Page 43 of 338
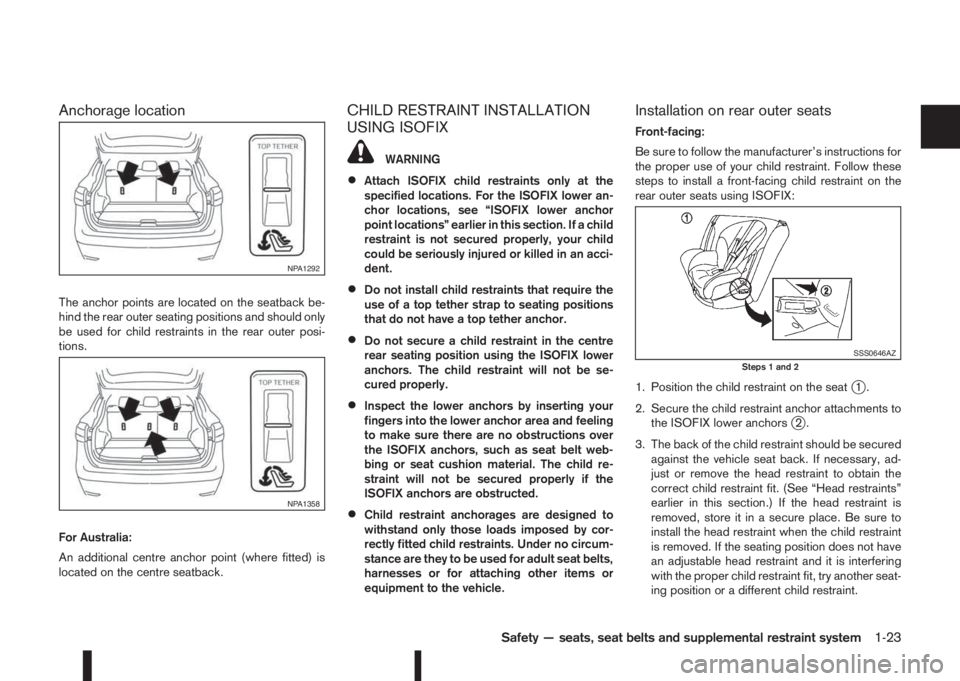
Anchorage location
The anchor points are located on the seatback be-
hind the rear outer seating positions and should only
be used for child restraints in the rear outer posi-
tions.
For Australia:
An additional centre anchor point (where fitted) is
located on the centre seatback.
CHILD RESTRAINT INSTALLATION
USING ISOFIX
WARNING
•Attach ISOFIX child restraints only at the
specified locations. For the ISOFIX lower an-
chor locations, see “ISOFIX lower anchor
point locations” earlier in this section. If a child
restraint is not secured properly, your child
could be seriously injured or killed in an acci-
dent.
•Do not install child restraints that require the
use of a top tether strap to seating positions
that do not have a top tether anchor.
•Do not secure a child restraint in the centre
rear seating position using the ISOFIX lower
anchors. The child restraint will not be se-
cured properly.
•Inspect the lower anchors by inserting your
fingers into the lower anchor area and feeling
to make sure there are no obstructions over
the ISOFIX anchors, such as seat belt web-
bing or seat cushion material. The child re-
straint will not be secured properly if the
ISOFIX anchors are obstructed.
•Child restraint anchorages are designed to
withstand only those loads imposed by cor-
rectly fitted child restraints. Under no circum-
stance are they to be used for adult seat belts,
harnesses or for attaching other items or
equipment to the vehicle.
Installation on rear outer seats
Front-facing:
Be sure to follow the manufacturer’s instructions for
the proper use of your child restraint. Follow these
steps to install a front-facing child restraint on the
rear outer seats using ISOFIX:
1. Position the child restraint on the seat
j1.
2. Secure the child restraint anchor attachments to
the ISOFIX lower anchors
j2.
3. The back of the child restraint should be secured
against the vehicle seat back. If necessary, ad-
just or remove the head restraint to obtain the
correct child restraint fit. (See “Head restraints”
earlier in this section.) If the head restraint is
removed, store it in a secure place. Be sure to
install the head restraint when the child restraint
is removed. If the seating position does not have
an adjustable head restraint and it is interfering
with the proper child restraint fit, try another seat-
ing position or a different child restraint.
NPA1292
NPA1358
SSS0646AZSteps 1 and 2
Safety — seats, seat belts and supplemental restraint system1-23
Page 46 of 338
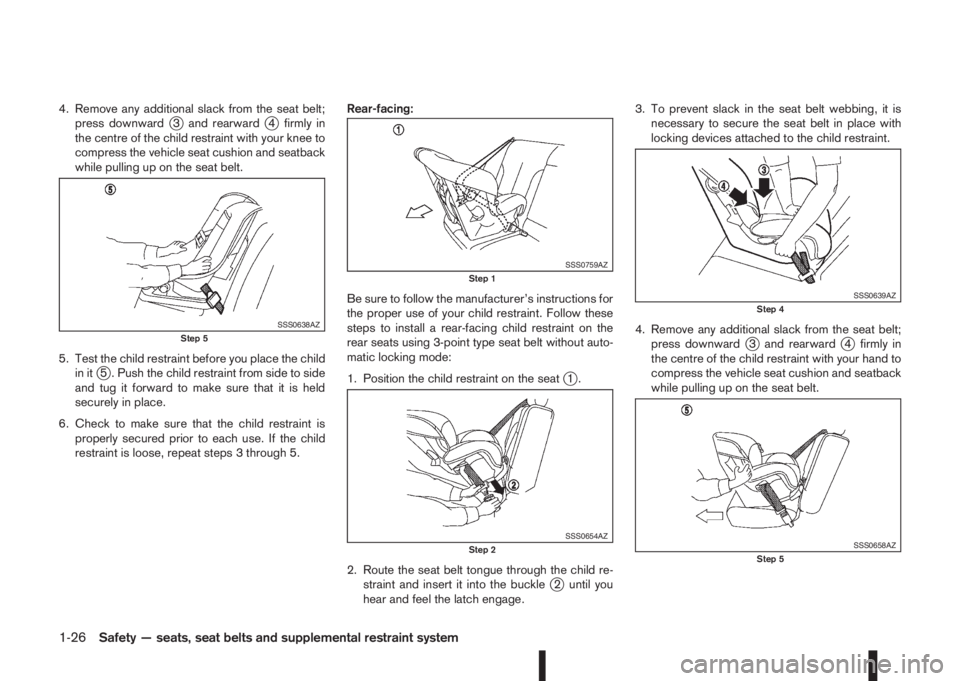
4. Remove any additional slack from the seat belt;
press downwardj3 and rearwardj4 firmly in
the centre of the child restraint with your knee to
compress the vehicle seat cushion and seatback
while pulling up on the seat belt.
5. Test the child restraint before you place the child
in it
j5 . Push the child restraint from side to side
and tug it forward to make sure that it is held
securely in place.
6. Check to make sure that the child restraint is
properly secured prior to each use. If the child
restraint is loose, repeat steps 3 through 5.Rear-facing:
Be sure to follow the manufacturer’s instructions for
the proper use of your child restraint. Follow these
steps to install a rear-facing child restraint on the
rear seats using 3-point type seat belt without auto-
matic locking mode:
1. Position the child restraint on the seatj1.
2. Route the seat belt tongue through the child re-
straint and insert it into the buckle
j2 until you
hear and feel the latch engage.3. To prevent slack in the seat belt webbing, it is
necessary to secure the seat belt in place with
locking devices attached to the child restraint.
4. Remove any additional slack from the seat belt;
press downward
j3 and rearwardj4 firmly in
the centre of the child restraint with your hand to
compress the vehicle seat cushion and seatback
while pulling up on the seat belt.
SSS0638AZStep 5
SSS0759AZStep 1
SSS0654AZStep 2
SSS0639AZStep 4
SSS0658AZStep 5
1-26Safety — seats, seat belts and supplemental restraint system