2014 NISSAN QASHQAI climate control
[x] Cancel search: climate controlPage 127 of 338

•A buzzer will sound if the vehicle is driven
without releasing the parking brake. See “Au-
dible reminders” in the “2. Instruments and
controls” section.
•While the electric parking brake is applied or
released, an operating sound is heard from
the lower side of the rear seat. This is normal
and does not indicate a malfunction.
•When the electric parking brake is frequently
applied and released in a short period of time,
the parking brake may not operate in order to
prevent the parking brake system from over-
heating. If this occurs, operate the electric
parking brake switch again after waiting ap-
proximately 1 minute.
•The electric parking brake can only be re-
leased with the ignition switch in the ON posi-
tion.
•If the electric parking brake must be applied
while driving in an emergency, pull up and
hold the parking brake switch. When you re-
lease the parking brake switch, the parking
brake will be released.
•While pulling up the electric parking brake
switch while driving, the parking brake is ap-
plied and a chime sounds. The parking brake
indicator light in the meter and in the parking
brake switch illuminate. This does not indi-
cate a malfunction. The electric parking brake
indicator lights in the meter and in the parking
brake switch turn off when the parking brake
is released.
•Pull up the electric parking brake switch twice
so that the maximum electric parking brake
force is applied to the vehicle.
•When pulling the electric parking brake switch
up with the ignition switch in the OFF or ACC
position, the parking brake switch indicator
light will continue to illuminate for a short pe-
riod of time.
CAUTION
To park the vehicle in cold climates place the
shift lever in 1st (1) or Reverse (R) (or in Park (P)
for automatic (AT) vehicles), and place suitable
chocks at both the front and back of a wheel with
the electric parking brake released. If the electric
parking brake is applied in cold climates, the
brake may become frozen and cannot be re-
leased.
DRIVING AWAY WHEN TOWING A
TRAILER
Please note the following points to prevent the ve-
hicle from rolling back unintentionally on a gradient.
•Pull and hold the parking brake switch and press
the accelerator. The parking brake will remain
engaged and prevent any tendency to roll back
down the slope.
•You can release the parking brake switch as
soon as the engine is delivering enough power
to the wheels.
Depending on the weight of the vehicle and trailer
and the steepness of the slope, there may be a ten-dency to roll back downhill when driving away from
a standstill. You can prevent this by pulling up the
parking brake switch as you press the accelerator
(in the same way as with a conventional handbrake).
Pre-driving checks and adjustments3-17
Page 150 of 338

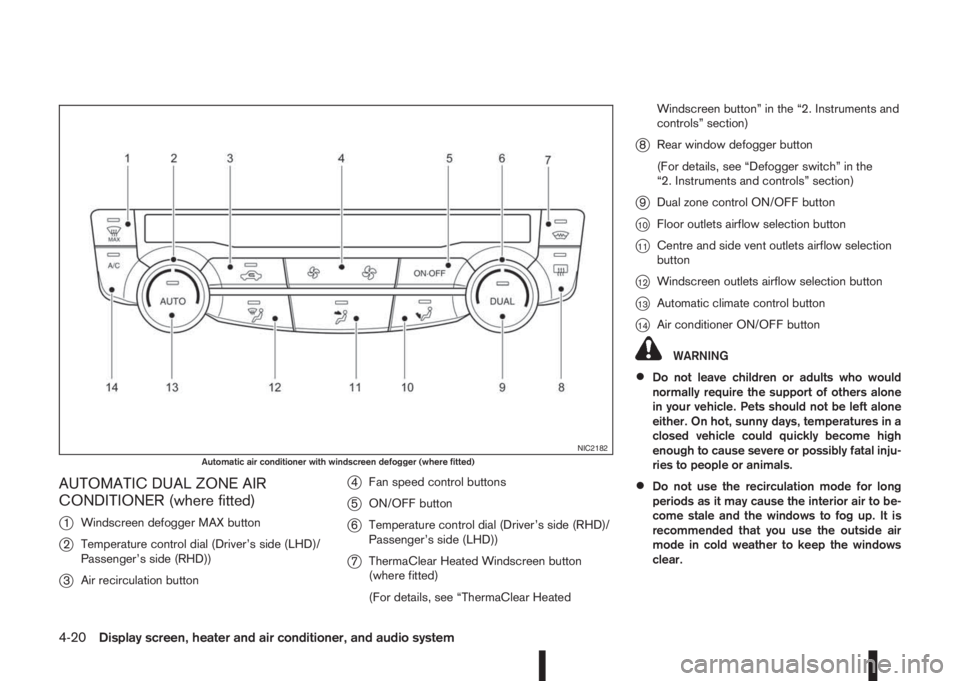
AUTOMATIC DUAL ZONE AIR
CONDITIONER (where fitted)
j
1Windscreen defogger MAX button
j2Temperature control dial (Driver’s side (LHD)/
Passenger’s side (RHD))
j3Air recirculation button
j4Fan speed control buttons
j5ON/OFF button
j6Temperature control dial (Driver’s side (RHD)/
Passenger’s side (LHD))
j7ThermaClear Heated Windscreen button
(where fitted)
(For details, see “ThermaClear HeatedWindscreen button” in the “2. Instruments and
controls” section)
j8Rear window defogger button
(For details, see “Defogger switch” in the
“2. Instruments and controls” section)
j9Dual zone control ON/OFF button
j10Floor outlets airflow selection button
j11Centre and side vent outlets airflow selection
button
j12Windscreen outlets airflow selection button
j13Automatic climate control button
j14Air conditioner ON/OFF button
WARNING
•Do not leave children or adults who would
normally require the support of others alone
in your vehicle. Pets should not be left alone
either. On hot, sunny days, temperatures in a
closed vehicle could quickly become high
enough to cause severe or possibly fatal inju-
ries to people or animals.
•Do not use the recirculation mode for long
periods as it may cause the interior air to be-
come stale and the windows to fog up. It is
recommended that you use the outside air
mode in cold weather to keep the windows
clear.
NIC2182Automatic air conditioner with windscreen defogger (where fitted)
4-20Display screen, heater and air conditioner, and audio system
Page 151 of 338

•Do not adjust the positioning of the heating/
ventilation or air conditioning controls while
driving.
NOTE
•The air conditioner cooling function operates
only when the engine is running, and the am-
bient temperature is above -2°C (28°F).
•The air conditioner can be used to dehumidify
when heating, or to reduce air temperature
and dehumidify when cooling. This is possible
in both auto or manual control mode as long
as the fan speed is at minimum (first bar) or
higher.
•When the AUTO mode is selected, the tem-
perature of the passenger compartment will
be maintained automatically. Air flow distribu-
tion and fan speed will also be controlled au-
tomatically.
Controls
NOTE
Before any selection or change is made, press
the AUTO button to activate the heater and air
conditioner system.
Cooling and/or dehumidified heating (AUTO
mode):
This mode may be used all year round. The system
works automatically to control the inside tempera-
ture, air flow distribution and fan speed after the
preferred temperature is set manually.1. Press the AUTO button (the indicator light will
illuminate).
2. Operate the driver’s side temperature control dial
to set the desired temperature.
Adjust the temperature to about 22°C (72°F) for
normal operation.
3. Driver’s side and passenger side temperatures
can be set independently using the individual
temperature control dial. When the passenger
side temperature control dial is turned, the DUAL
indicator light will come on. To turn off the pas-
senger side temperature control, press the DUAL
button.
NOTE
•A visible mist may be seen coming from the
vents in hot, humid conditions as the air is
cooled rapidly, this is not a malfunction.
Heating (AUTO mode):
Use this mode for heating purposes only.
1. Press the A/C button to turn off the air condi-
tioner cooling function (A/C indicator light goes
off).
2. Select the desired temperature with the tempera-
ture control dial.
•Do not set the temperature at a lower level than
the one of the outside air temperature. Other-
wise the system may not work properly.
•This mode is not recommended if the windscreen
fogs up.Airflow control buttons:
Use these buttons to manually select the air flow
form these outlets as described below:
: Air flows mainly from the windscreen defog-
ger outlets.
: Air flows from centre and side vents.
: Air flows mainly from floor outlets.
Windscreen defogger
m(manual mode):
Use this mode for defogging the windscreen as fol-
lows:
1. Press the
button.
The system will set the fan speed to maximum.
Air circulation is cancelled, the airflow mode
and the air conditioner is activated automatically.
Air flows mainly from the defogger outlets.
2. To switch off, press the
button to return to
the previous mode or the AUTO button for auto
climate control mode.
NOTE
•To quickly defrost/defog the windscreen, set
the fan speed to the maximum position.
•As soon as possible after the windscreen has
been cleared of ice or fog, press either the
windscreen defogger button or AUTO button.
•When the windscreen defogging mode is acti-
vated, the air conditioner will automatically
switch on at outside temperatures above –2°C
(28°F) and the air recirculation mode will be
switched off.
Display screen, heater and air conditioner, and audio system4-21
Page 190 of 338

If the battery of the vehicle is discharged, the push-
button ignition switch cannot be moved from the
LOCK position.
OFF position
The ignition switch is in the OFF position when the
engine is turned off using the ignition switch. No
lights will illuminate on the ignition switch.
ACC position
With the vehicle in the P (Park) position, the Intelli-
gent key with you and the ignition placed from ON
to OFF, the radio can still be used for a period of
time, or until the driver’s door is opened.
After a period of time, functions such as radio, navi-
gation, and Bluetooth® Hands-Free Phone System
may be restarted by pressing the “POWER button/
VOLUME control knob” (See “Monitor, climate, au-
dio, phone and voice recognition systems” in this
manual) or the keyfob unlock button up to a total of
30 minutes.
EMERGENCY ENGINE SHUT OFF
To shut off the engine in an emergency situation
while driving, perform the following procedure:
•Rapidly push the push-button ignition switch 3
consecutive times in less than 1.5 seconds, or
•Push and hold the push-button ignition switch
for more than 2 seconds.
STEERING LOCK
The ignition switch is equipped with an anti-theft
steering lock device.
To lock steering wheel
1. Push the ignition switch to the “OFF” position
where the ignition switch position indicator will
not illuminate.
2. Open or close the door. The ignition switch turns
to the “LOCK” position.
3. Turn the steering wheel 1/6 of a turn to the right
or left from the straight up position.
To unlock steering wheel
Push the ignition switch to “ACC”, and the steering
wheel will be automatically unlocked.
CAUTION
•If the battery of the vehicle is discharged, the
push-button ignition switch cannot be
switched from the “LOCK” position.
•If the ignition switch position does not change
from the “LOCK” position, push the ignition
switch again while rotating the steering wheel
slightly to the right and left.
INTELLIGENT KEY BATTERY
DISCHARGE
If the battery of the Intelligent Key is discharged, or
environmental conditions interfere with the Intelli-
gent Key operation, start the engine according to
the following procedure:
1. Move the shift lever to the P (Park) (XTRONIC
transmission models) or N (Neutral) (MT models)
position.
2. Firmly apply the footbrake.
3. Depress the clutch pedal to the floor (MT mod-
els)
4. Touch the ignition switch with the Intelligent Key
as illustrated. (A chime will sound.)
5. Push the ignition switch while depressing the
brake pedal within 10 seconds after the chime
sounds. The engine will start.
SSD0860Z
5-14Starting and driving