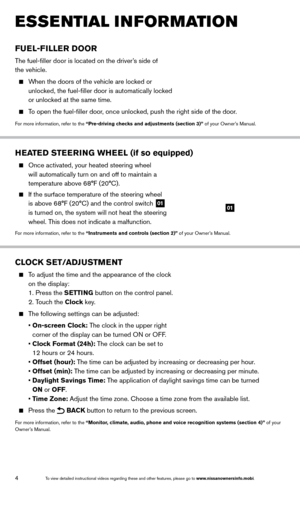
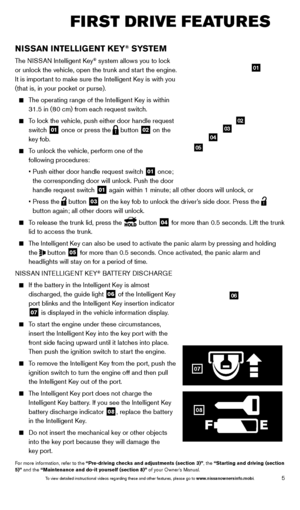
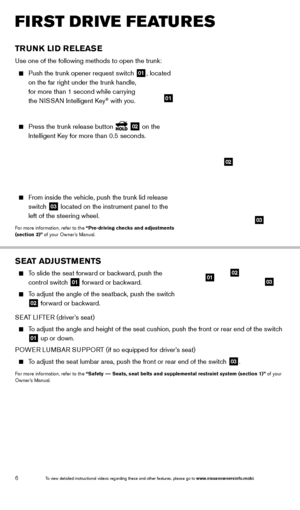
Page 17 of 24

15
To manually download entries:
1.
Press the button on the steering wheel.
2.
After the tone, s
ay “Phonebook”.
3.
After the next tone, s
ay “Transfer Entry”. The system acknowledges the command and
asks you to initiate the transfer from the phone handset. The new contact phone number
will be transferred from the cellular phone to the vehicle.
The transfer procedure varies according to each cellular phone. See your cellular phone’s owner’s manual for details. You can also visit www.nissanusa.com/bluetooth for
instructions on transferring phone numbers from NISSAN recommended cellular phones.
4.
T
he system repeats the number and prompts you for the next command. When you have
finished entering numbers or transferring an entry, choose “Store.”
5.
T
he system confirms the name, location and number.
MAKING A CALL FROM THE PHONEBOOK
In some cases, names stored in all U PPERCASE letters may not be recognized by the
voice recognition system.
1.
Press the button.
2.
After waiting for the tone, s
ay “Call”.
3.
After the next tone, speak a name of a phonebook entry
. For example, “Michael Smith”.
4.
Confirm the correct name is recognized by s
aying “Dial” after the tone.
MAKING A CALL BY PHONE NUMBER
1.
Press the button. A tone will sound.
2.
S
ay: “Call”. The system acknowledges the command and announces the next set of
available commands.
3.
S
ay: “Phone Number”. The system acknowledges the command and announces the next
set of available commands.
4.
S
ay the number you wish to call starting with the area code in single digit format.
5.
W
hen you have finished speaking the phone number, the system repeats it back and
announces the available commands.
6.
S
ay: “Dial”. The system acknowledges the command and makes the call.
RECEIVING/ENDING A CALL
When you receive a phone call, a ring tone sounds through the audio system.
To accept the call, press the button.
To reject the call, press the button.
To hang up the phone at the end of a call or to disconnect during call placement, press the
button.
1655343_14b_Maxima_QRG_012914.indd 151/29/14 4:00 PM
To view detailed instructional videos regarding these and other features, please go\
to www.nissanownersinfo.mobi.
Page 18 of 24

Bluetooth® Streaming Audio (available with Navigation System only) allows you to\
use a
compatible Bluetooth® phone to play")
16
SYSTEM GUIDE
Bluetooth® System with Navigation* (if so equipped)
Bluetooth® Streaming Audio (available with Navigation System only) allows you to\
use a
compatible Bluetooth® phone to play audio files on your device. Your compatible cellular
phone can be connected to the vehicle’s audio system allowing audio files to play through
the vehicle’s speakers.
CONNECTING PROCEDURE
The vehicle must be stationary when connecting the phone.
1.
Press the SETTING button on the instrument panel
and select the “Bluetooth” key on the display.
2.
Select the “Connect Bluetooth” key
.
3.
A pop-up bo
x will appear on the screen, prompting
you to confirm that the connection is for the phone
system. Select the “Yes” key.
4.
Initiate connecting from the phone.
The connecting procedure varies according to each cellular phone model.
For detailed connecting instructions and
a list of compatible phones, please visit
www.nissanusa.com/bluetooth.
When prompted for a PIN code, enter “1234” from the handset. (The PIN code is assigned by NISSAN and cannot be changed.)
5. W
hen connecting is complete, the screen will return to the Bluetooth
® settings screen.
*Some jurisdictions prohibit the use of cellular telephones while drivin\
g.
1655343_14b_Maxima_QRG_012914.indd 161/29/14 4:00 PM
To view detailed instructional videos regarding these and other features, please go\
to www.nissanownersinfo.mobi.
Page 19 of 24

17
PHONEBOOK SETUP
Depending on your cell phone, the system may automatically download your\
cell phone’s
entire phonebook to the vehicle’s Bluetooth® system.
If the phonebook does not download automatically , the vehicle phonebook may be set for
up to 40 entries.
To manually download entries:
1.
Press the PHONE
button and select the “Vehicle
Phonebook” key.
2.
Select the “
Add New” key at the top of the display.
There are different methods to input a phone
number. Select one of the following options:
•
“Copy from Call History” to s
ave a number from
the Outgoing, Incoming or Missed Calls lists.
•
“Copy from the Handset” to s
ave a number that
has been downloaded from your handset to
the vehicle.
•
“Enter Number by K
eypad” to input the number
and name manually.
MAKING A CALL
To make a call, follow this procedure:
1.
Press the PHONE button on the instrument panel
or the
button on the steering wheel. The “Phone”
menu will appear on the control panel display.
2.
Select the “V
ehicle Phonebook”, “Call History”,
“Handset Phonebook” or “Dial Number” key.
3.
Select the desired entry from the list.
4.
Dialing begins when the entry is selected or when the “O
K” key is selected.
RECEIVING/ENDING A CALL
To accept the call, press the PHONE button on the instrument panel, the
button on the steering
wheel or touch the “Answer” key.
To reject the call, touch the “Reject Call” key on the display or press and hold the
button on the
steering wheel.
To hang-up, press the button or touch the
“Hang Up” key.
For more information, refer to the “Monitor, climate, audio, phone and
voice recognition systems (section 4)” of your Owner’s Manual or visit
www.nissanusa.com/bluetooth.
1655343_14b_Maxima_QRG_012914.indd 171/29/14 4:00 PM
To view detailed instructional videos regarding these and other features, please go\
to www.nissanownersinfo.mobi.
Page 20 of 24

Your Navigation System can calculate a route from the current location to\
a preferred
destination. The real-")
18
SYSTEM GUIDE
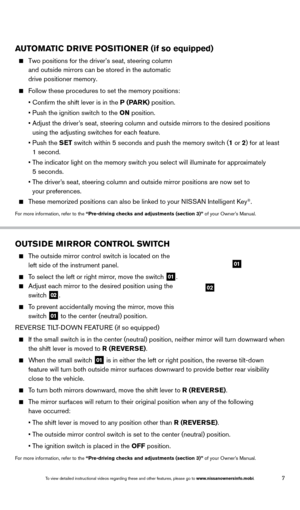
01
03
050607081011
1213
02
04
09
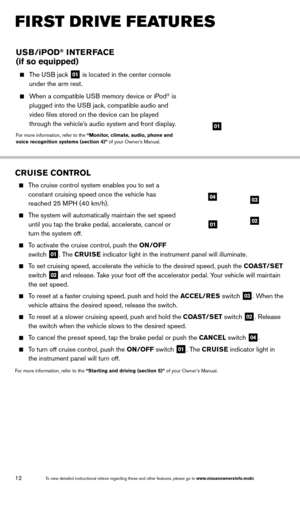
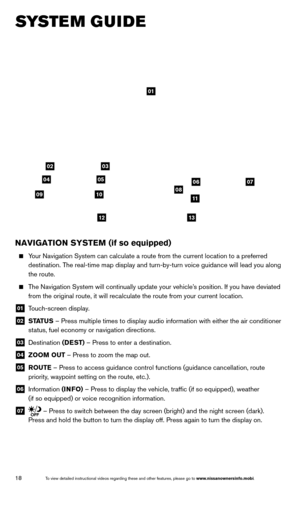
NAVIGATION SYSTEM (if so equipped)
Your Navigation System can calculate a route from the current location to\
a preferred
destination. The real-time map display and turn-by-turn voice guidance will lead you a\
long
the route.
The Navigation System will continually update your vehicle’s position. If you have deviated
from the original route, it will recalculate the route from your current\
location.
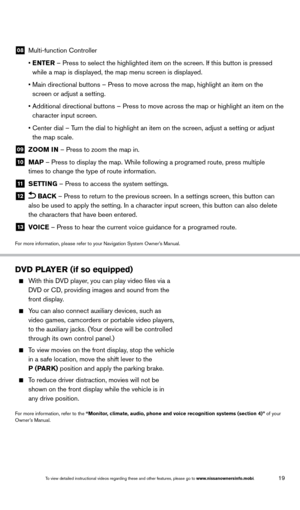
01 T ouch-screen display.
02 ST ATUS – Press multiple times to display audio information with either the \
air conditioner
status, fuel economy or navigation directions.
03 Destination (DEST) – Press to enter a destination.
04 ZOOM OUT – Press to zoom the map out.
05 R OUTE – Press to access guidance control functions (guidance cancellation\
, route
priority, waypoint setting on the route, etc.).
06 Information (INFO) – Press to display the vehicle, traffic (if so equipped), weathe\
r
(if so equipped) or voice recognition information.
07 – Press to switch between the day screen (bright) and the night screen (dark).
Press and hold the button to turn the display off. Press again to turn t\
he display on.
1655343_14b_Maxima_QRG_012914.indd 181/29/14 4:00 PM
To view detailed instructional videos regarding these and other features, please go\
to www.nissanownersinfo.mobi.
Page 21 of 24

19
08 Multi-function Controller
•
E
NTER – Press to select the highlighted item on the screen. If this button\
is pressed
while a map is displayed, the map menu screen is displayed.
•
Main directional buttons – Press to move across the map, highlight an\
item on the
screen or adjust a setting.
•
Additional directional buttons – Press to move across the map or high\
light an item on the
c
haracter input screen.
•
Center dial – T
urn the dial to highlight an item on the screen, adjust a setting or adj\
ust
the map scale.
09 Z OOM IN – Press to zoom the map in.
10 MAP – Press to display the map. While following a programed route, press multiple
times to change the type of route information.
11 S ETTING – Press to access the system settings.
12 BACK
– Press to return to the previous screen. In a settings screen, this\
button can
also be used to apply the setting. In a character input screen, this button can also delete
the characters that have been entered.
13 V OICE – Press to hear the current voice guidance for a programed route.
For more information, please refer to your Navigation System Owner’s Manual.
DVD PLAYER (if so equipped)
With this DVD player, you can play video files via a
DVD or CD, providing images and sound from the
front display.
You can also connect auxiliary devices, suc h as
video games, camcorders or portable video players,
to the auxiliary jacks. (Your device will be controlled
through its own control panel.)
To view movies on the front display, stop the vehicle
in a safe location, move the shift lever to the
P (PARK) position and apply the parking brake.
To reduce driver distraction, movies will not be
shown on the front display while the vehicle is in
any drive position.
For more information, refer to the “Monitor, climate, audio, phone and voice recognition systems (section 4)” of your
Owner’s Manual.
1655343_14b_Maxima_QRG_012914.indd 191/29/14 4:00 PM
To view detailed instructional videos regarding these and other features, please go\
to www.nissanownersinfo.mobi.
Page 22 of 24

The HomeLink® Universal Transceiver can learn and consolidate the functions of up to 3
different hand-held transmitters, operating items such")
20
HOMELINK® UNIVERSAL TRANSCEIVER (if so equipped)
The HomeLink® Universal Transceiver can learn and consolidate the functions of up to 3
different hand-held transmitters, operating items such as garage doors, property gates,
outdoor and indoor lights or alarm systems.
To program the HomeLink® Universal Transceiver:
•
P
osition the handheld transceiver 1-3 in (26-76 mm) away from the HomeLink surface,
keeping the HomeLink indicator light in view.
•
Press and hold the desired HomeLink button and the handheld transmitter \
button
simultaneously until the HomeLink indicator light flashes slowly and then ra\
pidly.
•
B
oth buttons may be released when the indicator light flashes rapidly.
To verify the programing is complete, press and hold the HomeLink button \
and observe the
indicator light:
•
A solid, continuous light indicates the programing is complete and the H\
omeLink button
will activate your device.
•
A blinking light that turns to a solid continuous light after 2 seconds \
indicates additional
steps are required to complete the programing.
An additional person may make the remaining steps easier
. To complete the
programing process:
•
At the receiver of the device that you are programing to the HomeLink, p\
ress and release
the “learn” or “smart” button (the name may vary by manufac\
turer but it is usually located
near where the hanging antenna wire is att
ached to the unit). You have approximately 30
seconds to initiate the following step.
•
Press and hold the programed HomeLink button for 2 seconds and release.
You may have to repeat the previous 2 steps up to 3 times to complete the\
programing
process. HomeLink should now activate your device.
For more information, refer to the “Instruments and controls (section 2)” of your Owner’s Manual, the HomeLink website at
www.homelink.com or call 1-800-355-3515.
HOMELINK
SYSTEM GUIDE
1655343_14b_Maxima_QRG_012914.indd 201/29/14 4:01 PM
To view detailed instructional videos regarding these and other features, please go\
to www.nissanownersinfo.mobi.
Page 23 of 24
MEMO
1655343_14b_Maxima_QRG_012914.indd 211/29/14 4:01 PM
Page 24 of 24

To view detailed instructional videos,")
Nissan, the Nissan Brand Symbol, Z and
Nissan model names are Nissan trademarks.
© 2014 Nissan North America, Inc.
QR
14E 0A35U1Printing: February 2 014 (12)
To view detailed instructional videos,
go to www.nissanownersinfo.mobi/2014/maxima
or snap this barcode with an appropriate barcode reader.
This Quick Reference Guide is intended to provide an overview of some of the uniq\
ue features of your new vehicle. See your
Owner’s Manual, which contains important safety warnings and information about the operation and maintenance of yo\
ur vehicle,
for complete details. Nissan North America, Inc. reserves the right to make changes, at any time, without prior notice, in prices,
colors, materials, equipment, specifications, and models and to discon\
tinue models or equipment. Due to continuous product
development and other pre- and post-production factors, actual vehicle, \
materials and specifications may vary. Some vehicles are
shown with optional equipment. See the actual vehicle for complete accur\
acy. Specifications, options and accessories may differ
in Hawaii, U.S. territories and other countries. For additional information on availability, options or accessories, see your NISSAN
dealer or contact Nissan North America, Inc.
1655343_14b_Maxima_QRG_012914.indd 21/29/14 4:00 PM
Page:
< prev 1-8 9-16 17-24