2014 NISSAN ARMADA center console
[x] Cancel search: center consolePage 8 of 24

6
FIRST DRIVE FEATURES
3RD ROW POWER FOLDING SEATS (if so equipped)
Before operating the 3rd row seats:
•
Make sure the 2nd row seatbac
k is not reclined.
•
Lower the 3rd row headrest to the full down position.
•
Disconnect and secure the center seat belt and tongues into the retracto\
r base. Always
reconnect the center seat belt when the seat is returned to the upright \
position.
•
Make sure that there are no objects on the seatbac
k cushion.
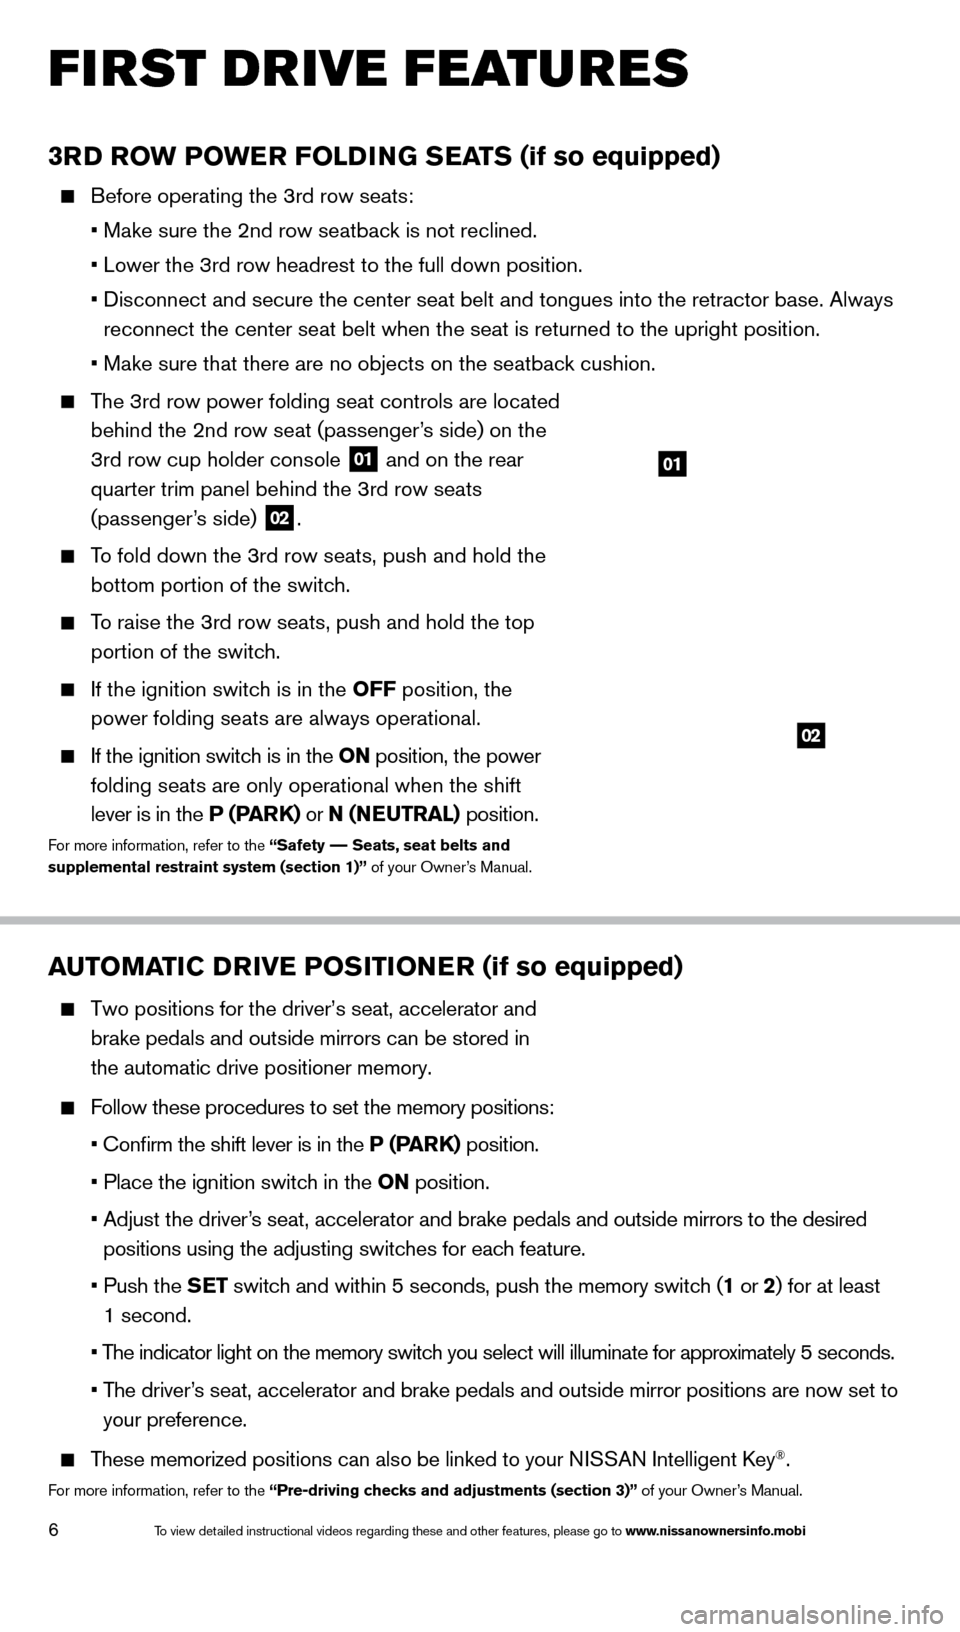
The 3rd row power folding seat controls are located behind the 2nd row seat (passenger’s side) on the
3rd row cup holder console
01 and on the rear
quarter trim panel behind the 3rd row seats
(passenger’s side)
02.
To fold down the 3rd row seats, push and hold the
bottom portion of the switch.
To raise the 3rd row seats, push and hold the top portion of the switch.
If the ignition switc h is in the OFF position, the
power folding seats are always operational.
If the ignition switc h is in the ON position, the power
folding seats are only operational when the shift
lever is in the P (PARK) or N (NEUTRAL) position.
For more information, refer to the “Safety –– Seats, seat belts and
supplemental restraint system (section 1)” of your Owner’s Manual.
AUTOMATIC DRIVE POSITIONER (if so equipped)
Two positions for the driver’s seat, accelerator and
brake pedals and outside mirrors can be stored in
the automatic drive positioner memory.
Follow these procedures to set the memory positions:
•
Confirm the shift lever is in the
P (PARK) position.
•
Place the ignition switc
h in the ON position.
•
Adjust the driver
’s seat, accelerator and brake pedals and outside mirrors to the desired
positions using the adjusting switches for each feature.
•
Push the
SET switch and within 5 seconds, push the memory switch (1 or 2) for at least
1 second.
•
T
he indicator light on the memory switch you select will illuminate for approximately 5 seconds.
•
T
he driver’s seat, accelerator and brake pedals and outside mirror positions are no\
w set to
your preference.
These memorized positions can also be linked to your NISSAN Intelligent Key®.
For more information, refer to the “Pre-driving checks and adjustments (section 3)” of your Owner’s Manual.
01
02
1590747_14b_Armada_QRG_011614.indd 61/16/14 10:41 AM
To view detailed instructional videos regarding these and other features, please go\
to www.nissanownersinfo.mobi
Page 13 of 24

11
04 STATION PRESET BUTTONS
Twelve stations can be set for the FM band, six for the AM band and eighteen for
satellite radio.
To store a station in a preset, you must first select a radio band by pressing the \
AM/FM
button
05 or
XM button
06, then tune to the desired AM, FM or XM satellite radio station.
Then press and hold the desired station preset button (1-6) until the preset number is
updated on the display and the sound is briefly muted. The channel indicator will then
come on and the sound will resume. Programming is now complete.
To retrieve a previously set station, select the radio band where the preset was stored then press the corresponding station select button (1-6).
For more information, refer to the “Monitor, climate, audio, phone and voice recognition systems (section 4)” of your
Owner’s Manual.
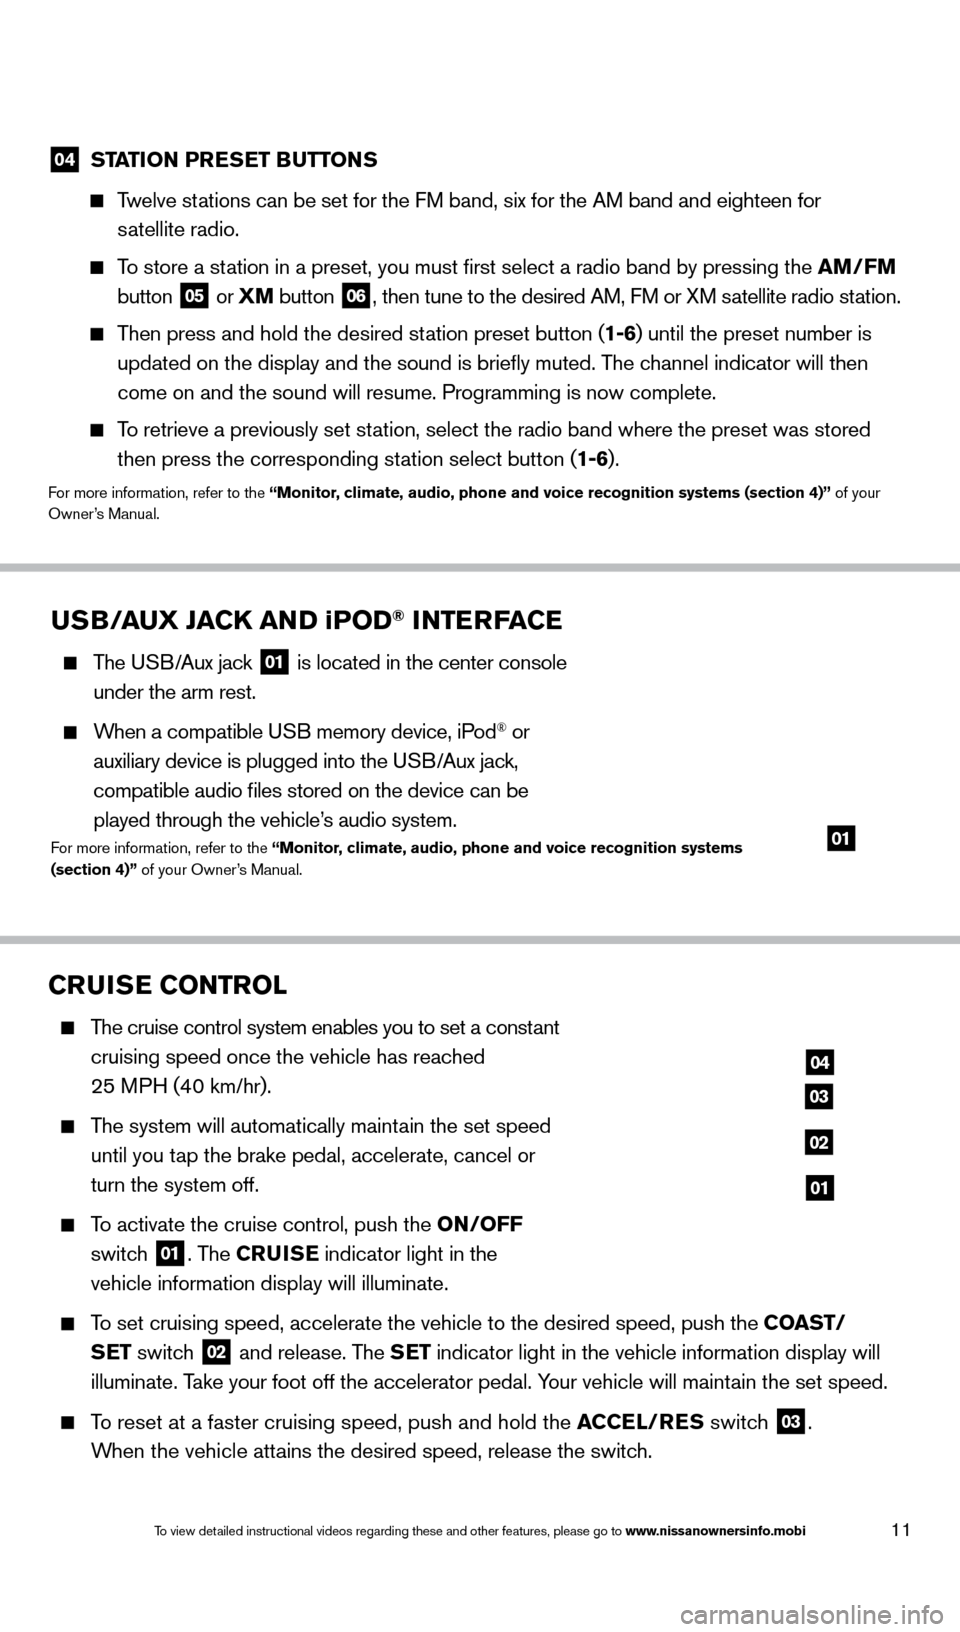
CRUISE CONTROL
The cruise control system enables you to set a constant
cruising speed once the vehicle has reached
25 MPH (40 km/hr).
The system will automatically maintain the set speed
until you tap the brake pedal, accelerate, cancel or
turn the system off.
To activate the cruise control, push the ON/OFF
switch
01. The CRUISE indicator light in the
vehicle information display will illuminate.
To set cruising speed, accelerate the vehicle to the desired speed, push \
the COAST/ SET switch
02 and release. The SET indicator light in the vehicle information display will
illuminate. Take your foot off the accelerator pedal. Your vehicle will maintain the set speed.
To reset at a faster cruising speed, push and hold the ACCEL/RES switch
03.
When the vehicle attains the desired speed, release the switch.
04
03
02
01
USB/AUX JACK AND iPOD® INTERFACE
The USB/Aux jack
01 is located in the center console
under the arm rest.
When a compatible USB memory device, iPod® or
auxiliary device is plugged into the USB/Aux jack,
compatible audio files stored on the device can be
played through the vehicle’s audio system.
For more information, refer to the “Monitor, climate, audio, phone and voice recognition systems
(section 4)” of your Owner’s Manual.01
1590747_14b_Armada_QRG_011614.indd 111/16/14 10:41 AM
To view detailed instructional videos regarding these and other features, please go\
to www.nissanownersinfo.mobi
Page 21 of 24

19
08 DISPLAY
– Press to access the display settings.
09 STATUS – Press multiple times to display audio information with either the \
air conditioner
status, fuel economy or navigation directions.
10 S ETTING – Press to access the system settings.
11 BAC K
– Press to return to the previous screen. In a settings screen, this\
button can also
be used to apply the setting. In a character input screen, this button can also delete the
characters that have been entered.
12 V OICE – Press to hear the current voice guidance for a programmed route.
For more information, refer to your Navigation System Owner’s Manual.
DUAL HEAD RESTRAINT DVD SYSTEM
(if so equipped)
With this Dual Head Restraint DVD System you can
play video files via a DVD or CD, providing images and
sound both from the front and rear display screens.
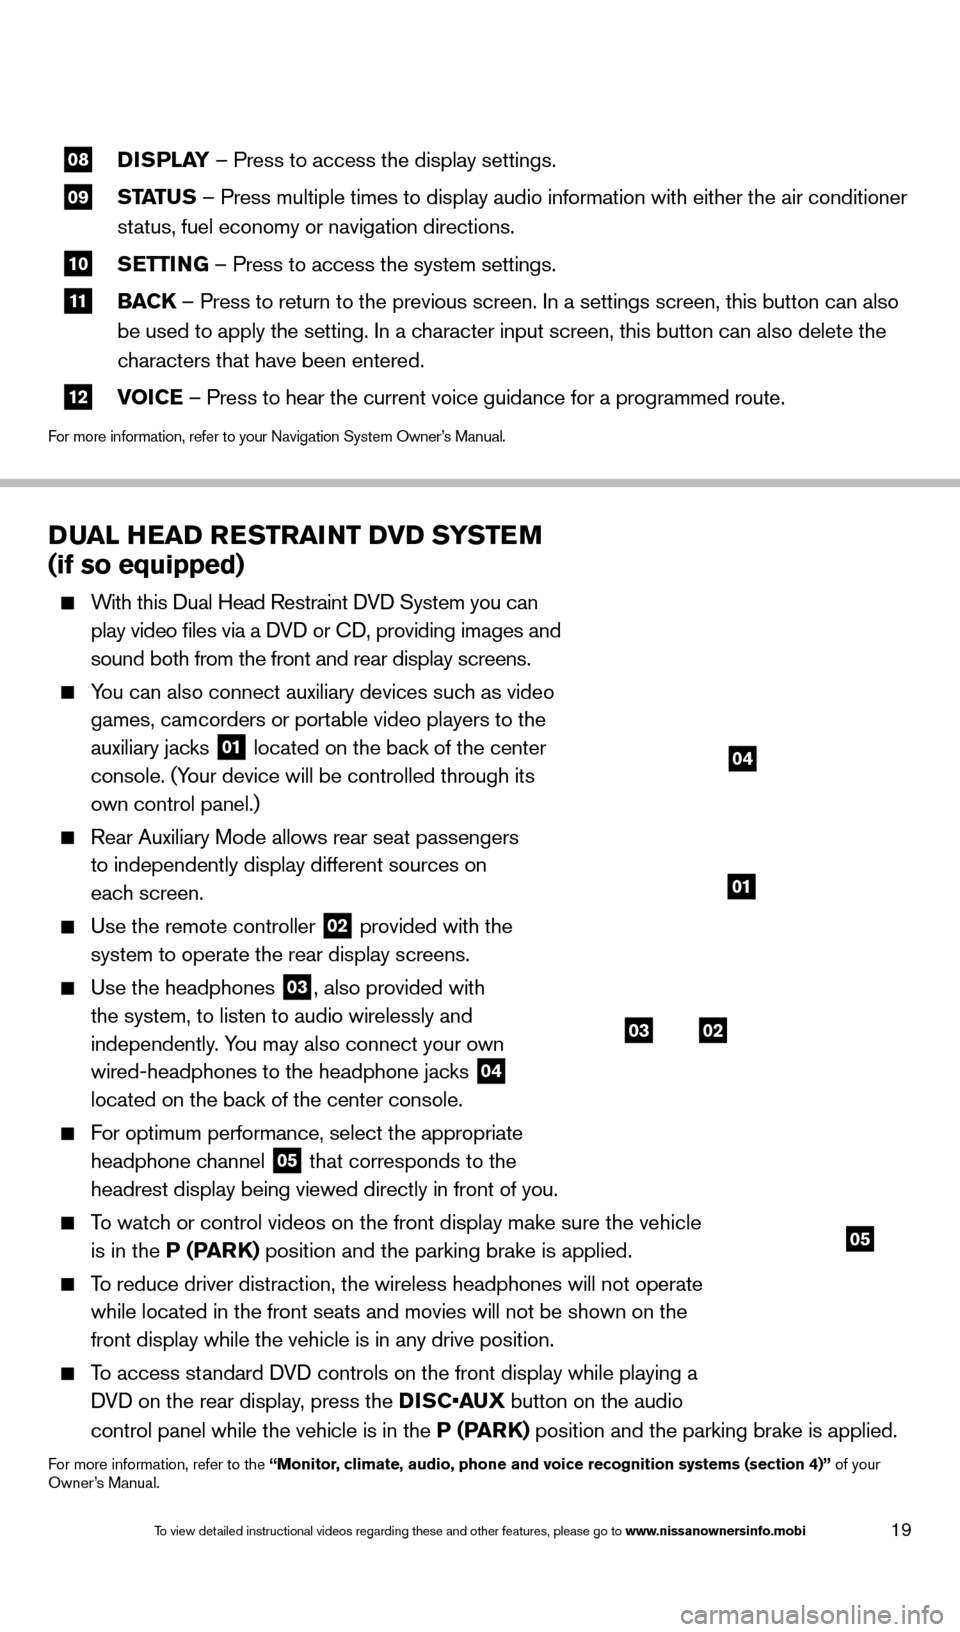
You can also connect auxiliary devices such as video games, camcorders or portable video players to the
auxiliary jacks
01 located on the back of the center
console. (Your device will be controlled through its
own control panel.)
Rear Auxiliary Mode allows rear seat passengers
to independently display different sources on
each screen.
Use the remote controller 02 provided with the
system to operate the rear display screens.
Use the headphones 03, also provided with
the system, to listen to audio wirelessly and
independently. You may also connect your own
wired-headphones to the headphone jacks
04
located on the back of the center console.
For optimum performance, select the appropriate
headphone channel
05 that corresponds to the
headrest display being viewed directly in front of you.
To watch or control videos on the front display make sure the vehicle is in the P (PARK) position and the parking brake is applied.
To reduce driver distraction, the wireless headphones will not operate while located in the front seats and movies will not be shown on the
front display while the vehicle is in any drive position.
To access standard DVD controls on the front display while playing a DVD on the rear display, press the DISC•AUX button on the audio
control panel while the vehicle is in the P (PARK) position and the parking brake is applied.
For more information, refer to the “Monitor, climate, audio, phone and voice recognition systems (section 4)” of your
Owner’s Manual.
03
05
02
01
04
1590747_14b_Armada_QRG_011614.indd 191/16/14 10:41 AM
To view detailed instructional videos regarding these and other features, please go\
to www.nissanownersinfo.mobi