Page 1 of 24
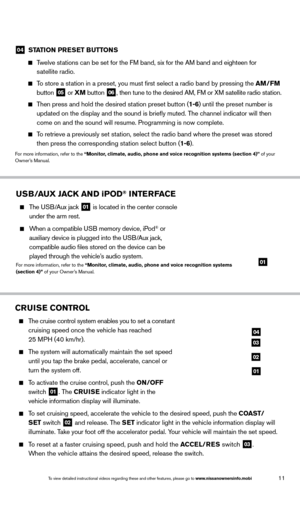
QUICK REFERENCE GUIDE
2014
ARMADA
1590747_14b_Armada_QRG_011614.indd 31/16/14 10:40 AM
Page 2 of 24
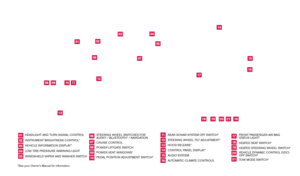
*See your Owner’s Manual for information.HEADLIGHT AND TURN SIGNAL CONTROL
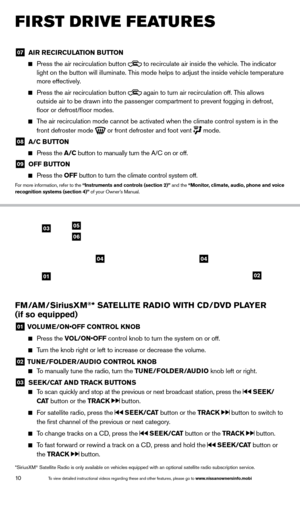
INSTRUMENT BRIGHTNESS CONTROL*
VEHICLE INFORMATION DISPLAY*
LOW TIRE PRESSURE WARNING LIGHT
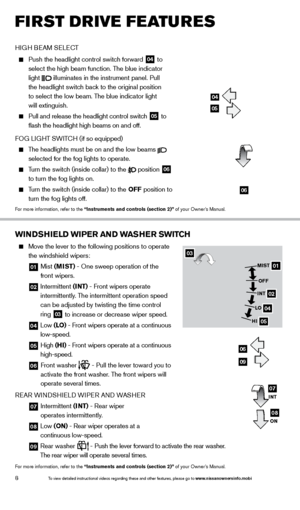
WINDSHIELD WIPER AND WASHER SWITCH
STEERING WHEEL SWITCHES FOR
AUDIO* / BLUETOOTH
® / NAVIGATION
CRUISE CONTROL
POWER LIFTGATE SWITCH
POWER VENT WINDOWS*
PEDAL POSITION ADJUSTMENT SWITCH* REAR SONAR SYSTEM OFF SWITCH*
STEERING WHEEL TILT ADJUSTMENT*
HOOD RELEASE*
CONTROL PANEL DISPLAY*
AU D I O SYSTE M
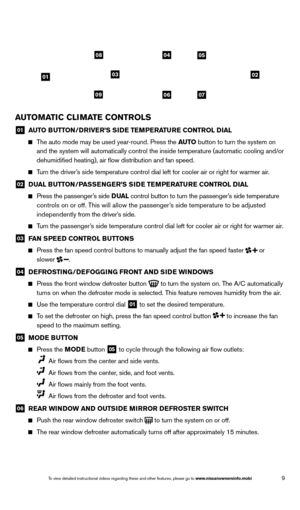
AUTOMATIC CLIMATE CONTROLS FRONT PASSENGER AIR BAG
STATUS LIGHT*
HEATED SEAT SWITCH*
HEATED STEERING WHEEL SWITCH*
VEHICLE DYNAMIC CONTROL (VDC)
OFF SWITCH*
TOW MODE SWITCH*
0102030405
0607080910
11 12131415
17
16
18192021
01
02
04
03
05
08
09
10
11
12
13
14
1516
17
19
21
18
18
20
06
07
Behind
shift lever
Underneath
instrument panel
1590747_14b_Armada_QRG_011614.indd 41/16/14 10:40 AM
Page 3 of 24

Please see your Owner’s Manual for important safety
information and system operation limitations.
•
A cellular telephone should not be used for any purpose while
driving so full attention may be given to vehicle operation.
• Always wear your seat belt.
•
Supplement
al air bags do not replace proper seat belt usage.
•
Children
12 and under should always ride in the rear seat
properly secured in child restraints or seat belts according to
their age and weight.
• Do not drink and drive.
For more information, refer to the “Safety –– Seats, seat belts and
supplemental restraint system (section 1)”, “Monitor, climate, audio,
phone and voice recognition systems (section 4)” and the “Starting
and driving (section 5)” of your Owner’s Manual.
TABLE OF CONTENTS
NEW SYSTEM FEATURES
RearV
iew Monitor (if so equipped)
.................................2
E
SSENTIAL INFORMATION
T
ire Pressure Monitoring System (TPMS)
...........................2
Loose Fuel Cap................................................3
Fuel-filler Door.................................................3
Cloc
k Set/Adjustment
...........................................3
FI
RST DRIVE FEATURES
N
ISSAN Intelligent Key
® System (if so equipped)....................4
P
ower Liftgate Release (if so equipped)
............................4
P
ower Front Seat Adjustments
....................................5
2nd Row Seat Adjustments (if so equipped)
........................
5
3rd Row P
ower Folding Seats (if so equipped) ......................
6
Automatic Drive P
ositioner (if so equipped) .........................
6
Outside Mirror Control Switc
h
....................................7
St
arting/Stopping the Engine
(NISSAN Intelligent Key
® models only - if so equipped)...............7
Headlight Control Switc
h ........................................
7
W
indshield Wiper and Washer Switch .............................
8
Automatic Climate Controls . . . . . . . . . . . . . . . . . . . . . . . . . . . . . . . . . . . .\
. . 9
FM/AM/SiriusXM
® Satellite Radio with CD/DVD Player (if so equipped)...10
U
SB/Aux Jack and iPod® Interface ...............................11
Cruise Control . . . . . . . . . . . . . . . . . . . . . . . . . . . . . . . . . . . .\
. . . . . . . . . . . . 11
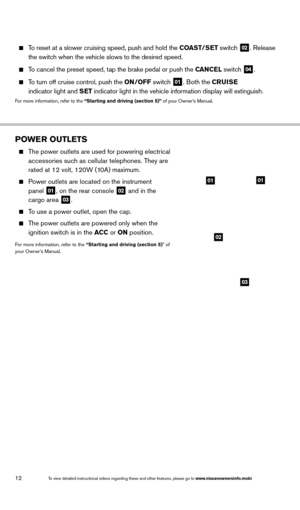
P
ower Outlets
................................................
12
S
YSTEM GUIDE
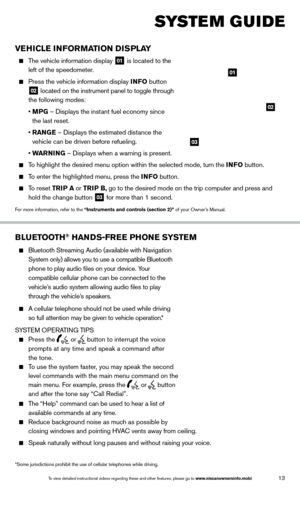
V
ehicle Information Display
......................................13
Bluetooth
® Hands-free Phone System ............................13
System Operating T
ips
.....................................13
Bluetooth
® System without Navigation (if so equipped) ..............14
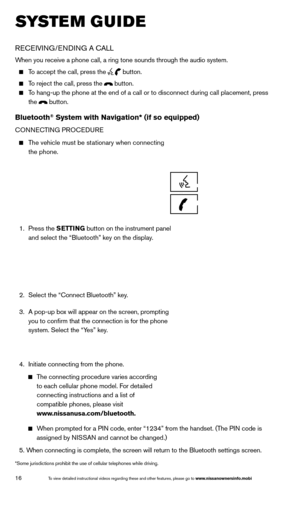
Bluetooth® System with Navigation (if so equipped).................16
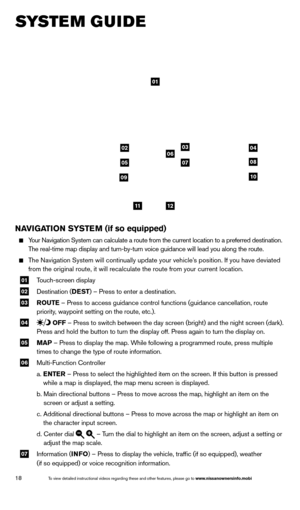
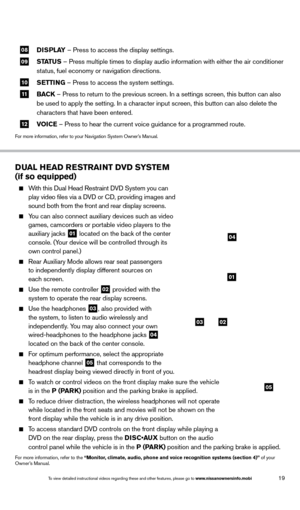
Navigation System (if so equipped)...............................18
Dual Head Restraint D
VD System (if so equipped) . . . . . . . . . . . . . . . . . . 19
HomeLink
® Universal Transceiver (if so equipped)...................20
Additional information about your vehicle is also available in your Owner’s Manual, Navigation System Owner’s Manual and at www.nissanusa.com. To view detailed
instructional videos, go to
www.nissanownersinfo.mobi/ 2014/armada
or snap this barcode with an appropriate barcode reader.
1590747_14b_Armada_QRG_011614.indd 51/16/14 10:40 AM
Page 4 of 24

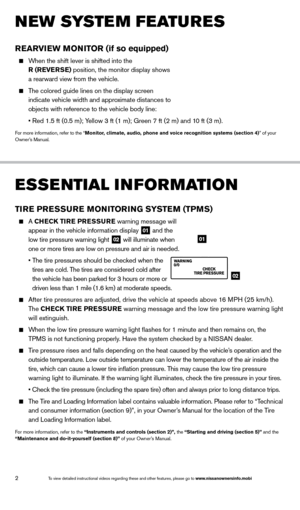
A CHECK TIRE PRESSURE warning message will
appear in the vehicle information display
01 and the
low tire pressure warning light 02 will illuminate")
2
TIRE PRESSURE MONITORING SYSTEM (TPMS)
A CHECK TIRE PRESSURE warning message will
appear in the vehicle information display
01 and the
low tire pressure warning light 02 will illuminate when
one or more tires are low on pressure and air is needed.
•
T
he tire pressures should be checked when the
tires are cold. The tires are considered cold after
the vehicle has been parked for 3 hours or more or
driven less than 1 mile (1.6 km) at moderate speeds.
After tire pressures are adjusted, drive the vehicle at speeds above 1 6 MPH (25 km/h).
The CHECK TIRE PRESSURE warning message and the low tire pressure warning light
will extinguish.
When the low tire pressure warning light flashes for 1 minute and then \
remains on, the TPMS is not functioning properly. Have the system checked by a NISSAN dealer.
Tire pressure rises and falls depending on the heat caused by the vehicle’s operation and the
outside temperature. Low outside temperature can lower the temperature o\
f the air inside the
tire, which can cause a lower tire inflation pressure. This may cause the low tire pressure
warning light to illuminate. If the warning light illuminates, check the tire pressure in your tires.
•
Chec
k the tire pressure (including the spare tire) often and always prior \
to long distance trips.
The Tire and Loading Information label contains valuable information. Please refer to “Technical and consumer information (section 9)”, in your Owner’s Manual for the location of the Tire
and Loading Information label.
For more information, refer to the “Instruments and controls (section 2)”, the “Starting and driving (section 5)” and the
“Maintenance and do-it-yourself (section 8)” of your Owner’s Manual.
ESSE NTIAL I N FOR MATION
02
01
NEW SYSTEM FEATURES
REARVIEW MONITOR (if so equipped)
When the shift lever is shifted into the
R (REVERSE) position, the monitor display shows
a rearward view from the vehicle.
The colored guide lines on the display screen indicate vehicle width and approximate distances to
objects with reference to the vehicle body line:
•
Red 1.5 ft (0.5 m); Y
ellow 3 ft (1 m); Green 7 ft (2 m) and 10 ft (3 m).
For more information, refer to the “Monitor, climate, audio, phone and voice recognition systems (section 4)” of your
Owner’s Manual.
1590747_14b_Armada_QRG_011614.indd 21/16/14 10:40 AM
To view detailed instructional videos regarding these and other features, please go\
to www.nissanownersinfo.mobi
Page 5 of 24

3
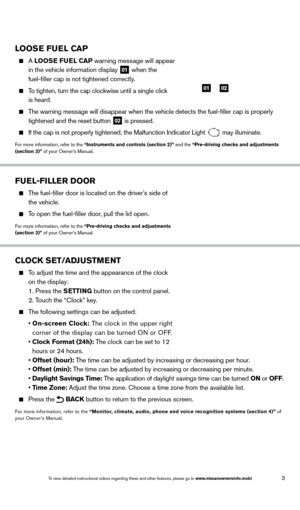
LOOSE FUEL CAP
A LOOSE FUEL CAP warning message will appear
in the vehicle information display
01 when the
fuel-filler cap is not tightened correctly.
To tighten, turn the cap clockwise until a single click
is heard.
The warning message will disappear when the vehicle detects the fuel-filler cap is properly tightened and the reset button
02 is pressed.
If the cap is not properly tightened, the Malfunction Indicator Light
may illuminate.
For more information, refer to the “Instruments and controls (section 2)” and the “Pre-driving checks and adjustments
(section 3)” of your Owner’s Manual.
0102
FUEL-FILLER DOOR
The fuel-filler door is located on the driver’s side of
the vehicle.
To open the fuel-filler door, pull the lid open.
For more information, refer to the “Pre-driving checks and adjustments
(section 3)” of your Owner’s Manual.
CLOCK SET/ADJUSTMENT
To adjust the time and the appearance of the clock on the display:
1. Press the SETTING button on the control panel.
2. Touch the “Clock” key.
The following settings can be adjusted:
•
On-screen Clock: The clock in the upper right
corner of the display can be turned ON or OFF.
•
Clock Format (24h): The clock can be set to 12
hours or 24 hours.
•
Offset (hour): The time can be adjusted by increasing or decreasing per hour.
•
Offset (min): The time can be adjusted by increasing or decreasing per minute.
•
Daylight Savings Time: The application of daylight savings time can be turned ON or OFF.
•
Time Zone: Adjust the time zone. Choose a time zone from the available list.
Press the BACK button to return to the previous screen.
For more information, refer to the “Monitor, climate, audio, phone and voice recognition systems (section 4)” of
your Owner’s Manual.
1590747_14b_Armada_QRG_011614.indd 31/16/14 10:40 AM
To view detailed instructional videos regarding these and other features, please go\
to www.nissanownersinfo.mobi
Page 6 of 24

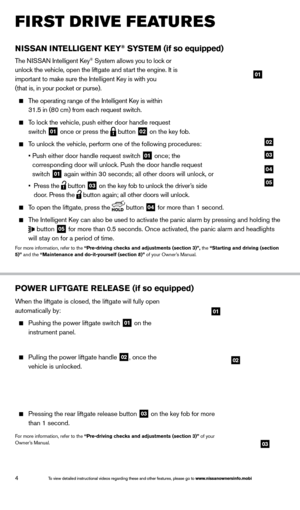
The NISSAN Intelligent Key® System allows you to lock or
unlock the vehicle, open the liftgate and start the engine. It is")
4
01
FIRST DRIVE FEATURES
NISSAN INTELLIGENT KEY® SYSTEM (if so equipped)
The NISSAN Intelligent Key® System allows you to lock or
unlock the vehicle, open the liftgate and start the engine. It is
important to make sure the Intelligent Key is with you
(that is, in your pocket or purse).
The operating range of the Intelligent Key is within
31.5 in (80 cm) from each request switch.
To lock the vehicle, push either door handle request
switch
01 once or press the
button
02 on the key fob.
To unlock the vehicle, perform one of the following procedures:
•
Push either door handle request switc
h
01 once; the
corresponding door will unlock. Push the door handle request
switch
01 again within 30 seconds; all other doors will unlock, or
•
Press the button
03 on the key fob to unlock the driver’s side
door. Press the button again; all other doors will unlock.
To open the liftgate, press the
button
04 for more than 1 second.
The Intelligent Key can also be used to activate the panic alarm by pressing and holding \
the
button
05 for more than 0.5 seconds. Once activated, the panic alarm and headlight\
s
will stay on for a period of time.
For more information, refer to the “Pre-driving checks and adjustments (section 3)”, the “Starting and driving (section
5)” and the “Maintenance and do-it-yourself (section 8)” of your Owner’s Manual.
POWE R LI FTGATE R E LEAS E (if so equipped)
When the liftgate is closed, the liftgate will fully open
automatically by:
Pushing the power liftgate switc h
01 on the
instrument panel.
Pulling the power liftgate handle 02, once the
vehicle is unlocked.
Pressing the rear liftgate release button 03 on the key fob for more
than 1 second.
For more information, refer to the “Pre-driving checks and adjustments (section 3)” of your
Owner’s Manual.
02
01
03
02
03
04
05
To view detailed instructional videos regarding these and other features, please go\
to www.nissanownersinfo.mobi
1590747_14b_Armada_QRG_011614.indd 41/16/14 10:41 AM
To view detailed instructional videos regarding these and other features, please go\
to www.nissanownersinfo.mobi
Page 7 of 24

5
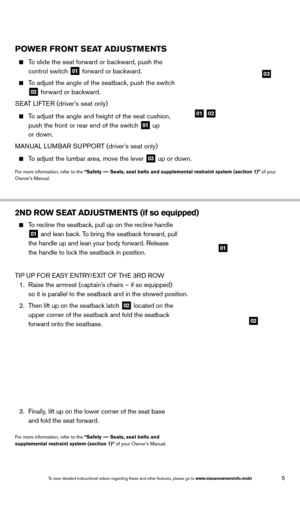
POWER FRONT SEAT ADJUSTMENTS
To slide the seat forward or bac kward, push the
control switch
01 forward or backward.
To adjust
the angle of the seatbac k, push the switch
02 forward or backward.
SEAT LIFTER (driver’s seat only)
To adjust the angle and height of the seat cushion,
push the front or rear end of the switch
01 up
or down.
MANUAL LUMBAR SUPPORT (driver’s seat only)
To adjust the lumbar area, move the lever 03 up or down.
For more information, refer to the “Safety –– Seats, seat belts and supplemental restraint system (section 1)”\
of your
Owner’s Manual.
0102
03
2ND ROW SEAT ADJUSTMENTS (if so equipped)
To recline the seatback, pull up on the recline handle
01 and lean back. To bring the seatback forward, pull
the handle up and lean your body forward. Release
the handle to lock the seatback in position.
TIP UP FOR EASY ENTRY/EXIT OF THE 3RD ROW
1.
Raise the armrest (capt
ain’s chairs – if so equipped)
so it is parallel to the seatback and in the stowed position.
2.
T
hen lift up on the seatback latch
02 located on the
upper corner of the seatback and fold the seatback
forward onto the seatbase.
3.
Finally
, lift up on the lower corner of the seat base
and fold the seat forward.
For more information, refer to the “Safety –– Seats, seat belts and
supplemental restraint system (section 1)” of your Owner’s Manual.
01
02
1590747_14b_Armada_QRG_011614.indd 51/16/14 10:41 AM
To view detailed instructional videos regarding these and other features, please go\
to www.nissanownersinfo.mobi
Page 8 of 24

Before operating the 3rd row seats:
•
Make sure the 2nd row seatbac
k is not reclined.
•
Lower the 3rd row")
6
FIRST DRIVE FEATURES
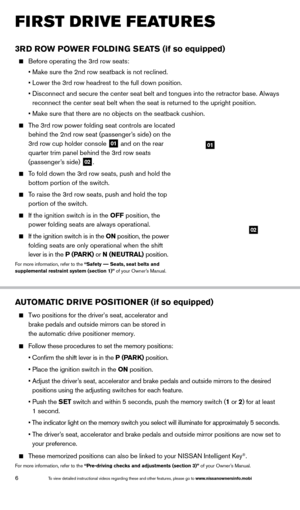
3RD ROW POWER FOLDING SEATS (if so equipped)
Before operating the 3rd row seats:
•
Make sure the 2nd row seatbac
k is not reclined.
•
Lower the 3rd row headrest to the full down position.
•
Disconnect and secure the center seat belt and tongues into the retracto\
r base. Always
reconnect the center seat belt when the seat is returned to the upright \
position.
•
Make sure that there are no objects on the seatbac
k cushion.
The 3rd row power folding seat controls are located behind the 2nd row seat (passenger’s side) on the
3rd row cup holder console
01 and on the rear
quarter trim panel behind the 3rd row seats
(passenger’s side)
02.
To fold down the 3rd row seats, push and hold the
bottom portion of the switch.
To raise the 3rd row seats, push and hold the top portion of the switch.
If the ignition switc h is in the OFF position, the
power folding seats are always operational.
If the ignition switc h is in the ON position, the power
folding seats are only operational when the shift
lever is in the P (PARK) or N (NEUTRAL) position.
For more information, refer to the “Safety –– Seats, seat belts and
supplemental restraint system (section 1)” of your Owner’s Manual.
AUTOMATIC DRIVE POSITIONER (if so equipped)
Two positions for the driver’s seat, accelerator and
brake pedals and outside mirrors can be stored in
the automatic drive positioner memory.
Follow these procedures to set the memory positions:
•
Confirm the shift lever is in the
P (PARK) position.
•
Place the ignition switc
h in the ON position.
•
Adjust the driver
’s seat, accelerator and brake pedals and outside mirrors to the desired
positions using the adjusting switches for each feature.
•
Push the
SET switch and within 5 seconds, push the memory switch (1 or 2) for at least
1 second.
•
T
he indicator light on the memory switch you select will illuminate for approximately 5 seconds.
•
T
he driver’s seat, accelerator and brake pedals and outside mirror positions are no\
w set to
your preference.
These memorized positions can also be linked to your NISSAN Intelligent Key®.
For more information, refer to the “Pre-driving checks and adjustments (section 3)” of your Owner’s Manual.
01
02
1590747_14b_Armada_QRG_011614.indd 61/16/14 10:41 AM
To view detailed instructional videos regarding these and other features, please go\
to www.nissanownersinfo.mobi