Page 14 of 357

Tank content/reserve fuel .............3
43
Fuel filler flap
Opening ......................................... 160
Fuel filter (white display message) .. 237
Fuel level
Calling up the range (on-board
computer) ...................................... 204
Gauge .............................................. 30
Fuel reserve
see Fuel
Fuel tank
Capacity ........................................ 343
Problem (malfunction) ................... 161
Fuse allocation chart (vehicle tool
kit) ...................................................... 295
Fuses
Allocation chart ............................ .310
Before changing ............................ .310
Fuse box in the boot ..................... .310
Fuse box in the engine compart-
ment .............................................. 310
Important safety notes .................. 309 G
Garage door opener Clearing the memory ..................... 273
Frequencies ................................... 273
General notes ................................ 271
Important safety notes .................. 271
Opening/closing the garage door .. 273
Programming (button in the rear-
view mirror) ................................... 271
Gear indicator (on-board com-
puter) ................................................. .219
Gearshift program
SETUP (on-board computer) .......... 219
Genuine Mercedes-Benz parts ........... 21
Glove compartment .......................... 264H
Handbrake see Parking brake
Hazard warning lamps ......................113
Display message ............................ 249
Head level heating (AIRSCARF) ........100 Head restraints
Adjusting ......................................... 98
see NECK-PRO head restraints
Headbag
Display message ............................ 231
Operation ......................................... 47
Headlamp
Cleaning system (function) ............ 113
Cleaning system (notes) ................ 349
Headlamps
Misting up ...................................... 116
Topping up the cleaning system .... 284
see Automatic headlamp mode
Heating
see Climate control
High-pressure cleaners .................... 287
Hill start assist .................................. 145
HOLD function
Activating ....................................... 184
Deactivating ................................... 184
Display message ............................ 238
Function/notes ............................ .183
Horn ...................................................... 28 I
Ignition lock see Key positions
Immobiliser .......................................... 68
Indicator and warning lamp
Restraint system ............................ 257
Indicator and warning lamps
Coolant .......................................... 258
DISTRONIC PLUS ........................... 260
Engine diagnostics ......................... 257
SPORT handling mode ................... 255
Indicator lamps
Display message ............................ 232
see Warning and indicator lamps
Indicators
see Turn signals
Insect protection on the radiator .... 281
Instrument cluster
Overview .......................................... 30
Warning and indicator lamps ........... 32
Instrument cluster lighting .............. 200
Intelligent Light System
Activating/deactivating ................. 214 Index
11
Page 298 of 357

Fire extinguisher
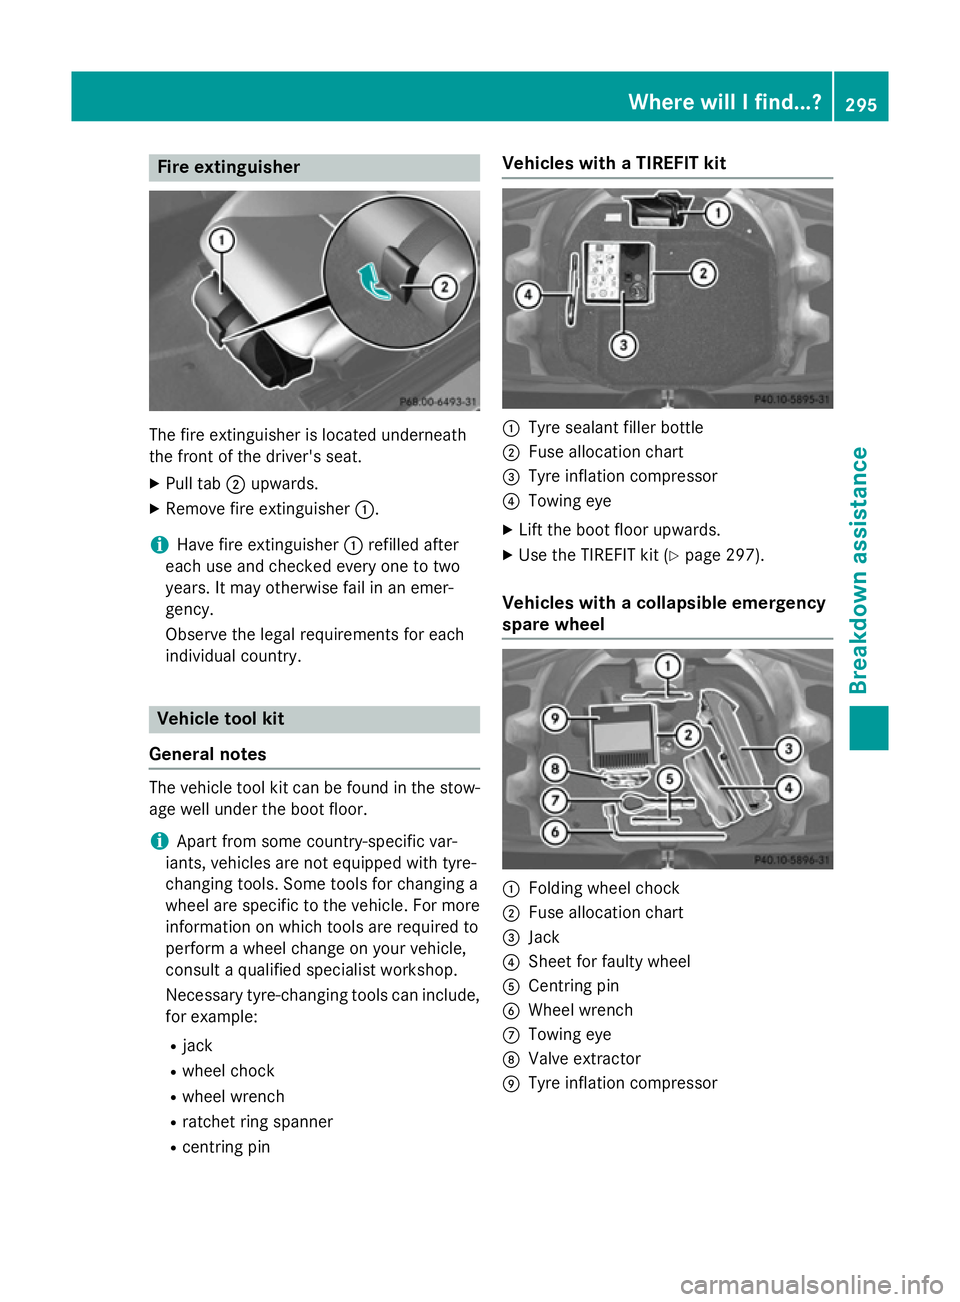
The fire extinguisher is located underneath
the front of the driver's seat.
X Pull tab ;upwards.
X Remove fire extinguisher :.
i Have fire extinguisher
:refilled after
each use and checked every one to two
years. It may otherwise fail in an emer-
gency.
Observe the legal requirements for each
individual country. Vehicle tool kit
General notes The vehicle tool kit can be found in the stow-
age well under the boot floor.
i Apart from some country-specific var-
iants, vehicles are not equipped with tyre-
changing tools. Some tools for changing a
wheel are specific to the vehicle. For more information on which tools are required to
perform a wheel change on your vehicle,
consult a qualified specialist workshop.
Necessary tyre-changing tools can include,
for example:
R jack
R wheel chock
R wheel wrench
R ratchet ring spanner
R centring pin Vehicles with a TIREFIT kit
:
Tyre sealant filler bottle
; Fuse allocation chart
= Tyre inflation compressor
? Towing eye
X Lift the boot floor upwards.
X Use the TIREFIT kit (Y page 297).
Vehicles with a collapsible emergency
spare wheel :
Folding wheel chock
; Fuse allocation chart
= Jack
? Sheet for faulty wheel
A Centring pin
B Wheel wrench
C Towing eye
D Valve extractor
E Tyre inflation compressor Where will I find...?
295Breakdown assistance
Page 313 of 357

Blown fuses must be replaced with fuses of
the same rating, which you can recognise by
the colour and fuse rating. The fuse ratings
are listed in the fuse allocation chart.
If the newly inserted fuse also blows, have the
cause traced and rectified at a qualified spe-
cialist workshop, e.g. a Mercedes-Benz Ser-
vice Centre. Before replacing a fuse
X Secure the vehicle against rolling away
(Y page 162).
X Switch off all electrical consumers.
X Turn the key to position 0in the ignition
lock and remove it (Y page 141).
or X On vehicles with KEYLESS-GO, make sure
the ignition is switched off (Y page 141).
All indicator lamps in the instrument cluster
must be off.
The fuses are located in various fuse boxes:
R fuse box in the engine compartment on the
left-hand side of the vehicle, when viewed
in the direction of travel
R fuse box in the boot
The fuse allocation chart is located in the
vehicle tool kit in the stowage compartment
under the boot floor (Y page 295).Fuse box in the engine compartment
i Observe the "Important safety notes" sec-
tion (Y page 309). G
WARNING
When the bonnet is open, and the windscreen wipers are set in motion, you can be injured by
the wiper linkage. There is a risk of injury.
Always switch off the windscreen wipers and
the ignition before opening the bonnet.
! Make sure that no moisture can enter the
fuse box when the cover is open. !
When closing the cover, make sure that it
is lying correctly on the fuse box. Moisture
seeping in or dirt could otherwise impair
the operation of the fuses. X
Make sure that the windscreen wipers are
switched off.
X Open the bonnet.
X Remove any existing moisture from the
fuse box using a dry cloth.
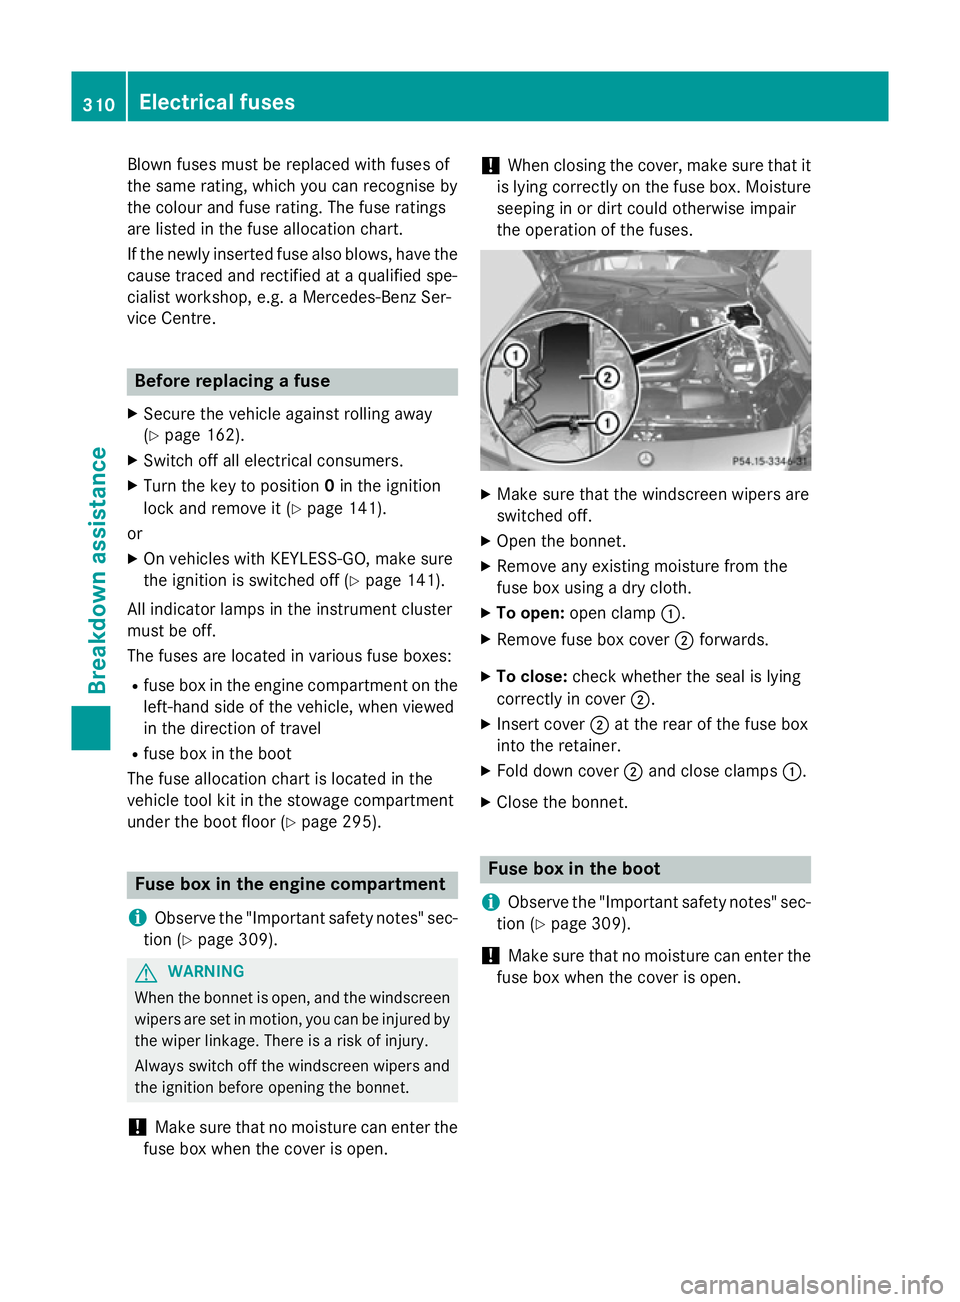
X To open: open clamp :.
X Remove fuse box cover ;forwards.
X To close: check whether the seal is lying
correctly in cover ;.
X Insert cover ;at the rear of the fuse box
into the retainer.
X Fold down cover ;and close clamps :.
X Close the bonnet. Fuse box in the boot
i Observe the "Important safety notes" sec-
tion (Y page 309).
! Make sure that no moisture can enter the
fuse box when the cover is open. 310
Electrical fusesBreakdown assistance