2014 MERCEDES-BENZ SLK ROADSTER fuel cap
[x] Cancel search: fuel capPage 13 of 357
Problem (fault) ...............................1
50
Engine oil
Additives ........................................ 347
Checking the oil level ..................... 282
Checking the oil level using the
dipstick .......................................... 282
Display message ............................ 236
Filling capacity ............................... 347
Notes about oil grades ................... 346
Notes on oil level/consumption .... 282
Temperature (on-board com-
puter) ............................................. 219
Topping up ..................................... 282
Viscosity ........................................ 347
Environmental protection
Returning an end-of-life vehicle ....... 21
ESP® (Electronic Stability Pro-
gram)
AMG menu (on-board computer) ... 219
Characteristics ................................. 63
Deactivating/activating (AMG
vehicles) .......................................... 64
Deactivating/activating (notes;
except AMG vehicles) ..................... .64
Display message ............................ 223
ETS .................................................. 63
Function/note s................................ 62
General notes .................................. 62
Important safety guidelines ............. 63
Warning lamp ................................. 254
ETS (Electronic Traction System) ....... 63
Exhaust pipe (cleaning instruc-
tions) .................................................. 290
Exterior lighting
Settings options ............................. 110
see Lights
Exterior mirrors
Adjusting ....................................... 103
Anti-dazzle mode (automatic) ........ 104
Folding in when locking (on-board computer) ...................................... 218
Folding in/out (automatically )....... 104
Folding in/out (electrically) ........... 104
Out of position (troubleshooting) ... 104
Parking position ............................. 105
Resetting ....................................... 104
Storing settings (memory func-
tion) ............................................... 106 F
Fault message see Display messages
Filler cap
see Fuel filler flap
Fire extinguisher ............................... 295
First-aid kit ......................................... 294
Fitting a wheel
Fitting a wheel ............................... 327
Lowering the vehicle ...................... 328
Preparing the vehicle ..................... 324
Raising the vehicl e......................... 325
Removing a whee l.......................... 327
Securing the vehicle against roll-
ing away ........................................ 325
Flat tyre
MOExtended tyre s......................... 296
Preparing the vehicle ..................... 296
TIREFIT kit ...................................... 297
see Emergency spare wheel
Floormat ............................................. 276
Foglamps
Extended rang e.............................. 115
Switching on/of f........................... 111
Frequencies
Garage door opener ....................... 273
Mobile phone ................................. 340
Two-way radio ................................ 340
Front foglamps
Display message ............................ 233
Fuel
Additives ........................................ 345
Consumption information .............. 346
Consumption statistics .................. 204
Displaying the current consump-
tion ................................................ 204
Displaying the range ...................... 204
Driving tips .................................... 165
E10 ................................................ 344
Fuel gaug e....................................... 30
Grade (petrol) ................................ 344
Important safety notes .................. 343
Low outside temperature s............. 346
Notes for AMG vehicles ................. 344
Problem (malfunction) ................... 161
Quality (diesel )............................... 345
Refuelling ....................................... 158 10
Index
Page 14 of 357
Tank content/reserve fuel .............3
43
Fuel filler flap
Opening ......................................... 160
Fuel filter (white display message) .. 237
Fuel level
Calling up the range (on-board
computer) ...................................... 204
Gauge .............................................. 30
Fuel reserve
see Fuel
Fuel tank
Capacity ........................................ 343
Problem (malfunction) ................... 161
Fuse allocation chart (vehicle tool
kit) ...................................................... 295
Fuses
Allocation chart ............................ .310
Before changing ............................ .310
Fuse box in the boot ..................... .310
Fuse box in the engine compart-
ment .............................................. 310
Important safety notes .................. 309 G
Garage door opener Clearing the memory ..................... 273
Frequencies ................................... 273
General notes ................................ 271
Important safety notes .................. 271
Opening/closing the garage door .. 273
Programming (button in the rear-
view mirror) ................................... 271
Gear indicator (on-board com-
puter) ................................................. .219
Gearshift program
SETUP (on-board computer) .......... 219
Genuine Mercedes-Benz parts ........... 21
Glove compartment .......................... 264H
Handbrake see Parking brake
Hazard warning lamps ......................113
Display message ............................ 249
Head level heating (AIRSCARF) ........100 Head restraints
Adjusting ......................................... 98
see NECK-PRO head restraints
Headbag
Display message ............................ 231
Operation ......................................... 47
Headlamp
Cleaning system (function) ............ 113
Cleaning system (notes) ................ 349
Headlamps
Misting up ...................................... 116
Topping up the cleaning system .... 284
see Automatic headlamp mode
Heating
see Climate control
High-pressure cleaners .................... 287
Hill start assist .................................. 145
HOLD function
Activating ....................................... 184
Deactivating ................................... 184
Display message ............................ 238
Function/notes ............................ .183
Horn ...................................................... 28 I
Ignition lock see Key positions
Immobiliser .......................................... 68
Indicator and warning lamp
Restraint system ............................ 257
Indicator and warning lamps
Coolant .......................................... 258
DISTRONIC PLUS ........................... 260
Engine diagnostics ......................... 257
SPORT handling mode ................... 255
Indicator lamps
Display message ............................ 232
see Warning and indicator lamps
Indicators
see Turn signals
Insect protection on the radiator .... 281
Instrument cluster
Overview .......................................... 30
Warning and indicator lamps ........... 32
Instrument cluster lighting .............. 200
Intelligent Light System
Activating/deactivating ................. 214 Index
11
Page 162 of 357
G
WARNING
Fuels are poisonous and hazardous to health. There is a danger of injury.
Do not swallow fuel or let it come into contact
with skin, eyes or clothing. Do not inhale fuel
vapours. Keep fuels out of the reach of chil-
dren.
If you or others come into contact with fuel,
observe the following:
R Wash the fuel off any affected areas of skin
with water and soap immediately.
R If you get fuel in your eyes, rinse them thor-
oughly with clean water immediately. Seek immediate medical attention.
R If fuel is swallowed, seek immediate medi-
cal attention. Do not induce vomiting.
R Change any clothing that has come into
contact with fuel immediately. G
WARNING
Electrostatic charge can cause sparks and
thereby ignite fuel vapours. There is a risk of
fire and explosion.
Always touch the vehicle body before opening the fuel filler flap or touching the fuel pump
nozzle. This discharges any electrostatic
charge that may have built up. G
WARNING
Vehicles with a diesel engine:
If you mix diesel fuel with petrol, the flash
point of this fuel mixture is lower than that of pure diesel fuel. When the engine is running,
components in the exhaust system may over-
heat unnoticed. There is a risk of fire.
Never refuel with petrol. Never add petrol to
diesel fuel.
! Do not use petrol to refuel vehicles with a
diesel engine. Do not use diesel to refuel
vehicles with a petrol engine. Do not switch on the ignition if you accidentally refuel
with the wrong fuel. Otherwise, the fuel will enter the fuel system. Even small amounts
of the wrong fuel could result in damage to the fuel system and the engine. The repair
costs are high. Notify a qualified specialist
workshop and have the fuel tank and fuel
lines drained completely.
! Do not use diesel to refuel vehicles with a
petrol engine. Do not switch on the ignition if you accidentally refuel with the wrong
fuel. Otherwise, fuel can enter the fuel sys-tem. Even small amounts of the wrong fuel
could result in damage to the fuel system
and the engine. Notify a qualified specialist
workshop and have the fuel tank and fuel
lines drained completely.
! Overfilling the fuel tank could damage the
fuel system.
! Take care not to spill any fuel on painted
surfaces. You could otherwise damage the
paintwork.
! Use a filter when adding fuel from a fuel
can. The fuel lines and/or the diesel injec-
tion system could otherwise be blocked by
particles from the fuel can.
Do not get into the vehicle again during the
refuelling process. Otherwise, electrostatic
charge could build up again.
If you overfill the fuel tank, some fuel may
spray out when you remove the fuel pump
nozzle.
Further information on fuel and fuel quality
(Y page 343). Refuelling
General notes The fuel filler flap is unlocked or locked auto-
matically when you open or close the vehicle
with the key or using KEYLESS-GO.
The position of the 8fuel filler cap is dis-
played in the instrument cluster. The arrow
next to the filling pump indicates the side of
the vehicle. Refuelling
159Driving and parking Z
Page 163 of 357
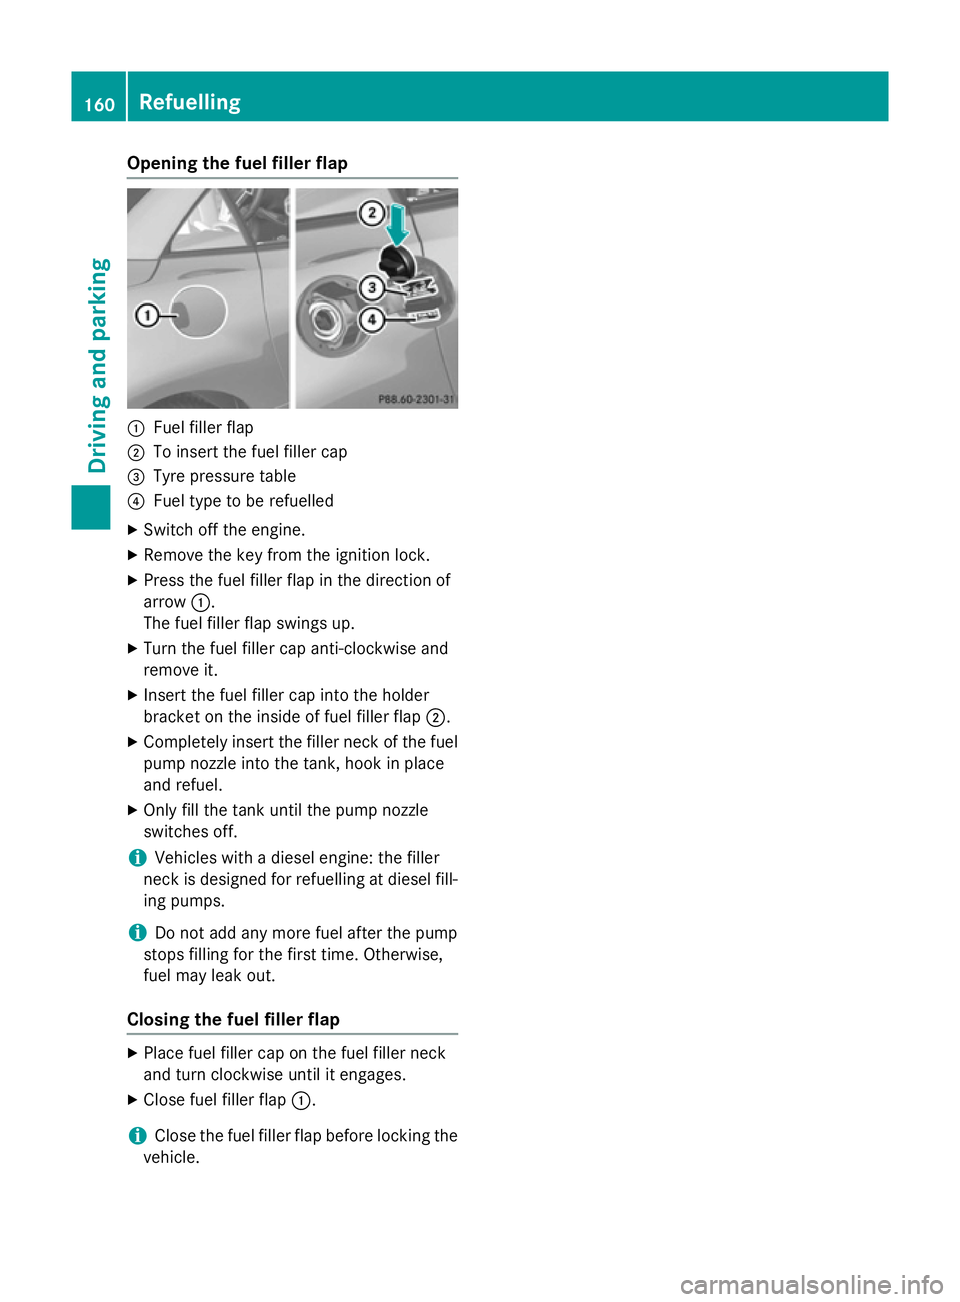
Opening the fuel filler flap
:
Fuel filler flap
; To insert the fuel filler cap
= Tyre pressure table
? Fuel type to be refuelled
X Switch off the engine.
X Remove the key from the ignition lock.
X Press the fuel filler flap in the direction of
arrow :.
The fuel filler flap swings up.
X Turn the fuel filler cap anti-clockwise and
remove it.
X Insert the fuel filler cap into the holder
bracket on the inside of fuel filler flap ;.
X Completely insert the filler neck of the fuel
pump nozzle into the tank, hook in place
and refuel.
X Only fill the tank until the pump nozzle
switches off.
i Vehicles with a diesel engine: the filler
neck is designed for refuelling at diesel fill-
ing pumps.
i Do not add any more fuel after the pump
stops filling for the first time. Otherwise,
fuel may leak out.
Closing the fuel filler flap X
Place fuel filler cap on the fuel filler neck
and turn clockwise until it engages.
X Close fuel filler flap :.
i Close the fuel filler flap before locking the
vehicle. 160
RefuellingDriving and parking
Page 303 of 357
instrument cluster where it will be easily
seen by the driver.
X Stop after driving for approximately ten
minutes and check the tyre pressure with
the tyre inflation compressor.
The tyre pressure must now be at least
130 kPa (1.3 bar/19 psi). G
WARNING
If the required tyre pressure is not reached
after driving for a short period, the tyre is too badly damaged. The tyre sealant cannot
repair the tyre in this instance. Damaged tyres and a tyre pressure that is too low can signif-
icantly impair the vehicle's braking and driv-
ing characteristics. There is a risk of accident.
Do not continue driving. Contact a qualified
specialist workshop.
i In your vehicle, you will find a sticker with
the Mercedes-Benz Service24h telephone
number, e.g. on the B-pillar on the driver's
side.
X Correct the tyre pressure if it is still at least
130 kPa (1.3 bar/19 psi) (see the fuel filler
flap for values).
X To increase the tyre pressure: switch on
the tyre inflation compressor. X
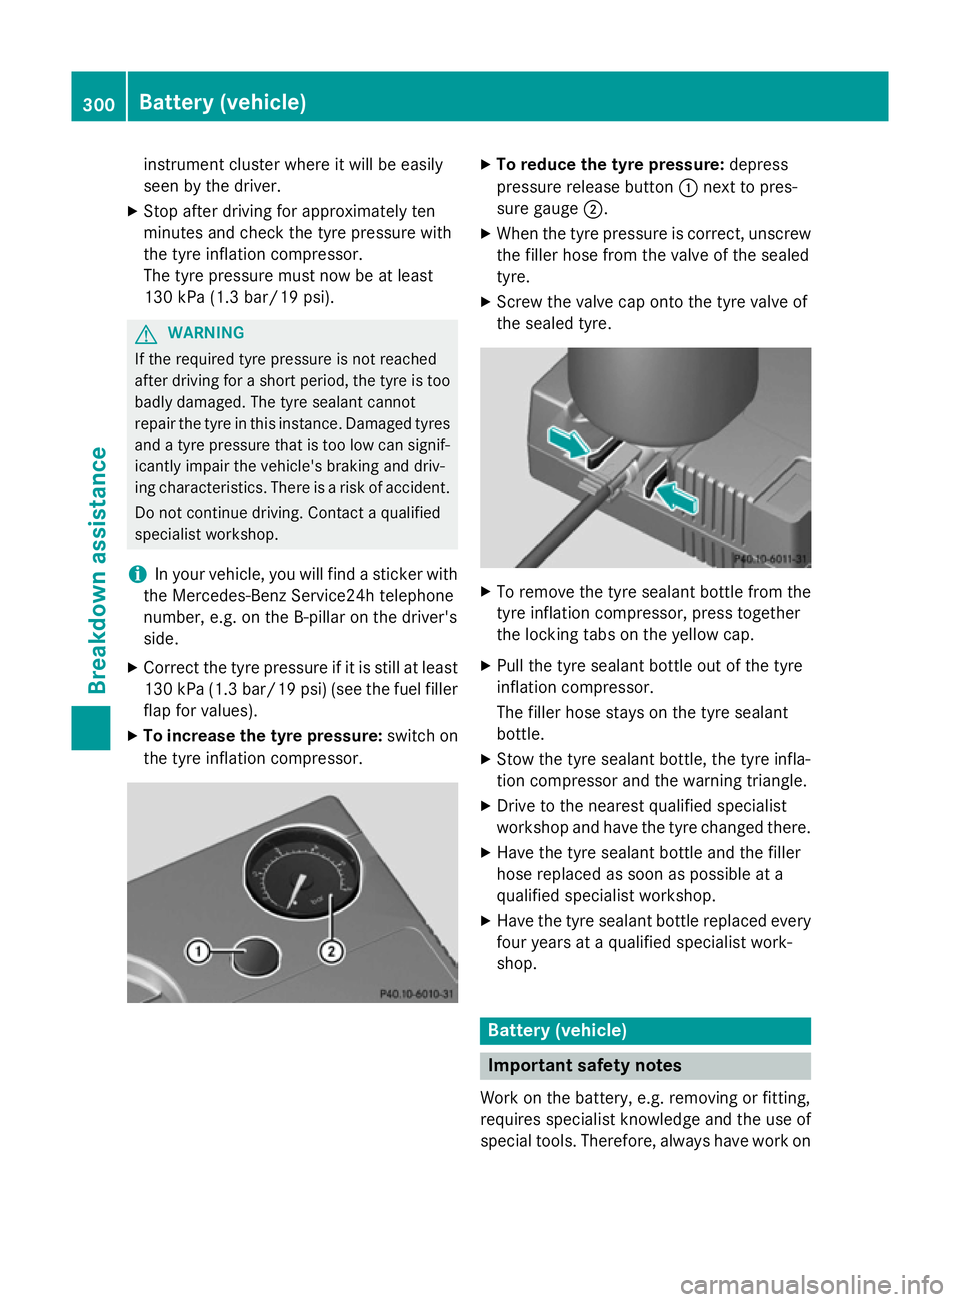
To reduce the tyre pressure: depress
pressure release button :next to pres-
sure gauge ;.
X When the tyre pressure is correct, unscrew
the filler hose from the valve of the sealed
tyre.
X Screw the valve cap onto the tyre valve of
the sealed tyre. X
To remove the tyre sealant bottle from the
tyre inflation compressor, press together
the locking tabs on the yellow cap.
X Pull the tyre sealant bottle out of the tyre
inflation compressor.
The filler hose stays on the tyre sealant
bottle.
X Stow the tyre sealant bottle, the tyre infla-
tion compressor and the warning triangle.
X Drive to the nearest qualified specialist
workshop and have the tyre changed there.
X Have the tyre sealant bottle and the filler
hose replaced as soon as possible at a
qualified specialist workshop.
X Have the tyre sealant bottle replaced every
four years at a qualified specialist work-
shop. Battery (vehicle)
Important safety notes
Work on the battery, e.g. removing or fitting,
requires specialist knowledge and the use of
special tools. Therefore, always have work on 300
Battery (vehicle)Breakdown assistance
Page 307 of 357
Jump-starting
For the jump-starting procedure, use only the jump-starting connection point, consisting of a positive terminal and an earth point, in the engine compartment. G
WARNING
Battery acid is caustic. There is a risk of injury.
Avoid contact with the skin, eyes or clothing. Do not inhale any battery gases. Do not lean over the battery. Keep children away from batteries. Wash battery acid immediately with water and seek
medical attention. G
WARNING
During charging and jump-starting, explosive gases can escape from the battery. There is a risk of an explosion.
Particularly avoid fire, naked flames, creating sparks and smoking. Ensure there is sufficient
ventilation while charging and jump-starting. Do not lean over a battery. G
WARNING
During the charging process, a battery produces hydrogen gas. If a short circuit occurs or sparks
are created, the hydrogen gas can ignite. There is a risk of an explosion.
R Make sure that the positive terminal of a connected battery does not come into contact with
vehicle parts.
R Never place metal objects or tools on a battery.
R It is important that you observe the described order of the battery terminals when connecting
and disconnecting a battery.
R When jump-starting, make sure that the battery poles with identical polarity are connected.
R It is particularly important to observe the described order when connecting and disconnecting
the jump leads.
R Never connect or disconnect the battery terminals while the engine is running. G
WARNING
A discharged battery can freeze at temperatures below freezing point. When jump-starting the
vehicle or charging the battery, gases can escape from the battery. There is a risk of an explosion.
Allow the frozen battery to thaw out before charging it or jump-starting.
! Vehicles with a petrol engine:
avoid repeated and lengthy starting attempts. Otherwise,
the non-combusted fuel may damage the catalytic converter.
If the indicator/warning lamps do not light up at low temperatures, it is very likely that the
discharged battery has frozen. In this case you may neither jump-start the vehicle nor charge
the battery. The service life of a battery that has been thawed may be reduced. The starting
characteristics may be impaired, especially at low temperatures. Have the thawed battery
checked at a qualified specialist workshop. 304
Jump-startingBreakdown assistance
Page 321 of 357
Tyre pressure
Tyre pressure specifications
G
WARNING
Underinflated or overinflated tyres pose the
following risks:
R the tyres may burst, especially as the load
and vehicle speed increase.
R the tyres may wear excessively and/or
unevenly, which may greatly impair tyre
traction.
R the driving characteristics, as well as steer-
ing and braking, may be greatly impaired.
There is a risk of an accident.
Observe the recommended tyre pressure and check the tyre pressure of all the tyres includ-
ing the spare wheel:
R at least every two weeks
R when the load changes
R before embarking on a longer journey
R for changed operating conditions, e.g. off-
road driving
If necessary, correct the tyre pressure. G
WARNING
If you fit unsuitable accessories onto tyre
valves, the tyre valves may be overloaded and malfunction, which can cause tyre pressure
loss. Due to their design, retrofitted tyre pres-
sure monitors keep the tyre valve open. This
can also result in tyre pressure loss. There is a risk of accident.
Only screw standard valve caps or valve caps
specifically provided by Mercedes-Benz for
your vehicle onto the tyre valve. G
WARNING
If the tyre pressure drops repeatedly, the
wheel, valve or tyre may be damaged. Tyre
pressure that is too low may result in a tyre
blow-out. There is a risk of accident.
R Check the tyre for foreign objects.
R Check whether the wheel is losing air or the
valve is leaking. If you are unable to rectify the damage, con-
tact a qualified specialist workshop.
H
Environmental note
Check the tyre pressure regularly, at least
every 14 days.
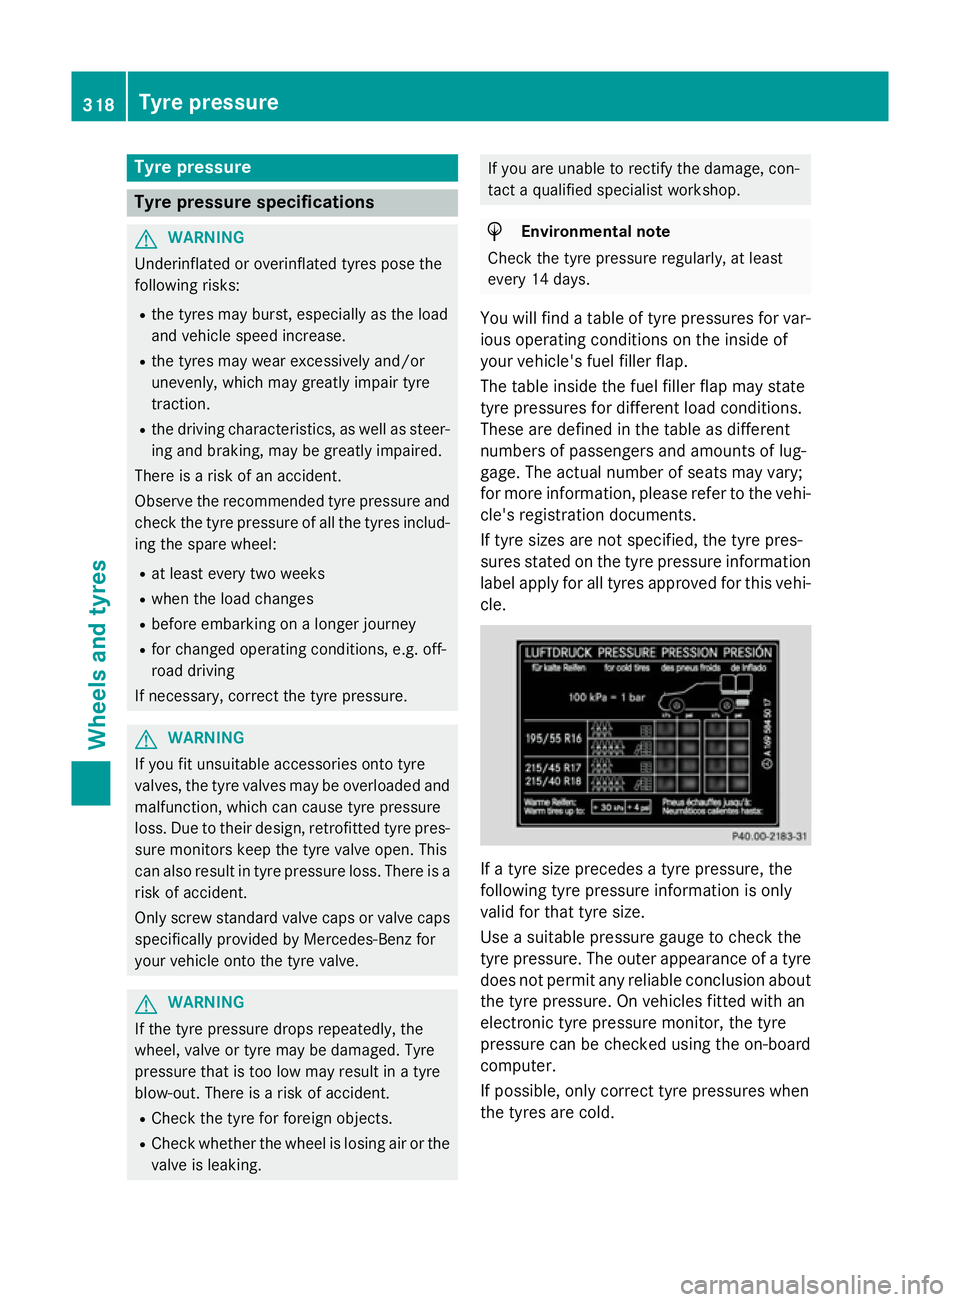
You will find a table of tyre pressures for var- ious operating conditions on the inside of
your vehicle's fuel filler flap.
The table inside the fuel filler flap may state
tyre pressures for different load conditions.
These are defined in the table as different
numbers of passengers and amounts of lug-
gage. The actual number of seats may vary;
for more information, please refer to the vehi-
cle's registration documents.
If tyre sizes are not specified, the tyre pres-
sures stated on the tyre pressure information
label apply for all tyres approved for this vehi- cle. If a tyre size precedes a tyre pressure, the
following tyre pressure information is only
valid for that tyre size.
Use a suitable pressure gauge to check the
tyre pressure. The outer appearance of a tyre
does not permit any reliable conclusion aboutthe tyre pressure. On vehicles fitted with an
electronic tyre pressure monitor, the tyre
pressure can be checked using the on-board
computer.
If possible, only correct tyre pressures when
the tyres are cold. 318
Tyre pressureWheels and tyres
Page 346 of 357
Service products include the following:
R fuels
R lubricants (e.g. engine oil, transmission oil)
R coolant
R brake fluid
R windscreen washer fluid
R climate control system refrigerant
When handling, storing and disposing of any
service products, please observe the relevant regulations.
Components and service products must be
matched. Mercedes-Benz recommends that
you use products tested and approved by
Mercedes-Benz. They are listed in this
Mercedes-Benz Owner's Manual in the appro-
priate section.
You can identify service products approved
by Mercedes-Benz by the following inscrip-
tions on the container:
R MB-Freigabe (e.g. MB-Freigabe 229.51)
R MB Approval (e.g. MB Approval 229.51)
Other designations or recommendations indi- cate a level of quality or a specification in
accordance with an MB Sheet Number (e.g.
MB 229.51). They have not necessarily been
approved by Mercedes-Benz.
Further information can be obtained from any
Mercedes-Benz Service Centre or on the
Internet at http://bevo.mercedes-benz.com. Fuel
Important safety notes G
WARNING
Fuel is highly flammable. If you handle fuel
incorrectly, there is a risk of fire and explo-
sion.
You must avoid fire, naked flames, creating
sparks and smoking. Switch off the engine
and, if applicable, the auxiliary heating before refuelling. G
WARNING
Fuels are poisonous and hazardous to health. There is a danger of injury.
Do not swallow fuel or let it come into contact
with skin, eyes or clothing. Do not inhale fuel
vapours. Keep fuels out of the reach of chil-
dren.
If you or others come into contact with fuel,
observe the following:
R Wash the fuel off any affected areas of skin
with water and soap immediately.
R If you get fuel in your eyes, rinse them thor-
oughly with clean water immediately. Seek immediate medical attention.
R If fuel is swallowed, seek immediate medi-
cal attention. Do not induce vomiting.
R Change any clothing that has come into
contact with fuel immediately.
Tank capacity The total capacity of the fuel tank may vary,
depending on the vehicle equipment.
Model Total capa-
city SLK 250 CDI
60.0 l
AMG vehicles
70.0 l
All other models
60 l
or
70.0 l Model Of which
reserve fuel Models with 60.0 l total
capacity
Approx.
8.0 l Models with 70.0 l total
capacity
Approx.
9.0 l Service products and capacities
343Technical data Z