2014 MERCEDES-BENZ SLK ROADSTER display
[x] Cancel search: displayPage 180 of 357
Make sure that you maintain a sufficient and
safe distance from the vehicle in front. Adjust
the distance to the vehicle in front if neces-
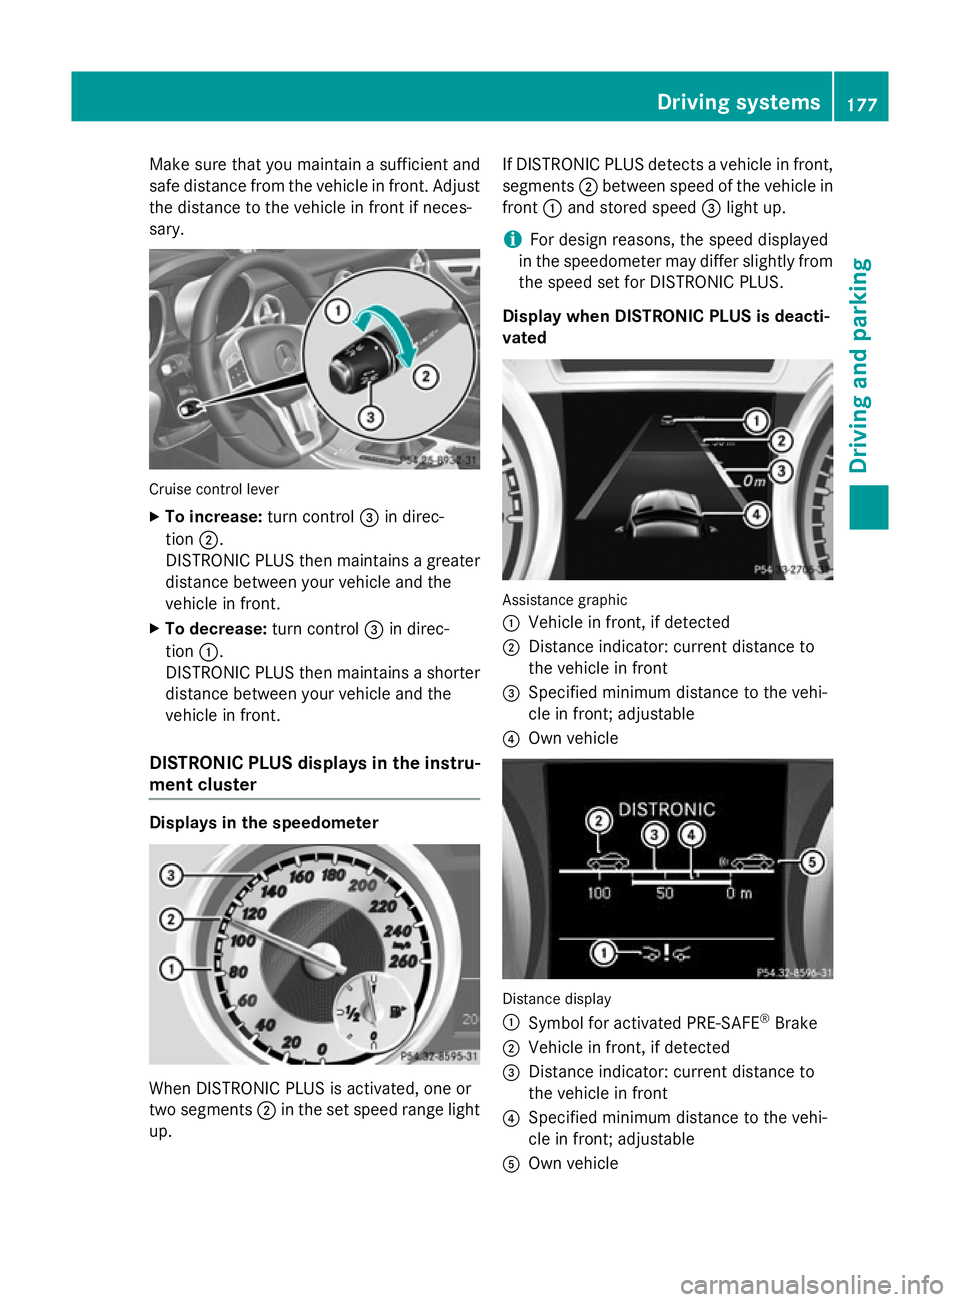
sary. Cruise control lever
X To increase: turn control=in direc-
tion ;.
DISTRONIC PLUS then maintains a greater distance between your vehicle and the
vehicle in front.
X To decrease: turn control=in direc-
tion :.
DISTRONIC PLUS then maintains a shorter distance between your vehicle and the
vehicle in front.
DISTRONIC PLUS displays in the instru-
ment cluster Displays in the speedometer
When DISTRONIC PLUS is activated, one or
two segments ;in the set speed range light
up. If DISTRONIC PLUS detects a vehicle in front,
segments ;between speed of the vehicle in
front :and stored speed =light up.
i For design reasons, the speed displayed
in the speedometer may differ slightly from the speed set for DISTRONIC PLUS.
Display when DISTRONIC PLUS is deacti-
vated Assistance graphic
:
Vehicle in front, if detected
; Distance indicator: current distance to
the vehicle in front
= Specified minimum distance to the vehi-
cle in front; adjustable
? Own vehicle Distance display
:
Symbol for activated PRE-SAFE ®
Brake
; Vehicle in front, if detected
= Distance indicator: current distance to
the vehicle in front
? Specified minimum distance to the vehi-
cle in front; adjustable
A Own vehicle Driving systems
177Driving and parking Z
Page 181 of 357
X
Vehicles with black and white multi-
function display: select theDistance Distance
display
display function using the on-board com-
puter (Y page 210).
X Vehicles with colour multifunction dis-
play: select the Assistance graphic
Assistance graphic
function using the on-board computer
(Y page 210).
In the Assistance menu of the on-board com-
puter, you can also activate or deactivate
PRE-SAFE ®
Brake (Y page 211).
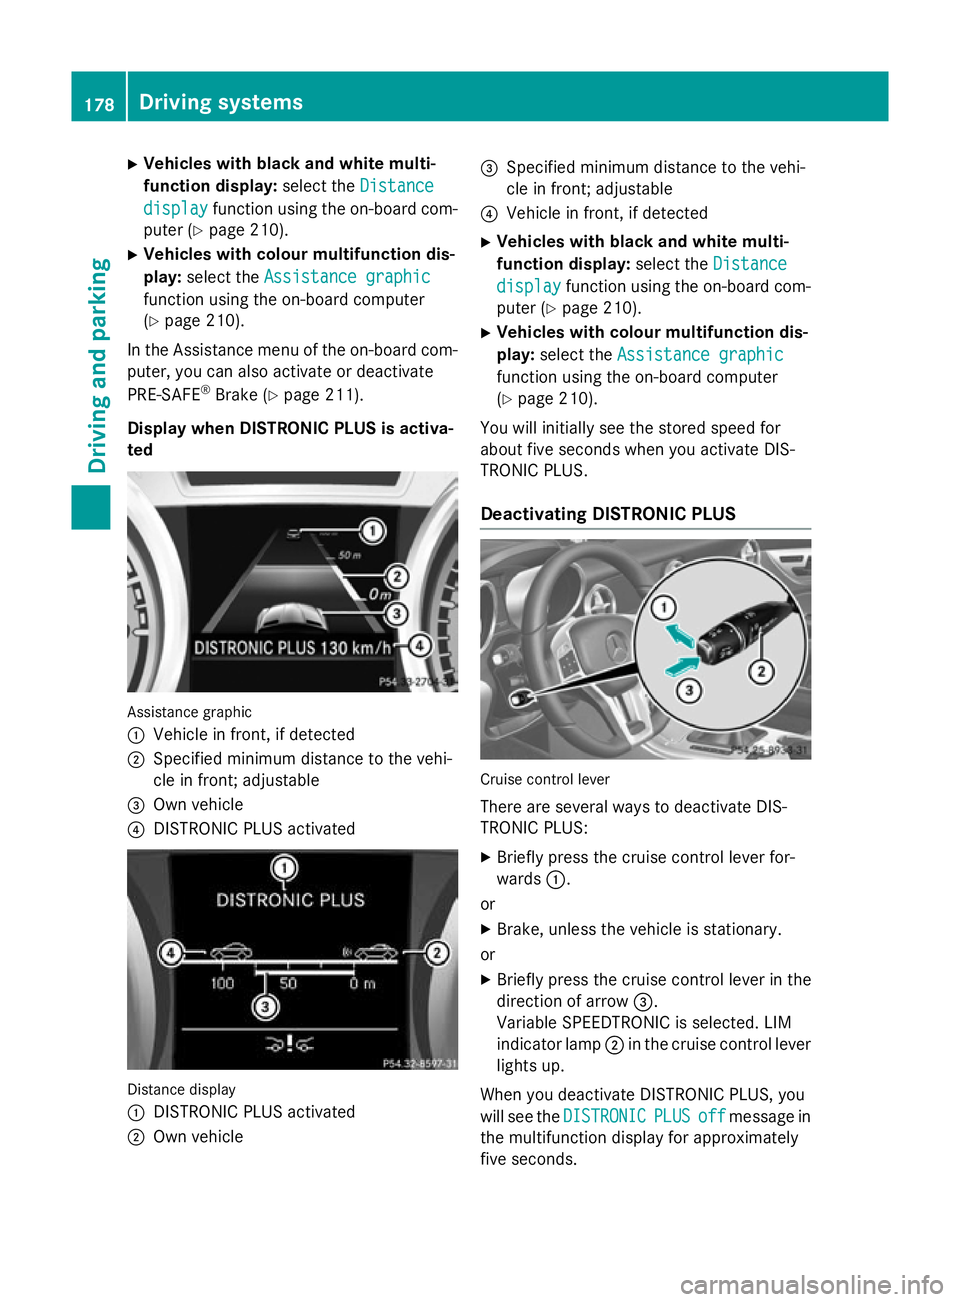
Display when DISTRONIC PLUS is activa-
ted Assistance graphic
:
Vehicle in front, if detected
; Specified minimum distance to the vehi-
cle in front; adjustable
= Own vehicle
? DISTRONIC PLUS activated Distance display
:
DISTRONIC PLUS activated
; Own vehicle =
Specified minimum distance to the vehi-
cle in front; adjustable
? Vehicle in front, if detected
X Vehicles with black and white multi-
function display: select theDistance Distance
display display function using the on-board com-
puter (Y page 210).
X Vehicles with colour multifunction dis-
play: select the Assistance graphic Assistance graphic
function using the on-board computer
(Y page 210).
You will initially see the stored speed for
about five seconds when you activate DIS-
TRONIC PLUS.
Deactivating DISTRONIC PLUS Cruise control lever
There are several ways to deactivate DIS-
TRONIC PLUS:
X Briefly press the cruise control lever for-
wards :.
or X Brake, unless the vehicle is stationary.
or
X Briefly press the cruise control lever in the
direction of arrow =.
Variable SPEEDTRONIC is selected. LIM
indicator lamp ;in the cruise control lever
lights up.
When you deactivate DISTRONIC PLUS, you
will see the DISTRONIC
DISTRONIC PLUS PLUSoff
offmessage in
the multifunction display for approximately
five seconds. 178
Driving systemsDriving and parking
Page 182 of 357
i
The last speed stored remains stored until
you switch off the engine.
i DISTRONIC PLUS is not deactivated if you
depress the accelerator pedal. If you accel-
erate to overtake, DISTRONIC PLUS
adjusts the vehicle's speed to the last
speed stored after you have finished over-
taking.
DISTRONIC PLUS is automatically deactiva-
ted if:
R you apply the electric parking brake or if the
vehicle is automatically secured with the
electric parking brake
R you are driving slower than 25 km/h and
there is no vehicle in front, or if the vehicle in front is no longer detected
R ESP ®
intervenes or you deactivate ESP ®
R the transmission is in the P,Ror Nposition
R you pull the cruise control lever towards
you in order to pull away and the front-
passenger door is open
R the vehicle has skidded
If DISTRONIC PLUS is deactivated, you will
hear a warning tone. You will see the DIS‐
DIS‐
TRONIC TRONIC PLUS
PLUSoff
offmessage in the multifunc-
tion display for approximately five seconds.
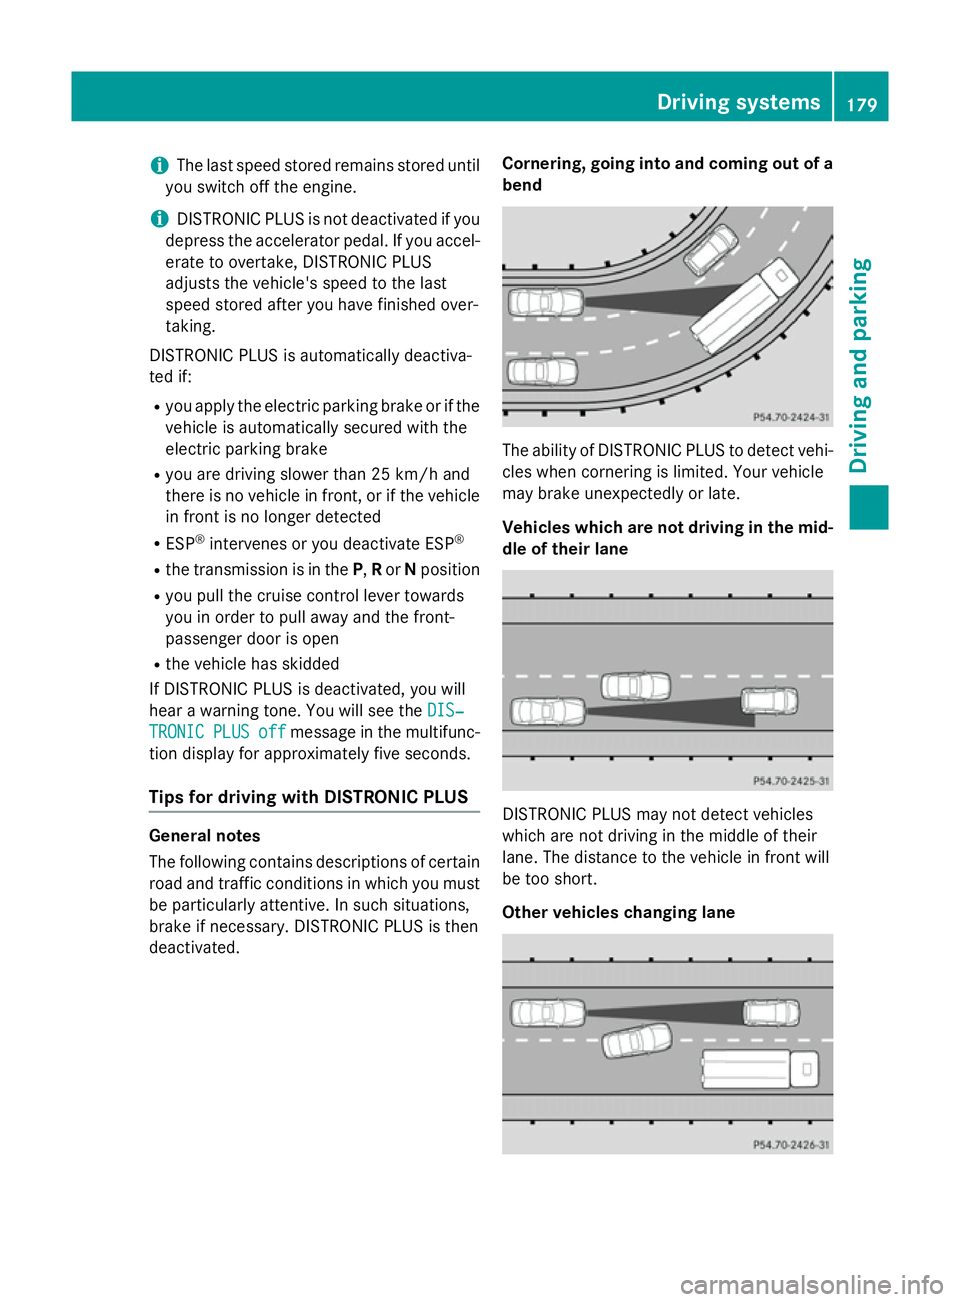
Tips for driving with DISTRONIC PLUS General notes
The following contains descriptions of certain
road and traffic conditions in which you must
be particularly attentive. In such situations,
brake if necessary. DISTRONIC PLUS is then
deactivated. Cornering, going into and coming out of a
bend The ability of DISTRONIC PLUS to detect vehi-
cles when cornering is limited. Your vehicle
may brake unexpectedly or late.
Vehicles which are not driving in the mid- dle of their lane DISTRONIC PLUS may not detect vehicles
which are not driving in the middle of their
lane. The distance to the vehicle in front will
be too short.
Other vehicles changing lane Driving systems
179Driving and parking Z
Page 184 of 357
dent nor override the laws of physics. SPEED-
TRONIC cannot take into account road,
weather or traffic conditions. SPEEDTRONIC
is only an aid. You are responsible for the dis-
tance to the vehicle in front, for vehicle speed,
for braking in good time, and for staying cor-
rectly in lane.
If there is a change of drivers, advise the new driver of the speed stored.
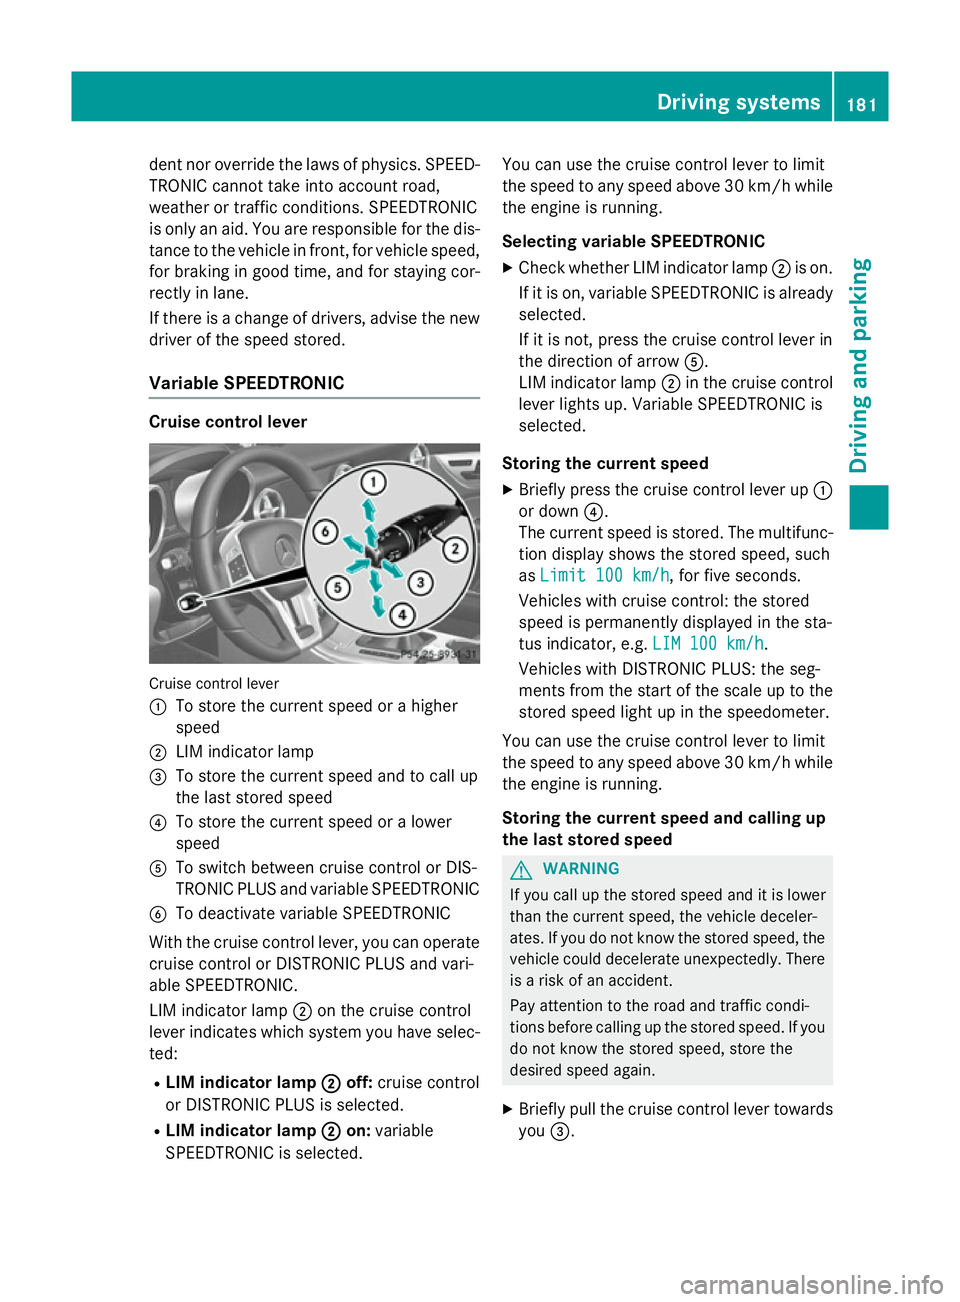
Variable SPEEDTRONIC Cruise control lever
Cruise control lever
:
To store the current speed or a higher
speed
; LIM indicator lamp
= To store the current speed and to call up
the last stored speed
? To store the current speed or a lower
speed
A To switch between cruise control or DIS-
TRONIC PLUS and variable SPEEDTRONIC
B To deactivate variable SPEEDTRONIC
With the cruise control lever, you can operate
cruise control or DISTRONIC PLUS and vari-
able SPEEDTRONIC.
LIM indicator lamp ;on the cruise control
lever indicates which system you have selec-
ted:
R LIM indicator lamp ; ;off: cruise control
or DISTRONIC PLUS is selected.
R LIM indicator lamp ;
;on: variable
SPEEDTRONIC is selected. You can use the cruise control lever to limit
the speed to any speed above 30 km/
hwhile
the engine is running.
Selecting variable SPEEDTRONIC
X Check whether LIM indicator lamp ;is on.
If it is on, variable SPEEDTRONIC is already
selected.
If it is not, press the cruise control lever in
the direction of arrow A.
LIM indicator lamp ;in the cruise control
lever lights up. Variable SPEEDTRONIC is
selected.
Storing the current speed X Briefly press the cruise control lever up :
or down ?.
The current speed is stored. The multifunc-
tion display shows the stored speed, such
as Limit 100 km/h
Limit 100 km/h, for five seconds.
Vehicles with cruise control: the stored
speed is permanently displayed in the sta-
tus indicator, e.g. LIM 100 km/h LIM 100 km/h.
Vehicles with DISTRONIC PLUS: the seg-
ments from the start of the scale up to the
stored speed light up in the speedometer.
You can use the cruise control lever to limit
the speed to any speed above 30 km/h while
the engine is running.
Storing the current speed and calling up
the last stored speed G
WARNING
If you call up the stored speed and it is lower
than the current speed, the vehicle deceler-
ates. If you do not know the stored speed, the vehicle could decelerate unexpectedly. There
is a risk of an accident.
Pay attention to the road and traffic condi-
tions before calling up the stored speed. If you do not know the stored speed, store the
desired speed again.
X Briefly pull the cruise control lever towards
you =. Driving systems
181Driving and parking Z
Page 185 of 357
Setting a speed
X To adjust the set speed in 10 km/h
increments: briefly press the cruise con-
trol lever up :past the pressure point for
a higher speed, or down ?for a lower
speed.
or
X Keep the cruise control lever pressed
beyond the pressure point until the desired
speed is set. Press the cruise control lever
up : for a higher speed or down ?for a
lower speed.
X To adjust the set speed in 1 km/h incre-
ments: briefly press the cruise control
lever up :to the pressure point for a
higher speed, or down ?for a lower speed.
or
X Keep the cruise control lever pressed to the
pressure point until the desired speed is
set. Press the cruise control lever up :for
a higher speed or down ?for a lower
speed.
Deactivating variable SPEEDTRONIC
There are several ways to deactivate variable SPEEDTRONIC:
X Briefly press the cruise control lever for-
wards B.
or
X Briefly move the cruise control lever in the
direction of arrow A.
LIM indicator lamp ;in the cruise control
lever goes out. Variable SPEEDTRONIC is
deactivated.
Cruise control or DISTRONIC PLUS is selec-
ted.
Variable SPEEDTRONIC is automatically
deactivated if:
R you depress the accelerator pedal beyond
the pressure point (kickdown) but only if
your current speed does not differ by more than 20 km/h from the stored speed. You
will hear a warning tone if this is the case.
R on vehicles with manual transmission, if
you shift to a higher gear and as a result, the
engine speed is too low.
It is not possible to deactivate variable
SPEEDTRONIC by braking.
i The last speed stored is cleared when you
switch off the engine.
Permanent SPEEDTRONIC
You can use the on-board computer to limit
the speed permanently to a value between
160 km/h(e.g. for driving on winter tyres) and the maximum speed (Y page 216).
Shortly before the stored speed is reached, it appears in the multifunction display.
Permanent SPEEDTRONIC remains active,
even if variable SPEEDTRONIC is deactivated.
You cannot exceed the stored limit speed,
even if you depress the accelerator pedal
beyond the pressure point (kickdown). Dynamic handling package
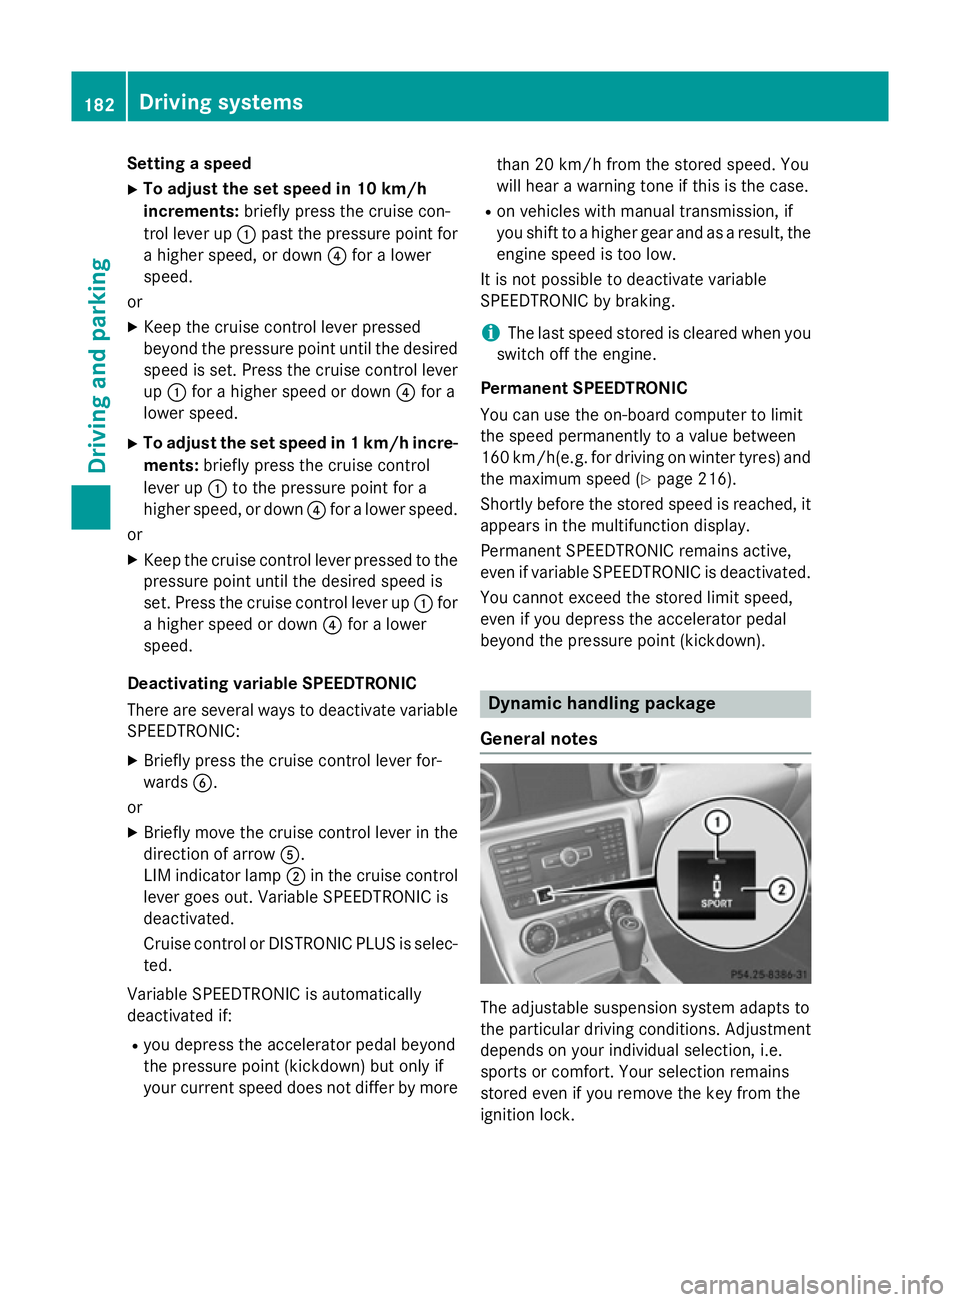
General notes The adjustable suspension system adapts to
the particular driving conditions. Adjustment
depends on your individual selection, i.e.
sports or comfort. Your selection remains
stored even if you remove the key from the
ignition lock. 182
Driving systemsDriving and parking
Page 187 of 357
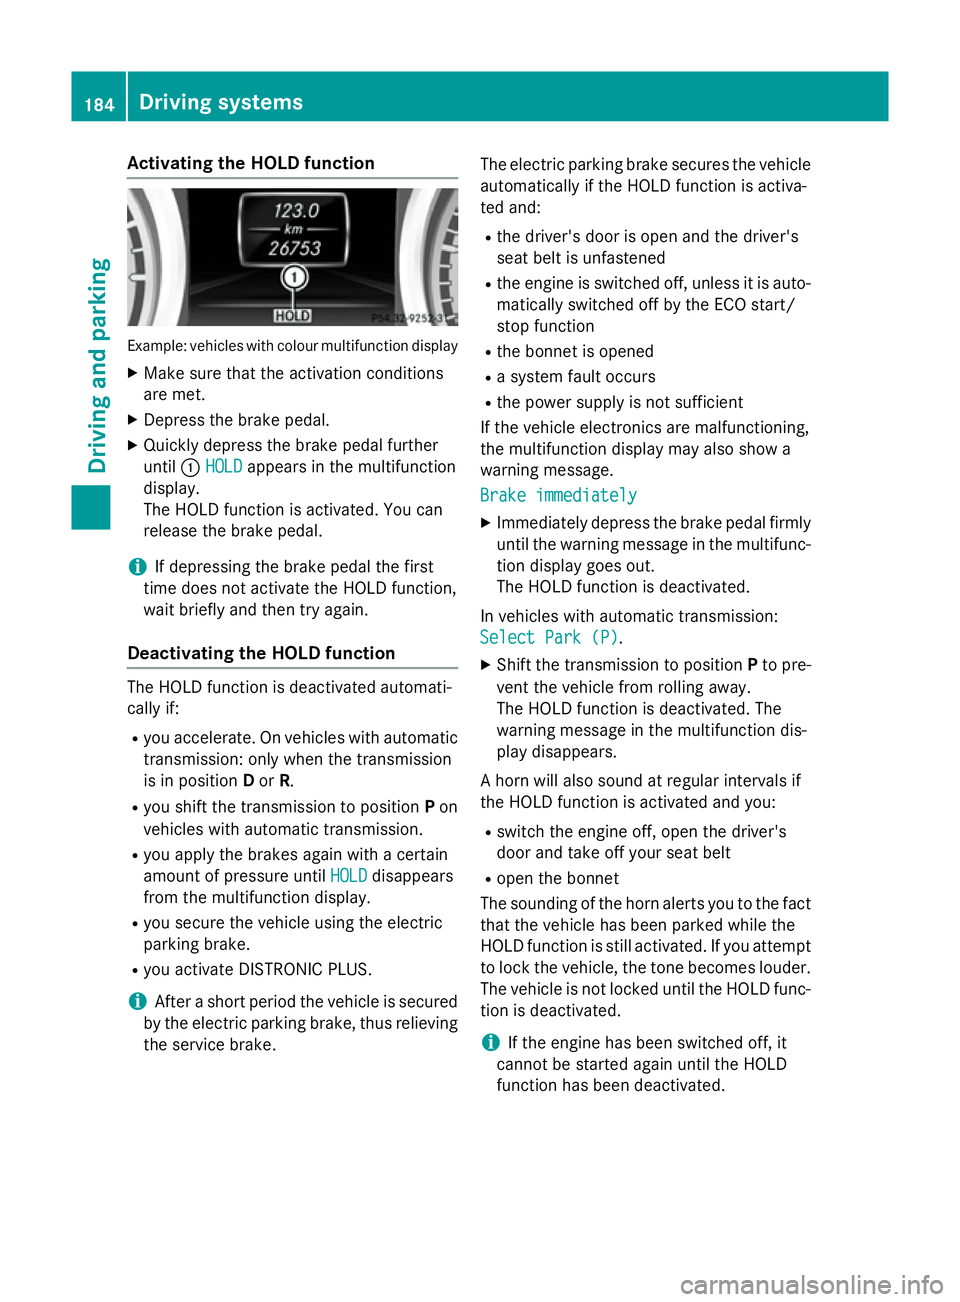
Activating the HOLD function
Example: vehicles with colour multifunction display
X Make sure that the activation conditions
are met.
X Depress the brake pedal.
X Quickly depress the brake pedal further
until :HOLD
HOLD appears in the multifunction
display.
The HOLD function is activated. You can
release the brake pedal.
i If depressing the brake pedal the first
time does not activate the HOLD function,
wait briefly and then try again.
Deactivating the HOLD function The HOLD function is deactivated automati-
cally if:
R you accelerate. On vehicles with automatic
transmission: only when the transmission
is in position Dor R.
R you shift the transmission to position Pon
vehicles with automatic transmission.
R you apply the brakes again with a certain
amount of pressure until HOLD HOLDdisappears
from the multifunction display.
R you secure the vehicle using the electric
parking brake.
R you activate DISTRONIC PLUS.
i After a short period the vehicle is secured
by the electric parking brake, thus relieving
the service brake. The electric parking brake secures the vehicle
automatically if the HOLD function is activa-
ted and:
R the driver's door is open and the driver's
seat belt is unfastened
R the engine is switched off, unless it is auto-
matically switched off by the ECO start/
stop function
R the bonnet is opened
R a system fault occurs
R the power supply is not sufficient
If the vehicle electronics are malfunctioning,
the multifunction display may also show a
warning message.
Brake immediately
Brake immediately
X Immediately depress the brake pedal firmly
until the warning message in the multifunc-
tion display goes out.
The HOLD function is deactivated.
In vehicles with automatic transmission: Select Park (P) Select Park (P) .
X Shift the transmission to position Pto pre-
vent the vehicle from rolling away.
The HOLD function is deactivated. The
warning message in the multifunction dis-
play disappears.
A horn will also sound at regular intervals if
the HOLD function is activated and you: R switch the engine off, open the driver's
door and take off your seat belt
R open the bonnet
The sounding of the horn alerts you to the fact
that the vehicle has been parked while the
HOLD function is still activated. If you attempt to lock the vehicle, the tone becomes louder.
The vehicle is not locked until the HOLD func- tion is deactivated.
i If the engine has been switched off, it
cannot be started again until the HOLD
function has been deactivated. 184
Driving systemsDriving and pa
rking
Page 189 of 357
The sensors must be free of dirt, ice and
slush. Otherwise, they may not function cor-
rectly. Clean the sensors regularly, taking
care not to scratch or damage them
(Y page 290).
Front sensors Centre Approx. 100 cm
Corners Approx. 60 cm
Rear sensors
Centre Approx. 120 cm
Corners Approx. 80 cm
Minimum distance
Centre Approx. 20 cm
Corners Approx. 15 cm
If there is an obstacle within this range, the
relevant warning displays light up and a warn- ing tone sounds. If the distance falls below
the minimum, the distance may no longer be
shown.
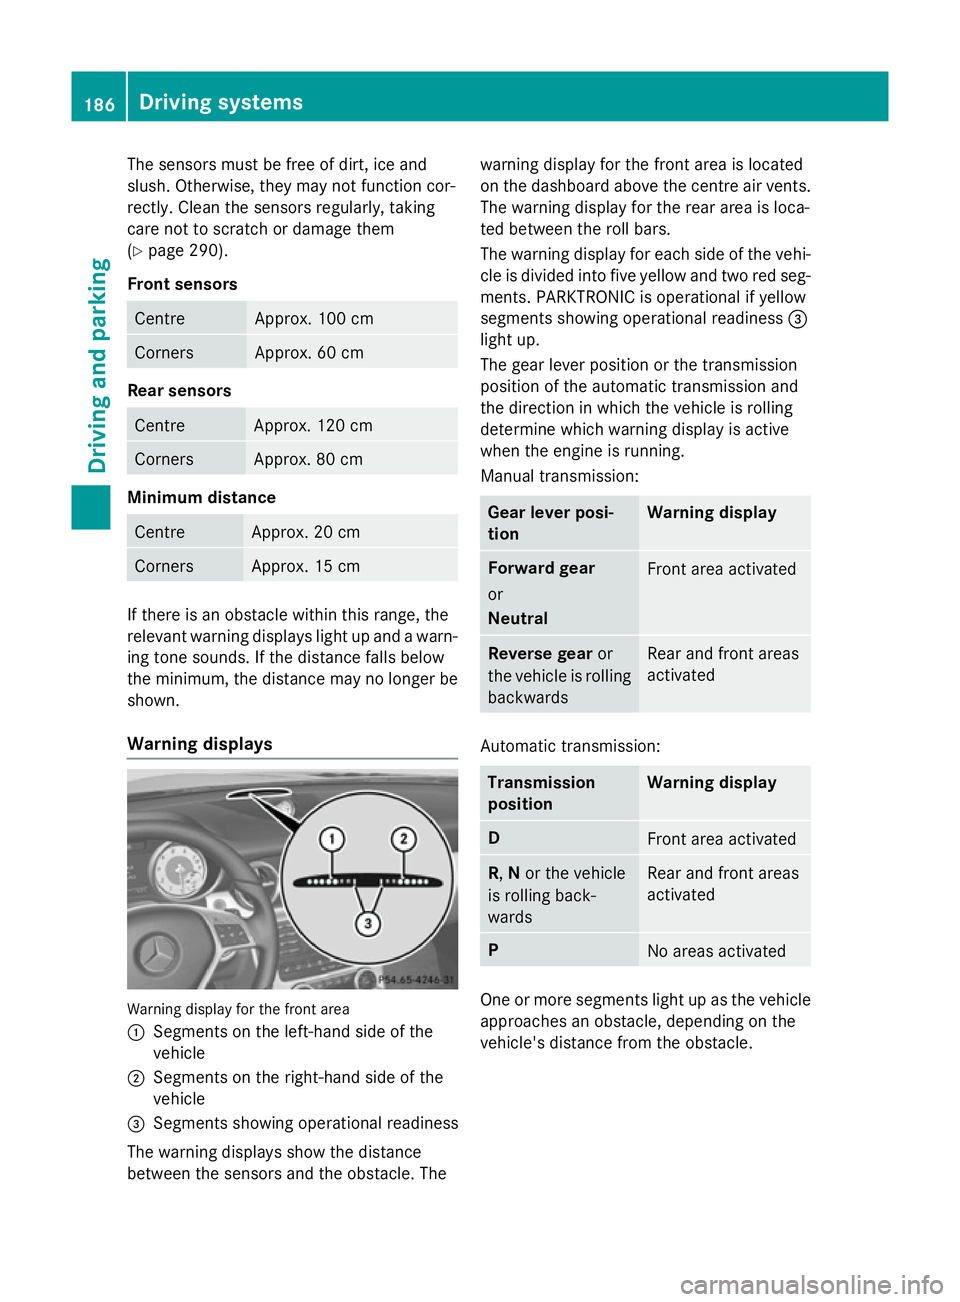
Warning displays Warning display for the front area
: Segments on the left-hand side of the
vehicle
; Segments on the right-hand side of the
vehicle
= Segments showing operational readiness
The warning displays show the distance
between the sensors and the obstacle. The warning display for the front area is located
on the dashboard above the centre air vents.
The warning display for the rear area is loca-
ted between the roll bars.
The warning display for each side of the vehi- cle is divided into five yellow and two red seg-ments. PARKTRONIC is operational if yellow
segments showing operational readiness =
light up.
The gear lever position or the transmission
position of the automatic transmission and
the direction in which the vehicle is rolling
determine which warning display is active
when the engine is running.
Manual transmission: Gear lever posi-
tion Warning display
Forward gear
or
Neutral
Front area activated
Reverse gear
or
the vehicle is rolling backwards Rear and front areas
activated
Automatic transmission:
Transmission
position Warning display
D
Front area activated
R,
Nor the vehicle
is rolling back-
wards Rear and front areas
activated
P
No areas activated
One or more segments light up as the vehicle
approaches an obstacle, depending on the
vehicle's distance from the obstacle. 186
Driving systemsDriving and parking
Page 191 of 357
Problems with PARKTRONIC
Problem
Possible causes/consequences and
M
MSolutions Only the red segments
in the PARKTRONIC
warning displays are lit.
You also hear a warning
tone for approximately
two seconds.
PARKTRONIC is deacti-
vated after approx-
imately 20 seconds,
and the indicator lamp
in the PARKTRONIC
button lights up. PARKTRONIC has malfunctioned and has switched off.
X If problems persist, have PARKTRONIC checked at a qualified
specialist workshop. Only the red segments
in the PARKTRONIC
warning displays are lit.
PARKTRONIC is deacti-
vated after approx-
imately five seconds. The PARKTRONIC sensors are dirty or there is interference.
X Clean the PARKTRONIC sensors (Y page 290).
X Switch the ignition back on. The problem may be caused by an external source of radio or
ultrasound waves.
X See if PARKTRONIC functions in a different location. Parking Guidance
Important safety notes Parking Guidance is an electronic parking aid
with ultrasound. Ultrasound is used to meas- ure the road on both sides of the vehicle. A
suitable parking space is indicated by the
parking symbol. You receive steering instruc-
tions when parking. You may also use PARK-
TRONIC (Y page 185).
Parking Guidance is only an aid. It is not a
substitute for your attention to the immediate
surroundings. The responsibility for safe
manoeuvring and parking remains with you.
Make sure that there are no persons, animals
or objects in range while manoeuvring and
parking. G
WARNING
If objects are located above the detection
range, Parking Guidance may provide steering instructions too soon. This could cause a col-
lision. There is a risk of an accident.
If objects are located above the detection
range, stop and switch off Parking Assist.
! If unavoidable, you should drive over
obstacles such as kerbs slowly and not at a
sharp angle. Otherwise, you may damage
the wheels or tyres.
When PARKTRONIC is deactivated, Parking
Guidance is also unavailable.
Parking Guidance may also display spaces
not suitable for parking, e.g.: R parking or stopping prohibitions
R in front of driveways or entrances and exits
R unsuitable surfaces 188
Driving systemsDriving and parking