2014 MERCEDES-BENZ SLK ROADSTER wheel size
[x] Cancel search: wheel sizePage 21 of 357
Function ........................................... 69
Tow-starting
Emergency engine starting ............ 309
Fitting the towing eye .................... 307
Important safety notes .................. 306
Removing the towing eye ............... 308
Towing
Important safety notes .................. 306
With the rear axle raised ................ 308
Towing away
Fitting the towing eye .................... 307
Removing the towing eye ............... 308
With both axles on the ground ....... 308
Transmission
Selector lever ................................ 152
see Automatic transmission
see Manual transmission
Transporting the vehicle .................. 308
Trim pieces (cleaning instruc-
tions) .................................................. 291
Trip computer (on-board com-
puter) .................................................. 204
Trip meter
Calling up ....................................... 204
Resetting (on-board computer) ...... 205
Turn signals
Changing bulbs (front) ................... 120
Switching on/off ........................... 113
TV
Operating (on-board computer) ..... 208
Two-way radio
Frequencies ................................... 340
Installation ..................................... 340
Transmission output (maximum) .... 340
Type identification plate
see Vehicle identification plate
Tyre pressure
Calling up (on-board computer) ..... 320
Display messag e............................ 243
Important safety notes .................. 320
Not reached (TIREFIT) .................... 299
Reached (TIREFIT) .......................... 299
Recommended ............................... 318
Tyre pressure loss warning
General notes ................................ 319
Important safety notes .................. 319
Restarting ...................................... 320 Tyre pressure monitor
Checking the tyre pressure elec-
tronically ........................................ 321
Function/note s............................. 320
General notes ................................ 320
Important safety notes .................. 320
Radio type approval for the tyre
pressure monitor ........................... 323
Restarting ...................................... 322
Warning lamp ................................. 261
Warning message .......................... 322
Tyres
Changing a whee l.......................... 323
Checking ........................................ 315
Direction of rotation ...................... 324
Display message ............................ 243
Important safety notes .................. 314
M+S tyres ...................................... 316
MOExtended tyre s......................... 316
Overview ........................................ 314
Replacing ....................................... 323
Service life ..................................... 315
Storing ........................................... 324
Summer tyres ................................ 316
Tyre size (data ).............................. 328
Tyre tread ...................................... 315
Wheel and tyre combinations ........ 330
see Flat tyre U
Unlocking Emergency unlocking ....................... 80
From inside the vehicle (central
unlocking button) ............................. 79 V
Vanity mirror (in sun visor) .............. 268
Variable SPEEDTRONIC
see SPEEDTRONIC
Vehicle
Correct use ...................................... 24
Data acquisition ............................... 25
Display message ............................ 245
Electronics ..................................... 340
Equipment ....................................... 22
Implied warranty .............................. 25
Individual settings .......................... 213 18
Index
Page 22 of 357
Leaving parked up .........................1
64
Locking (in an emergency) .............. .80
Locking (key) ................................... 73
Lowering ........................................ 328
Pulling away ................................... 144
Raising ........................................... 325
Registration ..................................... 24
Securing from rolling away ............ 325
Tow-starting ................................... 306
Towing away .................................. 306
Transporting .................................. 308
Unlocking (in an emergency) ........... 80
Unlocking (key) ................................ 73
Vehicle data ................................... 349
Vehicle battery
see Battery (vehicle)
Vehicle data ....................................... 349
Vehicle dimensions ........................... 349
Vehicle emergency locking ................ 80
Vehicle identification number
see VIN
Vehicle identification plate .............. 342
Vehicle tool kit .................................. 295
Video
Operating the DVD ......................... 207
VIN ...................................................... 342 W
Warning and indicator lamps ABS ................................................ 252
Brakes ........................................... 252
Distance warning signal ................. 260
ESP® ............................................. 254
ESP® OFF ...................................... 255
LIM (cruise control) ........................ 169
LIM (DISTRONIC PLUS) .................. 173
LIM (variable SPEEDTRONIC) ......... 181
Overview .......................................... 32
PASSENGER AIR BAG OFF ............... 41
Reserve fuel ................................... 258
Seat belt ........................................ 251
Tyre pressure monitor ................... 261
Warning triangle ................................ 294
Washer fluid
Display message ............................ 249
Wheel and tyre combinations
see Tyres Wheel bolt tightening torque
........... 328
Wheel chock ...................................... 325
Wheeled draught stop
see AIRGUIDE
Wheels
Changing a whee l.......................... 323
Changing/replacing ....................... 323
Checking ........................................ 315
Cleaning ......................................... 288
Cleaning (warning) ......................... 324
Emergency spare wheel ................. 334
Fitting a new wheel ........................ 327
Fitting a wheel ............................... 324
Important safety notes .................. 314
Overview ........................................ 314
Removing a whee l.......................... 327
Storing ........................................... 324
Tightening torque ........................... 328
Wheel size/tyre size ...................... 328
Windows
Cleaning ......................................... 289
see Side windows
Windscreen
Demisting ...................................... 133
Windscreen washer fluid
see Windscreen washer system
Windscreen washer system
Note s............................................. 349
Topping up ..................................... 284
Windscreen wipers
Display message ............................ 249
Problem (malfunction) ................... 123
Replacing the wiper blades ............ 121
Switching on/of f........................... 120
Winter operation
Important safety notes .................. 316
Overview ........................................ 316
Radiator cover ............................... 281
Slippery road surfaces ................... 168
Snow chains .................................. 317
Winter tyres
Limiting the speed (on-board com-
puter) ............................................. 216
M+S tyre s...................................... 316
Wiper blades
Cleaning ......................................... 289
Important safety notes .................. 121
Replacing ....................................... 121 Index
19
Page 54 of 357
The seat-belt adjustment is an integral part of
the PRE-SAFE ®
convenience function. Infor-
mation about the convenience function can
be found under "Belt adjustment"
(Y page 45). Automatic measures after an acci-
dent
Immediately after an accident, the following
measures are implemented, depending on
the type and severity of the impact:
R the hazard warning lamps are activated
R the emergency lighting is activated
R the vehicle doors are unlocked
R the front side windows are lowered
R in vehicles with a memory function: the
electrically adjustable steering wheel is
raised
R the engine is switched off
R vehicles with the Mercedes-Benz emer-
gency call system: automatic emergency
call Children in the vehicle
Important safety notes
If a child younger than 12 years old and under
1.50 m in height is travelling in the vehicle:
R always secure the child in a child restraint
system suitable for Mercedes-Benz vehi-
cles. The child restraint system must be
appropriate to the age, weight and size of
the child
R be sure to observe the instructions and
safety notes in this section in addition to
the child restraint system manufacturer's
installation instructions G
WARNING
If you leave children unattended in the vehi-
cle, they may be able to set the vehicle in
motion if, for example, they:
R release the parking brake
R shift the automatic transmission out of park
position Por shift manual transmission into
neutral
R start the engine
In addition, they may operate vehicle equip-
ment and become trapped. There is a risk of
an accident and injury.
When leaving the vehicle, always take the key with you and lock the vehicle. Never leave
children unattended in the vehicle. G
WARNING
If persons (particularly children) are exposed
to heat or cold for a prolonged period, there is a risk of serious or even fatal injuries. Never
leave persons (particularly children) unatten-
ded in the vehicle. G
WARNING
If the child restraint system is placed in direct sunlight, the parts could become very hot.
Children could be suffer burns by touching
these parts, in particular on the metallic parts
of the child restraint system. There is a risk of injury.
If you and your child leave the vehicle, always
make sure that the child restraint system is
not in direct sunlight. Cover it with a blanket, for example. If the child restraint system has
been exposed to direct sunlight, leave it to
cool down before securing the child in it.
Never leave children unattended in the vehi-
cle.
Always ensure that all vehicle occupants have their seat belts fastened correctly and are sit-
ting properly. Particular attention must be
paid to children.
Observe the safety notes on the seat belt
(Y page 42) and the information on the cor-
rect use of the seat belt (Y page 43). Children in the vehicle
51Safety Z
Page 66 of 357
ESP
®
monitors driving stability and traction,
i.e. power transmission between the tyres
and the road surface.
If ESP ®
detects that the vehicle is deviating
from the direction desired by the driver, one
or more wheels are braked to stabilise the
vehicle. The engine output is also modified to keep the vehicle on the desired course within
physical limits. ESP ®
assists the driver when
pulling away on wet or slippery roads. ESP ®
can also stabilise the vehicle during braking.
ETS (Electronic Traction System) i
Observe the "Important safety notes" sec-
tion (Y page 60).
ETS traction control is part of ESP ®
.
ETS brakes the drive wheels individually if
they spin. This enables you to pull away and
accelerate on slippery surfaces, for example
if the road surface is slippery on one side. In
addition, more drive torque is transferred to
the wheel or wheels with traction.
ETS remains active when you deactivate
ESP ®
.
i AMG vehicles:
your vehicle may be
equipped with 20-inch tyres on the rear
axle. If replaced with a 19-inch tyre, ETS
may intervene noticeably sooner for the
first few kilometres. After approximately
10 km ETS will function as usual again.
Information on the dimensions and types of
wheels and tyres for your vehicle can be
found under "Wheel/tyre combinations"
(Y page 328).
Important safety notes G
WARNING
If ESP ®
is malfunctioning, ESP ®
is unable to
stabilise the vehicle. In addition, other driving
safety systems are switched off. This increa-
ses the risk of skidding and an accident.
Drive on carefully. Have ESP ®
checked at a
qualified specialist workshop. !
When testing the electric parking brake
on a braking dynamometer, switch off the
ignition. Application of the brakes by ESP ®
may otherwise destroy the brake system.
When towing your vehicle with the rear axle
raised, observe the notes on
ESP ®
(Y page 308).
ESP ®
is deactivated if the åwarning lamp
in the instrument cluster lights up continu-
ously when the engine is running.
If the ÷ warning lamp and the åwarn-
ing lamp are lit continuously, ESP ®
is not
available due to a malfunction.
Observe the information on warning lamps
(Y page 254) and display messages which
may be shown in the instrument cluster
(Y page 223).
i Only use wheels with the recommended
tyre sizes. Only then will ESP ®
function
properly.
Characteristics of ESP ® General notes
If the
÷ ESP warning lamp goes out before
beginning the journey, ESP ®
is automatically
active.
If ESP ®
intervenes, the ÷ESP®
warning
lamp flashes in the instrument cluster.
If ESP ®
intervenes:
X Do not deactivate ESP ®
under any circum-
stances.
X When pulling away, only depress the accel-
erator pedal as far as is necessary.
X Adapt your driving style to suit the prevail-
ing road and weather conditions.
ECO start/stop function
The ECO start/stop function switches the
engine off automatically if the vehicle stops
moving. When pulling away again, the engine
starts automatically. ESP ®
remains in its pre-
viously selected status. Example:if ESP®
was deactivated before the engine was Driving safety systems
63Safety Z
Page 106 of 357
Mirrors
Rear-view mirror
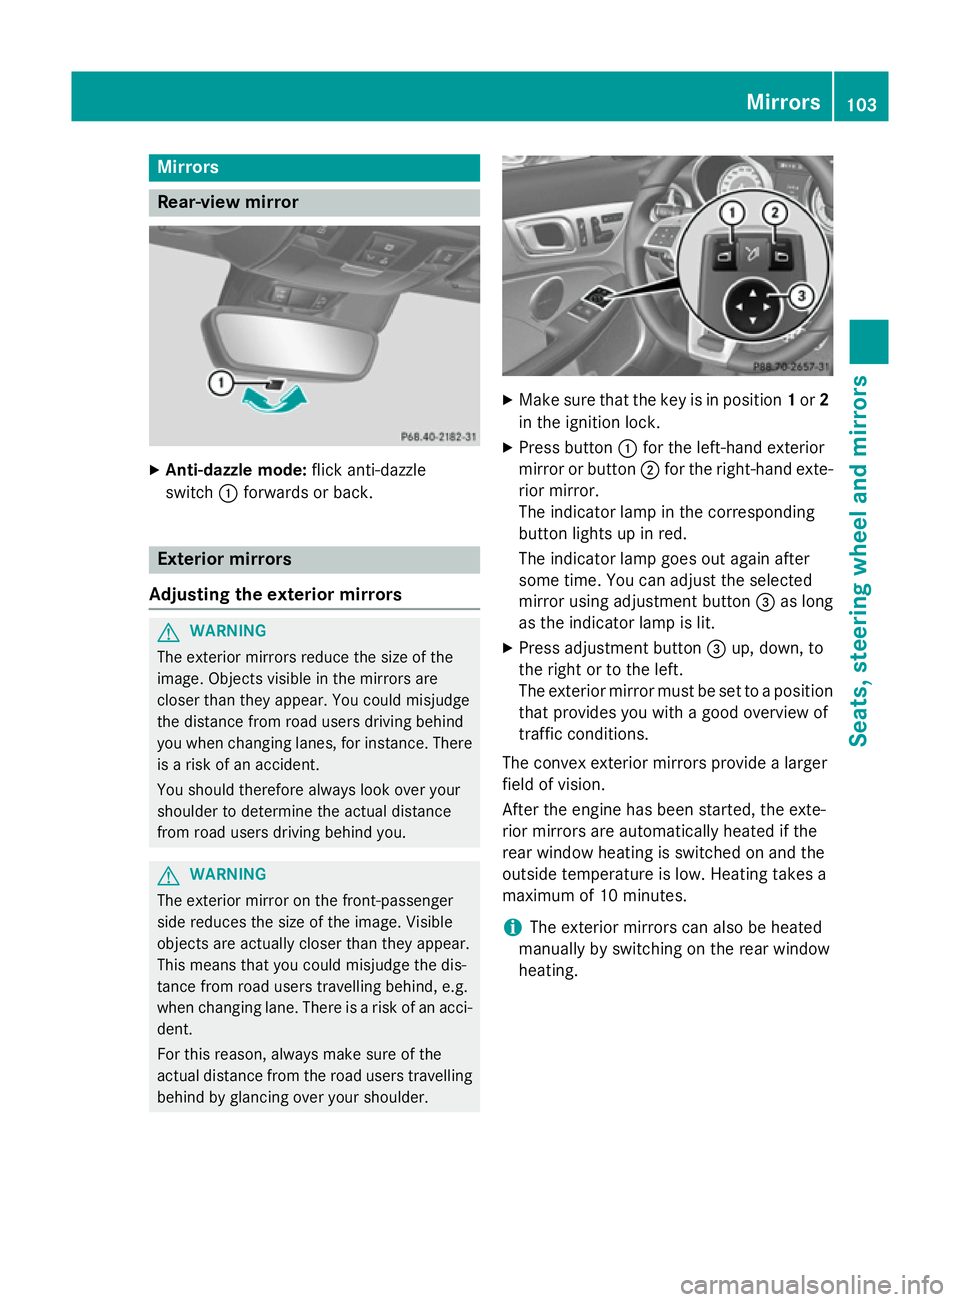
X
Anti-dazzle mode: flick anti-dazzle
switch :forwards or back. Exterior mirrors
Adjusting the exterior mirrors G
WARNING
The exterior mirrors reduce the size of the
image. Objects visible in the mirrors are
closer than they appear. You could misjudge
the distance from road users driving behind
you when changing lanes, for instance. There is a risk of an accident.
You should therefore always look over your
shoulder to determine the actual distance
from road users driving behind you. G
WARNING
The exterior mirror on the front-passenger
side reduces the size of the image. Visible
objects are actually closer than they appear.
This means that you could misjudge the dis-
tance from road users travelling behind, e.g.
when changing lane. There is a risk of an acci-
dent.
For this reason, always make sure of the
actual distance from the road users travelling behind by glancing over your shoulder. X
Make sure that the key is in position 1or 2
in the ignition lock.
X Press button :for the left-hand exterior
mirror or button ;for the right-hand exte-
rior mirror.
The indicator lamp in the corresponding
button lights up in red.
The indicator lamp goes out again after
some time. You can adjust the selected
mirror using adjustment button =as long
as the indicator lamp is lit.
X Press adjustment button =up, down, to
the right or to the left.
The exterior mirror must be set to a position
that provides you with a good overview of
traffic conditions.
The convex exterior mirrors provide a larger
field of vision.
After the engine has been started, the exte-
rior mirrors are automatically heated if the
rear window heating is switched on and the
outside temperature is low. Heating takes a
maximum of 10 minutes.
i The exterior mirrors can also be heated
manually by switching on the rear window
heating. Mirrors
103Seats, steering wheel and mirrors Z
Page 299 of 357
X
Lift the boot floor upwards.
X Remove the collapsible emergency spare
wheel (Y page 334).
X AMG vehicles: loosen the central screw of
the bracket anti-clockwise and remove it
together with the bracket. Flat tyre
Preparing the vehicle
Your vehicle may be equipped with: R MOExtended tyres (tyres with run-flat char-
acteristics) (Y page 296)
Vehicle preparation is not necessary on
vehicles with MOExtended tyres.
R a TIREFIT kit (Y page 295)
R an emergency spare wheel (only for certain
countries) (Y page 334)
Information on changing/fitting a wheel
(Y page 323).
X Stop the vehicle as far away as possible
from traffic on solid, non-slippery and level
ground.
X Switch on the hazard warning lamps.
X Secure the vehicle against rolling away
(Y page 162).
X If possible, bring the front wheels into the
straight-ahead position.
X Switch off the engine.
X Vehicles without KEYLESS-GO: remove
the key from the ignition lock.
X Vehicles with KEYLESS-GO: open the
driver's door.
The on-board electronics now have status
0. This is the same as the key having been
removed.
X Vehicles with KEYLESS-GO: remove the
Start/Stop button from the ignition lock
(Y page 141).
X All occupants must get out of the vehicle.
Make sure that they are not endangered as they do so. X
Make sure that no one is near the danger
area while a wheel is being changed. Any-
one who is not directly assisting in the
wheel change should, for example, stand
behind the barrier.
X Get out of the vehicle. Pay attention to traf-
fic conditions when doing so.
X Close the driver's door.
X Place the warning triangle a suitable dis-
tance away (Y page 294). Observe legal
requirements. MOExtended tyres (tyres with run-flat
characteristics)
General notes With MOExtended tyres (tyres with run-flat
characteristics), you can continue to drive
your vehicle even if there is a total loss of
pressure in one or more tyres. The affected
tyre must not show any clearly visible dam-
age.
You can recognise MOExtended tyres by the
MOExtended marking which appears on the
tyre wall. You will find this marking next to the
tyre size designation, the load-bearing capa-
city and the speed index.
MOExtended tyres may only be used in con-
junction with an activated tyre pressure loss
warning system or tyre pressure monitor.
If the pressure loss warning message
appears in the multifunction display:
R observe the instructions in the display mes-
sages (Y page 243).
R check the tyre for damage
R if driving on, observe the following notes
The maximum driving distance is approx-
imately 80 km when the vehicle is partially
laden and approximately 30 km when the
vehicle is fully laden. 296
Flat tyreBreakdown assistance
Page 300 of 357
In addition to the vehicle load, the driving dis-
tance possible depends upon:
R speed
R road condition
R outside temperature
The driving distance possible in run-flat mode may be reduced by extreme driving condi-
tions/manoeuvres, or it can be increased
through a moderate style of driving.
The maximum permissible distance which
can be driven in run-flat mode is counted from
the moment the tyre pressure loss warning
appears in the multifunction display.
You must not exceed a maximum speed of
80 km/h.
i When replacing one or all tyres, make
sure that you use only:
R the tyre size specified for the vehicle and
R tyre(s) marked "MOExtended"
If a tyre has gone flat and cannot be
replaced with an MOExtended tyre, a
standard tyre may be used as a temporary
measure. Make sure that you use the
proper size and type (summer or winter
tyre).
i Vehicles with MOExtended tyres are not
equipped with a TIREFIT kit at the factory. It
is therefore recommended that you addi-
tionally equip your vehicle with a TIREFIT kit if you fit tyres that do not feature run-flat
characteristics, e.g. winter tyres. A TIREFIT
kit is available, for example, from a qualified
specialist workshop.
Important safety notes G
WARNING
When driving in emergency mode, the driving characteristics deteriorate, e.g. when corner-
ing, accelerating quickly and when braking.
There is a risk of accident.
Do not exceed the stated maximum speed.
Avoid abrupt steering and driving manoeu-
vres, and driving over obstacles (kerbs, pot- holes, off-road). This applies in particular to a
laden vehicle.
Stop driving in emergency mode if:
R you hear banging noises.
R the vehicle starts to shake.
R you see smoke and smell rubber.
R ESP ®
is intervening constantly.
R there are tears in the sidewalls of the tyre.
After driving in emergency mode, have the
wheel rims checked at a qualified specialist
workshop with regard to their further use. The faulty tyre must be replaced. TIREFIT kit
Important safety notes TIREFIT is a tyre sealant.
You can use TIREFIT to seal punctures of up to
4 mm, particularly those in the tyre tread. You
can use TIREFIT at outside temperatures
down to Ò20 †. G
WARNING
In the following situations, the tyre sealant is
unable to provide sufficient breakdown assis- tance, as it is unable to seal the tyre properly:
R there are cuts or punctures in the tyre
larger than those mentioned above.
R the wheel rim is damaged.
R you have driven at very low tyre pressures
or on a flat tyre.
There is a risk of an accident.
Do not drive any further. Contact a qualified
specialist workshop. G
WARNING
The tyre sealant is harmful and causes irrita-
tion. It must not come into contact with your
skin, eyes or clothing or be swallowed. Do not inhale TIREFIT fumes. Keep tyre sealant away
from children. There is a risk of injury. Flat tyre
297Breakdown assistance
Z
Page 317 of 357
Useful information
i This Owner's Manual describes all mod-
els, series and optional equipment for your
vehicle that were available at the time of
going to press. National variations are pos- sible. Note that your vehicle may not be
equipped with all of the functions descri-
bed. This is also the case for systems and
functions relevant to safety.
i Read the information on qualified special-
ist workshops: (Y page 24). Important safety notes
G
WARNING
If wheels and tyres of the wrong size are used, the wheel brakes or suspension components
may be damaged. There is a risk of an acci-
dent.
Always replace wheels and tyres with those
that fulfil the specifications of the original
part.
When replacing wheels, make sure to fit the
correct:
R designation
R type
When replacing tyres, make sure to fit the
correct:
R designation
R manufacturer
R type G
WARNING
A flat tyre severely impairs the driving, steer-
ing and braking characteristics of the vehicle.
There is a risk of accident.
Tyres without run-flat characteristics:
R do not drive with a flat tyre.
R immediately replace the flat tyre with your
emergency spare wheel or spare wheel, or
consult a qualified specialist workshop. Tyres with run-flat characteristics:
R pay attention to the information and warn-
ing notices on MOExtended tyres (tyres
with run-flat characteristics).
Accessories that are not approved for your
vehicle by Mercedes-Benz or that are not
being used correctly can impair the operating
safety.
Before purchasing and using non-approved
accessories, visit a qualified specialist work-
shop and enquire about:
R suitability
R legal stipulations
R factory recommendations
Information on dimensions and types of
wheels and tyres for your vehicle can be
found (Y page 328).
Information on air pressure for the tyres on
your vehicle can be found:
R on the tyre pressure label on the fuel filler
flap (Y page 160)
R in the "Tyre pressure" section
Modification work on the brake system and
wheels is not permitted. The use of wheel
spacers or brake dust shields is not permit-
ted. This invalidates the general operating
permit for the vehicle.
i Further information on wheels and tyres
can be obtained at any qualified specialist
workshop. Operation
Information on driving
Check the tyre pressures when the vehicle is
heavily laden and, if necessary, adjust.
While driving, pay attention to vibrations,
noises and unusual handling characteristics,
e.g. pulling to one side. This may indicate that the wheels or tyres are damaged. If you sus-
pect that a tyre is defective, reduce your
speed immediately. Stop the vehicle as soon
as possible to check the wheels and tyres for 314
OperationWheels and tyres