2014 MERCEDES-BENZ SLK ROADSTER display
[x] Cancel search: displayPage 70 of 357
In these cases, PRE-SAFE
®
Brake may:
R give an unnecessary warning and then
brake the vehicle
R neither give a warning nor intervene
There is a risk of an accident.
Always pay particular attention to the traffic
situation and be ready to brake, especially if
PRE-SAFE ®
Brake warns you. Terminate the
intervention in a non-critical driving situation.
In order to maintain the appropriate distance
to the vehicle in front and thus prevent a col- lision, you must apply the brakes yourself. G
WARNING
PRE-SAFE ®
Brake does not react:
R to people or animals
R to oncoming vehicles
R to crossing traffic
R when cornering
As a result, PRE-SAFE ®
Brake may neither
give warnings nor intervene in all critical sit-
uations. There is a risk of an accident.
Always pay careful attention to the traffic sit-
uation and be ready to brake.
In the event of snowfall or heavy rain, detec-
tion can be impaired.
Detection by the radar sensor system is also
impaired in the event of:
R dirt on the sensors or obscured sensors
R interference by other radar sources
R strong radar reflections, for example, in
multi-storey car parks
R a narrow vehicle travelling in front, e.g. a
motorcycle
R a vehicle travelling in front on a different
line
Following damage to the front end of the vehi-
cle, have the radar sensor settings and oper- ation checked at a qualified specialist work-
shop. This also applies to collisions at slow
speeds where there is no visible damage to
the front of the vehicle. Function X
To activate/deactivate: activate or deac-
tivate PRE-SAFE ®
Brake in the on-board
computer (Y page 211).
Vehicles with a black and white multi-
function display: when PRE-SAFE®
Brake
is activated, the Äsymbol appears in
the status overview in the multifunction
display.
Vehicles with a colour multifunction
display: when PRE-SAFE ®
Brake is deacti-
vated, the æsymbol appears in the
assistance graphic in the multifunction dis- play.
This function will issue a warning if:
R at a speed of approximately 30 km/h or
higher, the distance maintained to the vehi-
cle travelling in front is insufficient for sev-
eral seconds.
The · distance warning lamp then lights
up in the instrument cluster.
R at a speed of approximately 7 km/h or
higher, you rapidly approach a vehicle in
front.
An intermittent warning tone will then
sound and the ·distance warning lamp
will light up in the instrument cluster.
X Brake immediately to defuse the situation.
or X Take evasive action provided it is safe to do
so.
The PRE-SAFE ®
Brake function can also brake
the vehicle automatically under the following
conditions:
R the driver and front passenger have their
seat belts fastened
and
R the vehicle speed is between approx-
imately 7 km/h and 200 km/h
Up to a speed of approximately 70 km/h,
PRE-SAFE ®
Brake can also detect stationary
objects. Examples of stationary objects are
stopped or parked vehicles. Driving safety systems
67Safety Z
Page 91 of 357
R
there is sufficient upward clearance, as
the roof swings upwards.
R there is sufficient clearance behind the
vehicle, as the boot lid swings backwards beyond the bumper.
R the boot is only loaded to below the boot
separator.
R the boot separator is not pushed up by
the load.
R the boot separator is closed.
R the boot lid is closed.
R the outside temperature is above Ò15 †.
You could otherwise damage the roof, boot
and other parts of the vehicle.
i The vehicle's dimensions when opening/
closing the roof (Y page 349).
i Make sure that the roof and rear window
are dry and clean before opening the roof.
Otherwise, water or dirt could enter the
vehicle interior or boot. Opening and closing using the roof
switch
Important safety notes G
WARNING
When opening or closing the roof, body parts could be trapped by, for example, the roof
mechanism, boot lid or side windows. There is a risk of injury.
When raising or lowering the roof, make sure
that no body parts are in the vicinity of moving
components. If someone becomes trapped,
release the button. Opening and closing X
Secure the vehicle against rolling away
(Y page 162).
X Close the boot separator (Y page 90).
X Close the boot lid.
X Turn the key to position 2in the ignition
lock.
X Open the cover on the lower centre con-
sole.
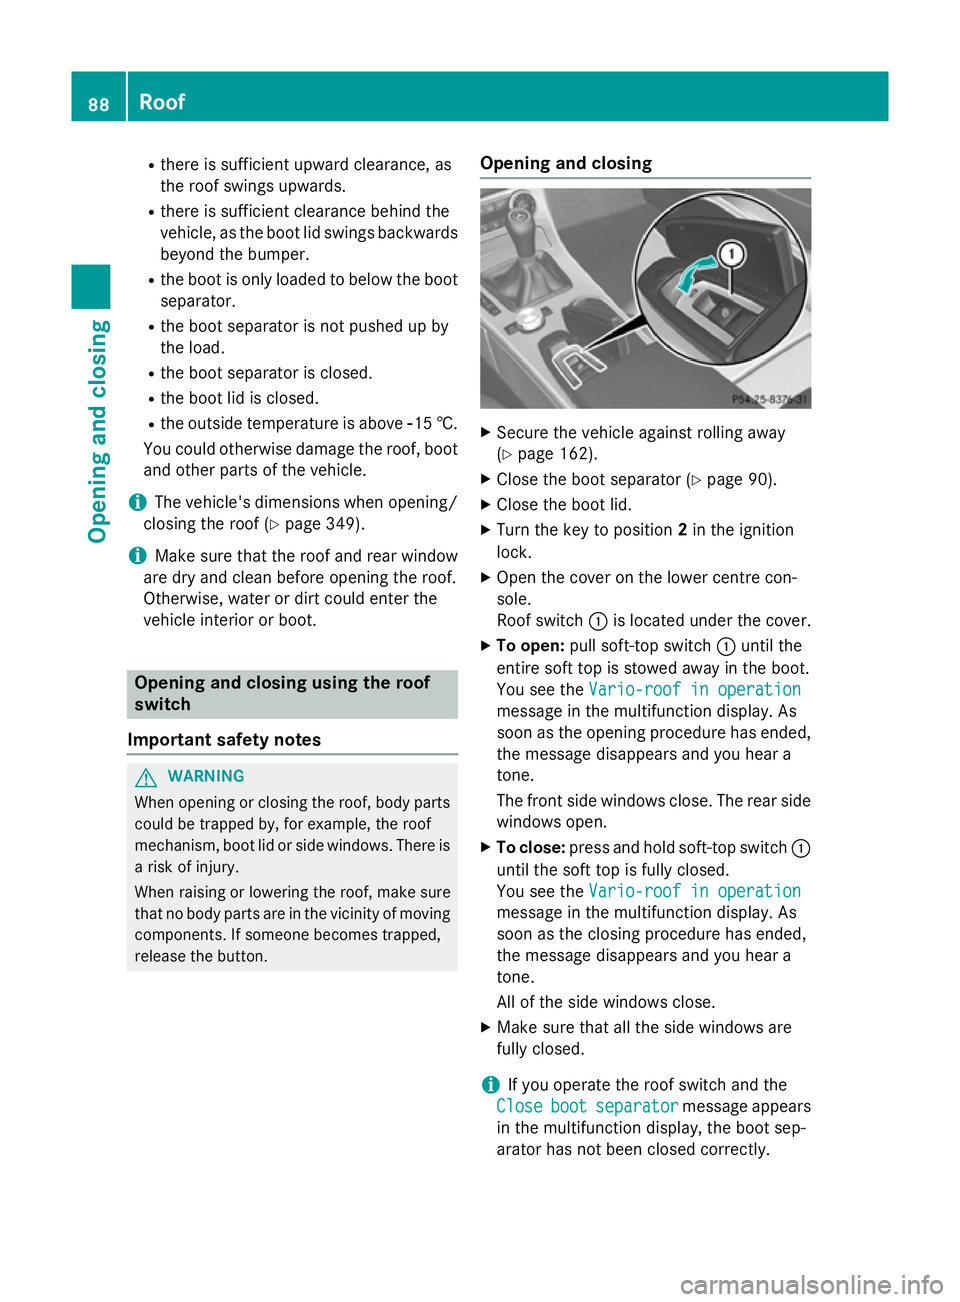
Roof switch :is located under the cover.
X To open: pull soft-top switch :until the
entire soft top is stowed away in the boot.
You see the Vario-roof in operation
Vario-roof in operation
message in the multifunction display. As
soon as the opening procedure has ended,
the message disappears and you hear a
tone.
The front side windows close. The rear side windows open.
X To close: press and hold soft-top switch :
until the soft top is fully closed.
You see the Vario-roof in operation Vario-roof in operation
message in the multifunction display. As
soon as the closing procedure has ended,
the message disappears and you hear a
tone.
All of the side windows close.
X Make sure that all the side windows are
fully closed.
i If you operate the roof switch and the
Close Close boot bootseparator
separator message appears
in the multifunction display, the boot sep-
arator has not been closed correctly. 88
RoofOpening and closing
Page 92 of 357
Opening and closing with the key
Important safety notes G
WARNING
When opening or closing the roof, body parts could be trapped by, for example, the roof
mechanism, boot lid or side windows. There is a risk of injury.
When raising or lowering the roof, make sure
that no body parts are in the vicinity of moving
components. If someone becomes trapped,
release the button.
Opening and closing X
Close the boot separator (Y page 89).
X Close the boot lid (Y page 81).
X Point the tip of the key at the driver's door
handle.
X To open: press and hold the %button
on the key until the roof is fully opened.
The roof and the rear side windows open.
The front side windows close.
X To interrupt the opening procedure:
release the %button.
X To open the front side windows: press
and hold the %button on the key again.
X To close: press and hold the &button
on the key until the roof is fully closed.
The roof and the side windows close.
X To interrupt the closing procedure:
release the &button.
i The key cannot be used to open the roof if
the roof is closed and the boot separator is
open. Instead, all of the side windows open or close simultaneously (Y page 84). Addi-
tionally, the Close Closeboot
bootseparator
separator mes-
sage appears in the multifunction display. Locking the roof again
Important safety notes G
WARNING
If you do not fully open/close the soft top, the soft-top hydraulics depressurise after a short time. This causes the soft top to lower unex-
pectedly and may cause you or others to be
trapped. There is a risk of injury.
Always open or close the soft top completely.
The roof is not locked if:
R the K symbol and the Vario-roof Vario-roofin
in
operation
operation message appears in the multi-
function display
R the K symbol and the Open/close
Open/close
vario-roof completely
vario-roof completely message
appear and you hear a warning tone.
R you hear a warning tone for up to 10 sec-
onds when pulling away or while driving.
Locking You can lock the roof again if it is not locked
fully.
X Pull over and stop the vehicle safely as soon
as possible, paying attention to road and
traffic conditions.
X Make sure the key is in position 2in the
ignition lock.
X Press the roof switch (Y page 88). Boot separator
General notes !
To avoid damaging the roof or luggage
when folding back the roof, you should:
R only load the boot to below the boot sep-
arator
R not place any objects on or in front of the
boot separator Roof
89Opening and closing Z
Page 99 of 357
Useful information
i This Owner's Manual describes all mod-
els, series and optional equipment for your
vehicle that were available at the time of
going to press. National variations are pos- sible. Note that your vehicle may not be
equipped with all of the functions descri-
bed. This is also the case for systems and
functions relevant to safety.
i Read the information on qualified special-
ist workshops: (Y page 24). Correct driver's seat position
X
Observe the safety guidelines on seat
adjustment (Y page 97).
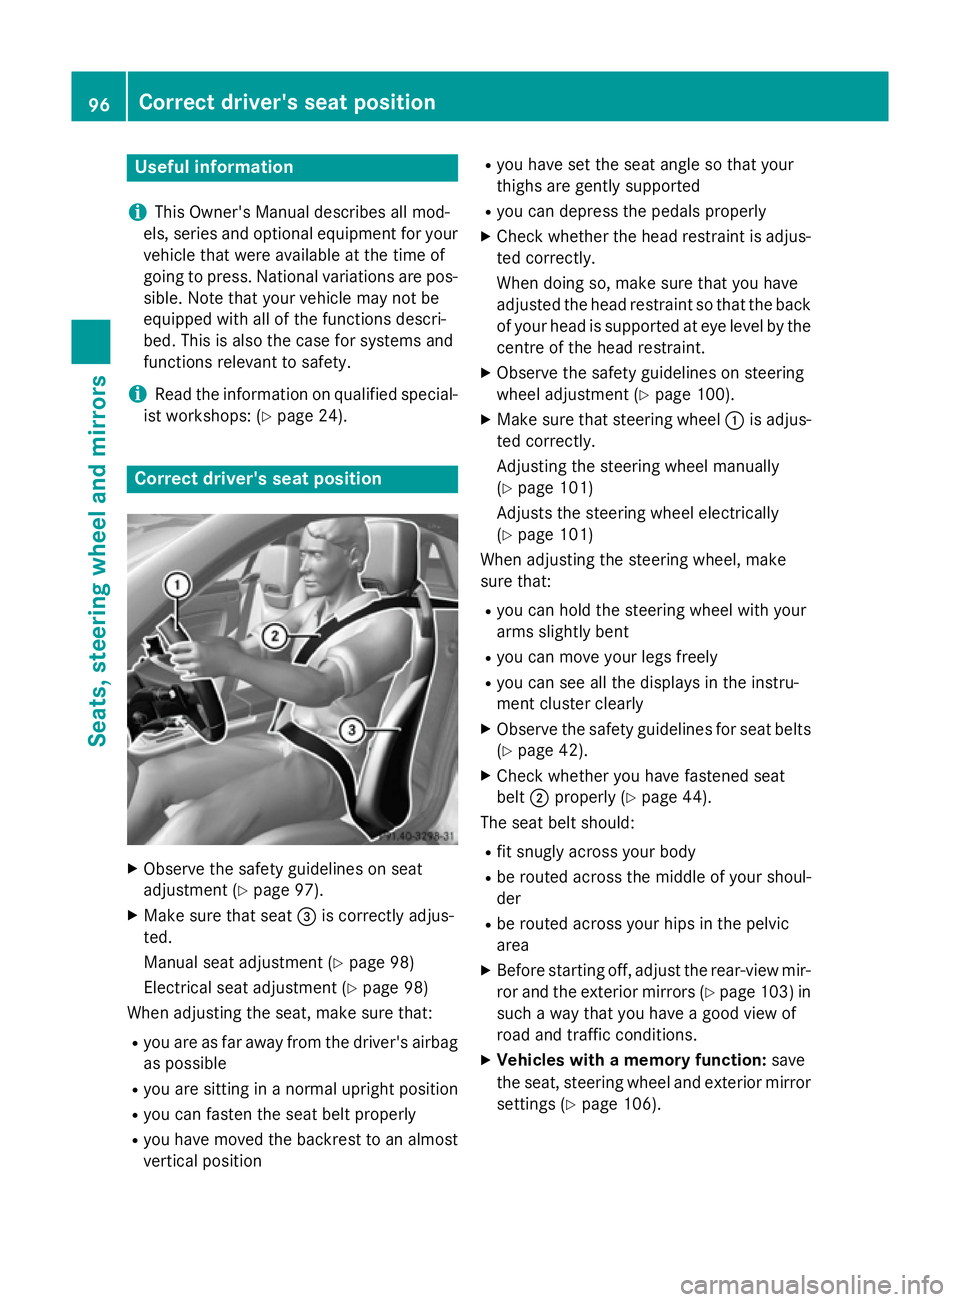
X Make sure that seat =is correctly adjus-
ted.
Manual seat adjustment (Y page 98)
Electrical seat adjustment (Y page 98)
When adjusting the seat, make sure that:
R you are as far away from the driver's airbag
as possible
R you are sitting in a normal upright position
R you can fasten the seat belt properly
R you have moved the backrest to an almost
vertical position R
you have set the seat angle so that your
thighs are gently supported
R you can depress the pedals properly
X Check whether the head restraint is adjus-
ted correctly.
When doing so, make sure that you have
adjusted the head restraint so that the back
of your head is supported at eye level by the centre of the head restraint.
X Observe the safety guidelines on steering
wheel adjustment (Y page 100).
X Make sure that steering wheel :is adjus-
ted correctly.
Adjusting the steering wheel manually
(Y page 101)
Adjusts the steering wheel electrically
(Y page 101)
When adjusting the steering wheel, make
sure that:
R you can hold the steering wheel with your
arms slightly bent
R you can move your legs freely
R you can see all the displays in the instru-
ment cluster clearly
X Observe the safety guidelines for seat belts
(Y page 42).
X Check whether you have fastened seat
belt ;properly (Y page 44).
The seat belt should:
R fit snugly across your body
R be routed across the middle of your shoul-
der
R be routed across your hips in the pelvic
area
X Before starting off, adjust the rear-view mir-
ror and the exterior mirrors (Y page 103) in
such a way that you have a good view of
road and traffic conditions.
X Vehicles with a memory function: save
the seat, steering wheel and exterior mirror
settings (Y page 106). 96
Correct driver's seat positionSeats, steering wheel and mirrors
Page 119 of 357
this, or in similar situations, the automatic
main-beam headlamps will not be deactivated or activated regardless. There is a risk of an
accident.
Always carefully observe the traffic conditions
and switch off the main-beam headlamps in
good time.
Adaptive Highbeam Assist cannot take into
account road, weather or traffic conditions.
Adaptive Highbeam Assist is only an aid. You are responsible for adjusting the vehicle's
lighting to the prevailing light, visibility and
traffic conditions.
In particular, the detection of obstacles can
be restricted if there is:
R poor visibility, e.g. due to fog, heavy rain or
snow
R dirt on the sensors or if the sensors are
obscured
Activating Adaptive Highbeam Assist X
To switch on: turn the light switch to Ã.
X Press the combination switch beyond the
pressure point in the direction of arrow :.
The _ indicator lamp in the multifunc-
tion display lights up when it is dark and the light sensor activates the dipped-beam
headlamps.
If you are driving at speeds above 25 km/h:
The headlamp range is set automatically
depending on the distance between the
vehicle and other road users.
If you are driving at speeds above approx-
imately 30 km/h and no other road users
are recognised:
The main-beam headlamps are switched on
automatically. The Kindicator lamp in
the instrument cluster also lights up.
If you are driving at speeds below 25 km/h
or other road users are recognised or the
roads are adequately lit:
The main-beam headlamps are switched off automatically. The Kindicator lamp in
the instrument cluster goes out. The _indicator lamp in the multifunction display
remains lit.
X To switch off: move the combination
switch back to its normal position or move the light switch to another position.
The _ indicator lamp in the multifunc-
tion display goes out. Headlamps misted up on the inside
Certain climatic and physical conditions may
cause moisture to form in the headlamp. This
moisture does not affect the functionality of
the headlamp. Interior lighting
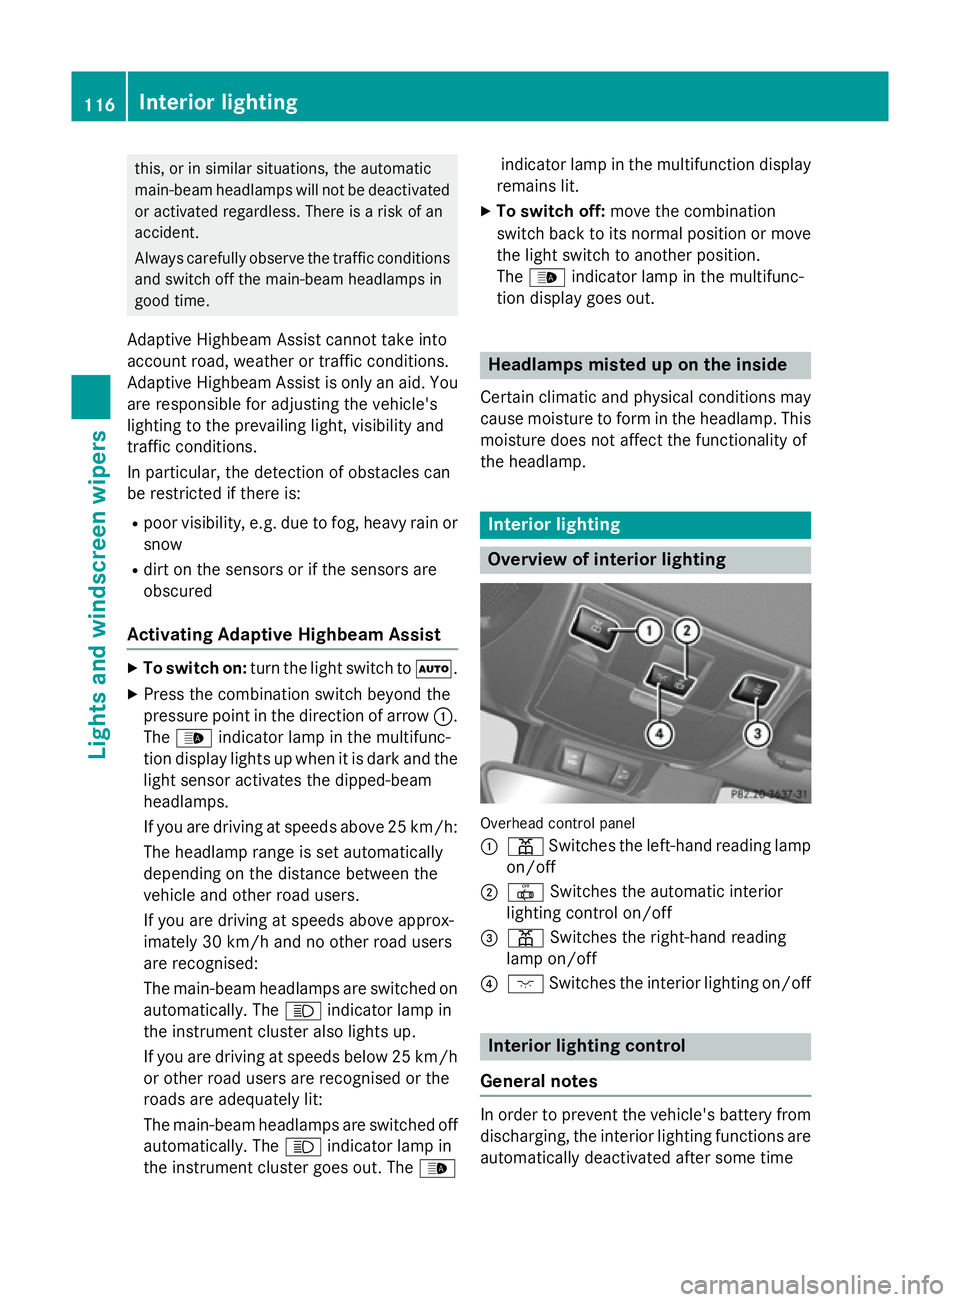
Overview of interior lighting
Overhead control panel
:
p Switches the left-hand reading lamp
on/off
; | Switches the automatic interior
lighting control on/off
= p Switches the right-hand reading
lamp on/off
? c Switches the interior lighting on/off Interior lighting control
General notes In order to prevent the vehicle's battery from
discharging, the interior lighting functions are
automatically deactivated after some time 116
Interior lightingLights and
windscreen wipers
Page 135 of 357
i
If you turn controls
:and Banti-clock-
wise to the lowest temperature setting, air- recirculation mode may activate automati-
cally, depending on the outside tempera-
ture. Setting the air distribution
Air-conditioning system X
Turn the key to position 2in the ignition
lock (Y page 141).
X Press one or more of the P,O,¯
buttons.
The corresponding indicator lamp comes
on.
The air distribution can be set to the following positions:
¯ Directs the airflow through the demis-
ter vents
O Directs the airflow through the foot-
well air vents
P Directs the airflow through the centre
and side air vents
i You can also activate several of the air
distribution settings simultaneously. In
order to do this, press several of the air
distribution buttons. The air is then routed
through different air vents.
THERMOTRONIC automatic climate
control X
Turn the key to position 2in the ignition
lock (Y page 141).
X Press the _button repeatedly until the
desired symbol appears in the display.
The air distribution can be set to the following positions:
P Directs the airflow through the centre
and side air vents
O Directs the airflow through the foot-
well air vents S
Directs the airflow through the centre
and side air vents as well as the foot-
well air vents
¯ Directs the airflow through the demis-
ter vents
b Directs the airflow through the demis-
ter, centre and side air vents
a Directs the airflow through the foot-
well and demister vents
_ Directs the airflow through the demis-
ter, centre, side and footwell air vents
i Regardless of the air distribution setting,
airflow is always directed through the side
air vents. You can only close the side air
vents by fully closing the adjuster on the
side air vents (Y page 136). Setting the airflow
Air-conditioning system X
Turn the key to position 2in the ignition
lock (Y page 141).
X To increase/reduce: turn controlC
clockwise or anti-clockwise (Y page 127).
THERMOTRONIC automatic climate
control X
Turn the key to position 2in the ignition
lock (Y page 141).
X To increase/reduce: press theKor
I button. Switching the ZONE function on/off
This function is only available with
THERMOTRONIC automatic climate control.
X To switch on: press theábutton.
The indicator lamp in the ábutton lights
up. The temperature setting for the driver's 132
Operating the climate control systemClimate control
Page 136 of 357
side is not adopted for the front-passenger
side.
X To switch off: press theábutton.
The indicator lamp in the ábutton goes
out. The temperature setting for the driv-
er's side is adopted for the front-passenger
side. Demisting the windscreen
General notes You can use this function to defrost the wind-
screen or to demist the inside of the wind-
screen and the side windows.
Switch off the "Windscreen demisting" func-
tion as soon as the windscreen is clear again.
Switching the "Demisting windscreen"
on/off X
Turn the key to position 2in the ignition
lock (Y page 141).
X To activate: press the¬button.
The indicator lamp in the ¬button lights
up.
The climate control system switches to the
following functions:
R high airflow
R high temperature
R air distribution to the windscreen and
front side windows
R air-recirculation mode off
X To deactivate: press the¬button.
The indicator lamp in the ¬button goes
out. The previous settings are reactivated.
Air-recirculation mode remains deactiva-
ted.
or
X THERMOTRONIC automatic climate con-
trol: press the Ãbutton.
The indicator lamp in the ¬button goes
out. Airflow and air distribution are set to
automatic mode. Demisting the windows
Windows misted up on the inside X
Activate the ¿/Ácooling with air
dehumidification function.
X THERMOTRONIC automatic air condition-
ing: activate the Ãmode button.
X If the windows continue to mist up, activate
the ¬ "Windscreen demisting" function.
i You should only select this setting until
the windscreen is clear again.
Windows misted up on the outside X
Activate the windscreen wipers.
X Air conditioning: press the PorO
button.
X Automatic air conditioning
THERMOTRONIC: press the _button
until the PorO symbol appears in
the display.
i You should only select this setting until
the windscreen is clear again. Rear window heating
General notes The rear window heating has a high current
draw. You should therefore switch it off as
soon as the window is clear. It otherwise
switches off automatically after several
minutes.
If the battery voltage is too low, the rear win-
dow heating may switch off.
Activating/deactivating X
Turn the key to position 2in the ignition
lock (Y page 141).
X Press button ¤.
The indicator lamp in the ¤button lights
up or goes out. Operating the climate control system
133Climate control
Page 147 of 357
Manual transmission
X
Depress the brake pedal and keep it
depressed.
X Fully depress the clutch pedal.
X Shift to neutral N.
i You can only start the engine when the
clutch pedal is fully depressed.
Automatic transmission X
Shift the transmission to position P.
The transmission position indicator in the
multifunction display shows P.
i You can also start the engine when the
transmission is in position N.
Starting procedure with the key X
To start a petrol engine: turn the key to
position 3in the ignition lock (Y page 141)
and release it as soon as the engine is run-
ning.
X To start a diesel engine: turn the key to
position 2in the ignition lock (Y page 141).
The % preglow indicator lamp in the
instrument cluster lights up.
X When the %preglow indicator lamp
goes out, turn the key to position 3
(Y page 141) and release it as soon as the
engine is running.
i To start the engine using the key instead
of KEYLESS-GO, pull the Start/Stop button
out of the ignition lock.
i You can start the engine without preglow
if the engine is warm.
Using KEYLESS-GO to start the engine i
The Start/Stop button can be used to
start the vehicle manually without inserting
the key into the ignition lock. The key must
be in the vehicle and the Start/Stop button must be inserted in the ignition lock. This
mode for starting the engine operates inde- pendently of the ECO start/stop automatic
engine start function.
X Depress the brake pedal and keep it
depressed.
X To start a petrol engine: press the Start/
Stop button once (Y page 141).
The engine starts.
X To start a diesel engine: press the Start/
Stop button once (Y page 141).
Preglow is activated and the engine starts. Pulling away
Manual transmission !
Change gear in good time and avoid spin-
ning the wheels. Otherwise, you could dam- age the vehicle.
X Depress the brake pedal and keep it
depressed.
X Depress the clutch pedal fully.
X Shift to either first gear or reverse gear R.
X Release the electric parking brake
(Y page 163).
X Release the brake pedal.
X Slowly release the clutch pedal and gently
depress the accelerator pedal.
i Follow the shift recommendations in the
multifunction display for an economical
driving style (Y page 152).
i The vehicle locks centrally once you have
pulled away. The locking knobs in the doors
drop down.
You can open the doors from the inside at
any time.
You can also deactivate the automatic lock- ing feature (Y page 216).
Automatic transmission G
WARNING
If the engine speed is above the idling speed
and you engage transmission position Dor R, 144
DrivingDriving and parking