2014 MERCEDES-BENZ SLK ROADSTER reset
[x] Cancel search: resetPage 87 of 357
G
WARNING
The reversing function does not react:
R to soft, light and thin objects, e.g. small fin-
gers
R while resetting
This means that the reversing feature cannot
prevent someone being trapped in these sit-
uations. There is a risk of injury.
When closing, make sure that no parts of the
body are in the closing area. If someone
becomes trapped, press the switch to open
the side window again. Opening and closing the side win-
dows in the front
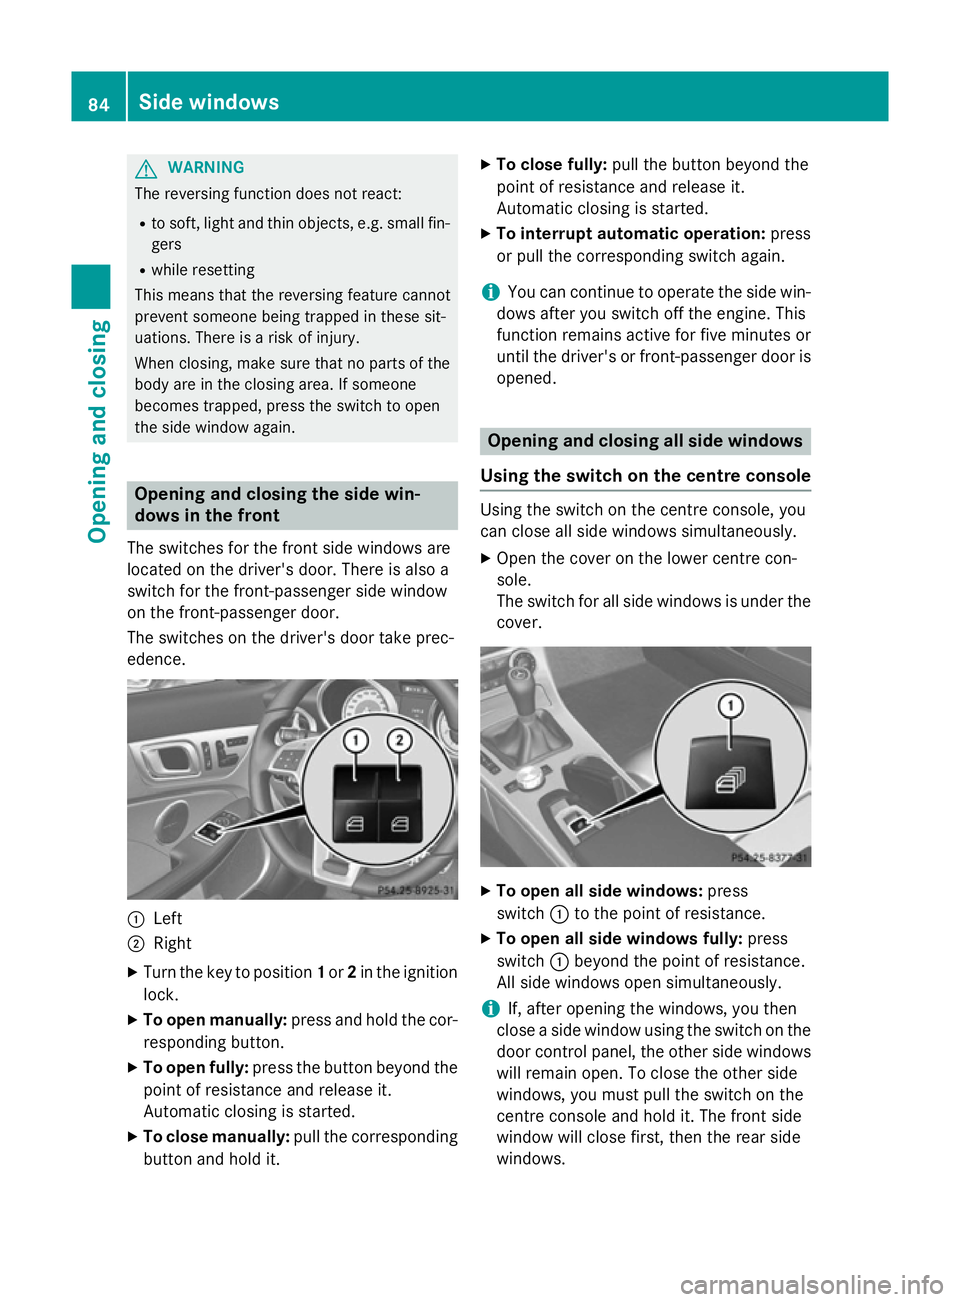
The switches for the front side windows are
located on the driver's door. There is also a
switch for the front-passenger side window
on the front-passenger door.
The switches on the driver's door take prec-
edence. :
Left
; Right
X Turn the key to position 1or 2in the ignition
lock.
X To open manually: press and hold the cor-
responding button.
X To open fully: press the button beyond the
point of resistance and release it.
Automatic closing is started.
X To close manually: pull the corresponding
button and hold it. X
To close fully: pull the button beyond the
point of resistance and release it.
Automatic closing is started.
X To interrupt automatic operation: press
or pull the corresponding switch again.
i You can continue to operate the side win-
dows after you switch off the engine. This
function remains active for five minutes or
until the driver's or front-passenger door is opened. Opening and closing all side windows
Using the switch on the centre console Using the switch on the centre console, you
can close all side windows simultaneously.
X Open the cover on the lower centre con-
sole.
The switch for all side windows is under the
cover. X
To open all side windows: press
switch :to the point of resistance.
X To open all side windows fully: press
switch :beyond the point of resistance.
All side windows open simultaneously.
i If, after opening the windows, you then
close a side window using the switch on the door control panel, the other side windows
will remain open. To close the other side
windows, you must pull the switch on the
centre console and hold it. The front side
window will close first, then the rear side
windows. 84
Side windowsOpening and closing
Page 89 of 357
Resetting the side windows
If a side window can no longer be closed fully, you must reset it.
X Close all doors.
X Turn the key to position 1or 2in the ignition
lock.
X Pull the corresponding switch on the door
control panel until the side window is com-
pletely closed. (Y page 84)
X Hold the switch for an additional second.
If the side window opens again slightly:
X immediately pull the corresponding switch
on the door control panel until the side win-
dow is completely closed (Y page 84).
X Hold the switch for an additional second.
X If the corresponding side window remains
closed after the button has been released,
the side window has been reset correctly. If this is not the case, repeat the steps aboveagain. 86
Side windowsOpening and closing
Page 90 of 357
Problems with the side windows
G
WARNING
If you close a side window again immediately after it has been blocked or reset, the side window
closes with increased or maximum force. The reversing function is then not active. Parts of the
body could be trapped in the closing area in the process. This poses an increased risk of injury or even fatal injury.
Make sure that no parts of the body are in the closing area. To stop the closing process, releasethe switch or push the switch again to reopen the side window. Problem
Possible causes/consequences and
M MSolutions A side window cannot
be closed because it is
blocked by objects, e.g.
leaves in the window
guide. X
Remove the objects.
X Close the side window. A side window cannot
be closed and you can-
not see the cause. If a side window is obstructed during closing and reopens again
slightly:
X Immediately after the window blocks, pull the corresponding
switch again until the side window has closed.
The side window is closed with increased force.
If a side window is obstructed again during closing and reopens
again slightly: X Immediately after the window blocks, pull the corresponding
switch again until the side window has closed.
The side window is closed without the anti-entrapment feature. Roof
Important safety notes
G
WARNING
If you do not fully open/close the soft top, the soft-top hydraulics depressurise after a short time. This causes the soft top to lower unex-
pectedly and may cause you or others to be
trapped. There is a risk of injury.
Always open or close the soft top completely. G
WARNING
Closing the roof manually is a complex, tech-
nically challenging procedure that requires
considerable effort during certain phases. You or others could be trapped while perform-
ing this task. There is a risk of injury.
Only have the soft top closed manually at a
qualified specialist workshop.
! Never sit on the rear shelf or store heavy
objects there. You will otherwise damage
the roof and the rear shelf of your vehicle.
! Do not forget that the weather can
change abruptly. Make certain that the roof
is closed when you leave the vehicle. The
vehicle electronics can be damaged if
water enters the vehicle interior.
! When opening and closing the roof, make
sure that: Roof
87Opening and closing Z
Page 107 of 357
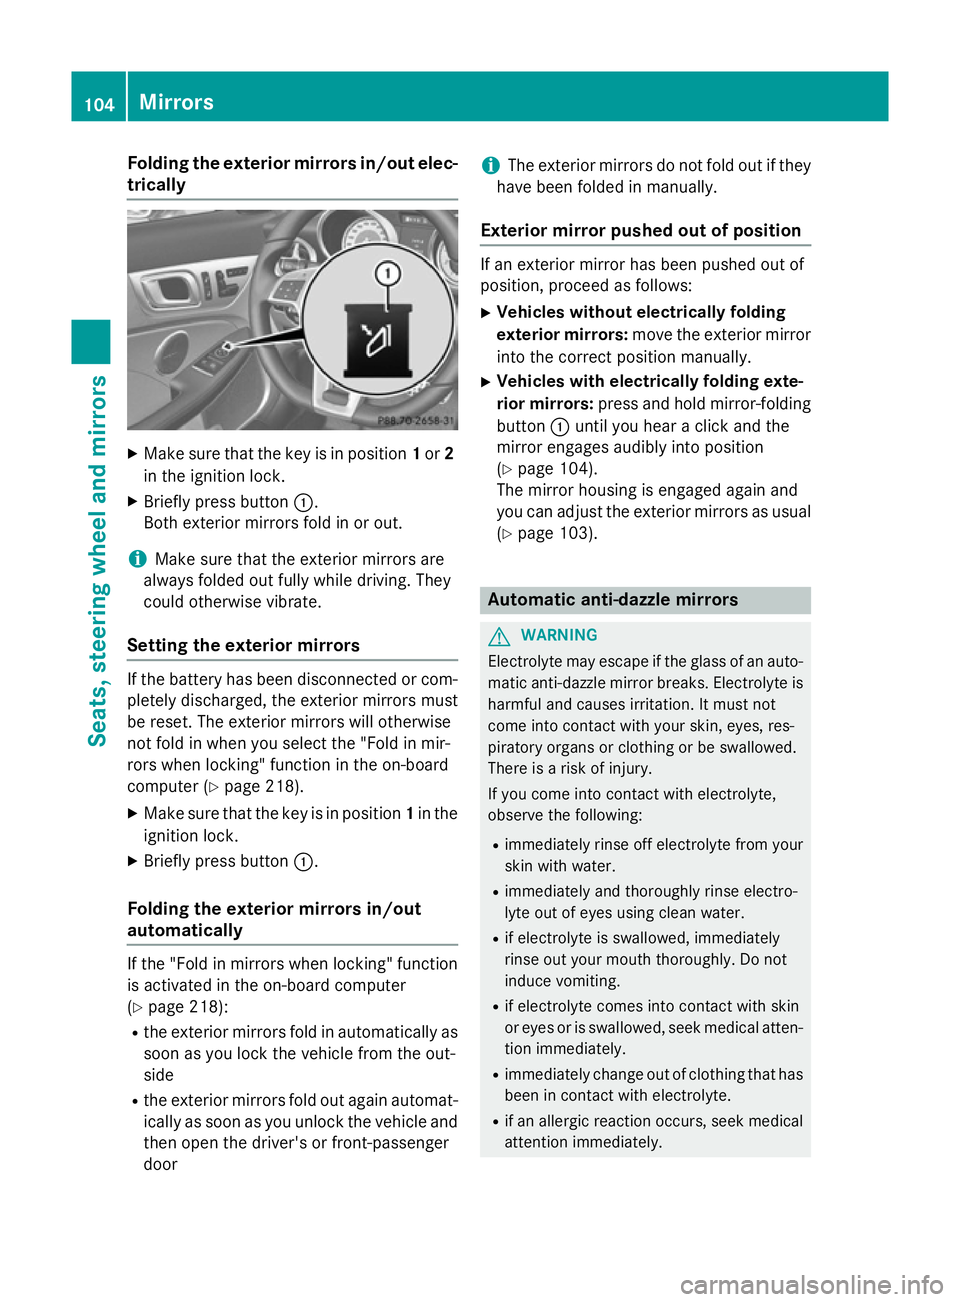
Folding the exterior mirrors in/out elec-
trically X
Make sure that the key is in position 1or 2
in the ignition lock.
X Briefly press button :.
Both exterior mirrors fold in or out.
i Make sure that the exterior mirrors are
always folded out fully while driving. They
could otherwise vibrate.
Setting the exterior mirrors If the battery has been disconnected or com-
pletely discharged, the exterior mirrors must
be reset. The exterior mirrors will otherwise
not fold in when you select the "Fold in mir-
rors when locking" function in the on-board
computer (Y page 218).
X Make sure that the key is in position 1in the
ignition lock.
X Briefly press button :.
Folding the exterior mirrors in/out
automatically If the "Fold in mirrors when locking" function
is activated in the on-board computer
(Y page 218):
R the exterior mirrors fold in automatically as
soon as you lock the vehicle from the out-
side
R the exterior mirrors fold out again automat-
ically as soon as you unlock the vehicle and
then open the driver's or front-passenger
door i
The exterior mirrors do not fold out if they
have been folded in manually.
Exterior mirror pushed out of position If an exterior mirror has been pushed out of
position, proceed as follows:
X Vehicles without electrically folding
exterior mirrors: move the exterior mirror
into the correct position manually.
X Vehicles with electrically folding exte-
rior mirrors: press and hold mirror-folding
button :until you hear a click and the
mirror engages audibly into position
(Y page 104).
The mirror housing is engaged again and
you can adjust the exterior mirrors as usual
(Y page 103). Automatic anti-dazzle mirrors
G
WARNING
Electrolyte may escape if the glass of an auto- matic anti-dazzle mirror breaks. Electrolyte is
harmful and causes irritation. It must not
come into contact with your skin, eyes, res-
piratory organs or clothing or be swallowed.
There is a risk of injury.
If you come into contact with electrolyte,
observe the following:
R immediately rinse off electrolyte from your
skin with water.
R immediately and thoroughly rinse electro-
lyte out of eyes using clean water.
R if electrolyte is swallowed, immediately
rinse out your mouth thoroughly. Do not
induce vomiting.
R if electrolyte comes into contact with skin
or eyes or is swallowed, seek medical atten-
tion immediately.
R immediately change out of clothing that has
been in contact with electrolyte.
R if an allergic reaction occurs, seek medical
attention immediately. 104
MirrorsSeats, steering wheel and
mirrors
Page 108 of 357
The rear-view mirror and the exterior mirror
on the driver's side automatically go into anti- dazzle mode if the following conditions are
met simultaneously:
R the ignition is switched on and
R incident light from headlamps strikes the
sensor in the rear-view mirror
The mirrors do not dip if reverse gear is
engaged or if the interior lighting is switched
on. Parking position of the exterior mirror
on the front-passenger side
Setting and storing the parking position Using reverse gear
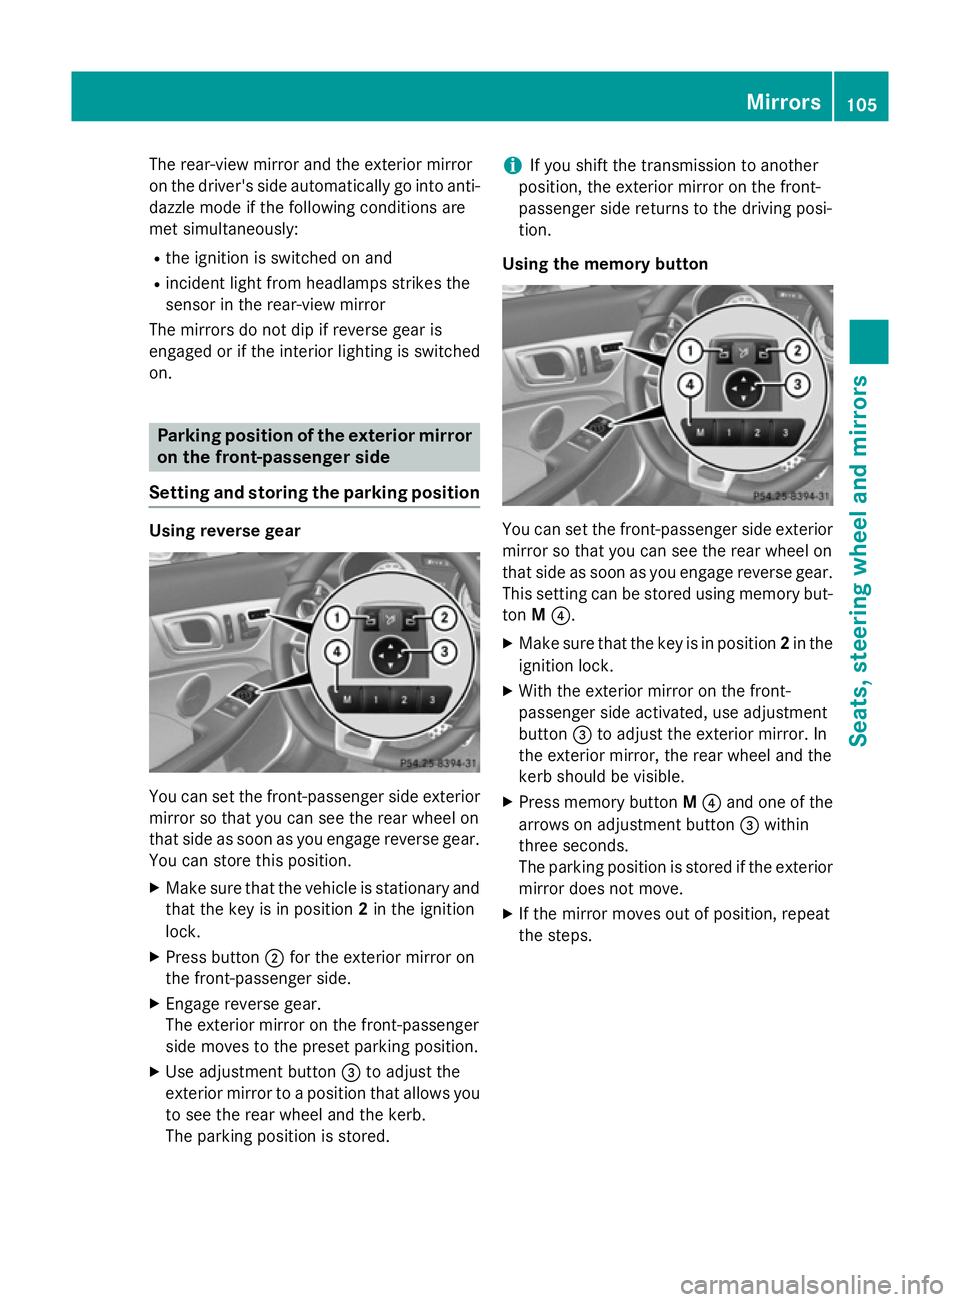
You can set the front-passenger side exterior
mirror so that you can see the rear wheel on
that side as soon as you engage reverse gear.
You can store this position.
X Make sure that the vehicle is stationary and
that the key is in position 2in the ignition
lock.
X Press button ;for the exterior mirror on
the front-passenger side.
X Engage reverse gear.
The exterior mirror on the front-passenger
side moves to the preset parking position.
X Use adjustment button =to adjust the
exterior mirror to a position that allows you to see the rear wheel and the kerb.
The parking position is stored. i
If you shift the transmission to another
position, the exterior mirror on the front-
passenger side returns to the driving posi-
tion.
Using the memory button You can set the front-passenger side exterior
mirror so that you can see the rear wheel on
that side as soon as you engage reverse gear.
This setting can be stored using memory but-
ton M?.
X Make sure that the key is in position 2in the
ignition lock.
X With the exterior mirror on the front-
passenger side activated, use adjustment
button =to adjust the exterior mirror. In
the exterior mirror, the rear wheel and the
kerb should be visible.
X Press memory button M? and one of the
arrows on adjustment button =within
three seconds.
The parking position is stored if the exterior mirror does not move.
X If the mirror moves out of position, repeat
the steps. Mirrors
105Seats, steering wheel and mirrors Z
Page 113 of 357
Useful information
i This Owner's Manual describes all mod-
els, series and optional equipment for your
vehicle that were available at the time of
going to press. National variations are pos- sible. Note that your vehicle may not be
equipped with all of the functions descri-
bed. This is also the case for systems and
functions relevant to safety.
i Read the information on qualified special-
ist workshops: (Y page 24). Exterior lighting
General notes
For reasons of safety, Mercedes-Benz recom- mends that you drive with the lights switched
on even during the daytime. In some coun-
tries, operation of the headlamps varies due
to legal requirements and self-imposed obli-
gations. Driving abroad
General notes If your journey takes you to countries where
vehicles are driven on the opposite side of the
road to the country in which the vehicle is
registered, your headlamps must be switched to symmetrical dipped beam as soon as pos-
sible after crossing the border (exception:
vehicles with halogen headlamps). This pre-
vents oncoming traffic from being dazzled.
Symmetrical lights do not illuminate as large
an area of the edge of the carriageway.
Vehicles with halogen headlamps It is not necessary to switch your headlamps
to symmetrical dipped beam when driving in
countries where vehicles are driven on the
opposite side of the road to the country in
which the vehicle is registered. Legal require- ments are fulfilled without switching the
headlamps to symmetrical dipped beam.
Vehicles with Intelligent Light System X
Before crossing the border, set the head-
lamps to symmetrical dipped beam; after
returning, reset them to asymmetrical
dipped beam via the "Dipped-beam head-
lamps for driving on the right/left" function
in the on-board computer (Y page 214).
If the headlamps are converted to symmetri-
cal dipped beam, the "motorway mode" and
"extended range foglamps" functions are not
available. Setting the exterior lighting
Setting options Exterior lighting can be set by:
R using the light switch
R headlamp range control (vehicles with hal-
ogen headlamps only) (Y page 112)
R using the combination switch
(Y page 113)
R using the on-board computer
(Y page 214)
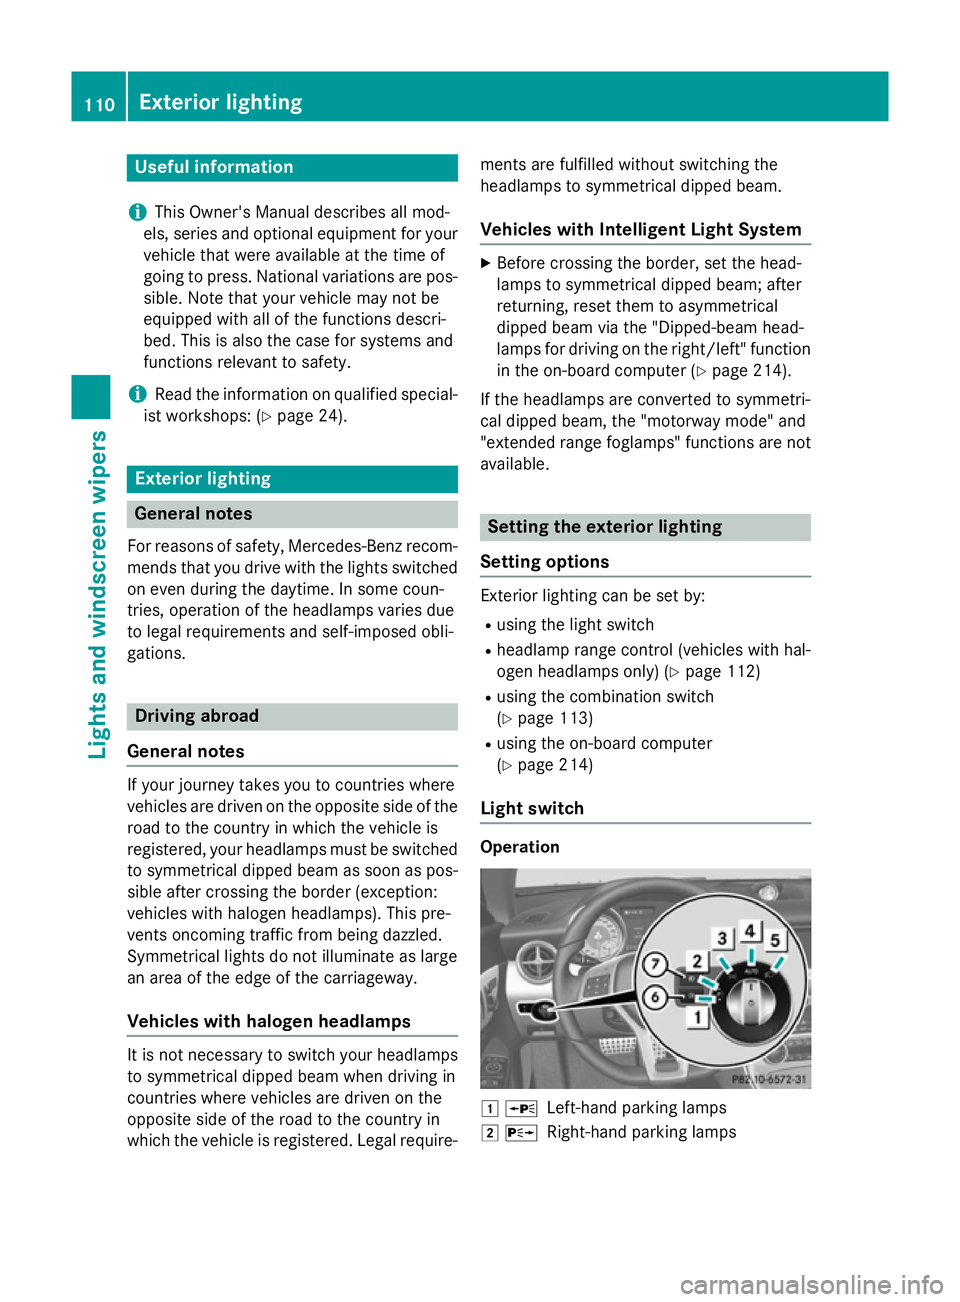
Light switch Operation
1
W
Left-hand parking lamps
2 X
Right-hand parking lamps 110
Exterior lightingLights and windscreen wipers
Page 117 of 357
ated five times (Y
page 120) while the lights
are on and the engine is running. When you
switch off the ignition, the automatic head-
lamp cleaning system is reset and counting is
resumed from 0. Intelligent Light System
General notes The Intelligent Light System is a system that
adjusts the headlamps automatically to suit
the prevailing driving and weather conditions. It offers advanced functions for improved illu-
mination of the road surface, e.g. depending
on the vehicle speed or weather conditions.
The system includes the active light function, cornering light function, motorway mode and
extended range foglamps. The system is only active when it is dark.
You can activate or deactivate the "IntelligentLight System" using the on-board computer
(Y page 214).
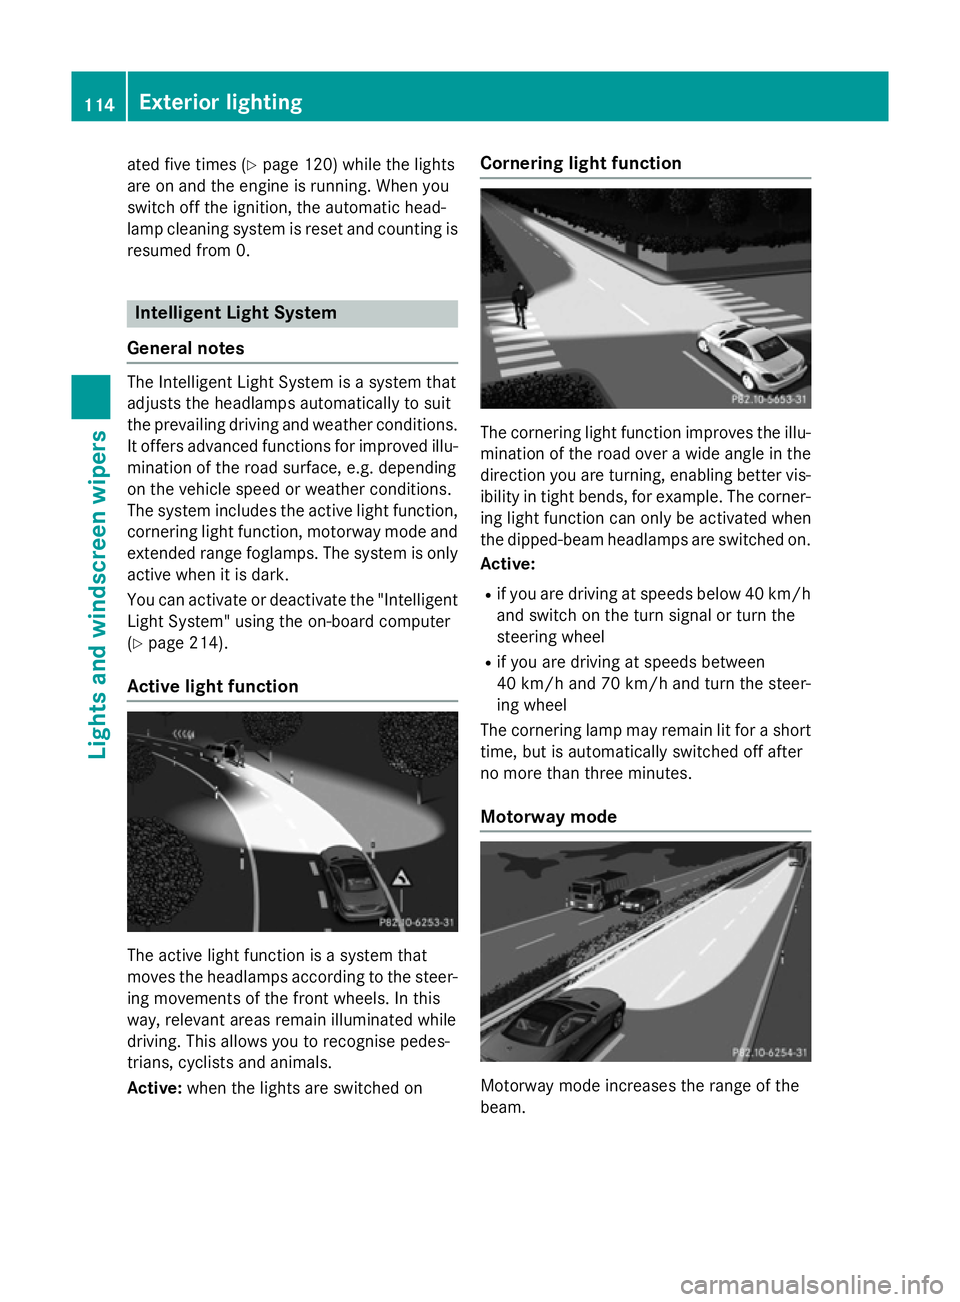
Active light function The active light function is a system that
moves the headlamps according to the steer-
ing movements of the front wheels. In this
way, relevant areas remain illuminated while
driving. This allows you to recognise pedes-
trians, cyclists and animals.
Active: when the lights are switched on Cornering light function
The cornering light function improves the illu-
mination of the road over a wide angle in the direction you are turning, enabling better vis-
ibility in tight bends, for example. The corner- ing light function can only be activated when
the dipped-beam headlamps are switched on.
Active:
R if you are driving at speeds below 40 km/h
and switch on the turn signal or turn the
steering wheel
R if you are driving at speeds between
40 km/h and 70 km/h and turn the steer-
ing wheel
The cornering lamp may remain lit for a short
time, but is automatically switched off after
no more than three minutes.
Motorway mode Motorway mode increases the range of the
beam.114
Exterior lightingLights and windscreen wipers
Page 169 of 357
accelerator. The vehicle can coast with-
out use of the brakes.
- the bar empties: frequent braking
i An economical driving style involves driv-
ing at a moderate engine speed.
To achieve a higher value in the categories
Acceleration
Acceleration andConstant Constant:
R observe the gearshift recommendation
R drive the vehicle in drive program E(vehi-
cles with automatic transmission)
i On long journeys at a constant speed, e.g.
on the motorway, only the bar for Constant
Constant
will change.
i The ECO display summarises the driving
characteristics from the start of the journey to its completion. Therefore, there are
dynamic changes in the bars at the start of
a journey. During a prolonged driving time, these changes are smaller. For more
dynamic changes, perform a manual reset.
Further information on the ECO display
(Y page 204). Braking
Important safety notes G
WARNING
If you shift down on a slippery road surface in an attempt to increase the engine's braking
effect, the drive wheels could lose their grip.
This increases the risk of skidding and having
an accident.
Do not shift down for additional engine brak-
ing on a slippery road surface.
Downhill gradients Change into a lower gear in good time on long
and steep downhill gradients. Take particular note of this when driving a laden vehicle.
i This also applies if you have activated
cruise control, SPEEDTRONIC or DIS-
TRONIC. This will use the braking effect of the engine,
so less braking will be required to maintain
vehicle speed. This relieves the load on the
brake system and prevents the brakes from
overheating and wearing too quickly.
Heavy and light loads G
WARNING
The braking system can overheat if you leave your foot on the brake pedal while driving.
This increases the braking distance and could
even cause the braking system to fail. There is
a risk of an accident.
Never use the brake pedal as a footrest. Do
not simultaneously depress both the brake
pedal and the accelerator pedal while driving.
! Depressing the brake pedal constantly
results in excessive and premature wear to
the brake pads.
If the brakes have been subjected to a heavy load, do not stop the vehicle immediately, but
drive on for a short while. This allows the air- flow to cool the brakes more quickly.
If the brakes have been used only moderately,
you should occasionally test their effective-
ness. To do this, brake more firmly from a
higher speed. This improves the grip of the
brakes.
Wet road surfaces If you have driven for a long time in heavy rain
without braking, there may be a delayed reac- tion from the brakes when braking for the firsttime. This may also occur after a car wash or
after driving through deep water.
You will have to depress the brake pedal more firmly. Maintain a greater distance to the vehi-
cle in front.
After driving on a wet road or having the vehi-
cle washed, brake firmly while paying atten-
tion to the traffic conditions. This will warm up the brake discs, thereby drying them more
quickly and protecting them against corro-
sion. 166
Driving tipsDriving and parking