2014 MERCEDES-BENZ SLK-CLASS ROADSTER tow
[x] Cancel search: towPage 93 of 356
AIRGUIDE
Important safety notes G
WARNING
You could lose control of the vehicle if you fold
AIRGUIDE in/out while the vehicle is in
motion. There is a risk of an accident.
Only fold AIRGUIDE in/out while the vehicle
is stationary.
! AIRGUIDE can only be positioned
correctly by folding it in or out. AIRGUIDE
cannot be dismantled. Do not try to remove
AIRGUIDE from its anchorage. Otherwise,
you could damage AIRGUIDE or the vehicle.
AIRGUIDE can be folded out or back in from
the driver's side or passenger side.
When operating AIRGUIDE, preferably stand
on the side of the vehicle away from the
traffic, after you have stopped the vehicle in
accordance with road and traffic conditions.
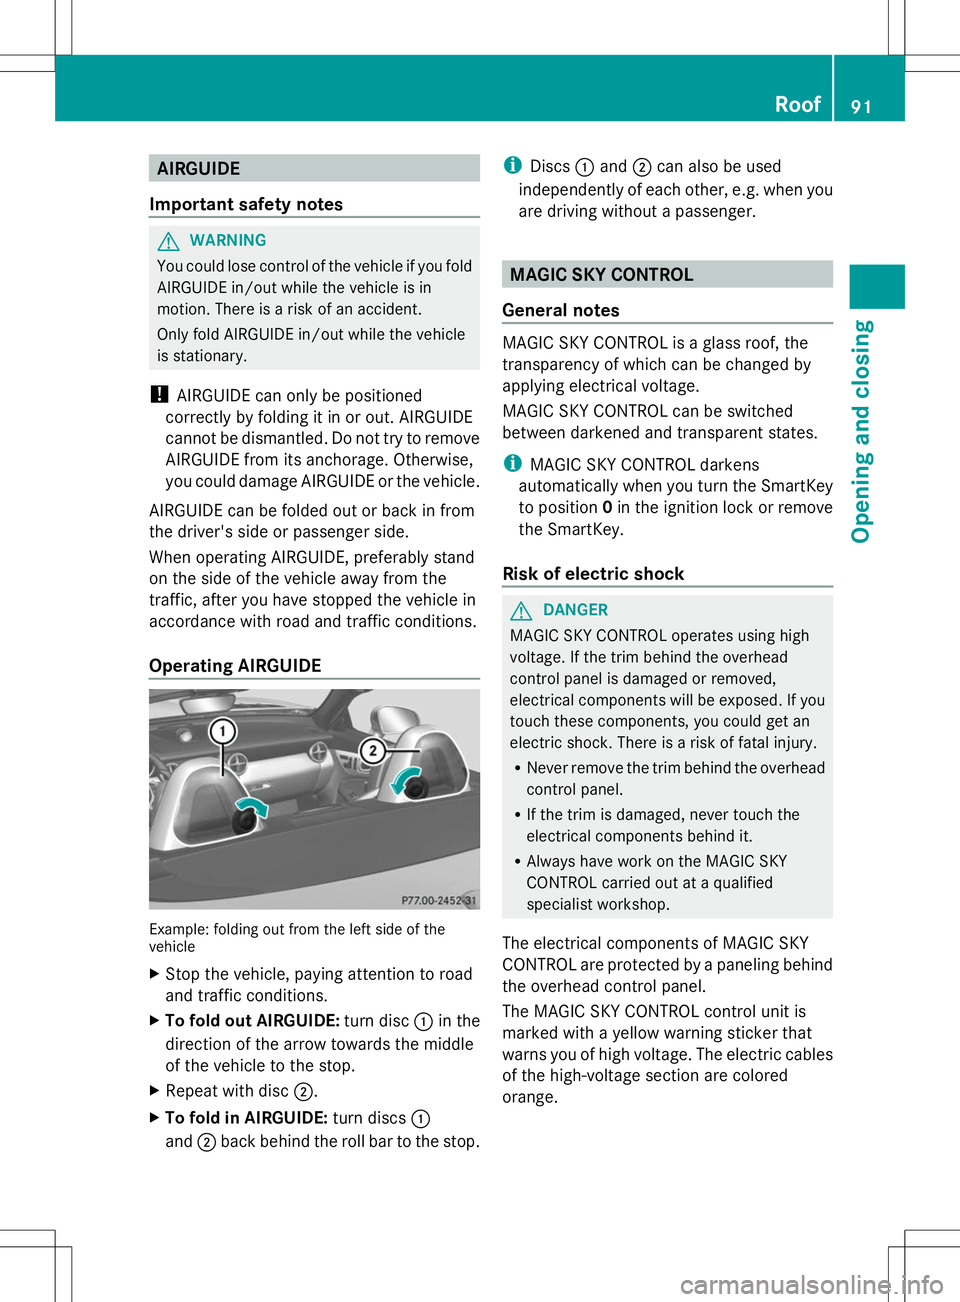
Operating AIRGUIDE Example: folding out from the left side of the
vehicle
X
Stop the vehicle, paying attention to road
and traffic conditions.
X To fold out AIRGUIDE: turn disc:in the
direction of the arrow towards the middle
of the vehicle to the stop.
X Repeat with disc ;.
X To fold in AIRGUIDE: turn discs:
and ;back behind the roll bar to the stop. i
Discs :and ;can also be used
independently of each other, e.g. when you
are driving without a passenger. MAGIC SKY CONTROL
General notes MAGIC SKY CONTROL is a glass roof, the
transparency of which can be changed by
applying electrical voltage.
MAGIC SKY CONTROL can be switched
between darkened and transparent states.
i
MAGIC SKY CONTROL darkens
automatically when you turn the SmartKey
to position 0in the ignition lock or remove
the SmartKey.
Risk of electric shock G
DANGER
MAGIC SKY CONTROL operates using high
voltage. If the trim behind the overhead
control panel is damaged or removed,
electrical components will be exposed. If you
touch these components, you could get an
electric shock. There is a risk of fatal injury.
R Never remove the trim behind the overhead
control panel.
R If the trim is damaged, never touch the
electrical components behind it.
R Always have work on the MAGIC SKY
CONTROL carried out at a qualified
specialist workshop.
The electrical components of MAGIC SKY
CONTROL are protected by a paneling behind
the overhead control panel.
The MAGIC SKY CONTROL control unit is
marked with a yellow warning sticker that
warns you of high voltage. The electric cables
of the high-voltage section are colored
orange. Roof
91Opening and closing Z
Page 103 of 356
G
WARNING
You can no longer steer the vehicle if the
steering wheel lock has been engaged. There
is a risk of an accident.
Always switch off the ignition when towing the
vehicle with a tow cable or a tow bar. Adjusting the steering wheel
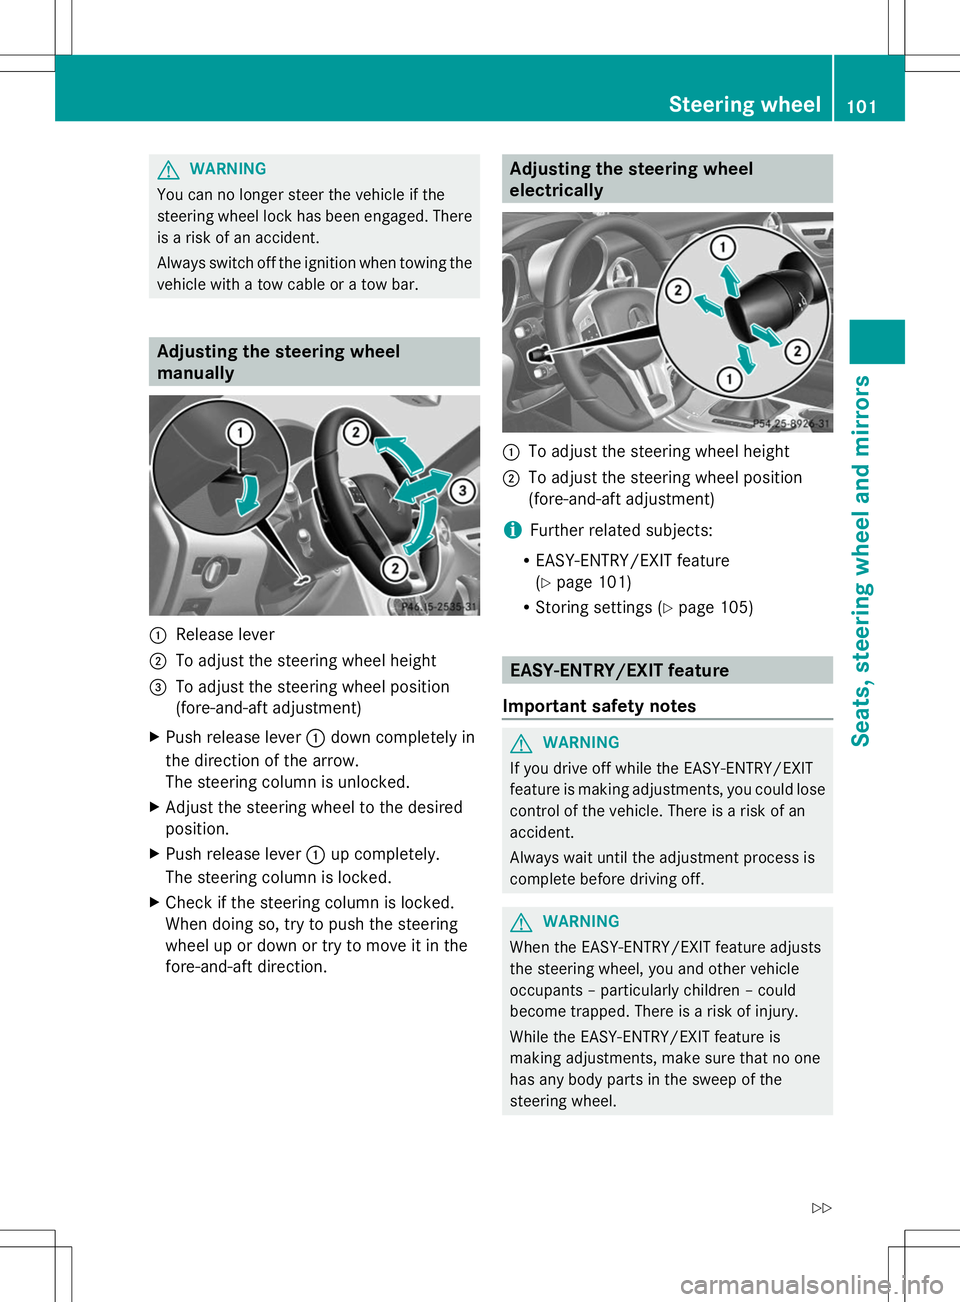
manually
:
Release lever
; To adjust the steering wheel height
= To adjust the steering wheel position
(fore-and-aft adjustment)
X Push release lever :down completely in
the direction of the arrow.
The steering column is unlocked.
X Adjust the steering wheel to the desired
position.
X Push release lever :up completely.
The steering column is locked.
X Check if the steering column is locked.
When doing so, try to push the steering
wheel up or down or try to move it in the
fore-and-aft direction. Adjusting the steering wheel
electrically
:
To adjust the steering wheel height
; To adjust the steering wheel position
(fore-and-aft adjustment)
i Further related subjects:
R EASY-ENTRY/EXIT feature
(Y page 101)
R Storing settings (Y page 105) EASY-ENTRY/EXIT feature
Important safety notes G
WARNING
If you drive off while the EASY-ENTRY/EXIT
feature is making adjustments, you could lose
control of the vehicle. There is a risk of an
accident.
Always wait until the adjustment process is
complete before driving off. G
WARNING
When the EASY-ENTRY/EXIT feature adjusts
the steering wheel, you and other vehicle
occupants – particularly children – could
become trapped. There is a risk of injury.
While the EASY-ENTRY/EXIT feature is
making adjustments, make sure that no one
has any body parts in the sweep of the
steering wheel. Steering wheel
101Seats, steering wheel and mirrors
Z
Page 140 of 356
Useful information
i This Operator's Manual describes all
models and all standard and optional
equipment of your vehicle available at the
time of publication of the Operator's
Manual. Country-specific differences are
possible. Please note that your vehicle may
not be equipped with all features
described. This also applies to safety-
related systems and functions.
i Read the information on qualified
specialist workshops: (Y page 24).Notes on breaking-in a new vehicle
Important safety notes
New and replaced brake pads and discs only
reach their optimum braking effect after
several hundred kilometers of driving.
Compensate for this by applying greater force
to the brake pedal. The first 1000 miles (1500 km)
The more you look after the engine when it is
new, the more satisfied you will be with its
performance in the future.
R You should therefore drive at varying
vehicle and engine speeds for the first
1,000 miles (1,500 km).
R Avoid heavy loads, e.g. driving at full
throttle, during this period.
R Change gear in good time, before the
tachometer needle is Ôof the way to the
red area of the tachometer.
R Do not manually shift to a lower gear to
brake the vehicle.
Vehicles with automatic transmission:
R Ideally, for the first 1,000 miles (1,500 km),
drive in program C.
R If possible, do not depress the accelerator
pedal past the point of resistance
(kickdown). After 1,000 miles (1,500 km), you can
increase the engine speed gradually and bring
the vehicle to full speed.
Additional breaking-in notes for AMG
vehicles:
R
Do not drive faster than 85 mph
(140 km/h) for the first 1,000 miles
(1,500 km).
R Only allow the engine to reach a maximum
engine speed of 4,500 rpm briefly.
R Change gear in good time.
i You should also observe these notes on
breaking in if the engine or parts of the drive
train on your vehicle have been replaced.
i Always observe the respective speed
limits. AMG vehicles with self-locking rear
axle differential
Your vehicle is equipped with a self-locking
differential on the rear axle. To protect the
differential on the rear axle, carry out an oil
change after a breaking-in phase of
2,000 miles (3,000 km). This oil change
prolongs the service life of the differential.
Have the oil change carried out at a qualified
specialist workshop. Mercedes-Benz
recommends that you use an authorized
Mercedes-Benz Center for this purpose. Driving
Important safety notes
G
WARNING
Objects in the driver's footwell can restrict the
pedal travel or obstruct a depressed pedal.
The operating and road safety of the vehicle
is jeopardized. There is a risk of an accident.
Make sure that all objects in the vehicle are
stowed correctly, and that they cannot enter
the driver's footwell. Install the floormats
securely and as specified in order to ensure
sufficient clearance for the pedals. Do not use 138
DrivingDriving and parking
Page 152 of 356
Transmission positions
B
Park position
Do not shift the transmission into
position P(Ypage 149) unless the
vehicle is stationary. The parking
lock should not be used as a brake
when parking. Always apply the
electronic parking brake in
addition to the parking lock in order
to secure the vehicle.
The SmartKey can only be removed
if the transmission is in position P.
If the SmartKey is removed from
the ignition lock, the selector lever
is locked.
If the vehicle electronics are
malfunctioning, the selector lever
may be locked in position P. To
release a locked selector lever, see
"Manual override of parking lock"
(Y page 156). C
Reverse gear
Only shift the transmission to R
when the vehicle is stationary. A
Neutral
Do not shift the transmission to
N
while driving. Otherwise, the
automatic transmission could be
damaged.
No power is transmitted from the
engine to the drive wheels.
Releasing the brakes will allow you
to move the vehicle freely, e.g. to
push it or tow it.
If ESP ®
is deactivated or faulty:
only shift the transmission to
position Nif the vehicle is in danger
of skidding, e.g. on icy roads.
! Rolling in neutral Ncan damage
the drive train. 7
Drive
The automatic transmission
changes gear automatically. All
forward gears are available.
Changing gear
The automatic transmission shifts to the
individual gears automatically when it is in
transmission position D. This automatic
gearshifting behavior is determined by:
R the selected drive program (Y page 151)
R the position of the accelerator pedal
R the road speed Driving tips
Accelerator pedal position Your style of driving influences how the
automatic transmission shifts gear:
R
little throttle: early upshifts
R more throttle: late upshifts 150
Automatic transmissionDriving an
d parking
Page 155 of 356
Upshifting
X
Briefly press the selector lever to the right
towards D+.
or
X Pull the right-hand steering wheel paddle
shifter (Y page 152).
In cases where it is permissible, the
automatic transmission shifts up to the
next gear.
i If the maximum engine speed on the
currently engaged gear is reached and you
continue to accelerate, the automatic
transmission automatically shifts up in
order to prevent engine damage.
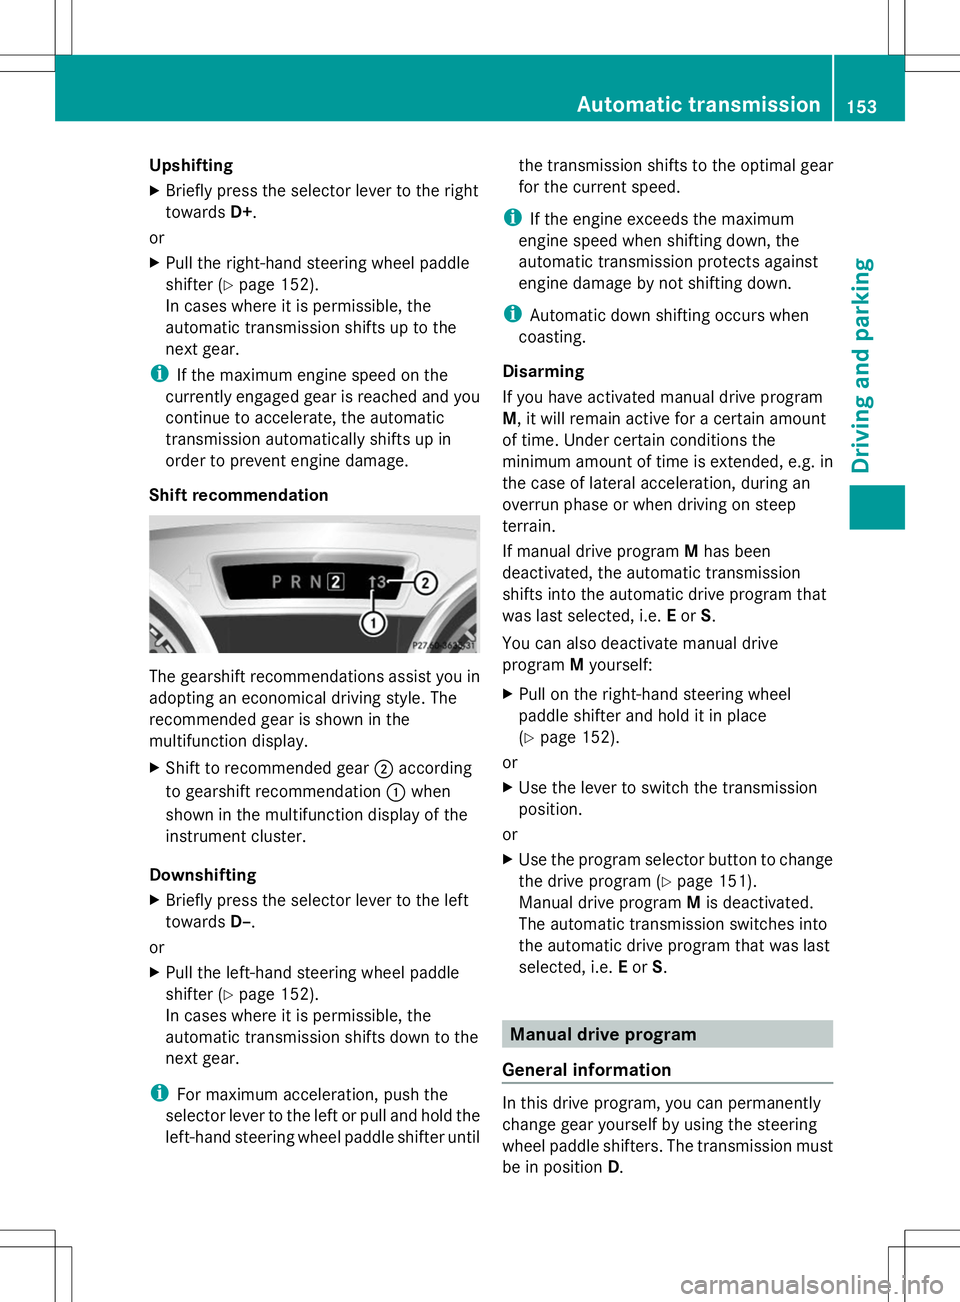
Shift recommendation The gearshift recommendations assist you in
adopting an economical driving style. The
recommended gear is shown in the
multifunction display.
X Shift to recommended gear ;according
to gearshift recommendation :when
shown in the multifunction display of the
instrument cluster.
Downshifting
X Briefly press the selector lever to the left
towards D–.
or
X Pull the left-hand steering wheel paddle
shifter (Y page 152).
In cases where it is permissible, the
automatic transmission shifts down to the
next gear.
i For maximum acceleration, push the
selector lever to the left or pull and hold the
left-hand steering wheel paddle shifter until the transmission shifts to the optimal gear
for the current speed.
i If the engine exceeds the maximum
engine speed when shifting down, the
automatic transmission protects against
engine damage by not shifting down.
i Automatic down shifting occurs when
coasting.
Disarming
If you have activated manual drive program
M, it will remain active for a certain amount
of time. Under certain conditions the
minimum amount of time is extended, e.g. in
the case of lateral acceleration, during an
overrun phase or when driving on steep
terrain.
If manual drive program Mhas been
deactivated, the automatic transmission
shifts into the automatic drive program that
was last selected, i.e. Eor S.
You can also deactivate manual drive
program Myourself:
X Pull on the right-hand steering wheel
paddle shifter and hold it in place
(Y page 152).
or
X Use the lever to switch the transmission
position.
or
X Use the program selector button to change
the drive program (Y page 151).
Manual drive program Mis deactivated.
The automatic transmission switches into
the automatic drive program that was last
selected, i.e. Eor S. Manual drive program
General information In this drive program, you can permanently
change gear yourself by using the steering
wheel paddle shifters. The transmission must
be in position
D. Automatic transmission
153Driving and parking Z
Page 156 of 356
i
As well as this permanent drive program
M, you can also activate temporary drive
program M(Ypage 152).
Switching on the manual drive program Manual drive program
Mis different from
drive program Swith regard to spontaneity,
responsiveness and smoothness of gear
changes.
Manual drive program Mcan be selected
using the program selector button. You can
change gear using the steering wheel paddle
shifters or the selector lever in manual drive
program Mif the transmission is in position
D. The selected gear appears in the
multifunction display.
X Press the program selector button
(Y page 151) repeatedly until Mappears in
the multifunction display.
Upshifting X
Briefly press the selector lever to the right
towards D+.
or
X Pull the right-hand steering wheel paddle
shifter (Y page 152).
The automatic transmission shifts up to the
next gear.
Shift recommendation The gearshift recommendations assist you in
adopting an economical driving style. The
recommended gear is shown in the
multifunction display.
X Shift to recommended gear ;according
to gearshift recommendation :when shown in the multifunction display of the
instrument cluster.
AMG vehicles !
In manual drive program M, the automatic
transmission does not shift up
automatically even when the engine
limiting speed for the current gear is
reached. When the engine limiting speed is
reached, the fuel supply is cut to prevent
the engine from overrevving. Always make
sure that the engine speed does not reach
the red area of the tachometer. There is
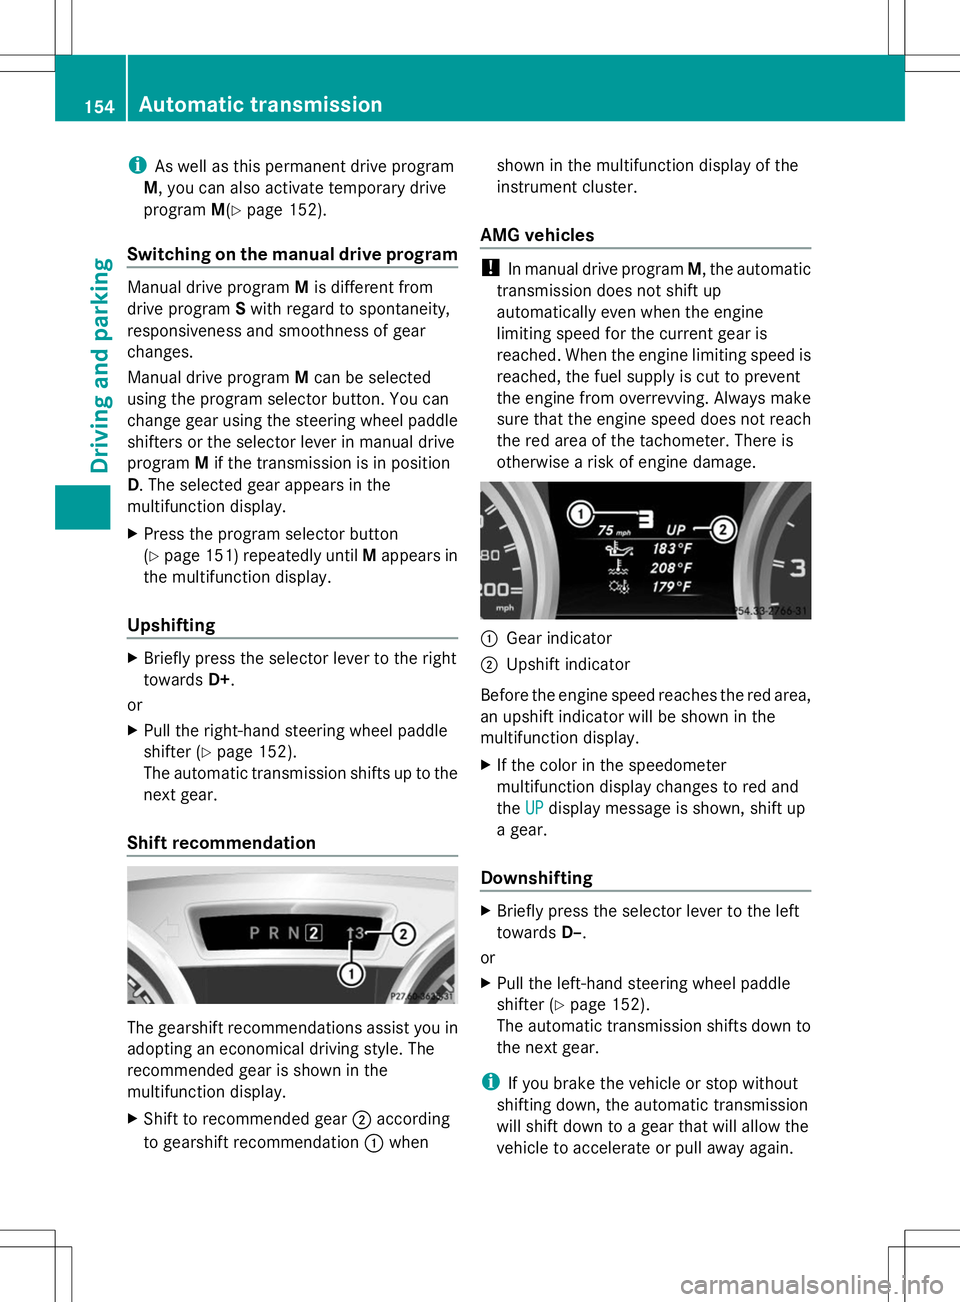
otherwise a risk of engine damage. :
Gear indicator
; Upshift indicator
Before the engine speed reaches the red area,
an upshift indicator will be shown in the
multifunction display.
X If the color in the speedometer
multifunction display changes to red and
the UP
UP display message is shown, shift up
a gear.
Downshifting X
Briefly press the selector lever to the left
towards D–.
or
X Pull the left-hand steering wheel paddle
shifter (Y page 152).
The automatic transmission shifts down to
the next gear.
i If you brake the vehicle or stop without
shifting down, the automatic transmission
will shift down to a gear that will allow the
vehicle to accelerate or pull away again. 154
Automatic transmissionDriving an
d parking
Page 158 of 356
Problems with the transmission
Problem Possible causes/consequences and
M
MSolutions The transmission has
problems shifting gear. The transmission is losing oil.
X
Have the transmission checked at a qualified specialist
workshop immediately. The acceleration ability
is deteriorating.
The transmission no
longer changes gear. The transmission is in emergency mode.
It is only possible to shift into
secondgear and reverse gear.
X Stop the vehicle.
X Shift the transmission to position P.
X Switch off the engine.
X Wait at least ten seconds before restarting the engine.
X Shift the transmission to position Dor R.
If D is selected, the transmission shifts into secondgear; ifRis
selected, the transmission shifts into reverse gear.
X Have the transmission checked at a qualified specialist
workshop, e.g. an authorized Mercedes-Benz Center,
immediately. Releasing the parking lock manually
! Do not use any sharp-edged objects to
remove the selector lever gaiter from the
center console. This could damage the
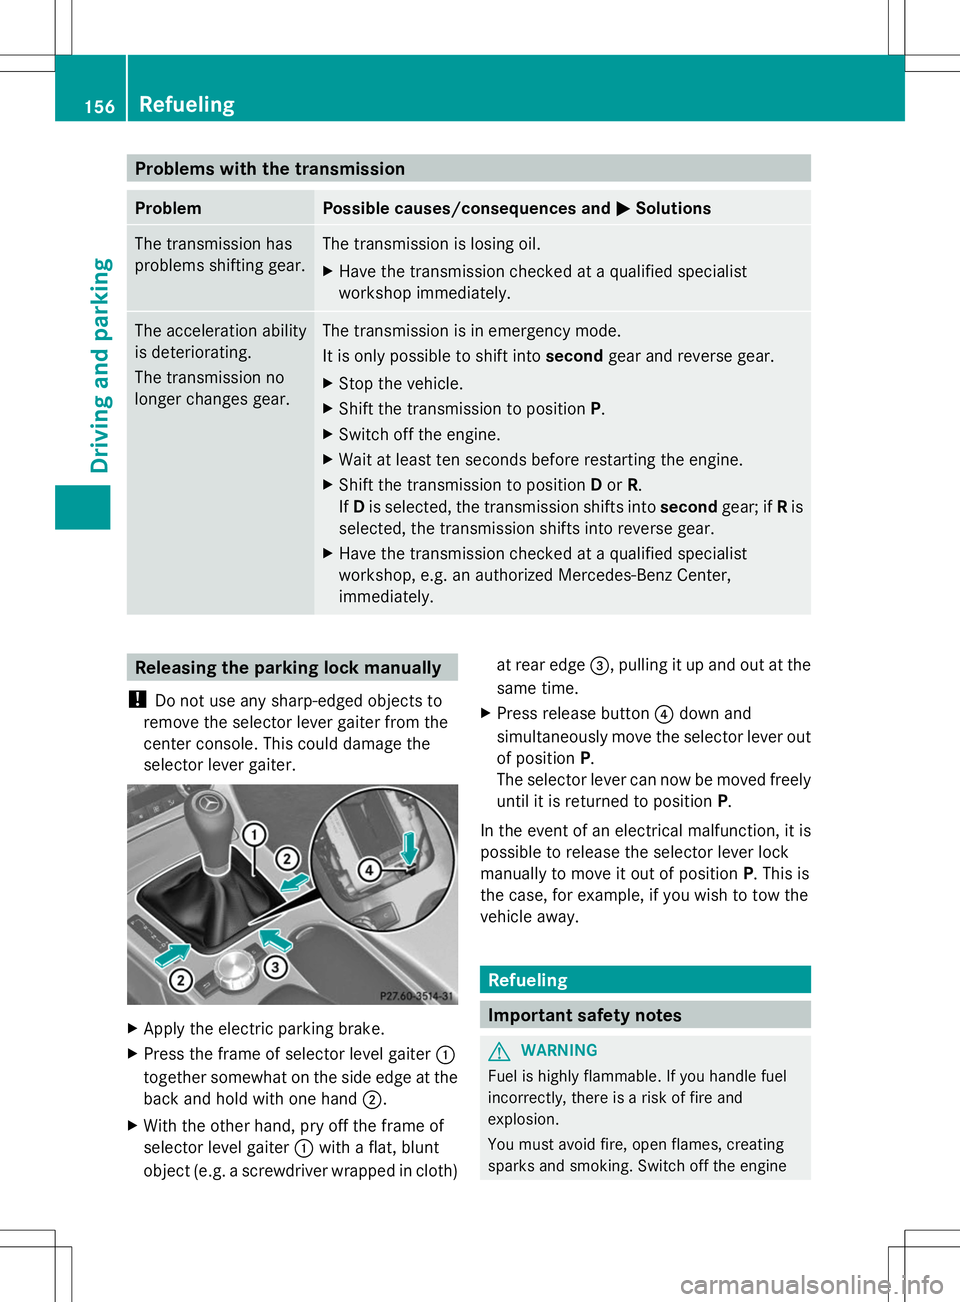
selector lever gaiter. X
Apply the electric parking brake.
X Press the frame of selector level gaiter :
together somewhat on the side edge at the
back and hold with one hand ;.
X With the other hand, pry off the frame of
selector level gaiter :with a flat, blunt
object (e.g. a screwdriver wrapped in cloth) at rear edge
=, pulling it up and out at the
same time.
X Press release button ?down and
simultaneously move the selector lever out
of position P.
The selector lever can now be moved freely
until it is returned to position P.
In the event of an electrical malfunction, it is
possible to release the selector lever lock
manually to move it out of position P. This is
the case, for example, if you wish to tow the
vehicle away. Refueling
Important safety notes
G
WARNING
Fuel is highly flammable. If you handle fuel
incorrectly, there is a risk of fire and
explosion.
You must avoid fire, open flames, creating
sparks and smoking. Switch off the engine 156
RefuelingDriving and parking
Page 162 of 356
!
Always secure the vehicle correctly
against rolling away. Otherwise, the vehicle
or its drivetrain could be damaged.
To ensure that the vehicle is secured against
rolling away unintentionally:
R the electric parking brake must be applied.
R on vehicles with manual transmission,
engage first gear or reverse gear.
R on vehicles with automatic transmission,
the transmission must be in position Pand
the SmartKey must be removed from the
ignition lock.
R on steep uphill or downhill gradients, turn
the front wheels towards the curb. Switching off the engine
Important safety notes G
WARNING
The automatic transmission switches to
neutral position Nwhen you switch off the
engine. The vehicle may roll away. There is a
risk of an accident.
After switching off the engine, always switch
to parking position P. Prevent the parked
vehicle from rolling away by applying the
parking brake.
Vehicles with manual transmission X
Shift to either first gear or reverse gear R.
X Turn the SmartKey to position 0in the
ignition lock and remove it.
The immobilizer is activated.
X Apply the electric parking brake.
Vehicles with automatic transmission X
Apply the electric parking brake.
X Shift the transmission to position P.Using the SmartKey
X
Turn the SmartKey to position 0in the
ignition lock and remove it.
The immobilizer is activated.
i The SmartKey can only be removed if the
transmission is in position P.
Using KEYLESS-GO
X Press the Start/Stop button (Y page 139).
The engine stops and all the indicator
lamps in the instrument cluster go out.
i When the driver's door is closed, this
corresponds to key position 1. When the
driver's door is open, this corresponds to
key position 0: "Key removed".
If you try to switch off the engine when the
transmission is not in position P, a message
appears in the multifunction display. A signal
sounds. Electric parking brake
General notes G
WARNING
If you leave children unsupervised in the
vehicle, they could set it in motion by, for
example:
R release the parking brake.
R shift an automatic transmission out of park
position P.
R shift the manual transmission into neutral.
R start the engine.
They could also operate the vehicle's
equipment. There is a risk of an accident and
injury.
When leaving the vehicle, always take the
SmartKey with you and lock the vehicle. Never
leave children unsupervised in the vehicle.
i The electric parking brake performs a
function test at regular intervals while the
engine is switched off. The sounds that can
be heard while this is occurring are normal. 160
ParkingDriving and parking