2014 MERCEDES-BENZ SLK-CLASS ROADSTER tow
[x] Cancel search: towPage 44 of 356
affect your hearing. The powder that is
released generally does not constitute a
health hazard and does not indicate that there
is a fire in the vehicle. The dust might cause
some temporary breathing difficulty for
people with asthma or other breathing
trouble. To avoid this, you may wish to get out
of the vehicle as soon as it is safe to do so.
You can also open the window to allow fresh
air to enter the vehicle interior. The 6SRS
warning lamp lights up.
The air bag installation locations are
identified by the AIR BAG symbol.
The air bags are deployed if the air bag control
unit detects the need for deployment. Only in
the event of such a situation will the air bags
provide their supplemental protection.
If the driver and front passenger do not wear
their seat belts, it is not possible for the air
bags to provide their supplemental
protection.
In the event of other types of impacts and
impacts below air bag deployment
thresholds, the air bags will not deploy. The
driver and passenger will then be protected
to the extent possible by a properly fastened
seat belt. A properly fastened seat belt is also
needed to provide the best possible
protection in a rollover.
Air bags provide additional protection; they
are not, however, a substitute for seat belts.
All vehicle occupants must fasten their seat
belts.
It is important for your safety and that of your
passenger to have deployed air bags replaced
and to have any malfunctioning air bags
repaired. This will help to make sure the air
bags continue to perform their protective
function for the vehicle occupants in the
event of a crash.
i After an air bag has been deployed, have
the vehicle towed to the nearest qualified
specialist workshop, even if your vehicle is
ready to drive. Front air bags
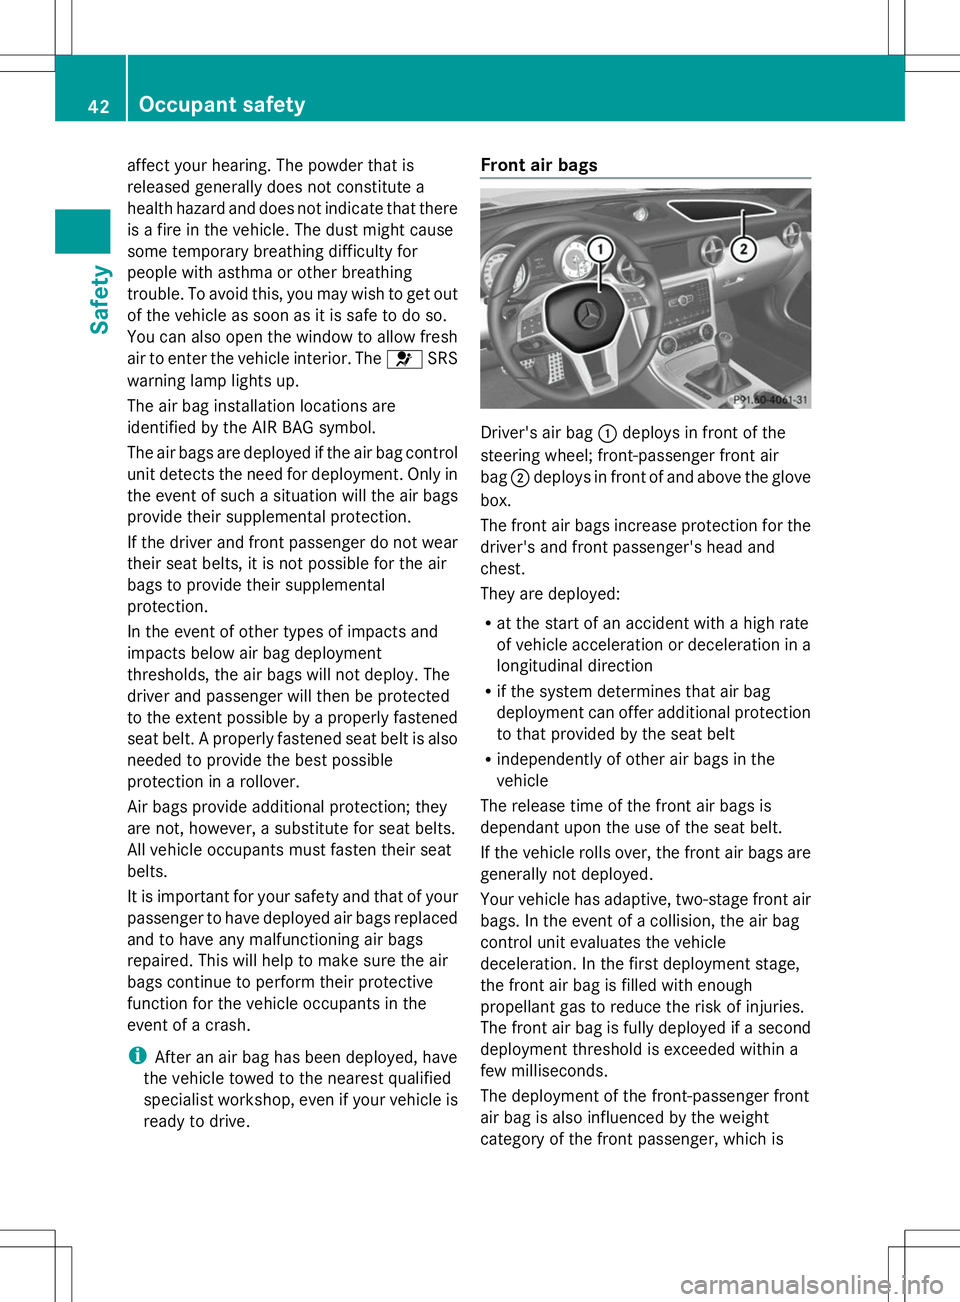
Driver's air bag
:deploys in front of the
steering wheel; front-passenger front air
bag ;deploys in front of and above the glove
box.
The front air bags increase protection for the
driver's and front passenger's head and
chest.
They are deployed:
R at the start of an accident with a high rate
of vehicle acceleration or deceleration in a
longitudinal direction
R if the system determines that air bag
deployment can offer additional protection
to that provided by the seat belt
R independently of other air bags in the
vehicle
The release time of the front air bags is
dependant upon the use of the seat belt.
If the vehicle rolls over, the front air bags are
generally not deployed.
Your vehicle has adaptive, two-stage front air
bags. In the event of a collision, the air bag
control unit evaluates the vehicle
deceleration. In the first deployment stage,
the front air bag is filled with enough
propellant gas to reduce the risk of injuries.
The front air bag is fully deployed if a second
deployment threshold is exceeded within a
few milliseconds.
The deployment of the front-passenger front
air bag is also influenced by the weight
category of the front passenger, which is 42
Occupant safetySafety
Page 57 of 356
Emergency Tensioning Devices, seat
belt force limiters G
WARNING
Pyrotechnic Emergency Tensioning Devices
that have been deployed are no longer
operational and are unable to perform their
intended protective function. This poses an
increased risk of injury or even fatal injury.
Therefore, have pyrotechnic Emergency
Tensioning Devices which have been
triggered immediately replaced at a qualified
specialist workshop.
! If the co-driver's seat is unoccupied, do
not insert the belt tongue into the buckle of
the co-driver's seat. This may otherwise
lead to the triggering of the Emergency
Tensioning Device in the event of an
accident, which will then need to be
replaced.
i Vehicles with PRE-SAFE ®
: Emergency
Tensioning Devices that are triggered by an
electric motor can be deployed as often as
desired and do not need to be replaced.
The seat belts are equipped with Emergency
Tensioning Devices and seat belt force
limiters.
The ETDs tighten the seat belts in an accident,
pulling them close against the body.
The ETDs do not correct incorrect seat
positions or incorrectly fastened seat belts.
The ETDs do not pull vehicle occupants back
towards the backrest.
The ETDs can only be activated when:
R the ignition is switched on
R the restraint systems are operational; see
"SRS warning lamp "( Ypage 39)
R the belt tongue is engaged in the buckle on
each of the three-point seat belts.
The ETDs are triggered depending on the type
and severity of an accident:
R in the event of a head-on or rear-end
collision if the vehicle decelerates or
accelerates rapidly in a longitudinal direction during the initial stages of the
impact.
R in the event of a side impact if the vehicle
decelerates or accelerates rapidly in a
lateral direction on the side opposite to the
impact..
R in certain situations where the vehicle rolls
over if the system determines that it can
provide additional protection.
If the ETDs are deployed, you will hear a bang,
and a small amount of powder may also be
released. Only in rare cases will the bang
affect your hearing. The powder that is
released generally does not constitute a
health hazard and does not indicate that there
is a fire in the vehicle. The dust might cause
some temporary breathing difficulty for
people with asthma or other breathing
trouble. To avoid this, you may wish to get out
of the vehicle as soon as it is safe to do so.
You can also open the window to allow fresh
air to enter the vehicle interior. The 6SRS
warning lamp lights up.
When triggered, seat belt force limiters help
to reduce the force exerted by the seat belt
on the vehicle occupant.
The seat belt force limiters are synchronized
with the front air bags, which take on a part
of the deceleration force. Thus, the force
exerted on the occupant is distributed over a
greater area. Child restraint systems
Important safety notes
G
WARNING
Children 12 years old and under must be
seated and properly secured in an appropriate
infant restraint, toddler restraint, or booster
seat recommended for the size and weight of
the child.
The infant or child restraint system must be
correctly secured using the vehicle's seat belt
in complete accordance with the child seat
manufacturer's instructions. Child restraint systems
55Safety
Z
Page 64 of 356

ETS traction control is part of ESP
®
.
ETS brakes the drive wheels individually if
they spin. This enables you to pull away and
accelerate on slippery surfaces, for example
if the road surface is slippery on one side. In
addition, more drive torque is transferred to
the wheel or wheels with traction.
ETS remains active when you deactivate
ESP ®
.
i AMG vehicles: your vehicle may be
equipped with 20-inch tires on the rear
axle. If replaced with a 19-inch tire, ETS
may intervene noticeably sooner for the
first few kilometers. After approximately
10 km ETS will function as usual again.
Information on the dimensions and types of
wheels and tires for your vehicle can be
found in the "Wheel/tire combinations"
section ( Ypage 333).
Important safety notes G
WARNING
If ESP ®
is malfunctioning, ESP ®
is unable to
stabilize the vehicle. Additionally, further
driving safety systems are deactivated. This
increases the risk of skidding and an accident.
Drive on carefully. Have ESP ®
checked at a
qualified specialist workshop.
! When testing the electric parking brake
on a braking dynamometer, switch off the
ignition. Application of the brakes by
ESP ®
may otherwise destroy the brake
system.
When towing the vehicle with the rear axle
raised, observe the notes on
ESP ®
(Y page 302).
ESP ®
is deactivated if the åwarning lamp
in the instrument cluster lights up
continuously when the engine is running.
If the ÷ warning lamp and the å
warning lamp are lit continuously, ESP ®
is not
available due to a malfunction. Observe the information on warning lamps
(Y
page 244) and display messages which
may be shown in the instrument cluster
(Y page 211).
i Only use wheels with the recommended
tire sizes. Only then will ESP ®
function
properly.
Characteristics of ESP ® General information
If the
÷ ESP warning lamp goes out before
beginning the journey, ESP ®
is automatically
active.
If ESP ®
intervenes, the ÷ESP®
warning
lamp flashes in the instrument cluster.
If ESP ®
intervenes:
X Do not deactivate ESP ®
under any
circumstances.
X Only depress the accelerator pedal as far
as necessary when pulling away.
X Adapt your driving style to suit the
prevailing road and weather conditions.
ECO start/stop function
The ECO start/stop function switches the
engine off automatically when the vehicle
stops moving. The engine starts
automatically when the driver wants to pull
away again. ESP ®
remains in its previously
selected status. Example:if ESP®
was
deactivated before the engine was switched
off, ESP ®
remains deactivated when the
engine is switched on again.
Deactivating/activating ESP ®
(except
AMG vehicles) Important safety notes
i
Observe the "Important safety notes"
section ( Ypage 59). 62
Driving safety systemsSafety
Page 69 of 356
You can prevent the intervention of the PRE-
SAFE ®
Brake at any time by:
R depressing the accelerator pedal further.
R activating kickdown.
R releasing the brake pedal.
The braking action of PRE-SAFE ®
Brake is
ended automatically if:
R you maneuver to avoid the obstacle.
R there is no longer any danger of a collision.
R there is no longer an obstacle detected in
front of your vehicle. Theft deterrent locking system
Immobilizer
X To activate with the SmartKey: remove
the SmartKey from the ignition lock.
X To activate with KEYLESS-GO: switch the
ignition off and open the driver's door.
X To deactivate: switch on the ignition.
The immobilizer prevents your vehicle from
being started without the correct SmartKey.
When leaving the vehicle, always take the
SmartKey with you and lock the vehicle. The
engine can be started by anyone with a valid
SmartKey that is left inside the vehicle.
i The immobilizer is always deactivated
when you start the engine.
In the event that the engine cannot be
started when the starter battery is fully
charged, the immobilizer may be faulty.
Contact an authorized Mercedes-Benz
Center or call 1-800-FOR-MERCedes (in
USA) or 1-800-387-010 0(in Canada). ATA (anti-theft alarm system)
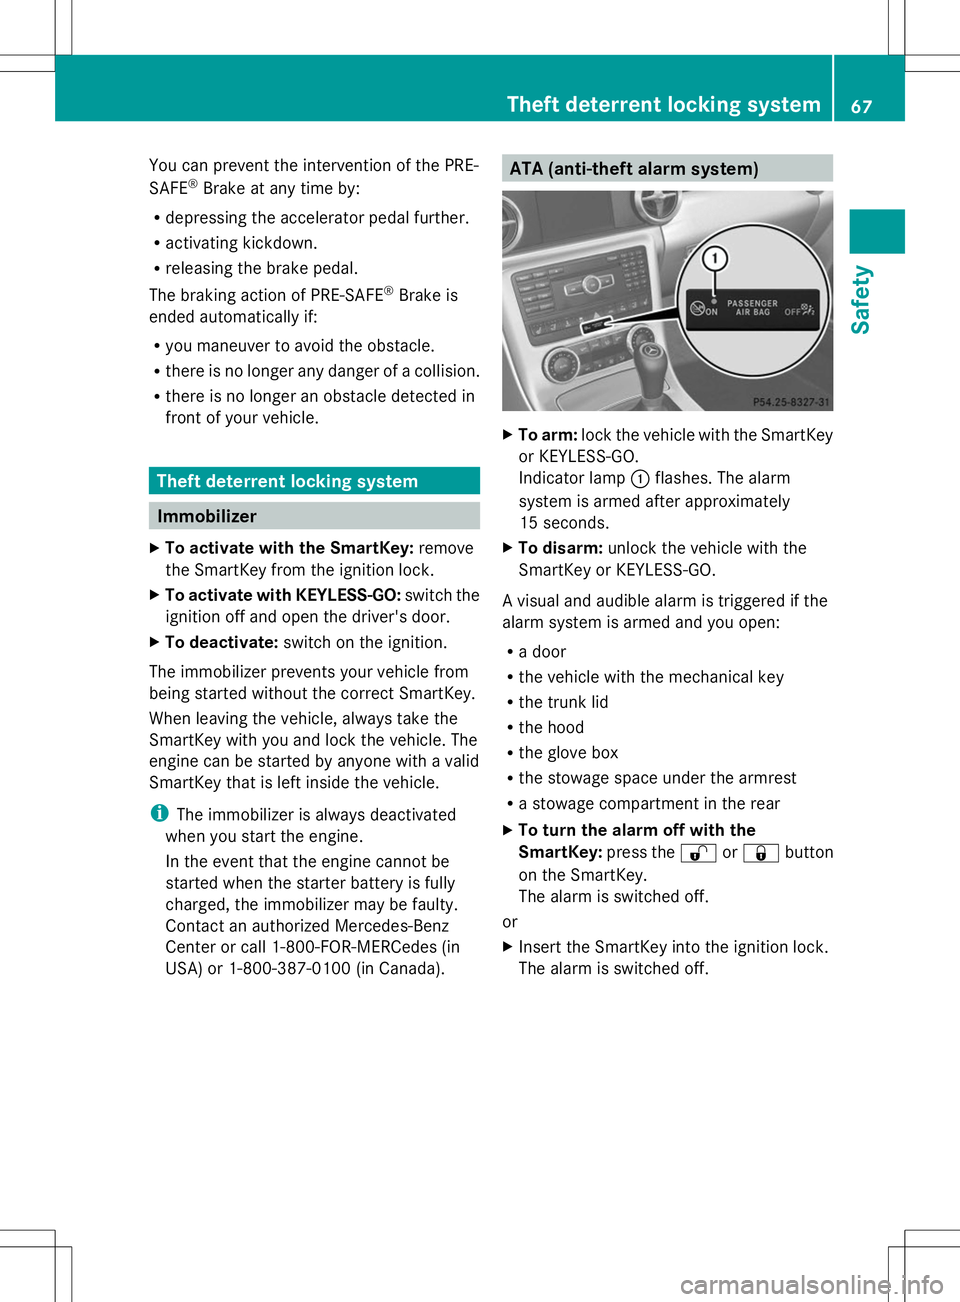
X
To arm: lock the vehicle with the SmartKey
or KEYLESS-GO.
Indicator lamp :flashes. The alarm
system is armed after approximately
15 seconds.
X To disarm: unlock the vehicle with the
SmartKey or KEYLESS-GO.
A visual and audible alarm is triggered if the
alarm system is armed and you open:
R a door
R the vehicle with the mechanical key
R the trunk lid
R the hood
R the glove box
R the stowage space under the armrest
R a stowage compartment in the rear
X To turn the alarm off with the
SmartKey: press the%or& button
on the SmartKey.
The alarm is switched off.
or
X Insert the SmartKey into the ignition lock.
The alarm is switched off. Theft deterrent locking system
67Safety Z
Page 73 of 356

X
To unlock centrally: press the%
button.
If you do not open the vehicle within
approximately 40 seconds of unlocking:
R the vehicle is locked again.
R the theft deterrent locking system is
armed again.
X To lock centrally: press the&button.
The SmartKey centrally locks/unlocks:
R the doors
R the trunk lid
R the glove box
R the stowage compartment in the center
console
R the fuel filler flap
When unlocking, the turn signals flash once.
When locking, they flash three times.
You can also set an audible signal to confirm
that the vehicle has been locked. The audible
signal can be activated and deactivated using
the on-board computer (Y page 205).
When it is dark, the surround lighting also
comes on if it is activated in the on-board
computer (Y page 204). KEYLESS-GO
General notes Bear in mind that the engine can be started
by any of the vehicle occupants if there is a
KEYLESS-GO key in the vehicle.
Locking/unlocking centrally You can start, lock or unlock the vehicle using
KEYLESS-GO. To do this, you only need carry
the SmartKey with you. You can combine the
functions of KEYLESS-GO with those of a
conventional SmartKey. Unlock the vehicle
by using KEYLESS-GO, for instance, and lock
it using the &button on the SmartKey.
When locking or unlocking with KEYLESS-GO,
the distance between the SmartKey and the corresponding door handle must not be
greater than 3 ft (1 m).
A check which periodically establishes a radio
connection between the vehicle and the
SmartKey determines whether a valid
SmartKey is in the vehicle. This occurs, for
example:
R when the external door handles are
touched
R when starting the engine
R while the vehicle is in motion X
To unlock the vehicle: touch the inner
surface of the door handle.
X To lock the vehicle: touch sensor
surface :.
X Convenience closing feature: touch
recessed sensor surface ;for an
extended period.
Further information on the convenience
closing feature (Y page 84).
X To unlock the trunk lid: pull the handle on
the trunk lid.
The vehicle only unlocks the trunk lid. Changing the settings of the locking
system
You can change the settings of the locking
system. This means only the driver's door, the
lockable stowage compartments in the
vehicle interior and the fuel filler flap are
unlocked when the vehicle is unlocked. This
is useful if you frequently travel on your own. SmartKey
71Opening and closing Z
Page 79 of 356
G
WARNING
If children are left unsupervised in the vehicle,
they could:
R open the doors, thus endangering other
people or road users.
R get out and disrupt traffic.
R operate the vehicle's equipment.
Additionally, children could set the vehicle in
motion if, for example, they:
R release the parking brake.
R shifting the automatic transmission out of
park position P
R Start the engine.
There is a risk of an accident and injury.
When leaving the vehicle, always take the
SmartKey with you and lock the vehicle. Never
leave children or animals unattended in the
vehicle. Always keep the SmartKey out of
reach of children. G
WARNING
If persons, particularly children are subjected
to prolonged exposure to extreme heat or
cold, there is a risk of injury, possibly even
fatal. Never leave children unattended in the
vehicle. Unlocking and opening doors from
the inside
! The side windows will not open/close if
the battery is discharged or if the side
windows have iced up. It will then not be
possible to close the door. Do not attempt
to force the door closed. You could
otherwise damage the door or the side
window.
You can open a door from inside the vehicle
even if it has been locked.
If the vehicle was previously locked with the
SmartKey or with KEYLESS-GO, opening the
vehicle from the inside will activate the anti-
theft alarm system. Switch off the alarm
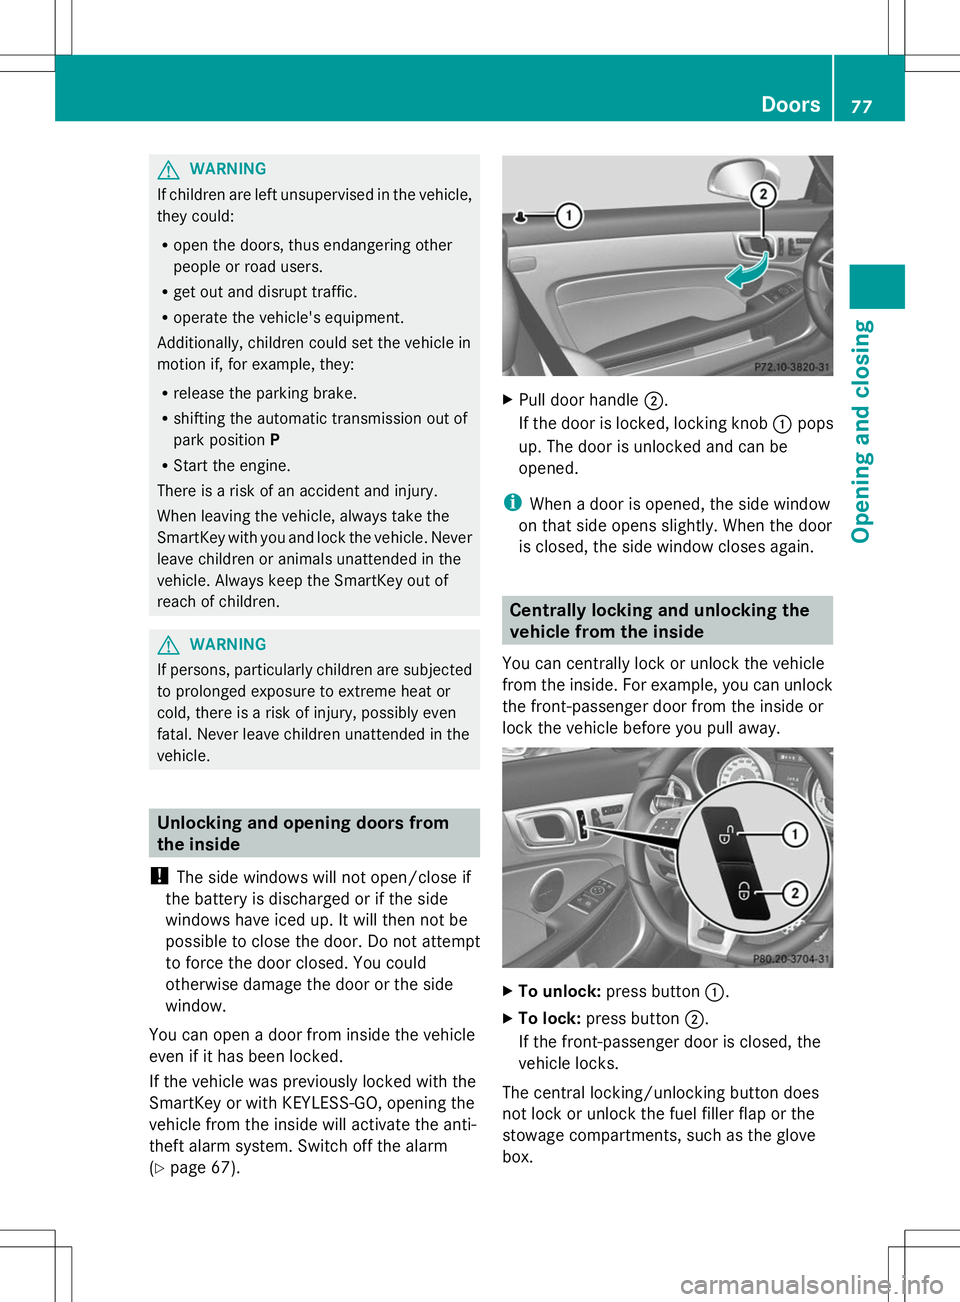
(Y page 67). X
Pull door handle ;.
If the door is locked, locking knob :pops
up. The door is unlocked and can be
opened.
i When a door is opened, the side window
on that side opens slightly. When the door
is closed, the side window closes again. Centrally locking and unlocking the
vehicle from the inside
You can centrally lock or unlock the vehicle
from the inside. For example, you can unlock
the front-passenger door from the inside or
lock the vehicle before you pull away. X
To unlock: press button :.
X To lock: press button ;.
If the front-passenger door is closed, the
vehicle locks.
The central locking/unlocking button does
not lock or unlock the fuel filler flap or the
stowage compartments, such as the glove
box. Doors
77Opening and closing Z
Page 80 of 356

You cannot unlock the vehicle centrally from
the inside if the vehicle has been locked with
the SmartKey or KEYLESS-GO.
You can open a door from inside the vehicle
even if it has been locked.
If the vehicle has been locked using the
locking button for the central locking, or has
been locked automatically, and a door is
opened from the inside:
R the vehicle will be fully unlocked if it had
previously been fully unlocked
R only the door which has been opened form
the inside is unlocked if only the driver's
door had been previously unlocked Automatic locking feature
:
Disarming
; Arming
X To disarm: press and hold button :for
about five seconds until a tone sounds.
X To arm: press and hold button ;for about
five seconds until a tone sounds.
i If you press one of the two buttons and
do not hear a tone, the relevant setting has
already been selected.
The vehicle is locked automatically when the
ignition is switched on and the wheels are
turning.
You could therefore lock yourself out if:
R the vehicle is being pushed.
R the vehicle is being towed.
R the vehicle is on a roller dynamometer. You can also switch the automatic locking
function on and off using the on-board
computer (Y
page 205). Unlocking the driver's door
(mechanical key)
If the vehicle can no longer be unlocked with
the SmartKey, use the mechanical key.
If you use the mechanical key to unlock and
open the driver's door, the anti-theft alarm
system will be triggered ( Ypage 67).
X Take the mechanical key out of the
SmartKey (Y page 72).
X Insert the mechanical key into the lock of
the driver's door as far as it will go. X
Turn the mechanical key counter-clockwise
to position 1.
The door is unlocked.
X Turn the mechanical key back and remove
it.
X Insert the mechanical key into the
SmartKey. Locking the vehicle (mechanical key)
If the vehicle can no longer be locked with the
SmartKey, use the mechanical key.
X Open the driver's door.
X Close the front-passenger door and the
trunk lid.
X Press the locking button (Y page 77).78
DoorsOpening and closing
Page 89 of 356
R
there is sufficient clearance, as the roof
swings upwards.
R there is sufficient clearance behind the
vehicle, as the trunk lid swings
backwards beyond the bumper.
R the trunk is only loaded to below the
trunk partition.
R the trunk partition is not pushed up by
the load.
R the trunk partition is closed.
R the trunk lid is closed.
R the outside temperature is above 5 ‡
(Ò15 †).
You could otherwise damage the roof,
trunk and other parts of the vehicle.
i The vehicle's dimensions when opening/
closing the roof (Y page 350).
i Make sure that the roof and rear window
are clean and dry before opening the roof.
Otherwise, water or dirt could enter the
vehicle interior or trunk. Opening and closing using the roof
switch
Important safety notes G
WARNING
When opening or closing the roof, body parts
could be trapped by, for example, the roof
mechanism, trunk lid or side windows. There
is a risk of injury.
When raising or lowering the roof, make sure
that no body parts are in the vicinity of moving
components. If someone becomes trapped,
release the button. Opening and closing X
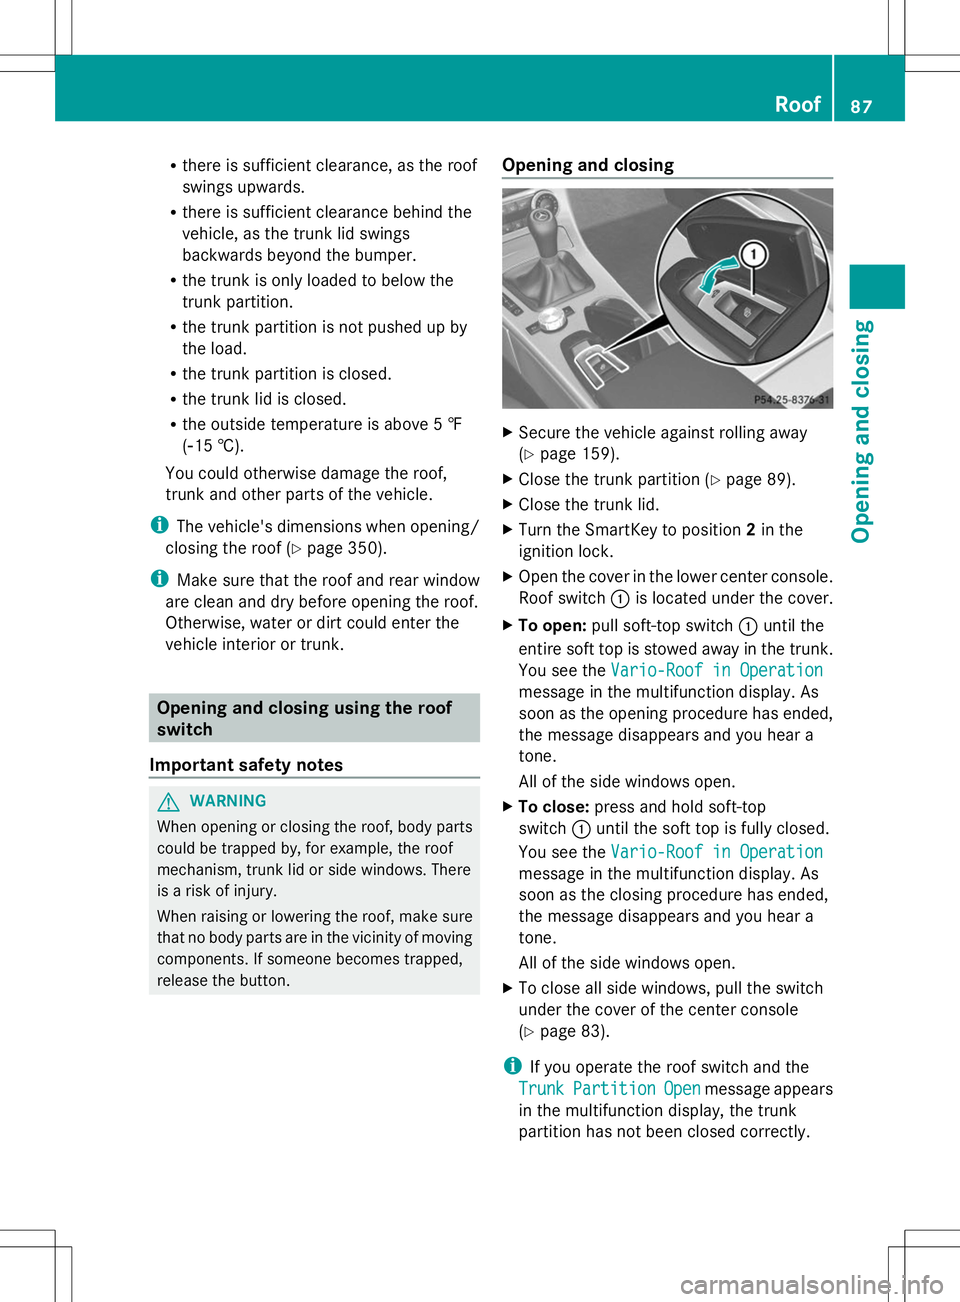
Secure the vehicle against rolling away
(Y page 159).
X Close the trunk partition (Y page 89).
X Close the trunk lid.
X Turn the SmartKey to position 2in the
ignition lock.
X Open the cover in the lower center console.
Roof switch :is located under the cover.
X To open: pull soft-top switch :until the
entire soft top is stowed away in the trunk.
You see the Vario-Roof in Operation Vario-Roof in Operation
message in the multifunction display. As
soon as the opening procedure has ended,
the message disappears and you hear a
tone.
All of the side windows open.
X To close: press and hold soft-top
switch :until the soft top is fully closed.
You see the Vario-Roof in Operation Vario-Roof in Operation
message in the multifunction display. As
soon as the closing procedure has ended,
the message disappears and you hear a
tone.
All of the side windows open.
X To close all side windows, pull the switch
under the cover of the center console
(Y page 83).
i If you operate the roof switch and the
Trunk Trunk Partition
Partition Open
Openmessage appears
in the multifunction display, the trunk
partition has not been closed correctly. Roof
87Opening and closing Z