2014 MERCEDES-BENZ SL-CLASS ROADSTER dashboard
[x] Cancel search: dashboardPage 9 of 284

Switching the rear window
defroster on/of
f............................ 116
Switching the ZONE function on/
off .................................................. 116
Cockpit
Overview .......................................... 34
see Instrument cluster
COMAND
Display ........................................... 191
Examples of operation ...................197
Menu overview .............................. 192
COMAND controller ...........................196
COMAND control panel .....................195
COMAND display Driving conditions menu (AMG
vehicles) ........................................ 144
Driving conditions menu (except
AMG vehicles) ................................ 143
Combination switch ..........................108
Connecting a USB device see also Digital Operator's Manual 188
Consumption statistics (on-board
computer) .......................................... 161
Convenience telephony see also Digital Operator's Manual 188
Coolant (engine)
Checking the level .........................219
Display message ............................ 172
Filling capacity ............................... 277
Important safety notes ..................277
Temperature (on-board
computer) ...................................... 161
Temperature gauge ........................ 160
Warning lamp ................................. 183
Cooling
see Climate control
Copyright ............................................. 32
Cornering light function Display message ............................ 163
Function/notes ............................. 108
Crash-responsive emergency
lighting ............................................... 110
Cruise control Cruise control lever .......................133
Deactivating ................................... 133
Display message ............................ 163
Driving system ............................... 132Function/notes
............................. 132
Important safety notes ..................132
Selecting ........................................ 133
Setting a speed .............................. 133
Storing and maintaining current
speed ............................................ .133
Cup holder
Center console .............................. 206
Important safety notes ..................206
Customer Assistance Center (CAC) ...31
Customer Relations Department .......31 D
Dashboard lighting see Instrument cluster lighting
Data
see Technical data
Daytime running lamps
Display message ............................ 163
Function/notes .....................107, 108
Switching on/off (on-board
computer) ...................................... 161
Dealerships
see Qualified specialist workshop
Declarations of conformity ................. 30
Delayed switch-off Exterior lighting (on-board
computer) ...................................... 161
Interior lighting .............................. 161
Diagnostics connection ......................30
Digital Operator's Manual Contents .......................................... 24
Installation ....................................... 21
Introduction ..................................... 21
Keyword search ............................... 23
Operating notes ............................... 22
Visual search ................................... 22
Digital speedometer .........................161
Display (cleaning instructions) ........223
Display messages ASSYST PLUS ................................ 220
Calling up (on-board
computer) ...................................... 163
Driving systems ............................. 173
Engine ............................................ 172
General notes ................................ 163
Hiding (on-board computer) ...........163 Index
7
Page 12 of 284

General notes
.................................. 69
Important safety information ...........69
Warning lamp ................................. 179
ETS (Electronic Traction System) ....... 69
Exhaust check ................................... 131
Exhaust tail pipe (cleaning
instructions) ...................................... 222
Exterior lighting Setting options .............................. 106
see Lights
Exterior mirrors
Adjusting ....................................... 102
Dipping (automatic) .......................102
Folding in when locking (on-board
computer) ...................................... 161
Storing settings (memory function) 103
Storing the parking position ..........102
Eyeglasses compartment .................204 F
Filler cap see Fuel filler flap
Filling capacities (Technical data) ...275
First-aid kit ......................................... 226
Flat tire MOExtended tires ..........................227
Preparing the vehicle .....................227
TIREFIT kit ...................................... 228
Floormats ........................................... 214
Front fog lamps Display message ............................ 163
Fuel
Consumption statistics ..................161
Displaying the current
consumption .................................. 161
Displaying the range ......................161
Driving tips .................................... 131
Fuel gauge ....................................... 35
Grade (gasoline) ............................ 276
Important safety notes ..................275
Premium-grade unleaded gasoline .276
Problem (malfunction) ...................130
Refueling ........................................ 127
Tank content/reserve fuel .............275
Fuel filler flap
Opening/closing ............................ 128Fuel level
Calling up the range (on-board
computer) ...................................... 161
Fuel tank
Capacity ........................................ 275
Problem (malfunction) ...................130
Fuse allocation chart (vehicle tool
kit) ...................................................... 226
Fuses Allocation chart ............................. 240
Before changing ............................. 240
Dashboard fuse box .......................241
Fuse box in the engine
compartment ................................. 241
Fuse box in the rear compartment .242
Important safety notes ..................240 G
Garage door opener Clearing the memory .....................214
Important safety notes ..................211
Opening/closing the garage door ..214
Programming (button in the rear-
view mirror) ................................... 212
Gasoline ............................................. 276
Gear indicator (on-board
computer) .......................................... 161
Gear or selector lever (cleaning
guidelines) ......................................... 223
Genuine parts ...................................... 26
Glass roof (sunblind) ...........................97
Glove box ........................................... 204
Google™ Local Search see also Digital Operator's Manual 188 H
HANDS-FREE ACCESS .......................... 86
Hazard warning lamps ......................106
Head bags Display message ............................ 168
Operation ........................................ .50
Headlamps
Cleaning system (notes) ................278
Fogging up ..................................... 106
see Automatic headlamp mode
Head level heating (AIRSCARF) ........101 10
Index
Page 35 of 284

Dashboard
........................................... 34
Instrument cluster ..............................35
Multifunction steering wheel .............37
Center console .................................... 38
Overhead control panel ......................41
Door control panel .............................. 42 33At a glance
Page 36 of 284

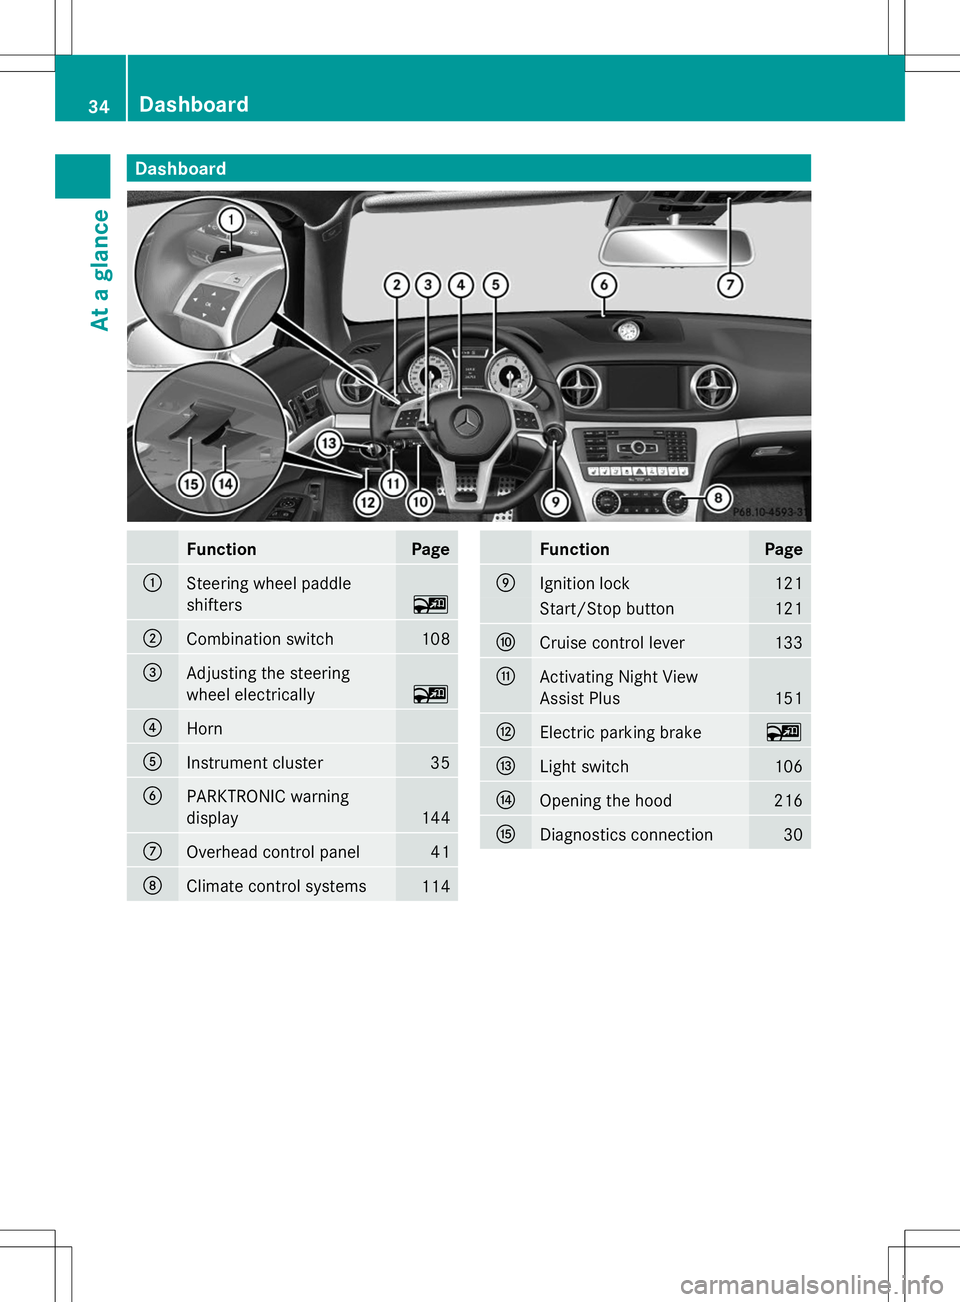
Dashboard
Function Page
:
Steering wheel paddle
shifters
~
;
Combination switch 108
=
Adjusting the steering
wheel electrically
~
?
Horn
A
Instrument cluster 35
B
PARKTRONIC warning
display
144
C
Overhead control panel 41
D
Climate control systems
114 Function Page
E
Ignition lock 121
Start/Stop button 121
F
Cruise control lever 133
G
Activating Night View
Assist Plus 151
H
Electric parking brake ~
I
Light switch 106
J
Opening the hood 216
K
Diagnostics connection 3034
Dashboa
rdAt a glance
Page 48 of 284

R
Do not install additional trim material, seat
covers, badges, etc. to the:
-padded steering wheel boss
- knee bag covers
- front-passenger air bag cover
- outer side of front seat bolsters
- outer seat bolsters of the rear bench seat
backrest
- roof frame trim
R Do not install additional electrical/
electronic equipment on or near SRS
components and wiring.
R Keep the area between the air bags and
occupants free of objects (e.g. packages,
handbags, umbrellas etc.).
R Do not hang any objects such as coat
hangers on the coat hooks or the grab
handle above the door. These items may be
thrown around in the vehicle and cause
head and other injuries when the window
curtain air bag is deployed.
R Air bag system components will be hot after
an air bag has inflated. Do not touch them.
R Never rest your feet on the dashboard or
the seat. Always keep both feet on the floor
in front of the seat.
R Improper repair work on the SRS creates a
risk of rendering the SRS inoperative or
causing unintended air bag deployment.
Work on the SRS must therefore only be
performed by qualified technicians.
Consult an authorized Mercedes-Benz
Center.
R For your protection and the protection of
others, when scrapping the air bag unit or
ETD, our safety instructions must be
followed. These are available from any
authorized Mercedes-Benz Center.
R Given the considerable deployment speed,
required inflation volume, and the material
of the air bags, there is the possibility of
abrasions or other, potentially more serious
injuries resulting from air bag deployment. If you sell your vehicle, Mercedes-Benz
strongly recommends that you inform the
subsequent owner that the vehicle is
equipped with SRS. Also, refer them to the
applicable section in the Operator's Manual. Air bags
Important safety notes G
WARNING
Using unsuitable seat covers could restrict or
even prevent deployment of the air bags
integrated into the seats. Consequently, the
air bags cannot protect vehicle occupants as
they are designed to do. In addition, the
function of the air bag deactivation system
could be restricted. This poses an increased
risk of injury or even fatal injury.
You should only use seat covers that have
been approved for the respective seat by
Mercedes-Benz. G
WARNING
The air bag parts are hot after the airbag has
been deployed. There is a risk of injury.
Do not touch the air bag parts. Have the
deployed air bags replaced at a qualified
specialist workshop as soon as possible. G
WARNING
Air bags are designed to reduce the incidence
of injuries and fatalities in certain situations:
R frontal impacts (driver's and front-
passenger front air bags and knee bags)
R side impacts (side impact air bags and head
bags)
R rollover (head bags)
However, no system available today can
completely eliminate injuries and fatalities.
When the air bags are deployed, a small
amount of powder is released. The powder
generally does not constitute a health hazard
and does not indicate that there is a fire in the
vehicle. In order to prevent potential 46
Occupant safetySafety
Page 49 of 284

breathing difficulties, you should leave the
vehicle as soon as it is safe to do so. If you
have any breathing difficulty but cannot get
out of the vehicle after the air bag inflates,
then get fresh air by opening a window or
door. G
WARNING
In order to reduce the potential danger of
injuries caused during the deployment of the
front air bags, the driver and front passenger
must always be correctly seated and wear
their seat belts.
For maximum protection in the event of a
collision, you must always be in the normal
seat position with your back against the
backrest. Fasten your seat belt and make sure
that it is correctly positioned on your body.
As the air bag inflates with considerable
speed and force, a proper seating position
and correct positioning of the hands on the
steering wheel will help to keep you at a safe
distance from the air bag. Occupants who are
not wearing their seat belt, are not seated
properly or are too close to the air bag can be
seriously injured or killed by an air bag, as it
inflates with great force instantaneously:
R sit with the seat belt fastened correctly and
in a position that is as upright as possible
with your back against the backrest.
R move the driver's seat as far back as
possible, still permitting proper operation
of vehicle controls. The distance from the
center of the driver's chest to the middle of
the air bag cover on the steering wheel
must be at least 10 inches (25 cm). You
should be able to accomplish this by
adjusting the seat and steering wheel. If
you have any difficulties, please contact a
qualified specialist workshop.
R do not lean your head or chest close to the
steering wheel or dashboard.
R only hold the steering wheel on the outside.
Placing hands and arms inside the rim of
the steering wheel can increase the risk and potential severity of hand/arm injuries
if the air bag inflates.
R adjust the front-passenger seat as far back
as possible from the dashboard when the
seat is occupied.
R occupants, especially children, should
never place their bodies or lean their heads
in the area of the door where the side
impact air bag and/or head bag inflates.
This could result in serious injuries or death
should the side impact air bag/head bag be
deployed. Always sit as upright as possible,
wear the seat belt properly and use an
appropriately sized infant restraint, toddler
restraint or booster seat recommended for
the size and weight of the child.
Failure to follow these instructions can result
in severe injuries to you or other occupants.
If you sell your vehicle, it is important that you
make the buyer aware of this safety
information. Be sure to give the buyer this
Operator's Manual. G
WARNING
If the side impact air bag and/or head bag is
deployed in the event of a side impact and the
front passenger, especially a child, is not
properly seated or restrained when next to a
side impact air bag/head bag, injuries are
possible due to the rapid inflation of the side
impact air bag/head bag.
To help avoid the possibility of injury, please
follow these guidelines:
(1) Always sit as upright as possible, and use the seat belts properly.
Make sure that children 12 years
old and under use an appropriately
sized child restraint, infant
restraint or booster seat
recommended for the size and
weight of the child.
(2) Always wear seat belts properly.
If the air bags are deployed, you will hear a
bang, and a small amount of powder may also
be released. Only in rare cases will the bang Occupant safety
47Safety Z
Page 62 of 284

around a person and another person or
other objects at the same time.
R Seat belts should not be worn twisted. In a
crash, you would not have the full width of
the seat belt to distribute impact forces.
The twisted seat belt against your body
could cause injuries.
R Pregnant women should also always use a
lap-shoulder belt. The lap belt portion
should be positioned as low as possible on
the hips to avoid any possible pressure on
the abdomen.
R Place the seat backrest in a position that is
as upright as possible.
R Check your seat belt during travel to make
sure it is properly positioned.
R Never place your feet on the instrument
panel, dashboard, or on the seat. Always
keep both feet on the floor in front of the
seat.
R When using a seat belt to secure infant
restraints, toddler restraints, or children in
booster seats, always follow the child seat
manufacturer's instructions.
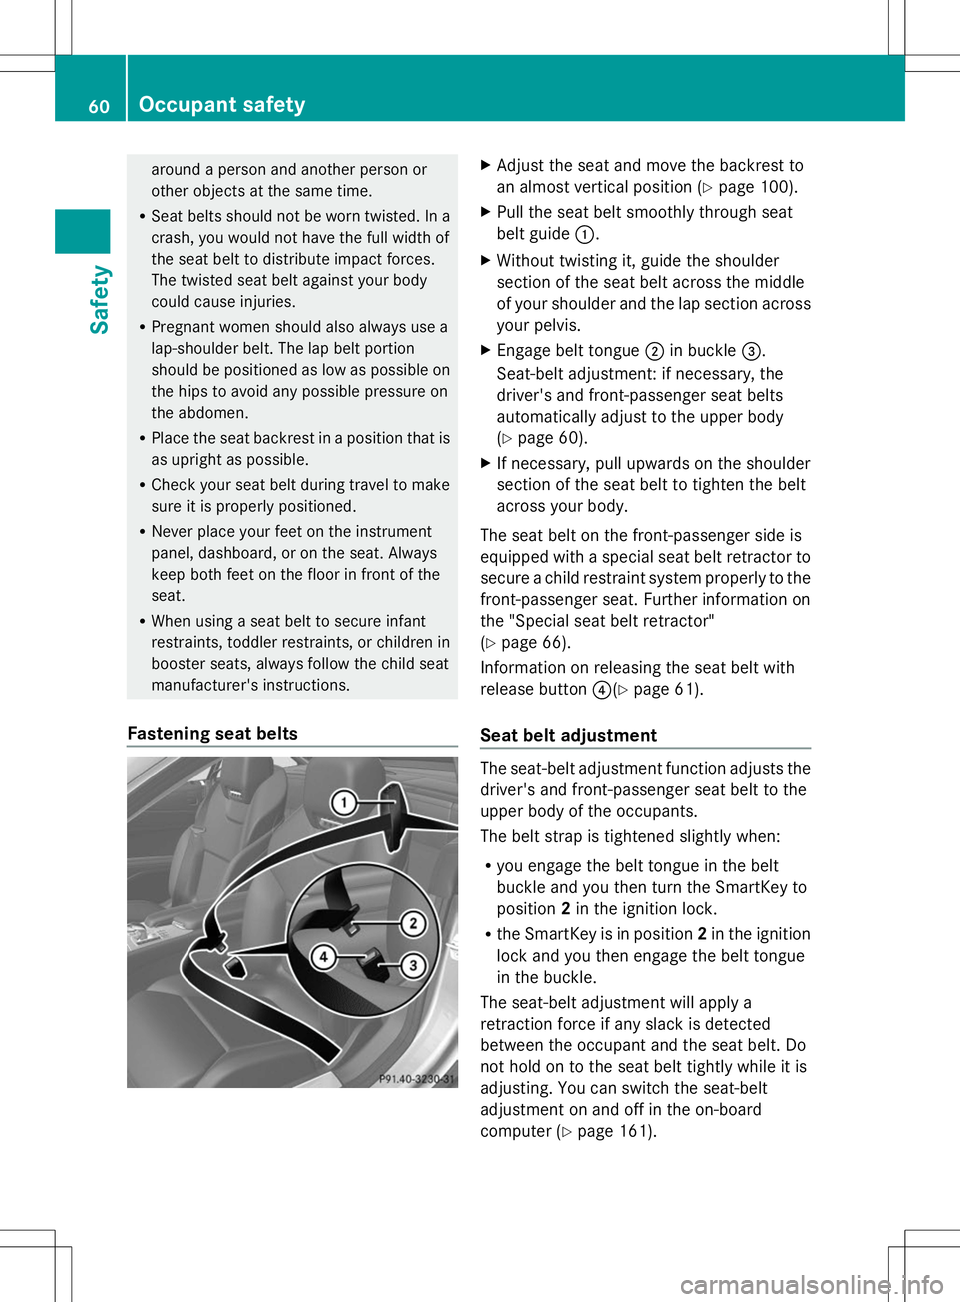
Fastening seat belts X
Adjust the seat and move the backrest to
an almost vertical position (Y page 100).
X Pull the seat belt smoothly through seat
belt guide :.
X Without twisting it, guide the shoulder
section of the seat belt across the middle
of your shoulder and the lap section across
your pelvis.
X Engage belt tongue ;in buckle =.
Seat-belt adjustment: if necessary, the
driver's and front-passenger seat belts
automatically adjust to the upper body
(Y page 60).
X If necessary, pull upwards on the shoulder
section of the seat belt to tighten the belt
across your body.
The seat belt on the front-passenger side is
equipped with a special seat belt retractor to
secure a child restraint system properly to the
front-passenger seat. Further information on
the "Special seat belt retractor"
(Y page 66).
Information on releasing the seat belt with
release button ?(Ypage 61).
Seat belt adjustment The seat-belt adjustment function adjusts the
driver's and front-passenger seat belt to the
upper body of the occupants.
The belt strap is tightened slightly when:
R you engage the belt tongue in the belt
buckle and you then turn the SmartKey to
position 2in the ignition lock.
R the SmartKey is in position 2in the ignition
lock and you then engage the belt tongue
in the buckle.
The seat-belt adjustment will apply a
retraction force if any slack is detected
between the occupant and the seat belt. Do
not hold on to the seat belt tightly while it is
adjusting. You can switch the seat-belt
adjustment on and off in the on-board
computer (Y page 161).60
Occupant safetySafety
Page 77 of 284

Theft deterrent locking system
Immobilizer
X To activate with the SmartKey: remove
the SmartKey from the ignition lock.
X To activate with KEYLESS-GO: switch the
ignition off and open the driver's door.
X To deactivate: switch on the ignition.
The immobilizer prevents your vehicle from
being started without the correct SmartKey.
When leaving the vehicle, always take the
SmartKey with you and lock the vehicle. The
engine can be started by anyone with a valid
SmartKey that is left inside the vehicle.
i The immobilizer is always deactivated
when you start the engine.
In the event that the engine cannot be
started when the starter battery is fully
charged, the immobilizer may be faulty.
Contact an authorized Mercedes-Benz
Center or call 1-800-FOR-MERCedes (in
USA) or 1-800-387-010 0(in Canada). ATA (anti-theft alarm system)
X
To arm: lock the vehicle with the SmartKey
or KEYLESS-GO.
Indicator lamp :flashes. The alarm
system is armed after approximately
15 seconds.
X To disarm: unlock the vehicle with the
SmartKey or KEYLESS-GO. A visual and audible alarm is triggered if the
alarm system is armed and you open:
R
a door
R the vehicle with the mechanical key
R the trunk lid
R the hood
R the glove box
R the stowage space under the armrest
R a stowage compartment in the rear
X To turn the alarm off with the
SmartKey: press the%or& button
on the SmartKey.
The alarm is switched off.
or
X Insert the SmartKey into the ignition lock.
The alarm is switched off.
X To stop the alarm using KEYLESS-GO:
grasp the outside door handle. The
SmartKey must be outside the vehicle.
The alarm is switched off.
or
X Press the Start/Stop button on the
dashboard. The SmartKey must be inside
the vehicle.
The alarm is switched off.
The alarm is not switched off, even if you
close the open door that triggered it, for
example.
i If the alarm continues for more than
30 seconds, the mbrace emergency call
system automatically notifies the
Customer Assistance Center. This is done
either by text message or data connection.
The emergency call system sends the
message or data provided that:
R you have subscribed to the mbrace
service.
R the mbrace service has been activated
properly.
R the necessary mobile phone network is
available. Theft deterrent locking system
75Safety Z