2014 MERCEDES-BENZ SL-CLASS ROADSTER oil level
[x] Cancel search: oil levelPage 11 of 284

Driving on flooded roads
................131
Driving on wet roads ......................131
Exhaust check ............................... 131
Fuel ................................................ 131
General .......................................... 131
Hydroplaning ................................. 131
Icy road surfaces ........................... 131
Limited braking efficiency on
salted road s................................... 131
Symmetrical low bea m.................. 106
Wet road surface ........................... 131
DVD audio
Operating (on-board
computer) ...................................... 161
see also Digital Operator's Manual 188
DVD video
Operating (on-board
computer) ...................................... 161
see also Digital Operator's Manual 188 E
EASY-ENTRY feature Activating/deactivating .................161
Function/notes ............................. 102
EASY-EXIT feature
Function/notes ............................. 102
Switching on/off ........................... 161
EBD (electronic brake force
distribution)
Display message ............................ 166
Function/notes ................................ 72
ECO display
Function/notes ............................. 131
ECO start/stop function
Automatic engine start ..................125
Automatic engine switch-off ..........125
Deactivating/activating .................125
General information .......................125
Important safety notes ..................125
Introduction ................................... 125
Electronic Stability Program
see ESP ®
(Electronic Stability Program)
Emergency release
Driver's door .................................... 84
Trunk ............................................... 89
Vehicle ............................................. 84Emergency Tensioning Devices
Function .......................................... .62
Safety guideline s............................. 45
Emissions control
Service and warranty information ....27
Engine
Check Engine warning lamp ........... 175
Display message ............................ 172
ECO start/stop function ................125
Engine number ............................... 274
Irregular running ............................ 126
Jump-starting ................................. 235
Starting problems ..........................126
Starting the engine with the
SmartKey ....................................... 123
Starting with KEYLESS-GO .............123
Switching off .................................. 131
Tow-starting (vehicle) ..................... 240
Engine electronics
Problem (malfunction) ...................126
Engine oil
Adding ........................................... 218
Additives ........................................ 276
Checking the oil level ..................... 217
Checking the oil level using the
dipstick .......................................... 217
Display message ............................ 163
Filling capacity ............................... 276
Notes about oil grades ................... 276
Notes on oil level/consumption ....217
Temperature (on-board
computer) ...................................... 161
Viscosity ........................................ 276
Entering a city
see also Digital Operator's Manual 188
Entering an address
see also Digital Operator's Manual 188
ESP ®
(Electronic Stability
Program) AMG menu (on-board
computer) ...................................... 161
Deactivating/activating (AMG
vehicles) .......................................... 71
Deactivating/activating (notes;
except AMG vehicles) ......................70
Display message ............................ 164
ETS .................................................. 69
Function/notes ................................ 69 Index
9
Page 175 of 284

Driving systems
Display messages Possible causes/consequences and
M
MSolutions ABC
ABC
Malfunction Malfunction The ABC function (Active Body Control) is restricted.
G WARNING
The vehicle's suspension tuning characteristics may be affected.
There is a risk of an accident.
X Do not drive at speeds above 50 mph (80 km/h).
X Visit a qualified specialist workshop. ABC ABC
Malfunction Stop Malfunction Stop
Vehicle Vehicle The vehicle level of the ABC is too low.
X
Pull over and stop the vehicle safely as soon as possible, paying
attention to road and traffic conditions.
After a few seconds, the vehicle level is adjusted and the display
message disappears. The vehicle is leaking oil.
The display message is shown continuously.
G WARNING
The vehicle's suspension tuning characteristics may be affected.
There is a risk of an accident.
X Pull over and stop the vehicle safely as soon as possible, paying
attention to road and traffic conditions. Do not continue driving
under any circumstances.
X Secure the vehicle against rolling away ( Ypage 130).
X Notify a qualified specialist workshop or breakdown service. ABC is malfunctioning.
The display message is shown continuously.
G WARNING
The suspension tuning characteristics are thus affected.
There is a risk of an accident.
X Do not drive at speeds above 50 mph (80 km/h).
X Make only slight steering movements. Otherwise, the front
fender or the tires could be damaged if the steering movement
is too large.
X Listen for scraping sounds.
X Visit a qualified specialist workshop. Display
messages
173On-board computer and displays Z
Page 219 of 284
X
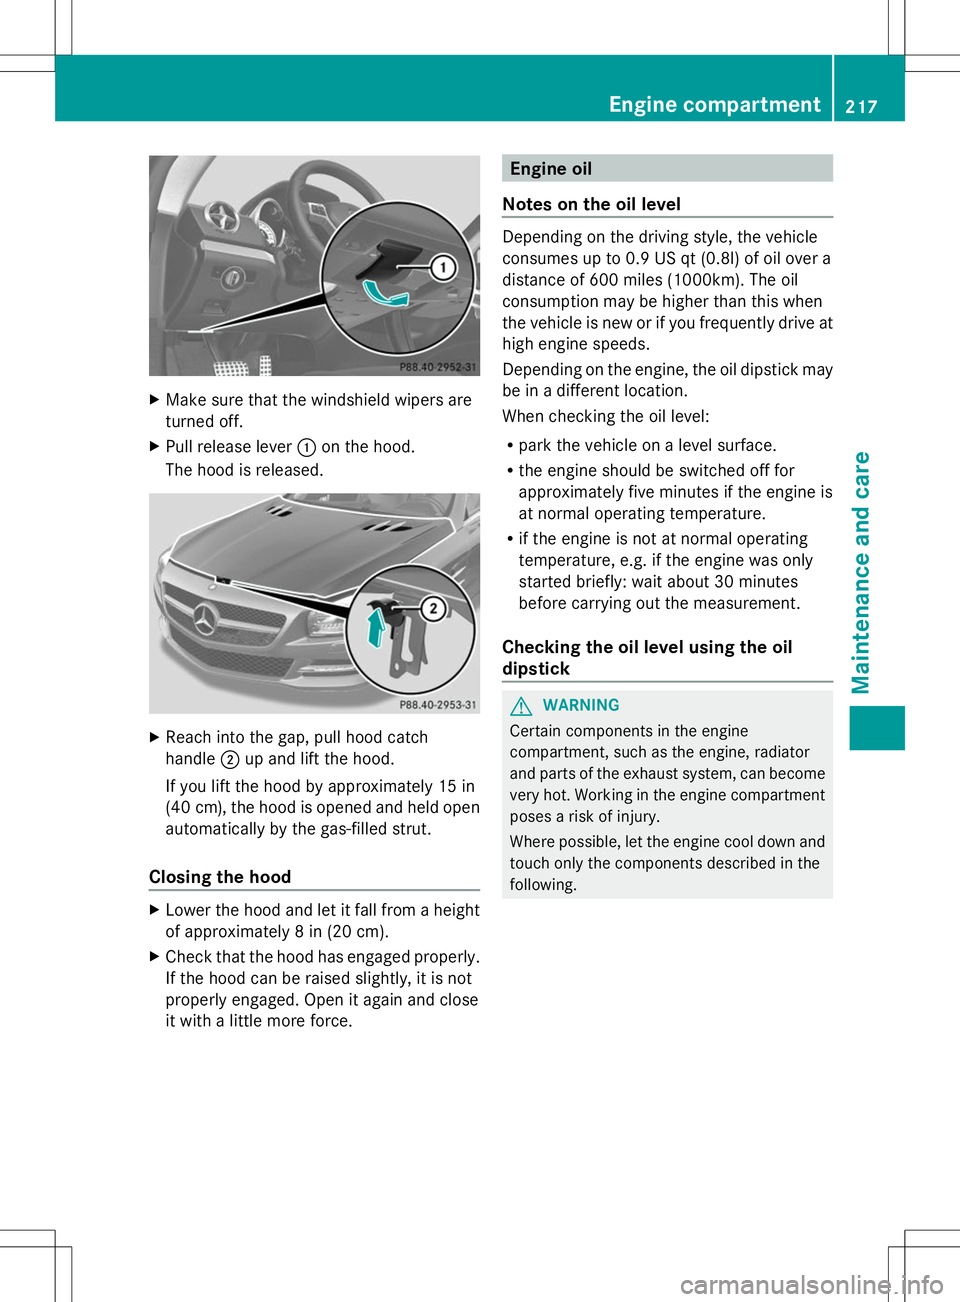
Make sure that the windshield wipers are
turned off.
X Pull release lever :on the hood.
The hood is released. X
Reach into the gap, pull hood catch
handle ;up and lift the hood.
If you lift the hood by approximately 15 in
(40 cm), the hood is opened and held open
automatically by the gas-filled strut.
Closing the hood X
Lower the hood and let it fall from a height
of approximately 8 in (20 cm).
X Check that the hood has engaged properly.
If the hood can be raised slightly, it is not
properly engaged. Open it again and close
it with a little more force. Engine oil
Notes on the oil level Depending on the driving style, the vehicle
consumes up to 0.9 US qt
(0.8l) of oil over a
distance of 600 miles (1000km). The oil
consumption may be higher than this when
the vehicle is new or if you frequently drive at
high engine speeds.
Depending on the engine, the oil dipstick may
be in a different location.
When checking the oil level:
R park the vehicle on a level surface.
R the engine should be switched off for
approximately five minutes if the engine is
at normal operating temperature.
R if the engine is not at normal operating
temperature, e.g. if the engine was only
started briefly: wait about 30 minutes
before carrying out the measurement.
Checking the oil level using the oil
dipstick G
WARNING
Certain components in the engine
compartment, such as the engine, radiator
and parts of the exhaust system, can become
very hot. Working in the engine compartment
poses a risk of injury.
Where possible, let the engine cool down and
touch only the components described in the
following. Engine compartment
217Maintenance and care Z
Page 220 of 284
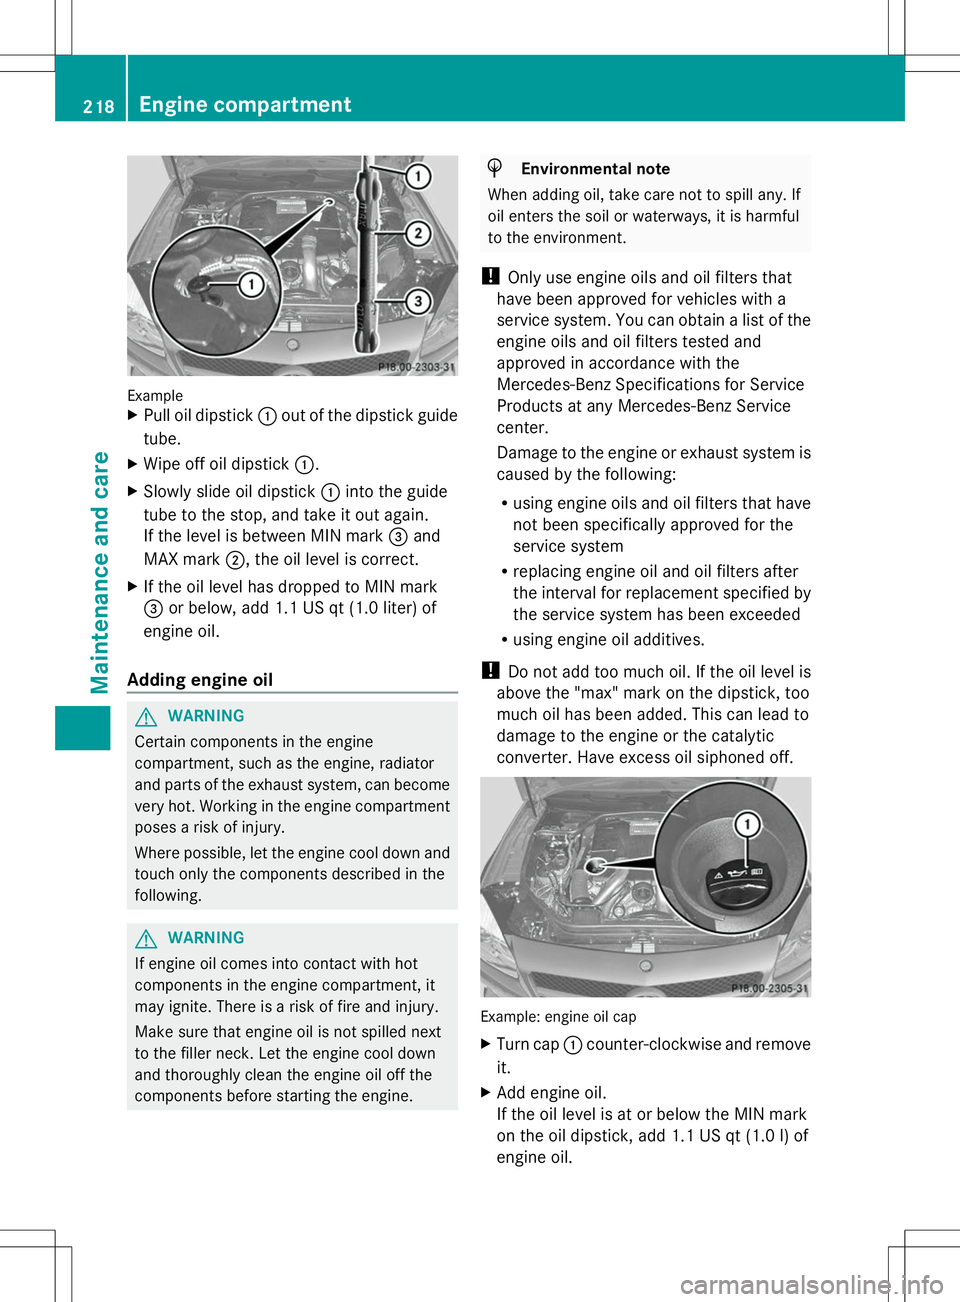
Example
X
Pull oil dipstick :out of the dipstick guide
tube.
X Wipe off oil dipstick :.
X Slowly slide oil dipstick :into the guide
tube to the stop, and take it out again.
If the level is between MIN mark =and
MAX mark ;, the oil level is correct.
X If the oil level has dropped to MIN mark
= or below, add 1.1 US qt (1.0 liter) of
engine oil.
Adding engine oil G
WARNING
Certain components in the engine
compartment, such as the engine, radiator
and parts of the exhaust system, can become
very hot. Working in the engine compartment
poses a risk of injury.
Where possible, let the engine cool down and
touch only the components described in the
following. G
WARNING
If engine oil comes into contact with hot
components in the engine compartment, it
may ignite. There is a risk of fire and injury.
Make sure that engine oil is not spilled next
to the filler neck. Let the engine cool down
and thoroughly clean the engine oil off the
components before starting the engine. H
Environmental note
When adding oil, take care not to spill any. If
oil enters the soil or waterways, it is harmful
to the environment.
! Only use engine oils and oil filters that
have been approved for vehicles with a
service system. You can obtain a list of the
engine oils and oil filters tested and
approved in accordance with the
Mercedes-Benz Specifications for Service
Products at any Mercedes-Benz Service
center.
Damage to the engine or exhaust system is
caused by the following:
R using engine oils and oil filters that have
not been specifically approved for the
service system
R replacing engine oil and oil filters after
the interval for replacement specified by
the service system has been exceeded
R using engine oil additives.
! Do not add too much oil. If the oil level is
above the "max" mark on the dipstick, too
much oil has been added. This can lead to
damage to the engine or the catalytic
converter. Have excess oil siphoned off. Example: engine oil cap
X
Turn cap :counter-clockwise and remove
it.
X Add engine oil.
If the oil level is at or below the MIN mark
on the oil dipstick, add 1.1 US qt (1.0 l) of
engine oil. 218
Engine compartmentMaintenance and care
Page 221 of 284

X
Replace cap :on the filler neck and turn
clockwise.
Ensure that the cap locks into place
securely.
X Check the oil level again with the oil
dipstick (Y page 217).
Further information on engine oil
(Y page 276). Checking and adding other service
products
Checking coolant level G
WARNING
Certain components in the engine
compartment, such as the engine, radiator
and parts of the exhaust system, can become
very hot. Working in the engine compartment
poses a risk of injury.
Where possible, let the engine cool down and
touch only the components described in the
following. G
WARNING
The engine cooling system is pressurized,
particularly when the engine is warm. When
opening the cap, you could be scalded by hot
coolant spraying out. There is a risk of injury.
Let the engine cool down before opening the
cap. Wear eye and hand protection when
opening the cap. Open the cap slowly half a
turn to allow pressure to escape. Example X
Park the vehicle on a level surface.
Only check the coolant level when the
vehicle is on a level surface and the engine
has cooled down.
X Turn the SmartKey to position 2in the
ignition lock (Y page 121).
On vehicles with KEYLESS-GO, press the
Start/Stop button twice (Y page 121).
X Check the coolant temperature gauge in
the multifunction display.
The coolant temperature must be below
158 ‡ (70 †).
X Turn the SmartKey to position
0(Y page 121) in the ignition lock.
X Slowly turn cap ;half a turn counter-
clockwise to allow excess pressure to
escape.
X Turn cap ;further counter-clockwise and
remove it.
If the coolant is at the level of marker bar
= in the filler neck when cold, there is
enough coolant in coolant expansion
tank :.
If the coolant level is approximately 0.6 in
(1.5 cm) above marker bar =in the fuel
filler neck when warm, there is enough
coolant in expansion tank :.
X If necessary, add coolant that has been
tested and approved by Mercedes-Benz.
X Replace cap ;and turn it clockwise as far
as it will go.
For further information on coolant, see
(Y page 277).
Windshield washer system G
WARNING
Certain components in the engine
compartment, such as the engine, radiator
and parts of the exhaust system, can become
very hot. Working in the engine compartment
poses a risk of injury.
Where possible, let the engine cool down and
touch only the components described in the
following. Engine compartment
219Maintenance and care Z
Page 222 of 284
G
WARNING
Windshield washer concentrate is highly
flammable. If it comes into contact with hot
engine components or the exhaust system it
could ignite. There is a risk of fire and injury.
Make sure that no windshield washer
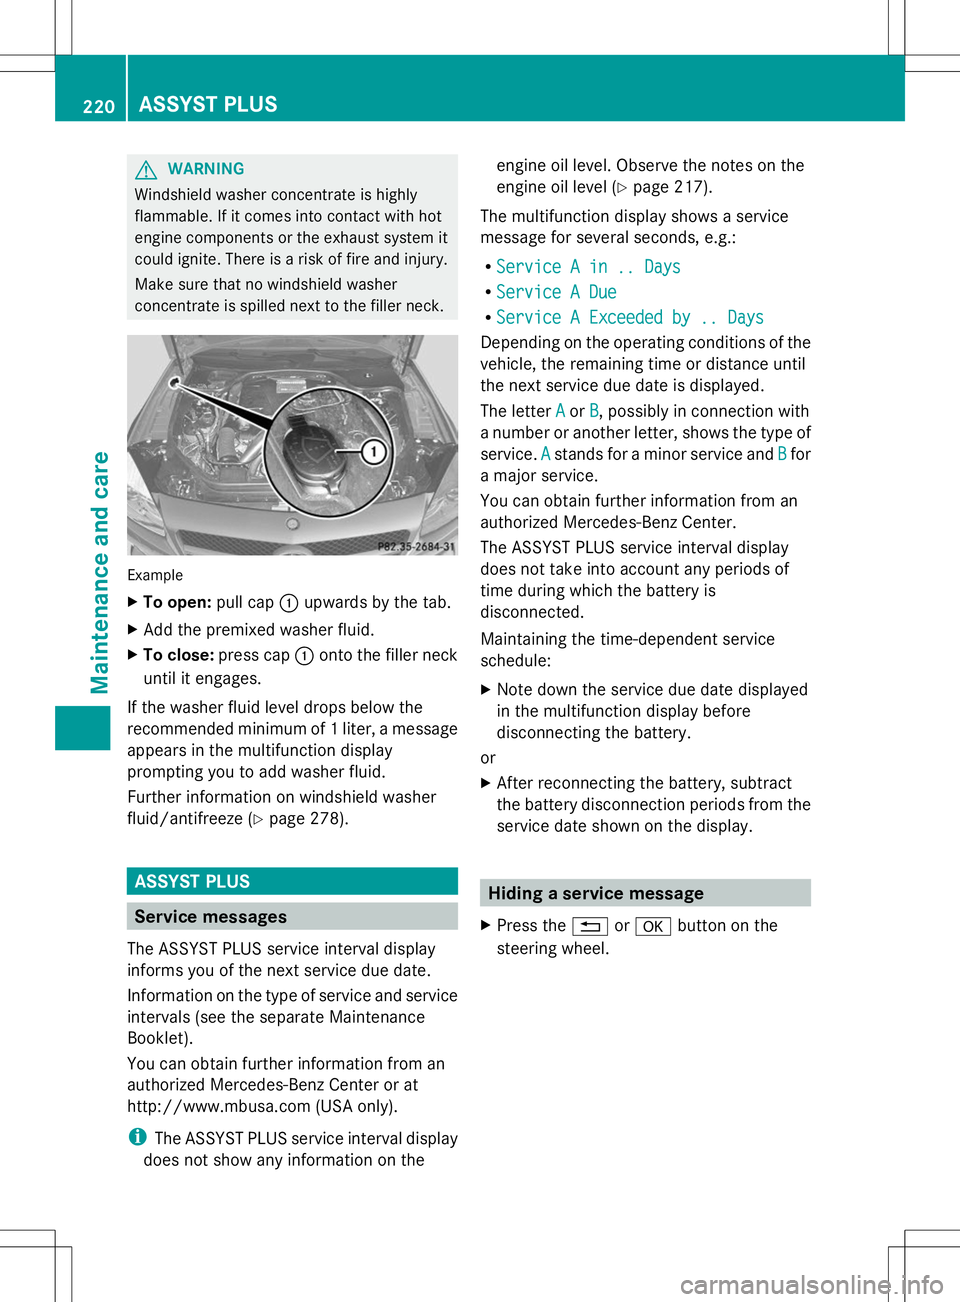
concentrate is spilled next to the filler neck. Example
X
To open: pull cap:upwards by the tab.
X Add the premixed washer fluid.
X To close: press cap :onto the filler neck
until it engages.
If the washer fluid level drops below the
recommended minimum of 1 liter, a message
appears in the multifunction display
prompting you to add washer fluid.
Further information on windshield washer
fluid/antifreeze (Y page 278).ASSYST PLUS
Service messages
The ASSYST PLUS service interval display
informs you of the next service due date.
Information on the type of service and service
intervals (see the separate Maintenance
Booklet).
You can obtain further information from an
authorized Mercedes-Benz Center or at
http://www.mbusa.com (USA only).
i The ASSYST PLUS service interval display
does not show any information on the engine oil level. Observe the notes on the
engine oil level (Y
page 217).
The multifunction display shows a service
message for several seconds, e.g.:
R Service A in .. Days Service A in .. Days
R Service A Due
Service A Due
R Service A Exceeded by .. Days
Service A Exceeded by .. Days
Depending on the operating conditions of the
vehicle, the remaining time or distance until
the next service due date is displayed.
The letter A Aor B
B, possibly in connection with
a number or another letter, shows the type of
service. A Astands for a minor service and B
Bfor
a major service.
You can obtain further information from an
authorized Mercedes-Benz Center.
The ASSYST PLUS service interval display
does not take into account any periods of
time during which the battery is
disconnected.
Maintaining the time-dependent service
schedule:
X Note down the service due date displayed
in the multifunction display before
disconnecting the battery.
or
X After reconnecting the battery, subtract
the battery disconnection periods from the
service date shown on the display. Hiding a service message
X Press the %ora button on the
steering wheel. 220
ASSYST PLUSMaintenance and care
Page 264 of 284

Maximum loaded vehicle weight
The maximum weight is the sum of:
R
the curb weight of the vehicle
R the weight of the accessories
R the load limit
R the weight of the factory installed optional
equipment
Kilopascal (kPa)
Metric unit for tire pressure. 6.9 kPa
corresponds to 1 psi. Another unit for tire
pressure is bar. There are 100 kilopascals
(kPa) to 1 bar.
Load index
In addition to the load-bearing index, the load
index may also be imprinted on the sidewall
of the tire. This specifies the load-bearing
capacity more precisely.
Curb weight
The weight of a vehicle with standard
equipment including the maximum capacity
of fuel, oil and coolant. It also includes the air-
conditioning system and optional equipment
if these are installed in the vehicle, but does
not include passengers or luggage.
Maximum load rating
The maximum tire load is the maximum
permissible weight in kilograms or lbs for
which a tire is approved.
Maximum permissible tire pressure
Maximum permissible tire pressure for one
tire.
Maximum load on one tire
Maximum load on one tire. This is calculated
by dividing the maximum axle load of one axle
by two.
PSI (pounds per square inch)
A standard unit of measure for tire pressure. Aspect ratio
Relationship between tire height and tire
width in percent.
Tire pressure
This is pressure inside the tire applying an
outward force to each square inch of the tire's
surface. The tire pressure is specified in
pounds per square inch (psi), in kilopascal
(kPa) or in bar. The tire pressure should only
be corrected when the tires are cold.
Cold tire pressure
The tires are cold:
R if the vehicle has been parked without
direct sunlight on the tires for at least three
hours and
R if the vehicle has been driven for less than
1 mile (1.6 km).
Tread
The part of the tire that comes into contact
with the road.
Bead
The tire bead ensures that the tire sits
securely on the wheel. There are several steel
wires in the bead to prevent the tire from
coming loose from the wheel rim.
Sidewall
The part of the tire between the tread and the
bead.
Weight of optional extras
The combined weight of those optional extras
that weigh more than the replaced standard
parts and more than 2.3 kilograms (5 lbs).
These optional extras, such as high-
performance brakes, level control, a roof rack
or a high-performance battery, are not
included in the curb weight and the weight of
the accessories.
TIN (Tire Identification Number)
This is a unique identifier which can be used
by a tire manufacturer to identify tires, for
example for a product recall, and thus identify 262
All about wheels and tiresWheels and tires
Page 266 of 284

Storing wheels
Store wheels that are not being used in a cool,
dry and preferably dark place. Protect the
tires from oil, grease, gasoline and diesel. Cleaning the wheels
G
WARNING
The water jet from a circular jet nozzle (dirt
blasters) can cause invisible exterior damage
to the tires or chassis components.
Components damaged in this way may fail
unexpectedly. There is a risk of an accident.
Do not use power washers with circular jet
nozzles to clean the vehicle. Have damaged
tires or chassis components replaced
immediately. Mounting a wheel
Preparing the vehicle X
Stop the vehicle on solid, non-slippery and
level ground.
X Unload the vehicle. The jack can only be
used when the vehicle is unladen.
X Apply the electric parking brake manually.
X Bring the front wheels into the straight-
ahead position.
X Shift the transmission to position P.
X Switch off the engine.
X Vehicles without KEYLESS-GO: remove
the SmartKey from the ignition lock.
X Vehicles with KEYLESS-GO: open the
driver's door.
The on-board electronics now have status
0. This is the same as the SmartKey having
been removed.
X Vehicles with KEYLESS-GO: remove the
Start/Stop button from the ignition lock
(Y page 121). X
If included in the vehicle equipment,
remove the tire-change tool kit from the
vehicle.
X Secure the vehicle to prevent it from rolling
away.
Securing the vehicle to prevent it from
rolling away If your vehicle is equipped with a wheel chock,
it can be found in the tire-change tool kit
(Y
page 226).
The folding wheel chock is an additional
securing measure to prevent the vehicle from
rolling away, for example when changing a
wheel.
X Fold both plates upwards :.
X Fold out lower plate ;.
X Guide the lugs on the lower plate fully into
the openings in base plate =. Securing the vehicle on level ground
X On level ground: place chocks or other
suitable items under the front and rear of 264
Changing a wheelWheels and tires