2014 MERCEDES-BENZ S-Class remove seats
[x] Cancel search: remove seatsPage 24 of 434

Protection of the environment
General notes
H
Environmental note
Daimler's declared policy is one of
comprehensive environmental protection.
The objectives are for the natural resources
that form the basis of our existence on this
planet to be used sparingly and in a manner
that takes the requirements of both nature
and humanity into account.
You too can help to protect the environment
by operating your vehicle in an
environmentally responsible manner.
Fuel consumption and the rate of engine,
transmission, brake and tire wear are affected
by these factors:
R operating conditions of your vehicle
R your personal driving style
You can influence both factors. You should
bear the following in mind:
Operating conditions:
R avoid short trips as these increase fuel
consumption.
R always make sure that the tire pressures
are correct.
R do not carry any unnecessary weight.
R remove roof racks once you no longer need
them.
R a regularly serviced vehicle will contribute
to environmental protection. You should
therefore adhere to the service intervals.
R always have service work carried out at a
qualified specialist workshop.
Personal driving style:
R do not depress the accelerator pedal when
starting the engine.
R do not warm up the engine when the vehicle
is stationary.
R drive carefully and maintain a safe distance
from the vehicle in front.
R avoid frequent, sudden acceleration and
braking. R
change gear in good time and use each gear
only up to 00C3of its maximum engine speed.
R switch off the engine in stationary traffic.
R keep an eye on the vehicle's fuel
consumption. H
Environmental note
Have a defective high-voltage battery
disposed of in an environmentally-
responsible manner. Contact a qualified
specialist workshop which has the necessary
specialist knowledge and tools to carry out
the work required. Mercedes-Benz
recommends that you use an authorized
Mercedes-Benz Center for this purpose. Environmental concerns and
recommendations
Wherever the operating instructions require
you to dispose of materials, first try to
regenerate or re-use them. Observe the
relevant environmental rules and regulations
when disposing of materials. In this way you
will help to protect the environment. Genuine Mercedes-Benz parts
H
Environmental note
Daimler AG also supplies reconditioned major
assemblies and parts which are of the same
quality as new parts. They are covered by the
same Limited Warranty entitlements as new
parts.
! Air bags and Emergency Tensioning
Devices, as well as control units and
sensors for these restraint systems, may be
installed in the following areas of your
vehicle:
R doors
R door pillars
R door sills
R seats 22
Introduction
Page 67 of 434

system checked at a qualified specialist
workshop, before you install a child restraint
system again. G
WARNING
Infants and small children should never share
a seat belt with another occupant. In the event
of an accident, they could be crushed
between the occupant and seat belt.
A child's risk of serious or fatal injuries is
significantly increased if the child restraints
are not properly secured in the vehicle and/
or the child is not properly secured in the child
restraint.
Children that are too large for a child restraint
must travel in seats using normal seat belts.
Position the shoulder belt across the chest
and shoulder, not the face or neck. A booster
seat may be necessary to achieve proper seat
belt positioning for children over 41 lbs
(18 kg) until they reach a height where a lap/
shoulder belt fits properly without a booster
seat.
When the child restraint is not in use, remove
it from the vehicle or secure it with the seat
belt to prevent the child restraint from
becoming a projectile in the event of an
accident. G
WARNING
If children are left unsupervised in the vehicle,
they could:
R open the doors, thus endangering other
people or road users.
R get out and disrupt traffic.
R operate the vehicle's equipment.
Additionally, children could set the vehicle in
motion if, for example, they:
R release the parking brake.
R shifting the automatic transmission out of
park position P
R Start the engine.
There is a risk of an accident and injury. When leaving the vehicle, always take the
SmartKey with you and lock the vehicle. Never
leave children or animals unattended in the
vehicle. Always keep the SmartKey out of
reach of children.
G
WARNING
If persons, particularly children are subjected
to prolonged exposure to extreme heat or
cold, there is a risk of injury, possibly even
fatal. Never leave children unattended in the
vehicle. G
WARNING
If the child restraint system is subjected to
direct sunlight, parts may get very hot.
Children may burn themselves on these parts,
particularly on the metal parts of the child
restraint system. There is a risk of injury.
If you leave the vehicle, taking the child with
you, always ensure that the child restraint
system is not exposed to direct sunlight.
Protect it with a blanket, for example. If the
child restraint system has been exposed to
direct sunlight, let it cool down before
securing the child in it. Never leave children
unattended in the vehicle.
If an infant or child is traveling in the vehicle:
R Secure the child with a child or infant seat
restraint system appropriate to the age and
weight of the child.
R Make sure that the infant or child is
properly secured at all times while the
vehicle is in motion.
Mercedes-Benz recommends that you always
properly secure all infants and children with
a child or infant seat restraint system for the
trip.
The use of seat belts and infant and child
restraint systems is required by law in:
R all 50 states
R the U.S. territories
R the District of Columbia
R all Canadian provinces Children in the vehicle
65Safety Z
Page 69 of 434

LATCH-type (ISOFIX) child seat anchors
in the rear G
WARNING
LATCH-type (ISOFIX) child restraint systems
do not offer sufficient protective effect for
children whose weight is greater than 48 lbs
(22 kg) who are secured using the safety belt
integrated in the child restraint system. In the
event of an accident, a child might not be
restrained correctly. This poses an increased
risk of injury or even fatal injury.
If the child weighs more than 48 lbs (22 kg),
only use LATCH-type (ISOFIX) child restraint
systems with which the child is also secured
with the vehicle seat belt. Also secure the
child restraint system with the Top Tether
belt, if available.
When installing a child restraint system, be
sure to observe the manufacturer's
installation instructions and the instructions
for correct use of the child restraint system.
Before every trip, make sure that the LATCH-
type (ISOFIX) child restraint system is
engaged correctly in both LATCH-type
(ISOFIX) securing rings
! When installing the LATCH-type (ISOFIX)
child restraint system, make sure that the
seat belt for the center seat does not get
trapped. Otherwise, the seat belt could be
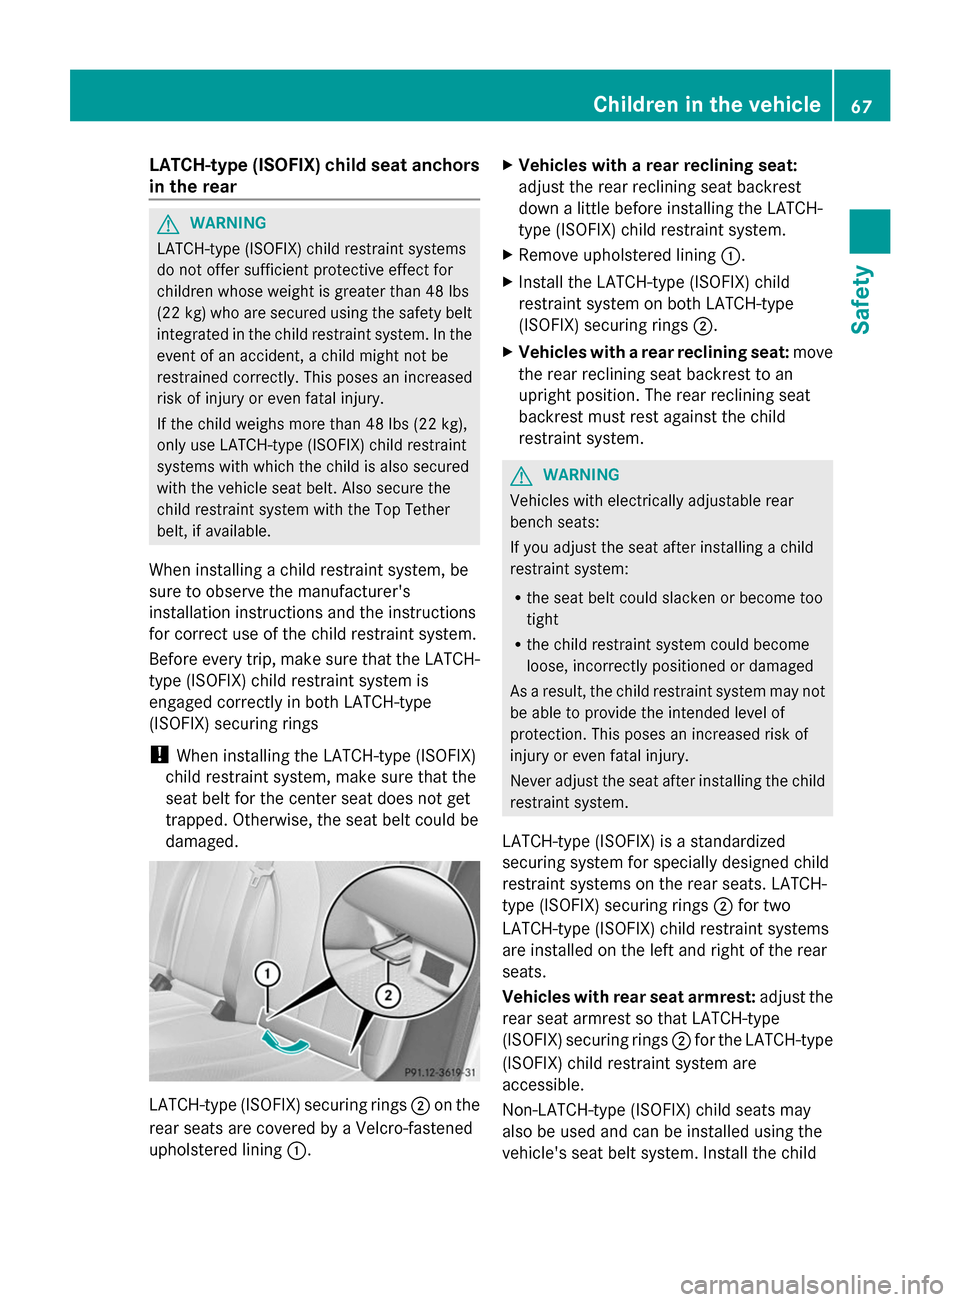
damaged. LATCH-type (ISOFIX) securing rings
0044on the
rear seats are covered by a Velcro-fastened
upholstered lining 0043. X
Vehicles with a rear reclining seat:
adjust the rear reclining seat backrest
down a little before installing the LATCH-
type (ISOFIX) child restraint system.
X Remove upholstered lining 0043.
X Install the LATCH-type (ISOFIX) child
restraint system on both LATCH-type
(ISOFIX) securing rings 0044.
X Vehicles with a rear reclining seat: move
the rear reclining seat backrest to an
upright position. The rear reclining seat
backrest must rest against the child
restraint system. G
WARNING
Vehicles with electrically adjustable rear
bench seats:
If you adjust the seat after installing a child
restraint system:
R the seat belt could slacken or become too
tight
R the child restraint system could become
loose, incorrectly positioned or damaged
As a result, the child restraint system may not
be able to provide the intended level of
protection. This poses an increased risk of
injury or even fatal injury.
Never adjust the seat after installing the child
restraint system.
LATCH-type (ISOFIX) is a standardized
securing system for specially designed child
restraint systems on the rear seats. LATCH-
type (ISOFIX) securing rings 0044for two
LATCH-type (ISOFIX) child restraint systems
are installed on the left and right of the rear
seats.
Vehicles with rear seat armrest: adjust the
rear seat armrest so that LATCH-type
(ISOFIX) securing rings 0044for the LATCH-type
(ISOFIX) child restraint system are
accessible.
Non-LATCH-type (ISOFIX) child seats may
also be used and can be installed using the
vehicle's seat belt system. Install the child Children in the vehicle
67Safety Z
Page 119 of 434

X
To select the rear seat: press button0043
repeatedly until the indicator lamp in the
button is not lit.
The rear-compartment seat is selected if
the indicator lamp in the button is not lit.
X Adjust the rear seats with buttons 0044to
006C.
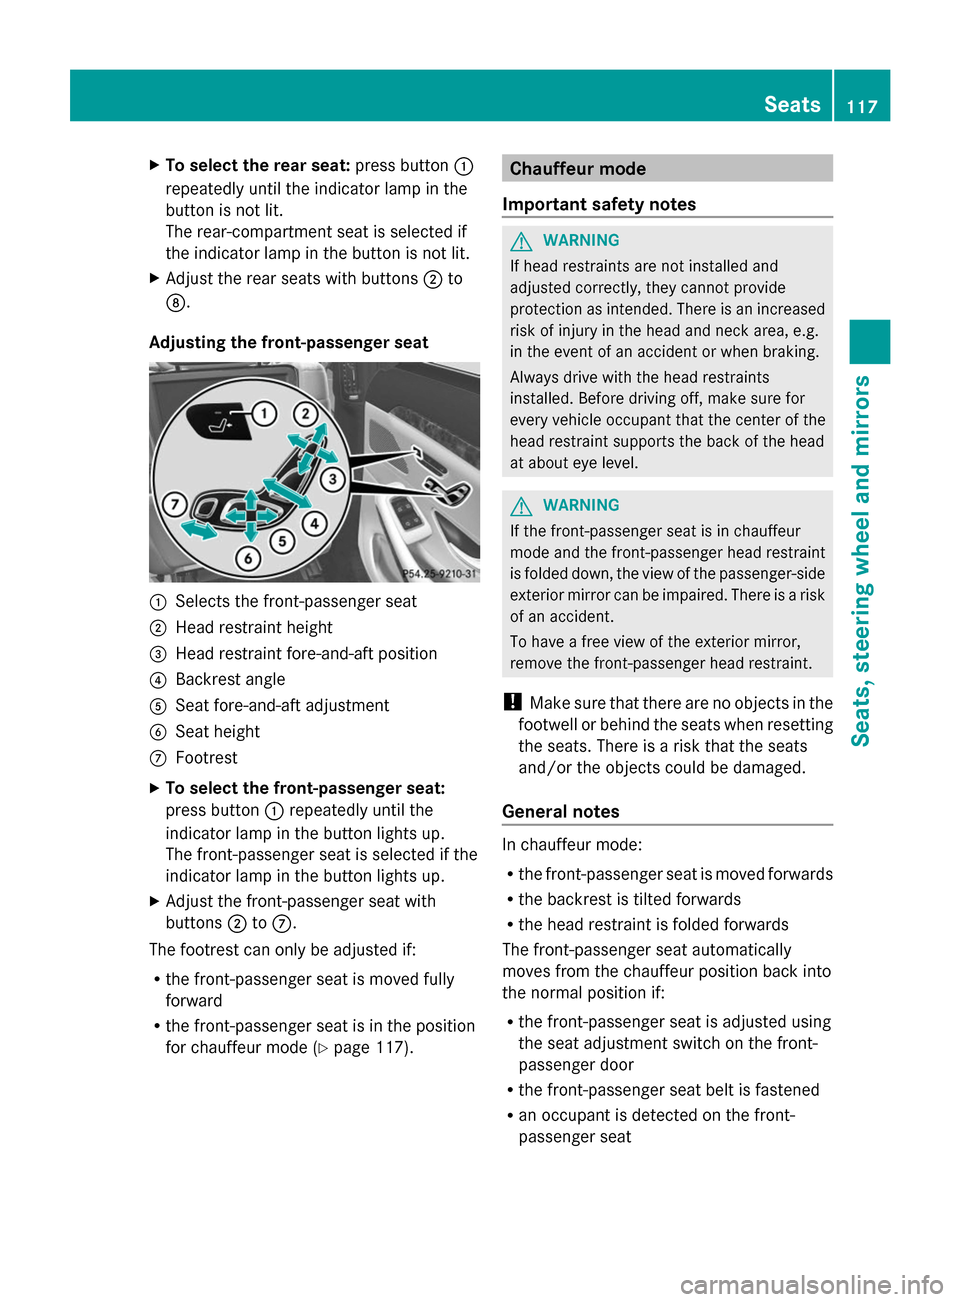
Adjusting the front-passenger seat 0043
Selects the front-passenger seat
0044 Head restraint height
0087 Head restraint fore-and-aft position
0085 Backrest angle
0083 Seat fore-and-aft adjustment
0084 Seat height
006B Footrest
X To select the front-passenger seat:
press button 0043repeatedly until the
indicator lamp in the button lights up.
The front-passenger seat is selected if the
indicator lamp in the button lights up.
X Adjust the front-passenger seat with
buttons 0044to006B.
The footrest can only be adjusted if:
R the front-passenger seat is moved fully
forward
R the front-passenger seat is in the position
for chauffeur mode (Y page 117). Chauffeur mode
Important safety notes G
WARNING
If head restraints are not installed and
adjusted correctly, they cannot provide
protection as intended. There is an increased
risk of injury in the head and neck area, e.g.
in the event of an accident or when braking.
Always drive with the head restraints
installed. Before driving off, make sure for
every vehicle occupant that the center of the
head restraint supports the back of the head
at about eye level. G
WARNING
If the front-passenger seat is in chauffeur
mode and the front-passenger head restraint
is folded down, the view of the passenger-side
exterior mirror can be impaired. There is a risk
of an accident.
To have a free view of the exterior mirror,
remove the front-passenger head restraint.
! Make sure that there are no objects in the
footwell or behind the seats when resetting
the seats. There is a risk that the seats
and/or the objects could be damaged.
General notes In chauffeur mode:
R
the front-passenger seat is moved forwards
R the backrest is tilted forwards
R the head restraint is folded forwards
The front-passenger seat automatically
moves from the chauffeur position back into
the normal position if:
R the front-passenger seat is adjusted using
the seat adjustment switch on the front-
passenger door
R the front-passenger seat belt is fastened
R an occupant is detected on the front-
passenger seat Seats
117Seats, steering wheel and mirrors Z
Page 120 of 434

R
the front-passenger seat head restraint is
inserted and the ignition is switched on
R the front-passenger seat backrest is moved
backwards or the seat is moved in a
longitudinal direction out of the chauffeur
area (Y page 120).
Positioning the front-passenger seat for
chauffeur mode General notes
Pay attention to the important safety notes
(Y page 117). Adjust the seat for chauffeur
mode before the journey (Y page 118). Do not
remove the front-passenger seat head
restraint during the journey.
Adjusting from the rear compartment You can use the override button to disable
this function (Y page 69).
In order for the front-passenger seat to be
positioned in chauffeur mode:
R the front-passenger door must be closed
R the SmartKey must be in the ignition lock
and in position 1or 2(Y page 171)
R the front-passenger seat may not be
occupied
R the front-passenger seat belt must not be
inserted into the buckle X
To select the front-passenger seat:
press button 0043repeatedly until the
indicator lamp in the button lights up.
The front-passenger seat is selected if the
indicator lamp in the button lights up.
X Press button 0044forwards and hold it in this
position.
The seat moves forward.
The seat stops at the threshold of the area
for chauffeur mode.
X Release button 0044.
X Press and hold button 0044again until the
front-passenger seat is in position for
chauffeur mode.
The head restraint on the front-passenger
seat folds forwards. The seat moves
forward.
The To Toview
view the
theext.
ext. mirror,
mirror, adjust
adjust
front-passenger
front-passenger seat
seator
orremove
remove the
the
head
head restraint.
restraint. message appears in the
multifunction display (Y page 299).
i If the front-passenger seat is already at
the threshold to the area for the chauffeur
mode, the position for the chauffeur mode
is set immediately.
i The position for chauffeur mode can be
saved or set using the memory function of
the rear seat (Y page 135). For this the
indicator lamp on button 0043must be lit.
Adjusting from the driver's seat 118
SeatsSeats, steering
wheel and mirrors
Page 121 of 434

In order for the front-passenger seat to be
positioned in chauffeur mode:
R the front-passenger door must be closed
R the SmartKey must be in the ignition lock
and in position 1or 2(Y page 171)
R the front-passenger seat may not be
occupied
R the front-passenger seat belt must not be
inserted into the buckle
X To select the front-passenger seat:
press button 0043repeatedly until the
indicator lamp in the button lights up.
The front-passenger seat is selected if the
indicator lamp in the button lights up.
X Press button 0044forward and hold it.
The seat moves forward.
The seat stops at the threshold of the area
for chauffeur mode.
X Release button 0044.
X Press and hold button 0044again until the
front-passenger seat is in position for
chauffeur mode.
The head restraint on the front-passenger
seat folds forwards. The seat moves
forward.
The To
To view view the
theext.
ext. mirror,
mirror, adjust
adjust
front-passenger
front-passenger seat
seator
orremove
remove the
the
head
head restraint.
restraint. message appears in the
multifunction display (Y page 299).
i If the front-passenger seat is already at
the threshold to the area for the chauffeur
mode, the position for the chauffeur mode
is set immediately.
i The position for chauffeur mode cannot
be stored or set with the driver's seat
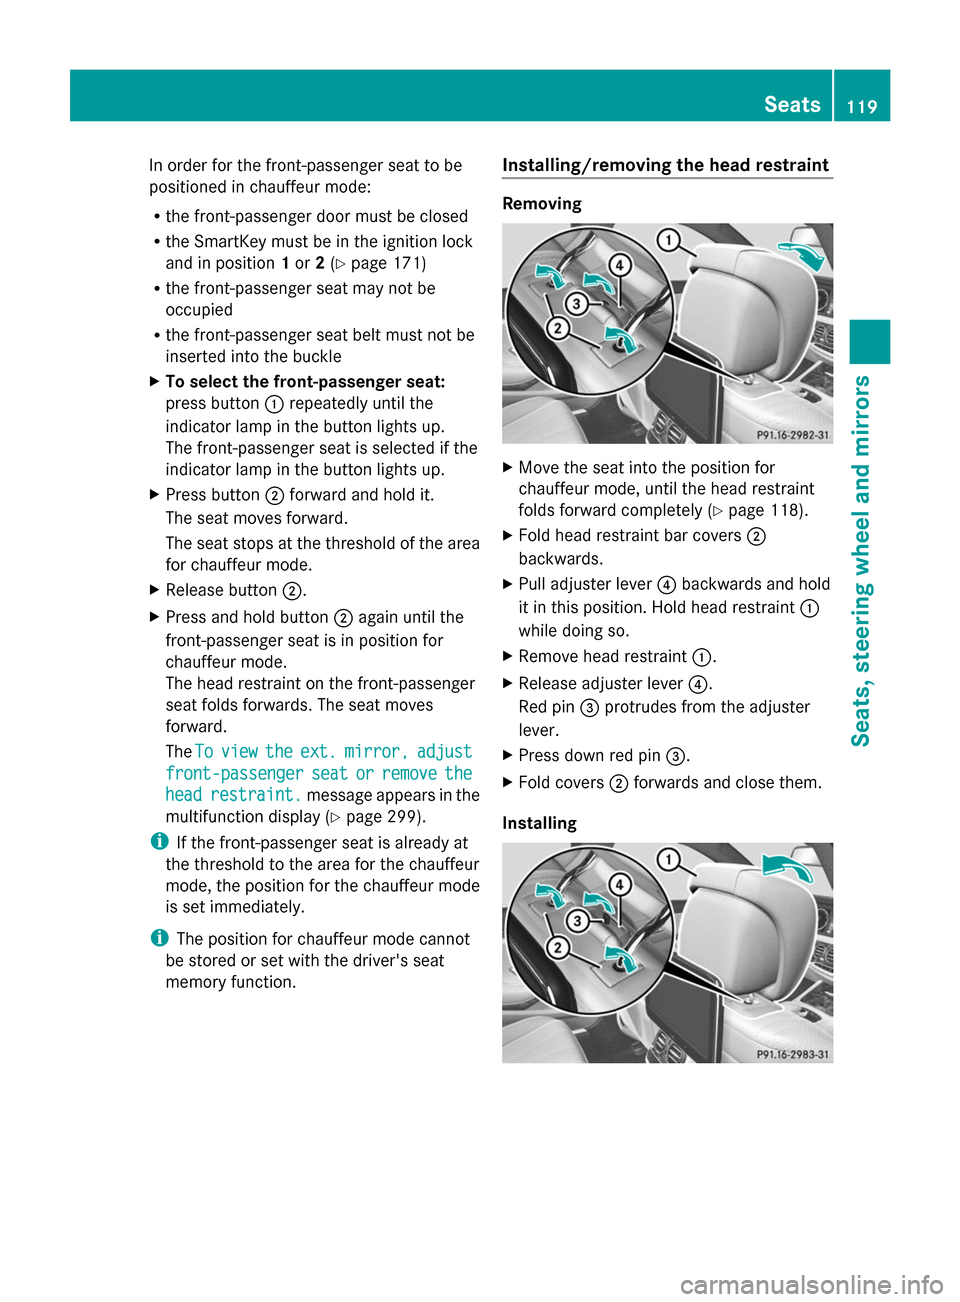
memory function. Installing/removing the head restraint Removing
X
Move the seat into the position for
chauffeur mode, until the head restraint
folds forward completely (Y page 118).
X Fold head restraint bar covers 0044
backwards.
X Pull adjuster lever 0085backwards and hold
it in this position. Hold head restraint 0043
while doing so.
X Remove head restraint 0043.
X Release adjuster lever 0085.
Red pin 0087protrudes from the adjuster
lever.
X Press down red pin 0087.
X Fold covers 0044forwards and close them.
Installing Seats
119Seats, steering wheel and mirrors Z
Page 123 of 434

X
To select the front-passenger seat:
press button 0043repeatedly until the
indicator lamp in the button lights up.
The front-passenger seat is selected if the
indicator lamp in the button lights up.
X Press button 0087backwards and hold it in
this position.
The front-passenger seat moves into the
normal adjustment range at the threshold
of the area for chauffeur mode. The head
restraint folds into position.
If you continue to hold down button 0087, the
seat continues to move backwards.
or
X Briefly press button 0044backwards.
The front-passenger seat moves into the
normal adjustment range at the threshold
to the area for chauffeur mode. The head
restraint folds into position.
i Further settings are available via the
memory adjustment buttons if the front-
passenger seat has been selected with
button 0043.
Adjusting from the front-passenger seat
X Press any seat adjustment button.
The front-passenger seat moves into the
normal adjustment range at the threshold
of the area for chauffeur mode. The head
restraint folds into position.
Fully reclined position of the front-
passenger seat Adjusting
This function is only available on vehicles with
electrically adjustable rear seats.
You can move the front-passenger seat into
a fully reclined position. The rear seat and
front-passenger seat then provide a
continuous surface. To do so:
R
move the seat cushion of the rear seat as
far back as possible in a longitudinal
direction (Y page 113)
R move the front-passenger seat into
position for chauffeur mode (Y page 118)
R remove the front-passenger seat head
restraint( Ypage 119)
R move the front-passenger seat so that the
backrest is in a fully reclined position
(Y page 112).
Exiting
To exit the fully reclined position:
R fold the backrest upright to a suitable
position
R install the head restraint (Y page 119). Adjusting the head restraints
Adjusting the front head restraints Important safety notes
G
WARNING
You could lose control of your vehicle if you
do the following while driving:
R adjust the driver's seat, head restraint,
steering wheel or mirrors
R fasten the seat belt
There is a risk of an accident.
Adjust the driver's seat, head restraint,
steering wheel and mirror and fasten your
seat belt before starting the engine. G
WARNING
If head restraints are not installed and
adjusted correctly, they cannot provide
protection as intended. There is an increased
risk of injury in the head and neck area, e.g.
in the event of an accident or when braking.
Always drive with the head restraints
installed. Before driving off, make sure for
every vehicle occupant that the center of the Seats
121Seats, steering wheel and mirrors
Z
Page 126 of 434

Adjusting the rear head restraints
electrically
The height and fore-and-aft position of the
rear head restraints can be adjusted with the
seat adjustment switch (Y page 113).
Supplementary cushion for luxury head
restraints
The supplementary cushion is available on
vehicles with electrically adjustable rear
seats.
Only use the supplementary cushion when
the vehicle is stationary. The supplementary cushion is located in the
vehicle.
The supplementary cushion is attached to the
head restraint by three press studs.
To install the supplementary cushion:
X Position the head restraint as far forwards
as possible ( Ypage 113).
X Hold supplementary cushion 0044against
the head restraint and push press
studs 0043into the counterpieces.
To remove the supplementary cushion:
X Position the head restraint as far forwards
as possible ( Ypage 113).
X Release press studs 0043and remove
supplementary cushion 0044.Adjusting the rear center head
restraints Retracting and extending electrically
This function is available on vehicles with
electrically adjustable rear seats.
X
Press and hold button 0043until the head
restraint has fully extended or retracted.
Folding into position mechanically This function is available on vehicles with a
rear bench seat.
X
Pull the head restraint up until it engages. Adjusting the multicontour seat
The multicontour seat can be adjusted using
COMAND (see the separate operating
instructions). 124
SeatsSeats, steering wheel and
mirrors