2014 MERCEDES-BENZ S-Class oil change
[x] Cancel search: oil changePage 189 of 434

Problems with the transmission
Problem Possible causes/consequences and
0050
0050Solutions The transmission has
problems shifting gear. The transmission is losing oil.
X
Have the transmission checked at a qualified specialist
workshop immediately. The acceleration ability
is deteriorating.
The transmission no
longer changes gear. The transmission is in emergency mode.
It is only possible to shift into
secondgear and reverse gear.
X Stop the vehicle.
X Shift the transmission to position P.
X Switch off the engine.
X Wait at least ten seconds before restarting the engine.
X Shift the transmission to position Dor R.
If D is selected, the transmission shifts into secondgear; ifRis
selected, the transmission shifts into reverse gear.
X Have the transmission checked at a qualified specialist
workshop immediately. Transfer case
! Performance tests may only be carried
out on a 2-axle dynamometer. The brake
system or transfer case could otherwise be
damaged. Contact a qualified specialist
workshop for a performance test.
! To prevent ESP ®
from intervening, the
ignition must be switched off (SmartKey or
the Start/Stop button in position 0or 1) if:
R the electric parking brake is being tested
on a brake dynamometer.
R the vehicle is being towed with only one
axle raised (not permitted for vehicles
with 4MATIC).
The brake system could otherwise be
damaged.
! Vehicles with 4MATIC must not be towed
with either the front or the rear axle raised,
as doing so will damage the transmission.
This section is only valid for vehicles with 4-
wheel drive (4MATIC). Power is always
transmitted to both axles. Refueling
Important safety notes
G
WARNING
Fuel is highly flammable. If you handle fuel
incorrectly, there is a risk of fire and
explosion.
You must avoid fire, open flames, creating
sparks and smoking. Switch off the engine
and, if applicable, the auxiliary heating before
refueling. G
WARNING
Fuel is poisonous and hazardous to health.
There is a risk of injury.
You must make sure that fuel does not come
into contact with your skin, eyes or clothing
and that it is not swallowed. Do not inhale fuel
vapors. Keep fuel away from children. Refueling
187Driving and parking
Z
Page 355 of 434

X
Press the 0063or0064 button on the
steering wheel to select the Service
Service menu
and press 0076to confirm.
X Press the 0063or0064 button on the
steering wheel to select the ASSYST PLUS
ASSYST PLUS
submenu and press 0076to confirm.
The service due date appears in the
multifunction display. Information about Service
Resetting the ASSYST PLUS service
interval display !
If the ASSYST PLUS service interval
display has been inadvertently reset, this
setting can be corrected at a qualified
specialist workshop.
Have service work carried out as described
in the Maintenance Booklet. This may
otherwise lead to increased wear and
damage to the major assemblies or the
vehicle.
A qualified specialist workshop, e.g. an
authorized Mercedes-Benz Center, will reset
the ASSYST PLUS service interval display
after the service work has been carried out.
You can also obtain further information on
maintenance work, for example.
Special service requirements The specified maintenance interval takes only
the normal operation of the vehicle into
account. Under arduous operating conditions
or increased load on the vehicle,
maintenance work must be carried out more
frequently, for example:
R regular city driving with frequent
intermediate stops
R if the vehicle is primarily used to travel
short distances
R use in mountainous terrain or on poor road
surfaces
R if the engine is often left idling for long
periods Under these or similar conditions, have, for
example, the air filter, engine oil and oil filter
replaced or changed more frequently. Under
arduous operating conditions, the tires must
be checked more often. Further information
can be obtained at a qualified specialist
workshop, e.g. an authorized Mercedes-Benz
Center.
Driving abroad An extensive Mercedes-Benz Service network
is also available in other countries. You can
obtain further information from any
authorized Mercedes-Benz Center.
Care
General notes
H
Environmental note
Dispose of empty packaging and cleaning
cloths in an environmentally responsible
manner.
! For cleaning your vehicle, do not use any
of the following:
R dry, rough or hard cloths
R abrasive cleaning agents
R solvents
R cleaning agents containing solvents
Do not scrub.
Do not touch the surfaces or protective
films with hard objects, e.g. a ring or ice
scraper. You could otherwise scratch or
damage the surfaces and protective film.
! Do not park the vehicle for an extended
period straight after cleaning it, particularly
after having cleaned the wheels with wheel
cleaner. Wheel cleaners could cause
increased corrosion of the brake discs and
brake pads/linings. For this reason, you
should drive for a few minutes after
cleaning. Braking heats the brake discs and
the brake pads/linings, thus drying them.
The vehicle can then be parked. Care
353Maintenance and care Z
Page 362 of 434

Cleaning the camera in the radiator trim
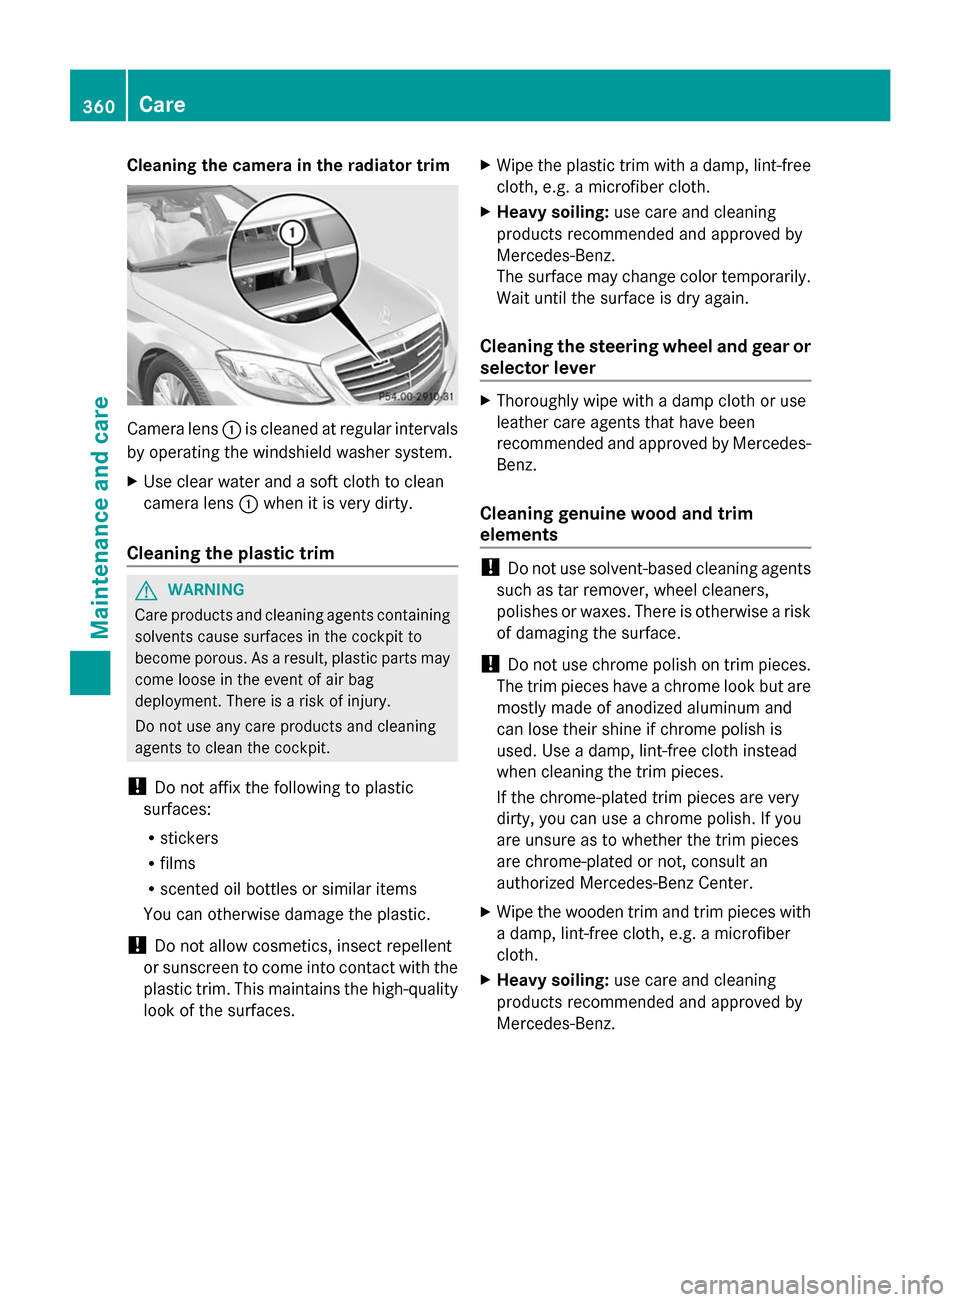
Camera lens
0043is cleaned at regular intervals
by operating the windshield washer system.
X Use clear water and a soft cloth to clean
camera lens 0043when it is very dirty.
Cleaning the plastic trim G
WARNING
Care products and cleaning agents containing
solvents cause surfaces in the cockpit to
become porous. As a result, plastic parts may
come loose in the event of air bag
deployment. There is a risk of injury.
Do not use any care products and cleaning
agents to clean the cockpit.
! Do not affix the following to plastic
surfaces:
R stickers
R films
R scented oil bottles or similar items
You can otherwise damage the plastic.
! Do not allow cosmetics, insect repellent
or sunscreen to come into contact with the
plastic trim. This maintains the high-quality
look of the surfaces. X
Wipe the plastic trim with a damp, lint-free
cloth, e.g. a microfiber cloth.
X Heavy soiling: use care and cleaning
products recommended and approved by
Mercedes-Benz.
The surface may change color temporarily.
Wait until the surface is dry again.
Cleaning the steering wheel and gear or
selector lever X
Thoroughly wipe with a damp cloth or use
leather care agents that have been
recommended and approved by Mercedes-
Benz.
Cleaning genuine wood and trim
elements !
Do not use solvent-based cleaning agents
such as tar remover, wheel cleaners,
polishes or waxes. There is otherwise a risk
of damaging the surface.
! Do not use chrome polish on trim pieces.
The trim pieces have a chrome look but are
mostly made of anodized aluminum and
can lose their shine if chrome polish is
used. Use a damp, lint-free cloth instead
when cleaning the trim pieces.
If the chrome-plated trim pieces are very
dirty, you can use a chrome polish. If you
are unsure as to whether the trim pieces
are chrome-plated or not, consult an
authorized Mercedes-Benz Center.
X Wipe the wooden trim and trim pieces with
a damp, lint-free cloth, e.g. a microfiber
cloth.
X Heavy soiling: use care and cleaning
products recommended and approved by
Mercedes-Benz. 360
CareMaintenance and care
Page 409 of 434

Occupant distribution
The distribution of occupants in a vehicle at
their designated seating positions.
Total load limit
Nominal load and luggage load plus 68 kg
(150 lbs) multiplied by the number of seats in
the vehicle. Changing a wheel
Flat tire
The "Breakdown assistance" section
(Y page 365)c ontains information and notes
on how to deal with a flat tire. Information on
driving with MOExtended tires in the event of
a flat tire can be found under "MOExtended
tires (tires with run-flat characteristics"
(Y page 365). Rotating the wheels
G
WARNING
Interchanging the front and rear wheels may
severely impair the driving characteristics if
the wheels or tires have different dimensions.
The wheel brakes or suspension components
may also be damaged. There is a risk of
accident.
Rotate front and rear wheels only if the wheels
and tires are of the same dimensions.
! On vehicles equipped with a tire pressure
monitor, electronic components are
located in the wheel.
Tire-mounting tools should not be used
near the valve. This could damage the
electronic components.
Only have tires changed at a qualified
specialist workshop.
Always observe the instructions and safety
notes in the "Mounting a wheel" section
(Y page 408).
The wear patterns on the front and rear tires
differ, depending on the operating conditions. Rotate the wheels before a clear wear pattern
has formed on the tires. Front tires typically
wear more on the shoulders and the rear tires
in the center.
If your vehicle's tire configuration allows, you
can rotate the wheels according to the
intervals in the tire manufacturer's warranty
book in your vehicle documents. If no
warranty book is available, the tires should be
rotated every 3,000 to 6,000 miles
(5,000 to
10,000 km), or earlier if tire wear requires.
Ensure the direction of rotation is maintained.
Clean the contact surfaces of the wheel and
the brake disc thoroughly every time a wheel
is rotated. Check the tire pressure and
reactivate the tire pressure monitor if
necessary (Y page 393). Direction of rotation
Tires with a specified direction of rotation
have additional benefits, e.g. if there is a risk
of hydroplaning. You will only gain these
benefits if the correct direction of rotation is
maintained.
An arrow on the sidewall of the tire indicates
its correct direction of rotation. Storing wheels
Store wheels that are not being used in a cool,
dry and preferably dark place. Protect the
tires from oil, grease, gasoline and diesel. Cleaning the wheels
G
WARNING
The water jet from a circular jet nozzle (dirt
blasters) can cause invisible exterior damage
to the tires or chassis components.
Components damaged in this way may fail
unexpectedly. There is a risk of an accident.
Do not use power washers with circular jet
nozzles to clean the vehicle. Have damaged Changing a wheel
407Wheels and tires
Z
Page 412 of 434

Vehicles with aluminum hub caps:
X To remove: take socket0044and lug wrench
0087 from the vehicle tool kit ( Ypage 364).
X Position socket 0044on hub cap 0043.
X Attach lug wrench 0087to socket 0044and
loosen hub cap 0043counter-clockwise.
X Remove hub cap 0043.
X To install: before installing, check hub
cap 0043and the wheel area for soiling and
clean if necessary.
X Put hub cap 0043in position and turn until it
is in the right position.
X Position socket 0044on hub cap 0043.
X Attach lug wrench 0087to socket 0044and
tighten hub cap 0043.
The tightening torque must be 18 lb-ft
(25 Nm).
i Note that the hub cap should be
tightened to the specified torque of 18 lb-ft
(25 Nm). Mercedes-Benz recommends
that you have the hub cap installed at a
qualified specialist workshop. X
Using lug wrench 0087, loosen the bolts on
the wheel you wish to change by about one
full turn. Do not unscrew the bolts
completely. The jacking points are located just behind the
front wheel housings and just in front of the
rear wheel housings (arrows).
X
Take the ratchet wrench out of the vehicle
tool kit and place it on the hexagon nut of
the jack so that the letters AUFare visible.
AMG vehicles and vehicles with AMG
equipment: to protect the vehicle body, the
vehicle has covers next to the jacking points
on the outer sills. X
AMG vehicles and vehicles with AMG
equipment: fold cover0085upwards. 410
Changing a wheelWheels and tires
Page 427 of 434

"Additives". You can obtain further
information from any authorized Mercedes-
Benz Center.
! To ensure the longevity and full
performance of the engine, only premium-
grade unleaded gasoline must be used.
If standard unleaded gasoline is
unavailable and you have to refuel with
unleaded gasoline of a lower grade,
observe the following precautions:
R Only fill the fuel tank to half full with
regular unleaded gasoline and fill the rest
with premium-grade unleaded gasoline
as soon as possible.
R Do not drive at the maximum speed.
R Avoid sudden acceleration and engine
speeds over 3,000 rpm.
Using mixtures of methanol and ethanol is not
permitted. E10 fuel or E15 fuel (unleaded
gasoline with 10% or 15% ethanol) can be
used.
You will usually find information about the fuel
grade on the pump. If you cannot find the
label on the pump, ask the staff for
assistance.
i For further information, consult a
qualified specialist workshop or visit
http://www.mbusa.com (USA only).
Information on refueling (Y page 188).
AMG vehicles
Additives
! Operating the engine with fuel additives
added later can lead to engine failure. Do
not mix fuel additives with fuel. This does
not include additives for the removal and
prevention of residue buildup. gasoline
must only be mixed with additives
recommended by Mercedes-Benz. Comply
with the instructions for use on the product
label. More information about
recommended additives can be obtained
from any authorized Mercedes-Benz
Center. Mercedes-Benz recommends that you use
branded fuels that have additives.
The quality of the fuel available in some
countries may not be sufficient. Residue
could build up in the injection system as a
result. In such cases, and in consultation with
an authorized Mercedes-Benz Center, the
gasoline may be mixed with the cleaning
additive recommended by Mercedes-Benz.
You must observe the notes and mixing ratios
specified on the container. Engine oil
General notes !
Never use engine oil or an oil filter of a
specification other than is necessary to
fulfill the prescribed service intervals. Do
not change the engine oil or oil filter in
order to achieve longer replacement
intervals than those prescribed. You could
otherwise cause engine damage or damage
to the exhaust gas aftertreatment.
Follow the instructions in the service
interval display regarding the oil change.
Otherwise, you may damage the engine and
the exhaust gas aftertreatment.
When handling engine oil, observe the
important safety notes on service products
(Y page 423).
The engine oils are matched to the
performance of Mercedes-Benz engines and
service intervals. You should therefore only
use engine oils and oil filters that are
approved for vehicles with maintenance
systems.
For a list of approved engine oils and oil filters,
consult an authorized Mercedes-Benz
Center. Or visit the website
http://bevo.mercedes-benz.co m.
The table shows which engine oils have been
approved for your vehicle. Service products and filling capacities
425Technical data Z
Page 428 of 434

Missing values were not available at time of
going to print. Model Engine
model MB
Approval AMG vehicles
157 229.5
All other models
278 229.5
i
MB approval is indicated on the oil
containers.
Filling capacities The following values refer to an oil change
including the oil filter.
Model Capacity
AMG vehicles
Without external oil
cooler: 9.0 US qt (8.5 l) All other models
8.5 qt (8.0 l)
Additives
!
Do not use any additives in the engine oil.
This could damage the engine.
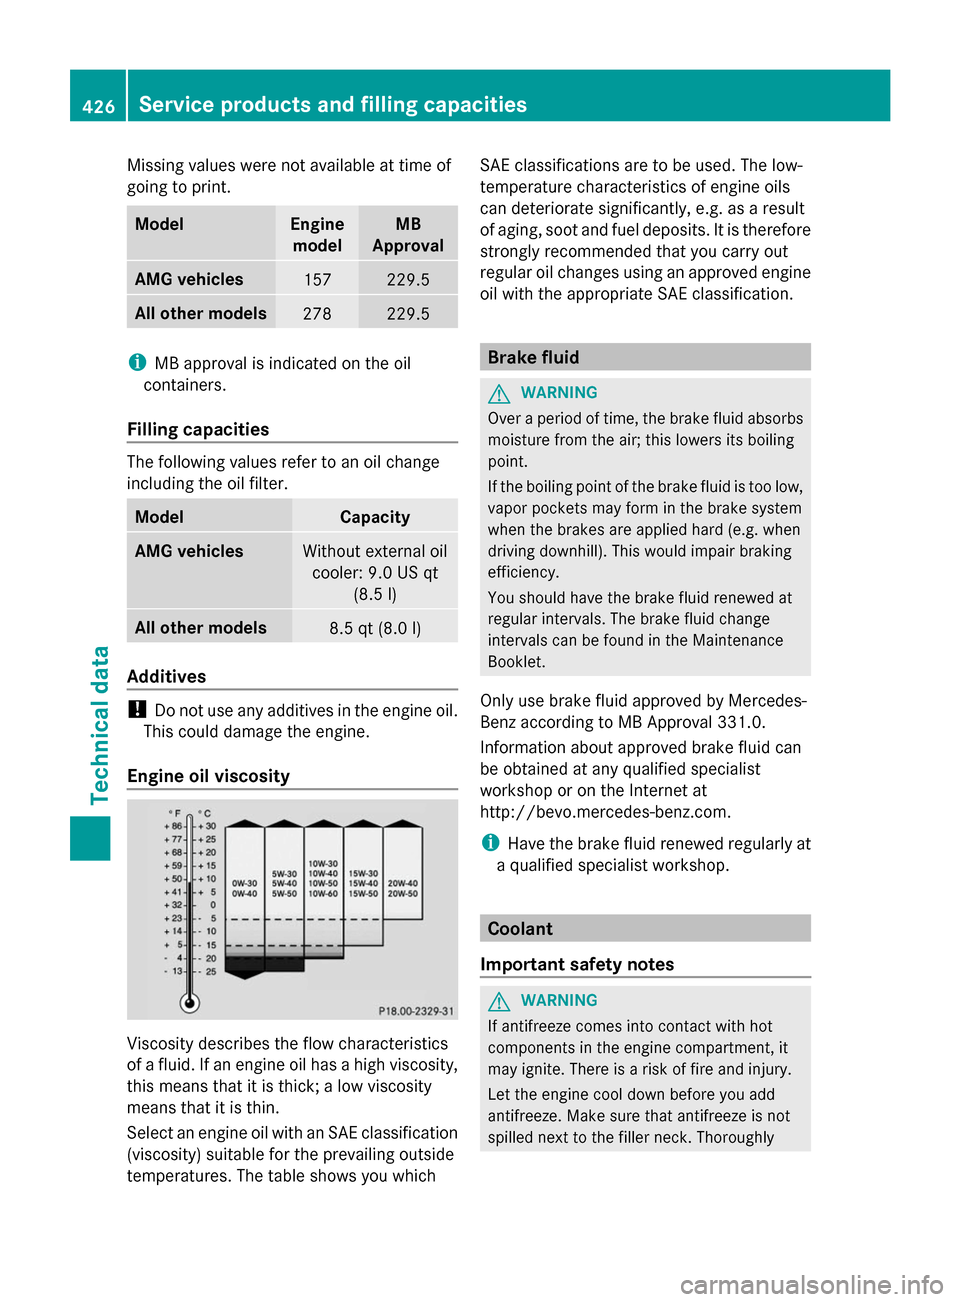
Engine oil viscosity Viscosity describes the flow characteristics
of a fluid. If an engine oil has a high viscosity,
this means that it is thick; a low viscosity
means that it is thin.
Select an engine oil with an SAE classification
(viscosity) suitable for the prevailing outside
temperatures. The table shows you which SAE classifications are to be used. The low-
temperature characteristics of engine oils
can deteriorate significantly, e.g. as a result
of aging, soot and fuel deposits. It is therefore
strongly recommended that you carry out
regular oil changes using an approved engine
oil with the appropriate SAE classification.
Brake fluid
G
WARNING
Over a period of time, the brake fluid absorbs
moisture from the air; this lowers its boiling
point.
If the boiling point of the brake fluid is too low,
vapor pockets may form in the brake system
when the brakes are applied hard (e.g. when
driving downhill). This would impair braking
efficiency.
You should have the brake fluid renewed at
regular intervals. The brake fluid change
intervals can be found in the Maintenance
Booklet.
Only use brake fluid approved by Mercedes-
Benz according to MB Approval 331.0.
Information about approved brake fluid can
be obtained at any qualified specialist
workshop or on the Internet at
http://bevo.mercedes-benz.com.
i Have the brake fluid renewed regularly at
a qualified specialist workshop. Coolant
Important safety notes G
WARNING
If antifreeze comes into contact with hot
components in the engine compartment, it
may ignite. There is a risk of fire and injury.
Let the engine cool down before you add
antifreeze. Make sure that antifreeze is not
spilled next to the filler neck. Thoroughly 426
Service products and filling capacitiesTechnical data