2014 MERCEDES-BENZ S-Class change time
[x] Cancel search: change timePage 257 of 434
Station
0044is displayed with the station
frequency or station name. The memory
position is only displayed along with
station 0044if this has been stored.
X Switch on COMAND (see the separate
operating instructions).
X Use 00E2 on the steering wheel to call up
the list of menus.
X Press the 0064or0063 button on the
steering wheel to select the Radio
Radio menu.
X Confirm by pressing 0076on the steering
wheel.
Currently selected station 0044appears in
the multifunction display.
X To open the station list: press0064or
0063 briefly.
X To select a station from the station
list: press 0064or0063 briefly.
X To select a station from the station list
using rapid scrolling: press and briefly
hold the 0064or0063 button.
X To select a waveband or station
memory: press0076briefly.
X Use 0064 or0063 to select the waveband
or station memory.
X Press 0076to confirm.
i To store a station, see the separate
operating instructions.
i SIRIUS XM satellite radio functions like a
normal radio.
For more information on satellite radio
operation, see the separate operating
instructions. Media menu
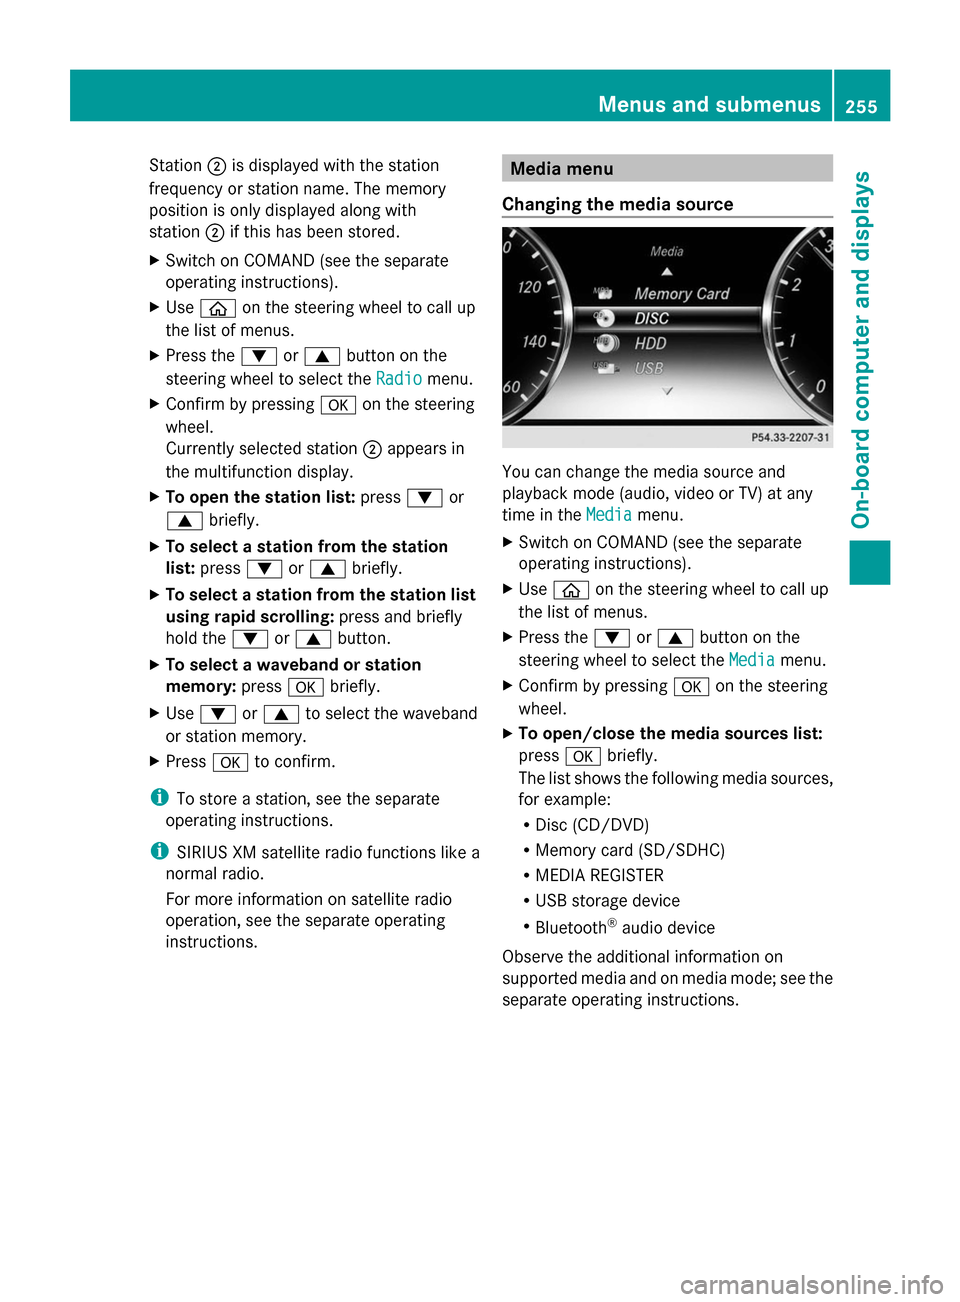
Changing the media source You can change the media source and
playback mode (audio, video or TV) at any
time in the
Media
Media menu.
X Switch on COMAND (see the separate
operating instructions).
X Use 00E2 on the steering wheel to call up
the list of menus.
X Press the 0064or0063 button on the
steering wheel to select the Media Mediamenu.
X Confirm by pressing 0076on the steering
wheel.
X To open/close the media sources list:
press 0076briefly.
The list shows the following media sources,
for example:
R Disc (CD/DVD)
R Memory card (SD/SDHC)
R MEDIA REGISTER
R USB storage device
R Bluetooth ®
audio device
Observe the additional information on
supported media and on media mode; see the
separate operating instructions. Menus and submenus
255On-board computer and displays Z
Page 264 of 434
Activating/deactivating Active Lane
Keeping Assist
X Use 00E2 on the steering wheel to call up
the list of menus.
X Press the 0064or0063 button on the
steering wheel to select the Settings
Settings
menu.
X Confirm by pressing 0076on the steering
wheel.
X Use 0064 or0063 to select the
DriveAssist
DriveAssist submenu.
X Press 0076to confirm.
X Press the 0064or0063 button to select
Lane Keeping Assist Lane Keeping Assist .
X Press 0076to confirm.
The current selection Standard
Standard or
Adaptive Adaptive is displayed.
X To change the setting: press0076again.
For further information about Active Lane
Keeping Assist, see (Y page 243).
Light submenu Switching the spotlight function on or off
X Use 00E2 on the steering wheel to call up
the list of menus.
X Press the 0064or0063 button on the
steering wheel to select the Settings
Settings
menu.
X Confirm by pressing 0076on the steering
wheel.
X Press the 0064or0063 button to select the
Lights
Lights submenu.
X Press 0076to confirm.
X Use 0064 or0063 to select the
Spotlight
Spotlight function.
X Press the 0076button to save the setting.
When the spotlight function is activated,
the assistance graphic shows the
pedestrian symbol.
Further information on the spotlight function
(Y page 238). Switching the daytime running lamps on/
off
This function is not available in Canada.
X
Use 00E2 on the steering wheel to call up
the list of menus.
X Press the 0064or0063 button on the
steering wheel to select the Settings
Settings
menu.
X Confirm by pressing 0076on the steering
wheel.
X Press the 0064or0063 button to select the
Lights Lights submenu.
X Press 0076to confirm.
X Press the 0064or0063 button to select the
Daytime Running Lights Daytime Running Lights function.
If the Daytime Running Lights Daytime Running Lights function
has been switched on, the cone of light and
the 0086 symbol in the multifunction
display are shown in white.
X Press the 0076button to save the setting.
Further information on daytime running
lamps ( Ypage 138).
Instrument cluster submenu Selecting the unit of measurement for
distance
The
Display Unit Speed-/Odometer: Display Unit Speed-/Odometer:
function allows you to choose whether
certain displays appear in kilometers or miles
in the multifunction display.
X Use 00E2 on the steering wheel to call up
the list of menus.
X Press the 0064or0063 button on the
steering wheel to select the Settings Settings
menu.
X Confirm by pressing 0076on the steering
wheel.
X Press the 0064or0063 button to select the
Instrument Cluster
Instrument Cluster submenu.
X Press 0076to confirm. 262
Menus and submenusOn-board computer and displays
Page 318 of 434
Useful information
i This Operator's Manual describes all
models and all standard and optional
equipment of your vehicle available at the
time of publication of the Operator's
Manual. Country-specific differences are
possible. Please note that your vehicle may
not be equipped with all features
described. This also applies to safety-
related systems and functions.
i Read the information on qualified
specialist workshops: (Y page 27).Stowage areas
Loading guidelines
G
WARNING
Combustion engines emit poisonous exhaust
gases such as carbon monoxide. Exhaust
gases can enter the vehicle interior if the
trunk lid is open when the engine is running,
especially if the vehicle is in motion. There is
a risk of poisoning.
Always switch off the engine before opening
the trunk lid. Never drive with the trunk lid
open. G
WARNING
If objects, luggage or loads are not secured or
not secured sufficiently, they could slip, tip
over or be flung around and thereby hit vehicle
occupants. There is a risk of injury,
particularly in the event of sudden braking or
a sudden change in direction.
Always store objects so that they cannot be
flung around. Secure objects, luggage or
loads against slipping or tipping before the
journey. The handling characteristics of a laden
vehicle are dependent on the distribution of
the load within the vehicle. For this reason,
you should observe the following notes when
transporting a load:
R
Never exceed the maximum permissible
gross vehicle weight or the gross axle
weight rating of the vehicle (including
occupants). The values are specified on the
vehicle identification plate on the B-pillar of
the driver's door.
R The trunk is the preferred place to carry
objects.
R Position heavy loads as far forwards as
possible and as low down in the trunk as
possible.
R The load must not protrude above the
upper edge of the seat backrests.
R Always place the load behind unoccupied
seats if possible.
R Secure the load with sufficiently strong and
wear-resistant tie-downs. Pad sharp edges
for protection. Stowage space
Important safety notes G
WARNING
If you do not correctly store objects in the
vehicle interior, they can slip or be flung
around, thus striking vehicle occupants.
There is a risk of injury, especially when
braking or abruptly changing directions.
R Always store objects so that they cannot be
flung around in these or in similar
situations.
R Always make sure that objects do not
protrude from stowage compartments,
parcel nets or stowage nets.
R Close lockable stowage compartments
while driving.
R Stow and secure objects that are heavy,
hard, pointy, sharp-edged, fragile or too
large in the trunk. 316
Stowage areasStowage and features
Page 366 of 434

Useful information
i This Operator's Manual describes all
models and all standard and optional
equipment of your vehicle available at the
time of publication of the Operator's
Manual. Country-specific differences are
possible. Please note that your vehicle may
not be equipped with all features
described. This also applies to safety-
related systems and functions.
i Read the information on qualified
specialist workshops: (Y page 27).Where will I find...?
Vehicle tool kit
General notes The towing eye is located in the stowage well
under the trunk floor.
i Apart from certain country-specific
variations, the vehicles are not equipped
with a tire-change tool kit. Some tools for
changing a wheel are specific to the
vehicle. For more information on which
tools are required and approved to perform
a wheel change on your vehicle, consult a
qualified specialist workshop.
Tools required for changing a wheel may
include, for example:
R Jack
R Wheel chock
R Lug wrench
R Ratchet wrench
R Alignment bolt Vehicles with a TIREFIT kit Example
0043 Tire sealant filler bottle
0044 Tire inflation compressor
0087 Towing eye
X Open the trunk lid.
X Lift the trunk floor upwards (Y page 320).
X Use the TIREFIT kit (Y page 366).
AMG vehicles Example
0043 Tire sealant filler bottle
0044 Jack
0087 Ratchet
0085 Alignment bolt
0083 Jacking support
0084 Socket
006B Lug wrench
006C Towing eye
006D Folding wheel chock
006E Tire inflation compressor 364
Where will I find...?Breakdown assistance
Page 369 of 434
plenty of water. Do not induce vomiting,
and seek medical attention immediately.
R Immediately change out of clothing which
has come into contact with tire sealant.
R If an allergic reaction occurs, seek medical
attention immediately.
! Do not operate the tire inflation
compressor for longer than eight minutes
at a time without a break. It may otherwise
overheat.
The tire inflation compressor can be
operated again once it has cooled down.
Using the TIREFIT kit X
Do not remove any foreign objects which
have penetrated the tire, e.g. screws or
nails.
X Remove the tire sealant bottle, the
accompanying TIREFIT sticker and the tire
inflation compressor from the stowage well
underneath the trunk floor (Y page 364).
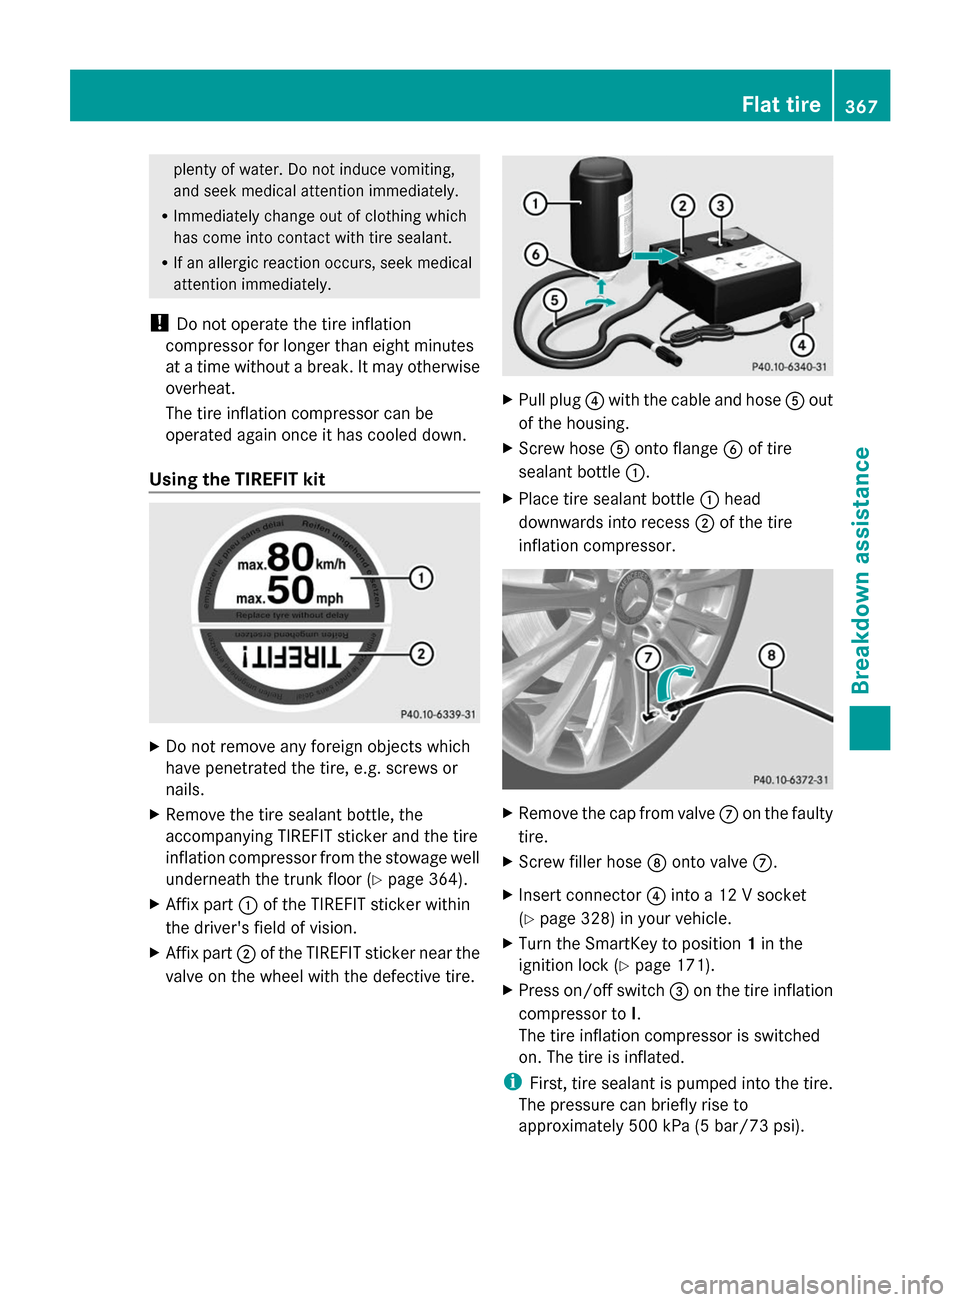
X Affix part 0043of the TIREFIT sticker within
the driver's field of vision.
X Affix part 0044of the TIREFIT sticker near the
valve on the wheel with the defective tire. X
Pull plug 0085with the cable and hose 0083out
of the housing.
X Screw hose 0083onto flange 0084of tire
sealant bottle 0043.
X Place tire sealant bottle 0043head
downwards into recess 0044of the tire
inflation compressor. X
Remove the cap from valve 006Bon the faulty
tire.
X Screw filler hose 006Conto valve 006B.
X Insert connector 0085into a 12 V socket
(Y page 328) in your vehicle.
X Turn the SmartKey to position 1in the
ignition lock (Y page 171).
X Press on/off switch 0087on the tire inflation
compressor to I.
The tire inflation compressor is switched
on. The tire is inflated.
i First, tire sealant is pumped into the tire.
The pressure can briefly rise to
approximately 500 kPa (5 bar/73 psi). Flat tire
367Breakdown assistance Z
Page 395 of 434

If the vehicle has been parked for over
20 minutes, the Tire pressure will be
Tire pressure will be
displayed after driving a few
displayed after driving a few
minutes minutes message appears.
After a teach-in process, the tire pressure
monitor automatically detects new wheels or
new sensors. As long as a clear allocation of
the tire pressure value to the individual
wheels is not possible, the Tire Pressure
Tire Pressure
Monitor Active Monitor Active display message is shown
instead of the tire pressure display. The tire
pressures are already being monitored.
Tire pressure monitor warning
messages If the tire pressure monitor detects a pressure
loss in one or more tires, a warning message
is shown in the multifunction display and the
yellow tire pressure monitor warning lamp
comes on.
R If the Correct Tire Pressure
Correct Tire Pressure message
appears in the multifunction display, the
tire pressure in at least one tire is too low
and must be corrected at the next
opportunity.
R If the Check
Check Tires Tiresmessage appears in the
multifunction display, the tire pressure in
one or more tires has dropped significantly
and the tires must be checked.
R If the Tire Malfunction
Tire Malfunction appears in the
multifunction display, the tire pressure in
one or more tires has dropped suddenly
and the tires must be checked.
Observe the instructions and safety notes in
the display messages in the "Tires" section
(Y page 295).
i If the wheel positions on the vehicle are
rotated, the tire pressures may be
displayed for the wrong positions for a
short time. This is rectified after a few
minutes of driving, and the tire pressures
are displayed for the correct positions. Restarting the tire pressure monitor When you restart the tire pressure monitor,
all existing warning messages are deleted and
the warning lamps go out. The monitor uses
the currently set tire pressures as the
reference values for monitoring. In most
cases, the tire pressure monitor will
automatically detect the new reference
values after you have changed the tire
pressure. However, you can also define
reference values manually as described here.
The tire pressure monitor then monitors the
new tire pressure values.
X
Set the tire pressure to the value
recommended for the corresponding
driving situation on the Tire and Loading
Information placard on the driver's side
B-pillar (Y page 387).
Additional tire pressure values for different
loads can also be found on the tire pressure
table on the inside of the fuel filler flap
(Y page 387).
X Make sure that the tire pressure is correct
on all four wheels.
X Make sure that the SmartKey is in position
2in the ignition lock.
X Use 00E2 on the steering wheel to call up
the list of menus.
X Press the 0063or0064 button on the
steering wheel to select the Service
Service
menu.
X Press the 0076button.
X Press the 0063or0064 button to select
Tire Pressure Tire Pressure.
X Press the 0076button.
The multifunction display shows the
current tire pressure for the individual tires
or the Tire pressure will be Tire pressure will be
displayed after driving a few
displayed after driving a few
minutes minutes message.
X Press the 0064button.
The Use current pressures as new
Use current pressures as new
reference values
reference values message appears in
the multifunction display. Tire pressure
393Wheels and tires Z
Page 396 of 434
If you wish to confirm the restart:
X Press the 0076button.
The Tire Press. Monitor Restarted
Tire Press. Monitor Restarted
message appears in the multifunction
display.
After driving for a few minutes, the system
checks whether the current tire pressures
are within the specified range. The new tire
pressures are then accepted as reference
values and monitored.
If you wish to cancel the restart:
X Press the 0038button.
The tire pressure values stored at the last
restart will continue to be monitored. Tire pressure loss warning system
(Canada only)
General notes While the vehicle is in motion, the tire
pressure loss warning system monitors the
set tire pressure using the rotational speed of
the wheels. This enables the system to detect
significant pressure loss in a tire. If the speed
of rotation of a wheel changes as a result of
a loss of pressure, a corresponding warning
message will appear in the multifunction
display.
You can recognize the tire pressure loss
warning by the Run Flat Indicator
Run Flat Indicator
Active Press 'OK' to Restart
Active Press 'OK' to Restart message
which appears in the Service
Service menu of the
multifunction display. Information on the
message display can be found in the
"Restarting the tire pressure loss warning
system" section (Y page 394).
Important safety notes The tire pressure warning system does not
warn you of an incorrectly set tire pressure.
Observe the notes on the recommended tire
pressure ( Ypage 387).
The tire pressure loss warning does not
replace the need to regularly check the tire pressure. An even loss of pressure on several
tires at the same time cannot be detected by
the tire pressure loss warning system.
The tire pressure monitor is not able to warn
you of a sudden loss of pressure, e.g. if the
tire is penetrated by a foreign object. In the
event of a sudden loss of pressure, bring the
vehicle to a halt by braking carefully. Avoid
abrupt steering maneuvers.
The function of the tire pressure loss warning
system is limited or delayed if:
R snow chains are mounted on your vehicle's
tires.
R road conditions are wintry.
R you are driving on sand or gravel.
R you adopt a very sporty driving style
(cornering at high speeds or driving with
high rates of acceleration).
R you are driving with a heavy load (in the
vehicle or on the roof).
Restarting the tire pressure loss
warning system Restart the tire pressure loss warning system
if you have:
R changed the tire pressure
R changed the wheels or tires
R mounted new wheels or tires
X Before restarting, make sure that the tire
pressures are set properly on all four tires
for the respective operating conditions.
The recommended tire pressure can be
found on the Tire and Loading Information
placard on the B-pillar on the driver's side.
Additionally, a tire pressure table is
attached to the fuel filler flap. The tire
pressure loss warning system can only give
reliable warnings if you have set the correct
tire pressure. If an incorrect tire pressure
is set, these incorrect values will be
monitored.
X Also observe the notes in the section on tire
pressures ( Ypage 387). 394
Tire pressureWheels and ti
res
Page 409 of 434

Occupant distribution
The distribution of occupants in a vehicle at
their designated seating positions.
Total load limit
Nominal load and luggage load plus 68 kg
(150 lbs) multiplied by the number of seats in
the vehicle. Changing a wheel
Flat tire
The "Breakdown assistance" section
(Y page 365)c ontains information and notes
on how to deal with a flat tire. Information on
driving with MOExtended tires in the event of
a flat tire can be found under "MOExtended
tires (tires with run-flat characteristics"
(Y page 365). Rotating the wheels
G
WARNING
Interchanging the front and rear wheels may
severely impair the driving characteristics if
the wheels or tires have different dimensions.
The wheel brakes or suspension components
may also be damaged. There is a risk of
accident.
Rotate front and rear wheels only if the wheels
and tires are of the same dimensions.
! On vehicles equipped with a tire pressure
monitor, electronic components are
located in the wheel.
Tire-mounting tools should not be used
near the valve. This could damage the
electronic components.
Only have tires changed at a qualified
specialist workshop.
Always observe the instructions and safety
notes in the "Mounting a wheel" section
(Y page 408).
The wear patterns on the front and rear tires
differ, depending on the operating conditions. Rotate the wheels before a clear wear pattern
has formed on the tires. Front tires typically
wear more on the shoulders and the rear tires
in the center.
If your vehicle's tire configuration allows, you
can rotate the wheels according to the
intervals in the tire manufacturer's warranty
book in your vehicle documents. If no
warranty book is available, the tires should be
rotated every 3,000 to 6,000 miles
(5,000 to
10,000 km), or earlier if tire wear requires.
Ensure the direction of rotation is maintained.
Clean the contact surfaces of the wheel and
the brake disc thoroughly every time a wheel
is rotated. Check the tire pressure and
reactivate the tire pressure monitor if
necessary (Y page 393). Direction of rotation
Tires with a specified direction of rotation
have additional benefits, e.g. if there is a risk
of hydroplaning. You will only gain these
benefits if the correct direction of rotation is
maintained.
An arrow on the sidewall of the tire indicates
its correct direction of rotation. Storing wheels
Store wheels that are not being used in a cool,
dry and preferably dark place. Protect the
tires from oil, grease, gasoline and diesel. Cleaning the wheels
G
WARNING
The water jet from a circular jet nozzle (dirt
blasters) can cause invisible exterior damage
to the tires or chassis components.
Components damaged in this way may fail
unexpectedly. There is a risk of an accident.
Do not use power washers with circular jet
nozzles to clean the vehicle. Have damaged Changing a wheel
407Wheels and tires
Z