2014 MERCEDES-BENZ S-Class Release
[x] Cancel search: ReleasePage 107 of 434
If somebody becomes trapped:
R
release the switch immediately, or
R during automatic operation, push the
switch briefly in any direction
The closing process is stopped.
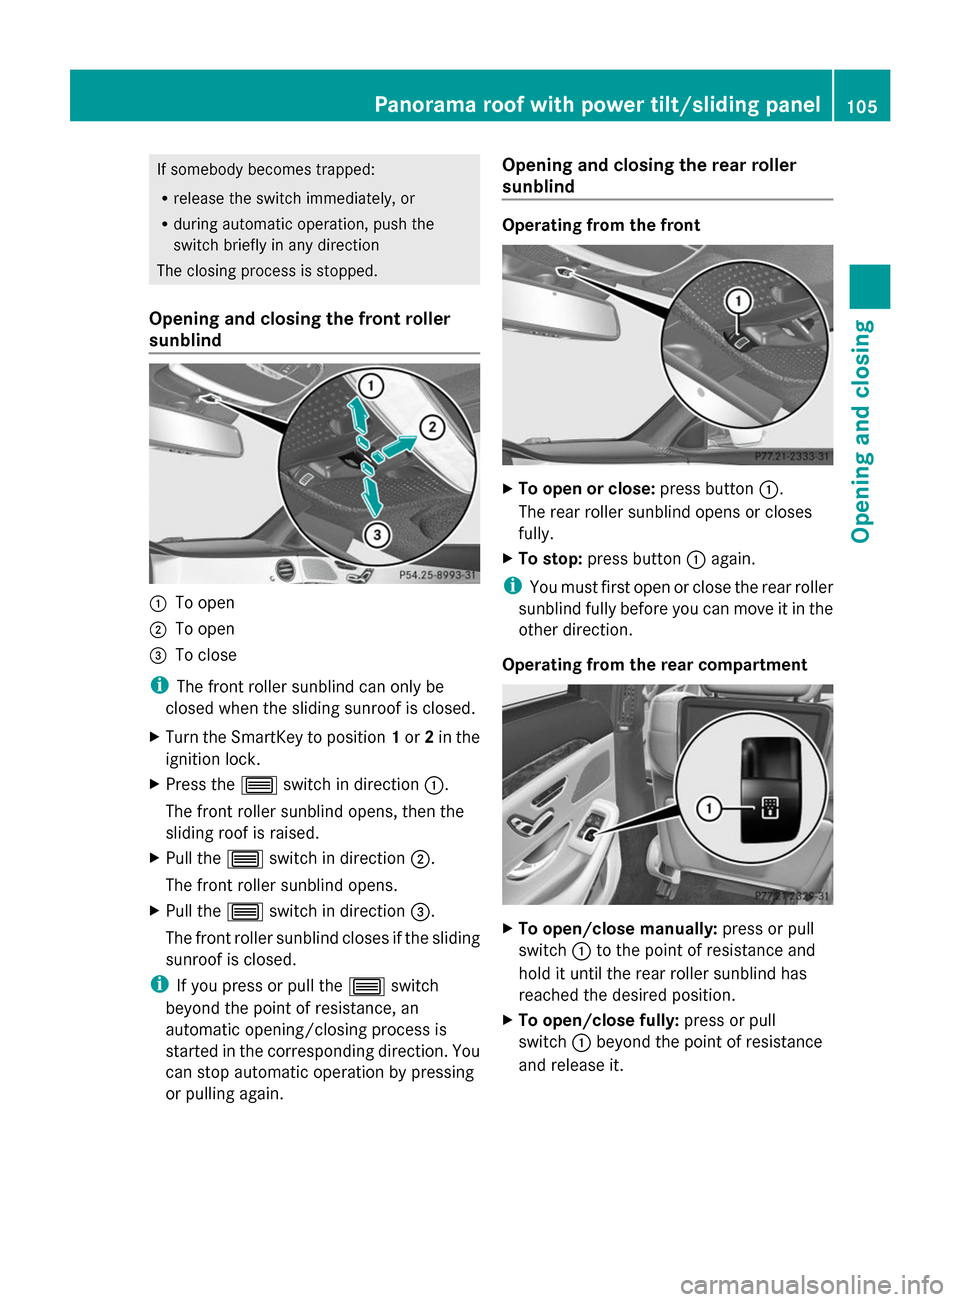
Opening and closing the front roller
sunblind 0043
To open
0044 To open
0087 To close
i The front roller sunblind can only be
closed when the sliding sunroof is closed.
X Turn the SmartKey to position 1or 2in the
ignition lock.
X Press the 0057switch in direction 0043.
The front roller sunblind opens, then the
sliding roof is raised.
X Pull the 0057switch in direction 0044.
The front roller sunblind opens.
X Pull the 0057switch in direction 0087.
The front roller sunblind closes if the sliding
sunroof is closed.
i If you press or pull the 0057switch
beyond the point of resistance, an
automatic opening/closing process is
started in the corresponding direction. You
can stop automatic operation by pressing
or pulling again. Opening and closing the rear roller
sunblind Operating from the front
X
To open or close: press button0043.
The rear roller sunblind opens or closes
fully.
X To stop: press button 0043again.
i You must first open or close the rear roller
sunblind fully before you can move it in the
other direction.
Operating from the rear compartment X
To open/close manually: press or pull
switch 0043to the point of resistance and
hold it until the rear roller sunblind has
reached the desired position.
X To open/close fully: press or pull
switch 0043beyond the point of resistance
and release it. Panorama roof with power tilt/sliding panel
105Opening and closing Z
Page 109 of 434
Problems with the sliding sunroof
G
WARNING
If you close the sliding sunroof again immediately after it has been blocked or reset, the sliding
sunroof closes with increased or maximum force. The reversing feature is then not active. Parts
of the body could be trapped in the closing area in the process. This poses an increased risk of
injury or even fatal injury.
Make sure that no parts of the body are in the closing area.
If somebody becomes trapped:
R release the switch immediately, or
R during automatic operation, push the switch briefly in any direction
The closing process is stopped.
! If the sliding sunroof still cannot be opened or closed as a result of a malfunction, contact
a qualified specialist workshop. Problem Possible causes/consequences and
0050 0050Solutions The sliding sunroof
cannot be closed and
you cannot see the
cause. If the sliding sunroof is obstructed during closing and reopens
again slightly:
X
Immediately after it blocks, pull the 0057switch down again to
the point of resistance until the sliding sunroof is closed
The sliding sunroof is closed with increased force.
If the sliding sunroof is obstructed again during closing and then
reopens slightly:
X Immediately after it blocks, pull the 0057switch down again to
the point of resistance until the sliding sunroof is closed
The sliding sunroof is closed without the anti-entrapment
feature. Panorama roof with power tilt/sliding panel
107Opening and closing Z
Page 120 of 434

R
the front-passenger seat head restraint is
inserted and the ignition is switched on
R the front-passenger seat backrest is moved
backwards or the seat is moved in a
longitudinal direction out of the chauffeur
area (Y page 120).
Positioning the front-passenger seat for
chauffeur mode General notes
Pay attention to the important safety notes
(Y page 117). Adjust the seat for chauffeur
mode before the journey (Y page 118). Do not
remove the front-passenger seat head
restraint during the journey.
Adjusting from the rear compartment You can use the override button to disable
this function (Y page 69).
In order for the front-passenger seat to be
positioned in chauffeur mode:
R the front-passenger door must be closed
R the SmartKey must be in the ignition lock
and in position 1or 2(Y page 171)
R the front-passenger seat may not be
occupied
R the front-passenger seat belt must not be
inserted into the buckle X
To select the front-passenger seat:
press button 0043repeatedly until the
indicator lamp in the button lights up.
The front-passenger seat is selected if the
indicator lamp in the button lights up.
X Press button 0044forwards and hold it in this
position.
The seat moves forward.
The seat stops at the threshold of the area
for chauffeur mode.
X Release button 0044.
X Press and hold button 0044again until the
front-passenger seat is in position for
chauffeur mode.
The head restraint on the front-passenger
seat folds forwards. The seat moves
forward.
The To Toview
view the
theext.
ext. mirror,
mirror, adjust
adjust
front-passenger
front-passenger seat
seator
orremove
remove the
the
head
head restraint.
restraint. message appears in the
multifunction display (Y page 299).
i If the front-passenger seat is already at
the threshold to the area for the chauffeur
mode, the position for the chauffeur mode
is set immediately.
i The position for chauffeur mode can be
saved or set using the memory function of
the rear seat (Y page 135). For this the
indicator lamp on button 0043must be lit.
Adjusting from the driver's seat 118
SeatsSeats, steering
wheel and mirrors
Page 121 of 434
In order for the front-passenger seat to be
positioned in chauffeur mode:
R the front-passenger door must be closed
R the SmartKey must be in the ignition lock
and in position 1or 2(Y page 171)
R the front-passenger seat may not be
occupied
R the front-passenger seat belt must not be
inserted into the buckle
X To select the front-passenger seat:
press button 0043repeatedly until the
indicator lamp in the button lights up.
The front-passenger seat is selected if the
indicator lamp in the button lights up.
X Press button 0044forward and hold it.
The seat moves forward.
The seat stops at the threshold of the area
for chauffeur mode.
X Release button 0044.
X Press and hold button 0044again until the
front-passenger seat is in position for
chauffeur mode.
The head restraint on the front-passenger
seat folds forwards. The seat moves
forward.
The To
To view view the
theext.
ext. mirror,
mirror, adjust
adjust
front-passenger
front-passenger seat
seator
orremove
remove the
the
head
head restraint.
restraint. message appears in the
multifunction display (Y page 299).
i If the front-passenger seat is already at
the threshold to the area for the chauffeur
mode, the position for the chauffeur mode
is set immediately.
i The position for chauffeur mode cannot
be stored or set with the driver's seat
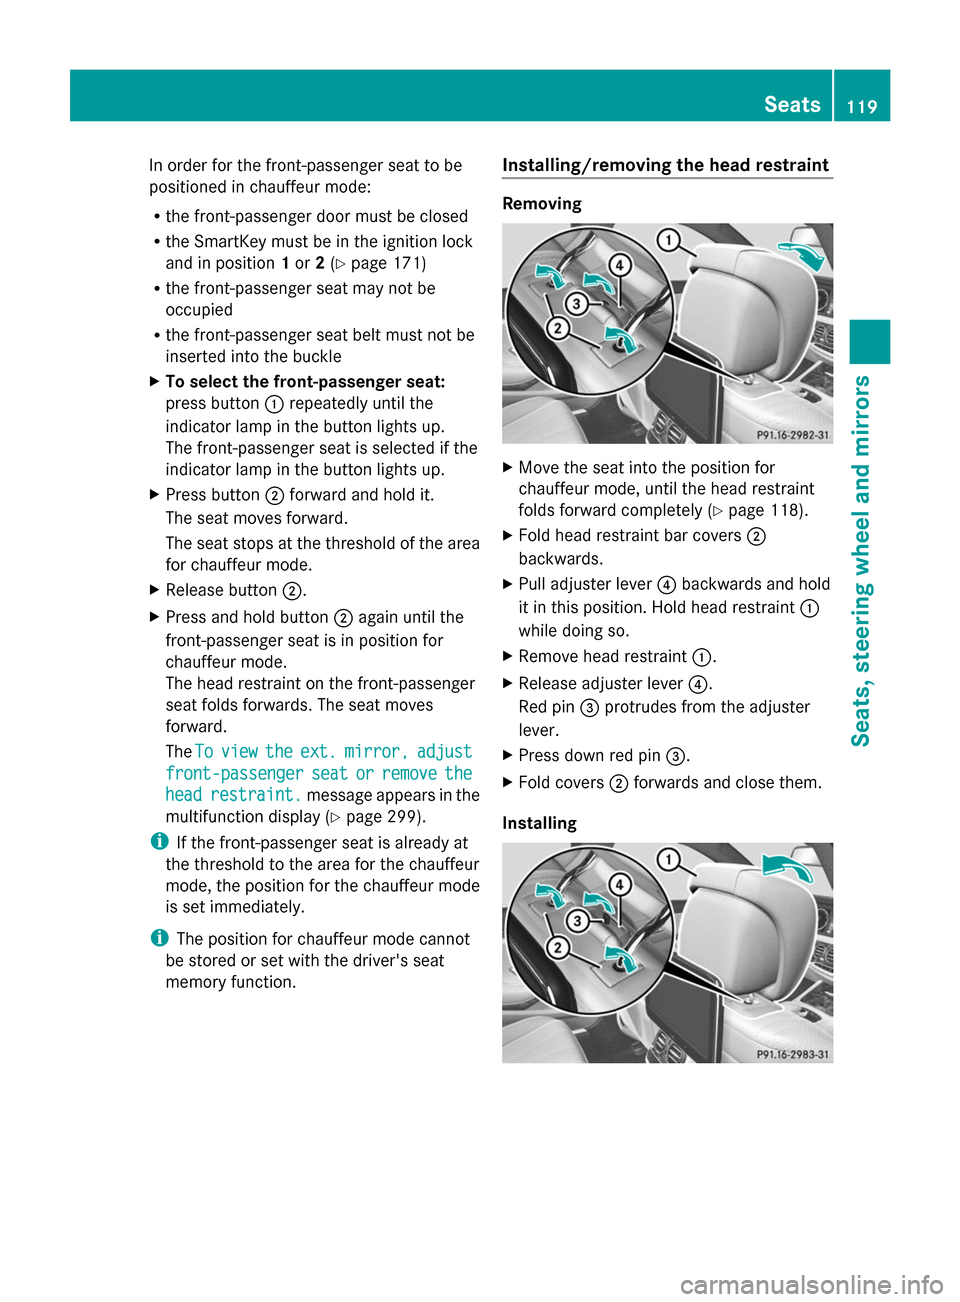
memory function. Installing/removing the head restraint Removing
X
Move the seat into the position for
chauffeur mode, until the head restraint
folds forward completely (Y page 118).
X Fold head restraint bar covers 0044
backwards.
X Pull adjuster lever 0085backwards and hold
it in this position. Hold head restraint 0043
while doing so.
X Remove head restraint 0043.
X Release adjuster lever 0085.
Red pin 0087protrudes from the adjuster
lever.
X Press down red pin 0087.
X Fold covers 0044forwards and close them.
Installing Seats
119Seats, steering wheel and mirrors Z
Page 122 of 434

X
Fold covers 0044backwards.
X Pull adjuster lever 0085backwards and hold
it in this position.
Red pin 0087protrudes from the adjuster
lever.
X Insert head restraint 0043into the brackets.
The head restraint must engage on both
sides.
X Release adjuster lever 0085.
X Press down red pin 0087.
If the pin can be pressed down and is then
no longer visible, the head restraint has
engaged correctly.
X Fold covers 0044forwards and close them.
The head restraint folds into position
automatically.
Moving the front-passenger seat into
the normal position Adjusting from the rear compartment
You can use the override button to disable
this function (Y page 69).
The head restraint must be installed, in order
for the front-passenger seat to be moved into
the normal position (Y page 119). X
To select the front-passenger seat:
press button 0043repeatedly until the
indicator lamp in the button lights up.
The front-passenger seat is selected if the
indicator lamp in the button lights up.
X Press button 0087backwards and hold it in
this position.
The front-passenger seat moves into the
normal adjustment range at the threshold
of the area for chauffeur mode. The head
restraint folds into position.
If you continue to hold down button 0087, the
seat continues to move backwards.
or
X Briefly press button 0044backwards.
The front-passenger seat moves into the
normal adjustment range at the threshold
to the area for chauffeur mode. The head
restraint folds into position.
i Further settings are available via the
memory adjustment buttons, if:
R a position in the normal setting has
already been saved.
R the front-passenger seat has been
selected with button 0043.
Adjusting from the driver's seat The head restraint must be installed, in order
for the front-passenger seat to be moved into
the normal position (Y page 119).120
SeatsSeats, steering wheel and mirrors
Page 124 of 434
head restraint supports the back of the head
at about eye level.
General notes
Pay attention to the important safety notes
(Y page 111).
Do not rotate the head restraints of the front
and rear seats. Otherwise, you cannot adjust
the height and angle of the head restraints to
the correct position.
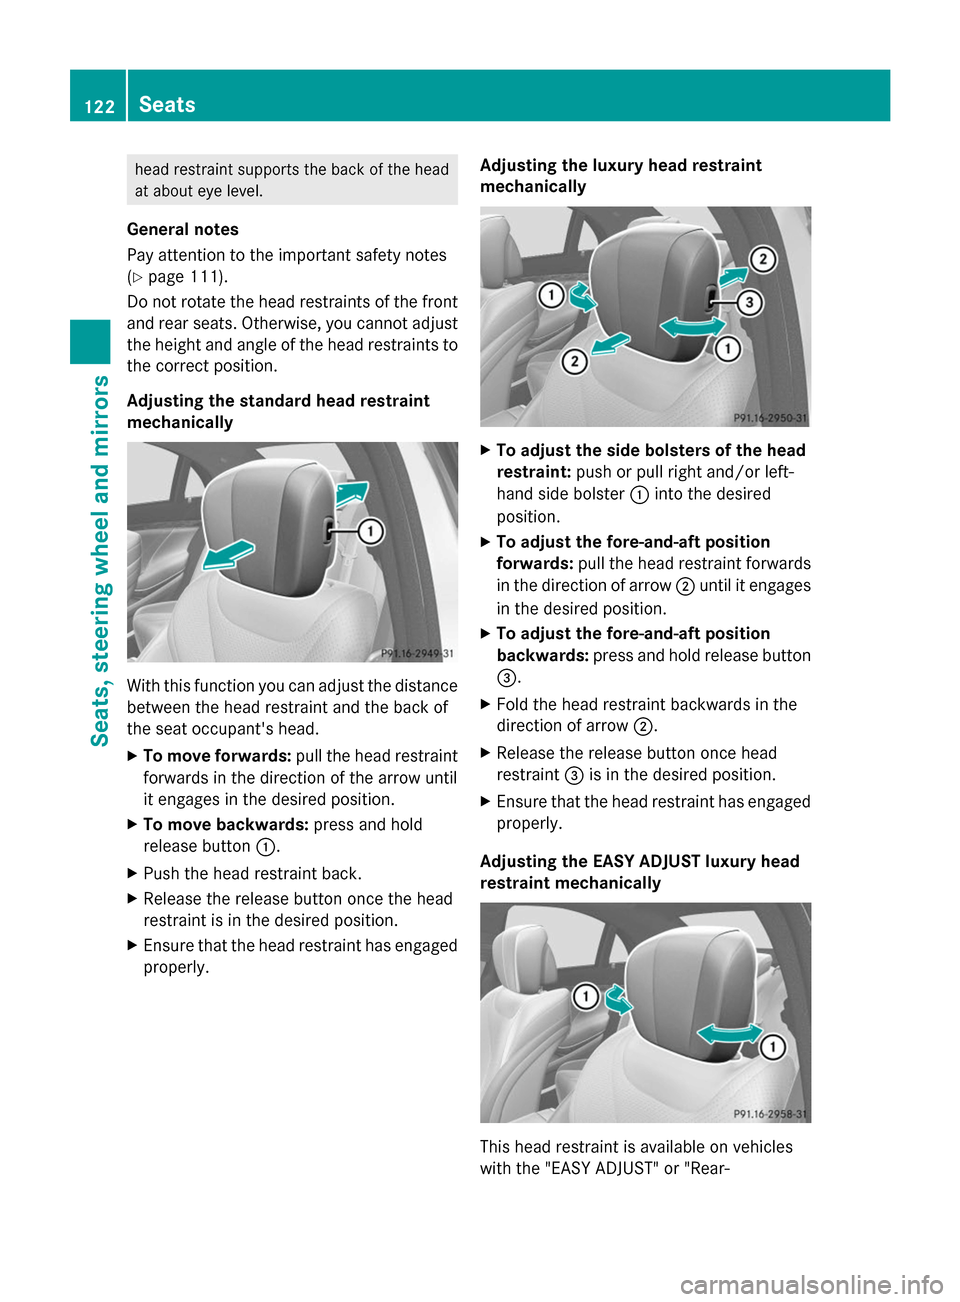
Adjusting the standard head restraint
mechanically With this function you can adjust the distance
between the head restraint and the back of
the seat occupant's head.
X To move forwards: pull the head restraint
forwards in the direction of the arrow until
it engages in the desired position.
X To move backwards: press and hold
release button 0043.
X Push the head restraint back.
X Release the release button once the head
restraint is in the desired position.
X Ensure that the head restraint has engaged
properly. Adjusting the luxury head restraint
mechanically X
To adjust the side bolsters of the head
restraint: push or pull right and/or left-
hand side bolster 0043into the desired
position.
X To adjust the fore-and-aft position
forwards: pull the head restraint forwards
in the direction of arrow 0044until it engages
in the desired position.
X To adjust the fore-and-aft position
backwards: press and hold release button
0087.
X Fold the head restraint backwards in the
direction of arrow 0044.
X Release the release button once head
restraint 0087is in the desired position.
X Ensure that the head restraint has engaged
properly.
Adjusting the EASY ADJUST luxury head
restraint mechanically This head restraint is available on vehicles
with the "EASY ADJUST" or "Rear-122
SeatsSeats, steering wheel and mirrors
Page 126 of 434

Adjusting the rear head restraints
electrically
The height and fore-and-aft position of the
rear head restraints can be adjusted with the
seat adjustment switch (Y page 113).
Supplementary cushion for luxury head
restraints
The supplementary cushion is available on
vehicles with electrically adjustable rear
seats.
Only use the supplementary cushion when
the vehicle is stationary. The supplementary cushion is located in the
vehicle.
The supplementary cushion is attached to the
head restraint by three press studs.
To install the supplementary cushion:
X Position the head restraint as far forwards
as possible ( Ypage 113).
X Hold supplementary cushion 0044against
the head restraint and push press
studs 0043into the counterpieces.
To remove the supplementary cushion:
X Position the head restraint as far forwards
as possible ( Ypage 113).
X Release press studs 0043and remove
supplementary cushion 0044.Adjusting the rear center head
restraints Retracting and extending electrically
This function is available on vehicles with
electrically adjustable rear seats.
X
Press and hold button 0043until the head
restraint has fully extended or retracted.
Folding into position mechanically This function is available on vehicles with a
rear bench seat.
X
Pull the head restraint up until it engages. Adjusting the multicontour seat
The multicontour seat can be adjusted using
COMAND (see the separate operating
instructions). 124
SeatsSeats, steering wheel and
mirrors
Page 135 of 434
Using the memory button
You can position the front-passenger side
exterior mirror in such a way that you can see
the rear wheel on that side as soon as you
engage reverse gear. This setting can be
stored using memory button M0043.
X Turn the SmartKey to position 2in the
ignition lock (Y page 171).
X Press button 0087for the exterior mirror on
the front-passenger side.
X Use adjustment button 0044to adjust the
exterior mirror to a position that allows you
to see the rear wheel and the curb.
X Press memory button M0043 and one of the
arrows on adjustment button 0044within
three seconds.
The parking position is stored if the exterior
mirror does not move.
X If the mirror moves out of position, repeat
the steps.
Calling up a stored parking position
setting X
Turn the SmartKey to position 2in the
ignition lock (Y page 171).
X Adjust the exterior mirror on the front-
passenger side using button 0087.
X Engage reverse gear.
The exterior mirror on the front-passenger
side moves to the stored parking position.
The exterior mirror on the front-passenger
side moves back to its original position:
R as soon as you exceed a speed of 9 mph
(15 km/h)
R about ten seconds after you have
disengaged reverse gear
R if you press button 0085for the exterior
mirror on the driver's side Memory function
Important safety notes
G
WARNING
If you use the memory function on the driver's
side while driving, you could lose control of
the vehicle as a result of the adjustments
being made. There is a risk of an accident.
Only use the memory function on the driver's
side when the vehicle is stationary. G
WARNING
When the memory function adjusts the seat
or steering wheel, you and other vehicle
occupants – particularly children – could
become trapped. There is a risk of injury.
While the memory function is making
adjustments, make sure that no one has any
body parts in the sweep of the seat or steering
wheel. If somebody becomes trapped,
immediately release the memory function
position button. The adjustment process is
stopped. G
WARNING
Children could become trapped if they
activate the memory function, particularly
when unattended. There is a risk of injury.
When leaving the vehicle, always take the
SmartKey with you and lock the vehicle. Never
leave children unsupervised in the vehicle. Storing settings
With the memory function, you can store up
to three different settings, e.g. for three
different people.
The following settings are stored as a single
memory preset:
R seat, backrest, head restraint position and
contour of the backrest in the lumbar
region
R multicontour seat: the side bolsters of the
backrest as well as the contour of the Memory function
133Seats, steering wheel and mirrors Z