2014 MERCEDES-BENZ S-Class buttons
[x] Cancel search: buttonsPage 136 of 434
backrest in the lumbar and shoulder
regions
R active multicontour seat: side bolsters of
the backrest, shoulder of the backrest,
contour of the backrest, dynamic function
level
R seat heating: distribution of the heated
sections of the seat cushion and backrest
R driver's side: position of the exterior
mirrors on the driver's and front-passenger
sides X
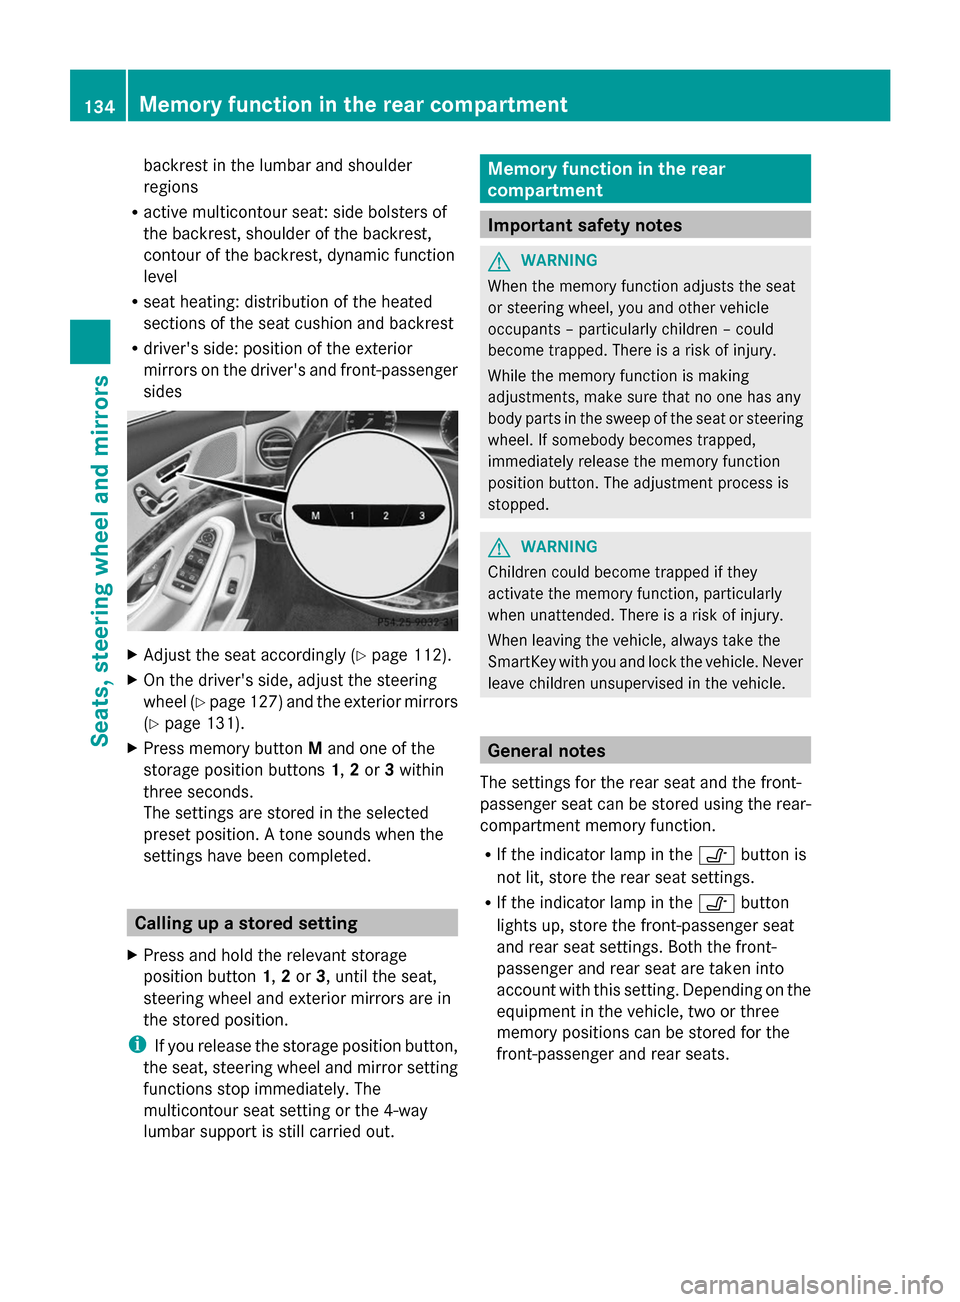
Adjust the seat accordingly (Y page 112).
X On the driver's side, adjust the steering
wheel (Y page 127 )and the exterior mirrors
(Y page 131).
X Press memory button Mand one of the
storage position buttons 1,2or 3within
three seconds.
The settings are stored in the selected
preset position. A tone sounds when the
settings have been completed. Calling up a stored setting
X Press and hold the relevant storage
position button 1,2or 3, until the seat,
steering wheel and exterior mirrors are in
the stored position.
i If you release the storage position button,
the seat, steering wheel and mirror setting
functions stop immediately. The
multicontour seat setting or the 4-way
lumbar support is still carried out. Memory function in the rear
compartment
Important safety notes
G
WARNING
When the memory function adjusts the seat
or steering wheel, you and other vehicle
occupants – particularly children – could
become trapped. There is a risk of injury.
While the memory function is making
adjustments, make sure that no one has any
body parts in the sweep of the seat or steering
wheel. If somebody becomes trapped,
immediately release the memory function
position button. The adjustment process is
stopped. G
WARNING
Children could become trapped if they
activate the memory function, particularly
when unattended. There is a risk of injury.
When leaving the vehicle, always take the
SmartKey with you and lock the vehicle. Never
leave children unsupervised in the vehicle. General notes
The settings for the rear seat and the front-
passenger seat can be stored using the rear-
compartment memory function.
R If the indicator lamp in the 0095button is
not lit, store the rear seat settings.
R If the indicator lamp in the 0095button
lights up, store the front-passenger seat
and rear seat settings. Both the front-
passenger and rear seat are taken into
account with this setting. Depending on the
equipment in the vehicle, two or three
memory positions can be stored for the
front-passenger and rear seats. 134
Memory function in the rear compartmentSeats, steering
wheel and mirrors
Page 137 of 434
Storing settings
General notes With the memory function in the rear, you can
store up to three different settings, e.g. for
three different people.
The following settings are stored as a single
memory preset:
R position of the seat, backrest and head
restraint
R multicontour seat: the side bolsters of the
backrest as well as the contour of the
backrest in the lumbar and shoulder
regions
R seat heating: distribution of the heated
sections of the seat cushion and backrest
if the indicator lamp in the 0095button is
not lit.
The following settings are stored to a memory
position, if the indicator lamp in the 0095
button lights up:
R position of the footrest for the front-
passenger seat, if available
R position of the screen, if available
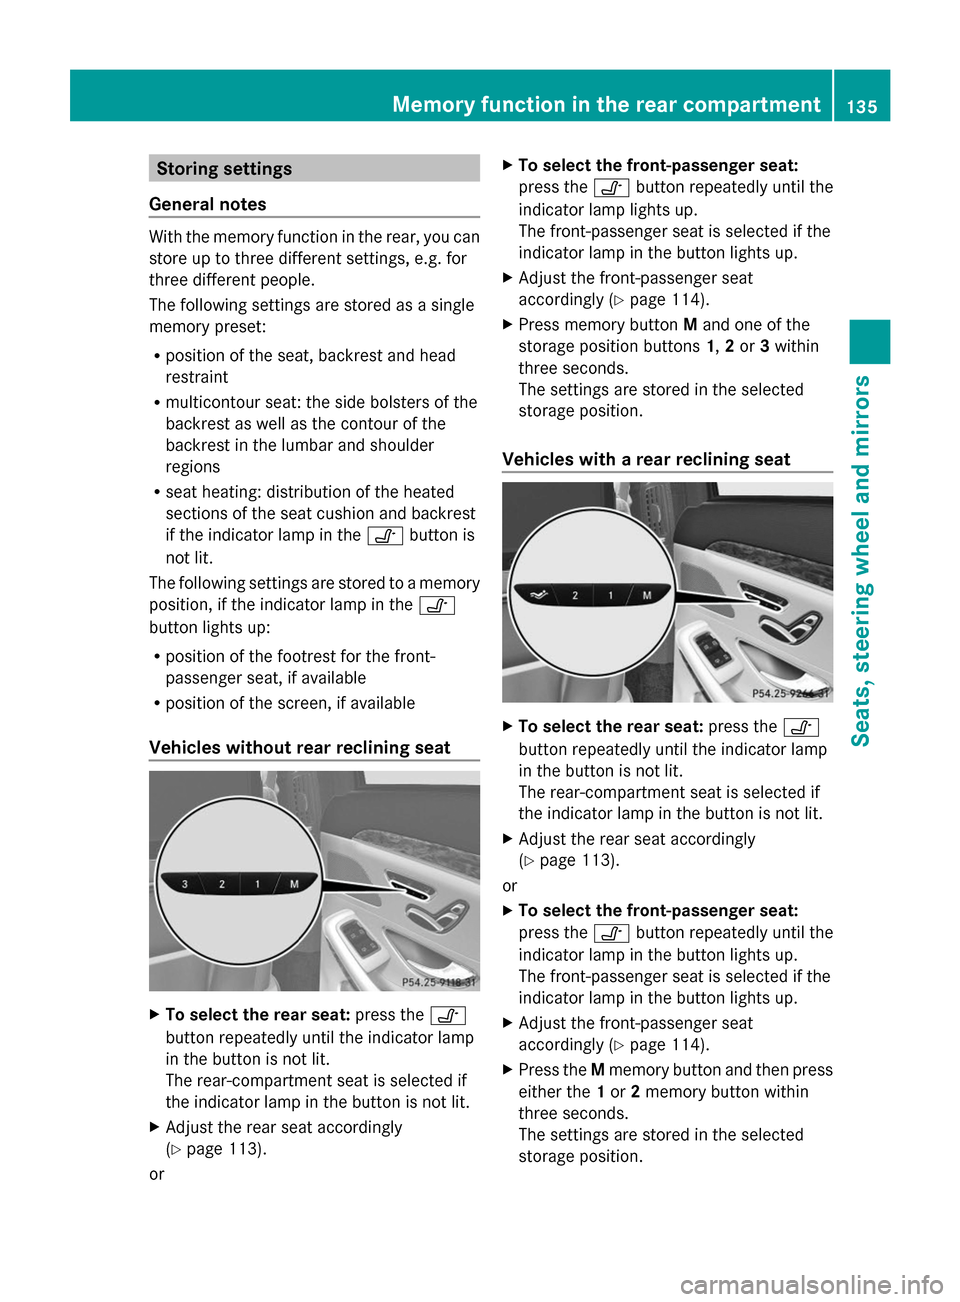
Vehicles without rear reclining seat X
To select the rear seat: press the0095
button repeatedly until the indicator lamp
in the button is not lit.
The rear-compartment seat is selected if
the indicator lamp in the button is not lit.
X Adjust the rear seat accordingly
(Y page 113).
or X
To select the front-passenger seat:
press the 0095button repeatedly until the
indicator lamp lights up.
The front-passenger seat is selected if the
indicator lamp in the button lights up.
X Adjust the front-passenger seat
accordingly (Y page 114).
X Press memory button Mand one of the
storage position buttons 1,2or 3within
three seconds.
The settings are stored in the selected
storage position.
Vehicles with a rear reclining seat X
To select the rear seat: press the0095
button repeatedly until the indicator lamp
in the button is not lit.
The rear-compartment seat is selected if
the indicator lamp in the button is not lit.
X Adjust the rear seat accordingly
(Y page 113).
or
X To select the front-passenger seat:
press the 0095button repeatedly until the
indicator lamp in the button lights up.
The front-passenger seat is selected if the
indicator lamp in the button lights up.
X Adjust the front-passenger seat
accordingly (Y page 114).
X Press the Mmemory button and then press
either the 1or 2memory button within
three seconds.
The settings are stored in the selected
storage position. Memory function in the rear compartment
135Seats, steering wheel and mirrors Z
Page 251 of 434
Operating the on-board computer
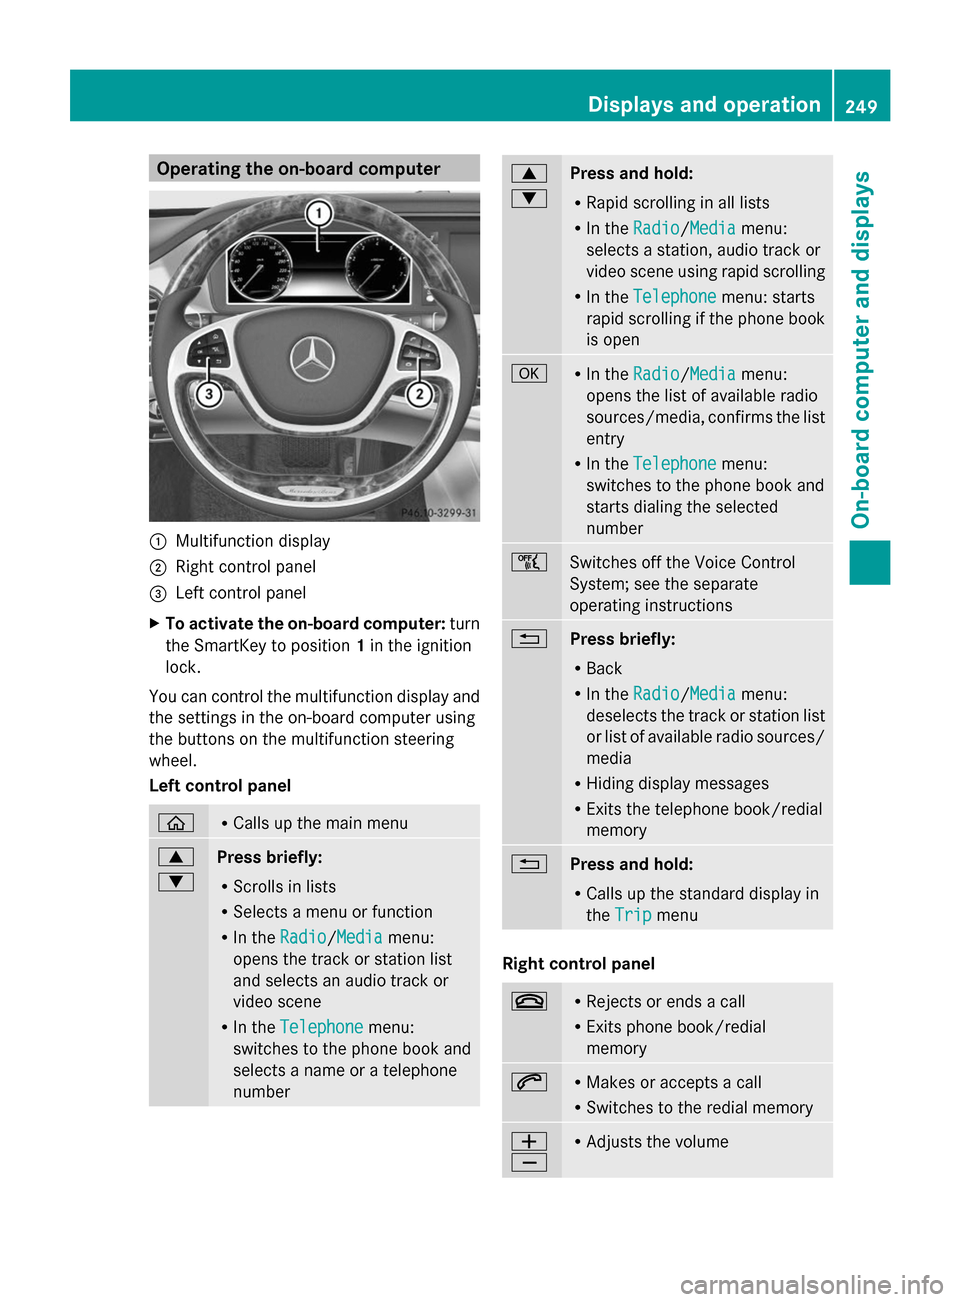
0043
Multifunction display
0044 Right control panel
0087 Left control panel
X To activate the on-board computer: turn
the SmartKey to position 1in the ignition
lock.
You can control the multifunction display and
the settings in the on-board computer using
the buttons on the multifunction steering
wheel.
Left control panel 00E2 R
Calls up the main menu 0063
0064
Press briefly:
R
Scrolls in lists
R Selects a menu or function
R In the Radio Radio/Media Mediamenu:
opens the track or station list
and selects an audio track or
video scene
R In the Telephone Telephone menu:
switches to the phone book and
selects a name or a telephone
number 0063
0064
Press and hold:
R
Rapid scrolling in all lists
R In the Radio
Radio/Media Mediamenu:
selects a station, audio track or
video scene using rapid scrolling
R In the Telephone Telephone menu: starts
rapid scrolling if the phone book
is open 0076 R
In the Radio Radio/Media Mediamenu:
opens the list of available radio
sources/media, confirms the list
entry
R In the Telephone
Telephone menu:
switches to the phone book and
starts dialing the selected
number 00E1
Switches off the Voice Control
System; see the separate
operating instructions
0038
Press briefly:
R
Back
R In the Radio Radio/Media Mediamenu:
deselects the track or station list
or list of available radio sources/
media
R Hiding display messages
R Exits the telephone book/redial
memory 0038
Press and hold:
R
Calls up the standard display in
the Trip Trip menu Right control panel
0076 R
Rejects or ends a call
R Exits phone book/redial
memory 0061 R
Makes or accepts a call
R Switches to the redial memory 0081
0082 R
Adjusts the volume Displays and operation
249On-board computer and displays Z
Page 327 of 434
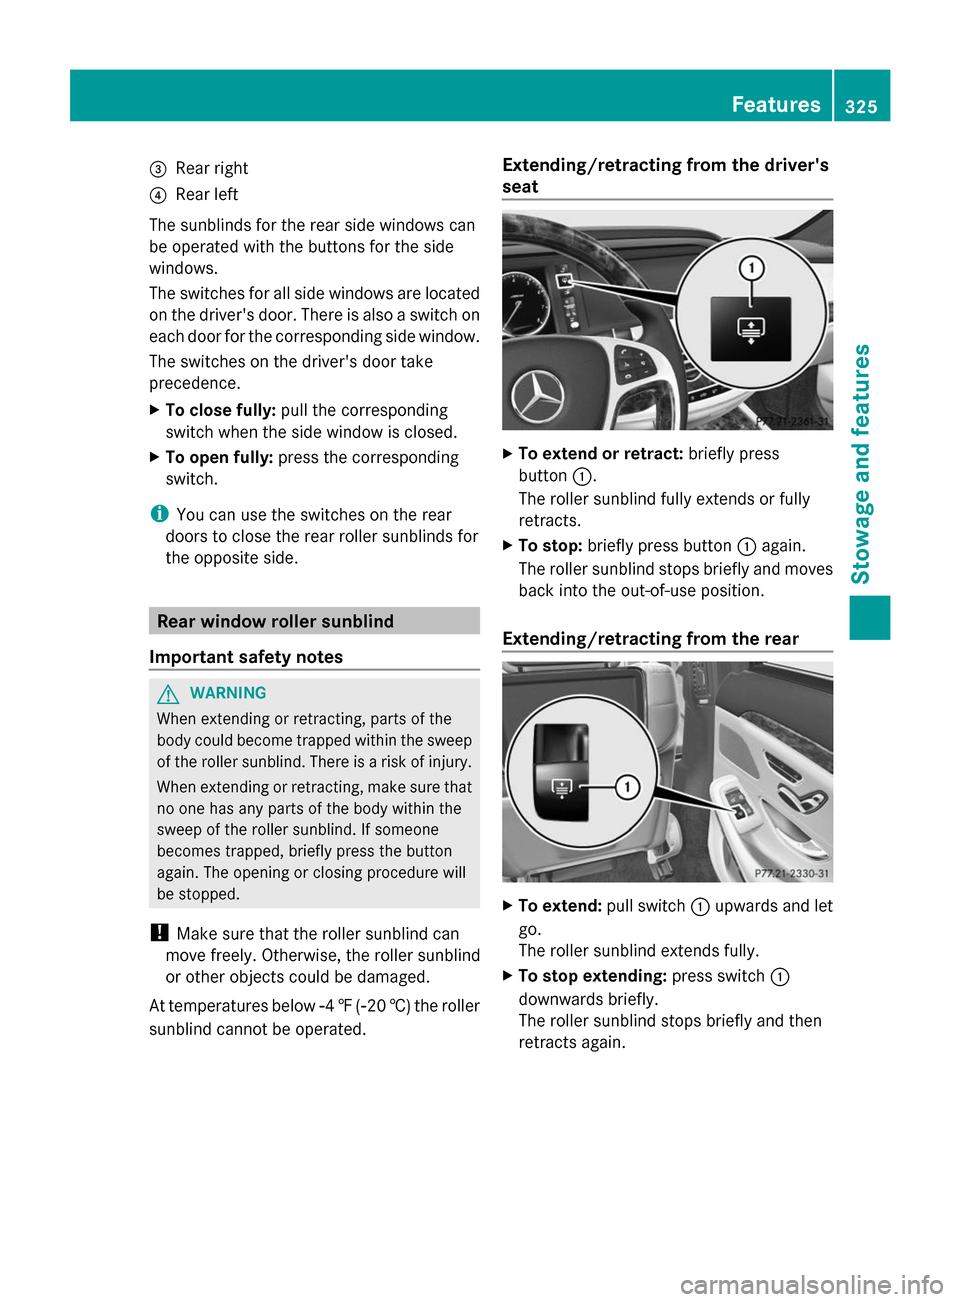
0087
Rear right
0085 Rear left
The sunblinds for the rear side windows can
be operated with the buttons for the side
windows.
The switches for all side windows are located
on the driver's door. There is also a switch on
each door for the corresponding side window.
The switches on the driver's door take
precedence.
X To close fully: pull the corresponding
switch when the side window is closed.
X To open fully: press the corresponding
switch.
i You can use the switches on the rear
doors to close the rear roller sunblinds for
the opposite side. Rear window roller sunblind
Important safety notes G
WARNING
When extending or retracting, parts of the
body could become trapped within the sweep
of the roller sunblind. There is a risk of injury.
When extending or retracting, make sure that
no one has any parts of the body within the
sweep of the roller sunblind. If someone
becomes trapped, briefly press the button
again. The opening or closing procedure will
be stopped.
! Make sure that the roller sunblind can
move freely. Otherwise, the roller sunblind
or other objects could be damaged.
At temperatures below 00F84‡( 00F820 †) the roller
sunblind cannot be operated. Extending/retracting from the driver's
seat
X
To extend or retract: briefly press
button 0043.
The roller sunblind fully extends or fully
retracts.
X To stop: briefly press button 0043again.
The roller sunblind stops briefly and moves
back into the out-of-use position.
Extending/retracting from the rear X
To extend: pull switch0043upwards and let
go.
The roller sunblind extends fully.
X To stop extending: press switch0043
downwards briefly.
The roller sunblind stops briefly and then
retracts again. Features
325Stowage and features Z
Page 335 of 434

be sent to you by mail. You can use this
password to log onto the mbrace area under
"Owners Online" at http://
www.mbusa.com .
The system is available if:
R it has been activated and is operational
R the corresponding mobile phone network
is available for transmitting data to the
Customer Center
R a service subscription is available
R the starter battery is sufficiently charged
i Determining the location of the vehicle on
a map is only possible if:
R GPS reception is available.
R the vehicle position can be forwarded to
the Customer Assistance Center.
The mbrace system To adjust the volume during a call, proceed
as follows:
X Press the 0081or0082 button on the
multifunction steering wheel.
or
X Use the volume controller of COMAND.
The system offers various services, e.g:
R Automatic and manual emergency call
R Roadside Assistance call
R MB Info call
You can find information and a description of
all available features under "Owners Online"
at http://www.mbusa.com.
System self-test After you have switched on the ignition, the
system carries out a self-diagnosis. A malfunction in the system has been
detected if one of the following occurs:
R
The indicator lamp in the SOS button does
not come on during the system self-test.
R The indicator lamp in the 0052Roadside
Assistance button does not light up during
self-diagnosis of the system.
R The indicator lamp in the 00D9MB Info call
button does not light up during self-
diagnosis of the system.
R The indicator lamp in one or more of the
following buttons continues to light up red
after the system self-diagnosis:
-SOS button
- 0052 Roadside Assistance call button
- 00D9 MB Info call button
R After the system self-diagnosis, the
Inoperative
Inoperative orService Not Service Not
Activated
Activated message appears in the
multifunction display.
If a malfunction is indicated as outlined
above, the system may not operate as
expected. In the event of an emergency, help
will have to be summoned by other means.
Have the system checked at the nearest
authorized Mercedes-Benz Center or contact
the following service hotlines:
Mercedes-Benz Customer Assistance Center
at 1-800-FOR-MERCedes(1-800-367-6372)
or 1-866-990-9007 Features
333Stowage and features Z
Page 344 of 434
Programing
Programing buttons
Pay attention to the "Important safety notes"
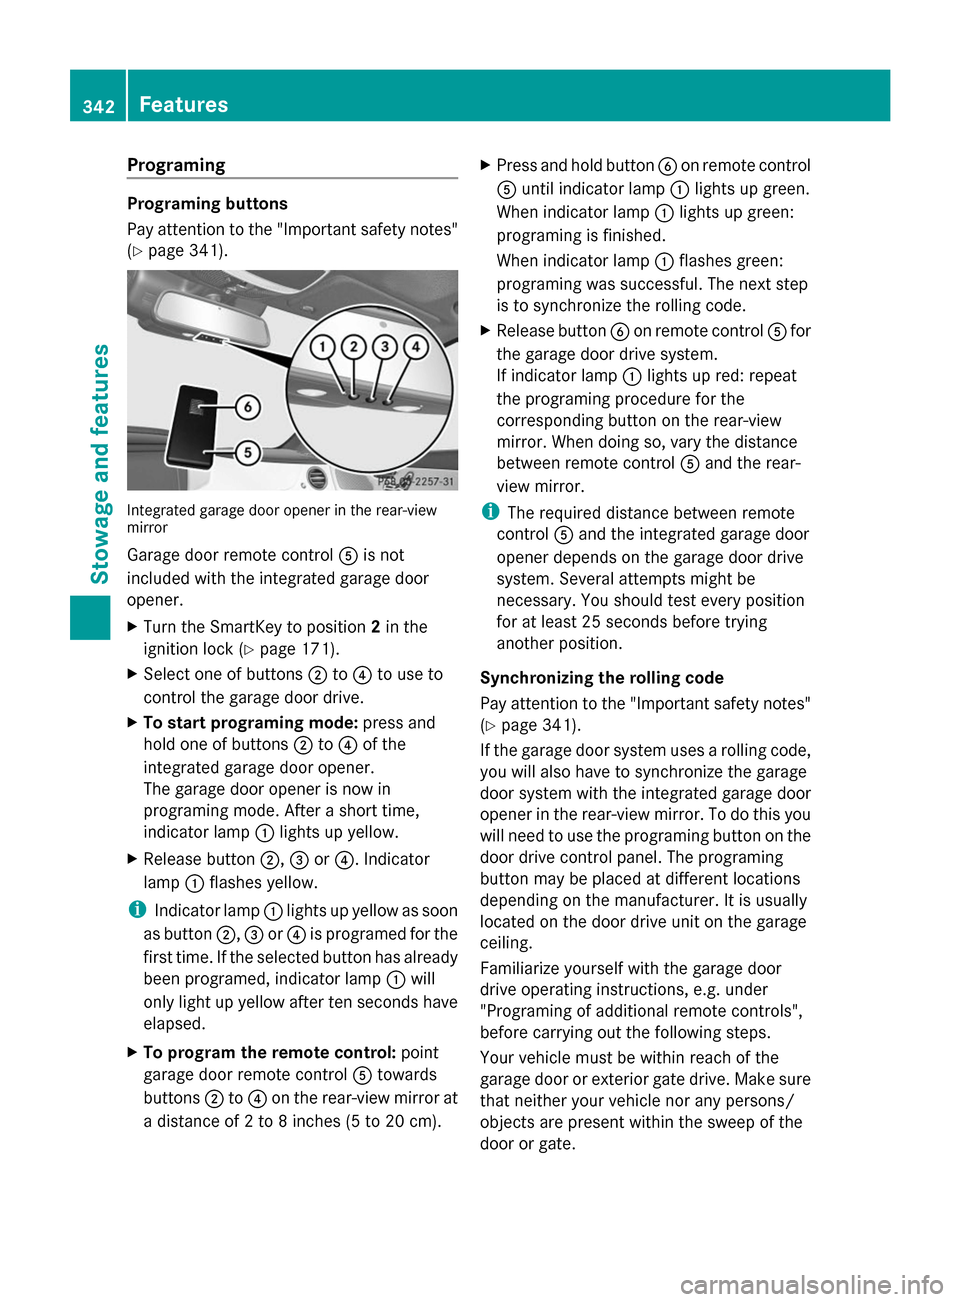
(Y page 341). Integrated garage door opener in the rear-view
mirror
Garage door remote control
0083is not
included with the integrated garage door
opener.
X Turn the SmartKey to position 2in the
ignition lock (Y page 171).
X Select one of buttons 0044to0085 to use to
control the garage door drive.
X To start programing mode: press and
hold one of buttons 0044to0085 of the
integrated garage door opener.
The garage door opener is now in
programing mode. After a short time,
indicator lamp 0043lights up yellow.
X Release button 0044,0087or0085. Indicator
lamp 0043flashes yellow.
i Indicator lamp 0043lights up yellow as soon
as button 0044,0087or0085 is programed for the
first time. If the selected button has already
been programed, indicator lamp 0043will
only light up yellow after ten seconds have
elapsed.
X To program the remote control: point
garage door remote control 0083towards
buttons 0044to0085 on the rear-view mirror at
a distance of 2 to 8 inches (5 to 20 cm). X
Press and hold button 0084on remote control
0083 until indicator lamp 0043lights up green.
When indicator lamp 0043lights up green:
programing is finished.
When indicator lamp 0043flashes green:
programing was successful. The next step
is to synchronize the rolling code.
X Release button 0084on remote control 0083for
the garage door drive system.
If indicator lamp 0043lights up red: repeat
the programing procedure for the
corresponding button on the rear-view
mirror. When doing so, vary the distance
between remote control 0083and the rear-
view mirror.
i The required distance between remote
control 0083and the integrated garage door
opener depends on the garage door drive
system. Several attempts might be
necessary. You should test every position
for at least 25 seconds before trying
another position.
Synchronizing the rolling code
Pay attention to the "Important safety notes"
(Y page 341).
If the garage door system uses a rolling code,
you will also have to synchronize the garage
door system with the integrated garage door
opener in the rear-view mirror. To do this you
will need to use the programing button on the
door drive control panel. The programing
button may be placed at different locations
depending on the manufacturer. It is usually
located on the door drive unit on the garage
ceiling.
Familiarize yourself with the garage door
drive operating instructions, e.g. under
"Programing of additional remote controls",
before carrying out the following steps.
Your vehicle must be within reach of the
garage door or exterior gate drive. Make sure
that neither your vehicle nor any persons/
objects are present within the sweep of the
door or gate. 342
FeaturesStowage and features
Page 345 of 434
X
Turn the SmartKey to position 2in the
ignition lock (Y page 171).
X Get out of the vehicle.
X Press the programing button on the door
drive unit.
i Usually, you now have 30 seconds to
initiate the next step.
X Get into the vehicle.
X Press previously programed button 0044,0087
or 0085 of the integrated garage door opener
until the door closes.
The rolling code synchronization is then
complete.
Notes on programing the remote control
Canadian radio frequency laws require a
"break" (or interruption) of the transmission
signals after broadcasting for a few seconds.
Therefore, these signals may not last long
enough for the integrated garage door
opener. The signal is not recognized during
programing. Comparable with Canadian law,
some U.S. garage door openers also feature
a "break".
Proceed as follows:
R if you live in Canada
R if you have difficulties programing the
garage door opener (regardless of where
you live) when using the programing steps
X Press and hold one of buttons 0044to0085 on
the integrated garage door opener.
After a short time, indicator lamp 0043lights
up yellow.
X Release the button.
Indicator lamp 0043flashes yellow.
X Press button 0084of garage door remote
control 0083for two seconds, then release it
for two seconds.
X Press button 0084again for two seconds.
X Repeat this sequence on button 0084of
remote control 0083until indicator lamp 0043
lights up green.
When indicator lamp 0043lights up green:
programing is finished. When indicator lamp
0043flashes green:
programing was successful. The next step
is to synchronize the rolling code.
X Release button 0084of remote control 0083of
the garage door drive.
If indicator lamp 0043blinks red: repeat the
programing process for the corresponding
button on the rear-view mirror. When doing
so, vary the distance between remote
control 0083and the rear-view mirror.
i The required distance between remote
control 0083and the integrated garage door
opener depends on the garage door drive
system. Several attempts might be
necessary. You should test every position
for at least 25 seconds before trying
another position.
Problems when programing
If you are experiencing problems programing
the integrated garage door opener on the
rear-view mirror, take note of the following
instructions:
R Check the transmitter frequency used by
garage door drive remote control 0083and
whether it is supported. The transmitter
frequency can usually be found on the back
of the garage door drive remote control.
The integrated garage door opener is
compatible with devices that have units
which operate in the frequency range of
280 to 433 MHz.
R Replace the batteries in garage door
remote control 0083. This increases the
likelihood that garage door remote control
0083 will transmit a strong and precise signal
to the integrated garage door opener in the
rear-view mirror.
R When programing, hold remote control 0083
at varying distances and angles from the
button that you are programing. Try various
angles at a distance between 2and
12 inches (5to 30 cm) or at the same angle
but at varying distances. Features
343Stowage and features Z
Page 346 of 434
R
If another remote control for the same
garage door drive is available, repeat the
same programing steps with this remote
control. Before performing these steps,
make sure that new batteries have been
installed in garage door drive remote
control 0083.
R Note that some remote controls only
transmit for a limited amount of time (the
indicator lamp on the remote control goes
out). Press button 0084on remote control
0083 again before transmission ends.
R Align the antenna cable of the garage door
opener unit. This can improve signal
reception/transmission.
Opening/closing the garage door After it has been programed, the integrated
garage door opener performs the function of
the garage door system remote control.
Please also read the operating instructions
for the garage door system.
X Turn the SmartKey to position 2in the
ignition lock (Y page 171).
X Press button 0044,0087or0085 which you have
programed to operate the garage door.
Garage door system with a fixed code:
indicator lamp 0043lights up green.
Garage door system with a rolling code:
indicator lamp 0043flashes green.
i The transmitter will transmit a signal as
long as the button is pressed. The
transmission is halted after a maximum of
ten seconds and indicator lamp 0043lights
up yellow. Press button 0044,0087or0085 again
if necessary.
Clearing the memory Make sure that you clear the memory of the
integrated garage door opener before selling
the vehicle. X
Turn the SmartKey to position 2in the
ignition lock (Y page 171).
X Press and hold buttons 0044and 0085.
The indicator lamp initially lights up yellow
and then green.
X Release buttons 0044and 0085.
The memory of the integrated garage door
opener in the rear-view mirror is cleared. Floormats
G
WARNING
Objects in the driver's footwell can restrict the
pedal travel or obstruct a depressed pedal.
The operating and road safety of the vehicle
is jeopardized. There is a risk of an accident.
Make sure that all objects in the vehicle are
stowed correctly, and that they cannot enter
the driver's footwell. Install the floormats
securely and as specified in order to ensure
sufficient clearance for the pedals. Do not use
loose floormats and do not place floormats on
top of one another. X
Slide the relevant seat back.
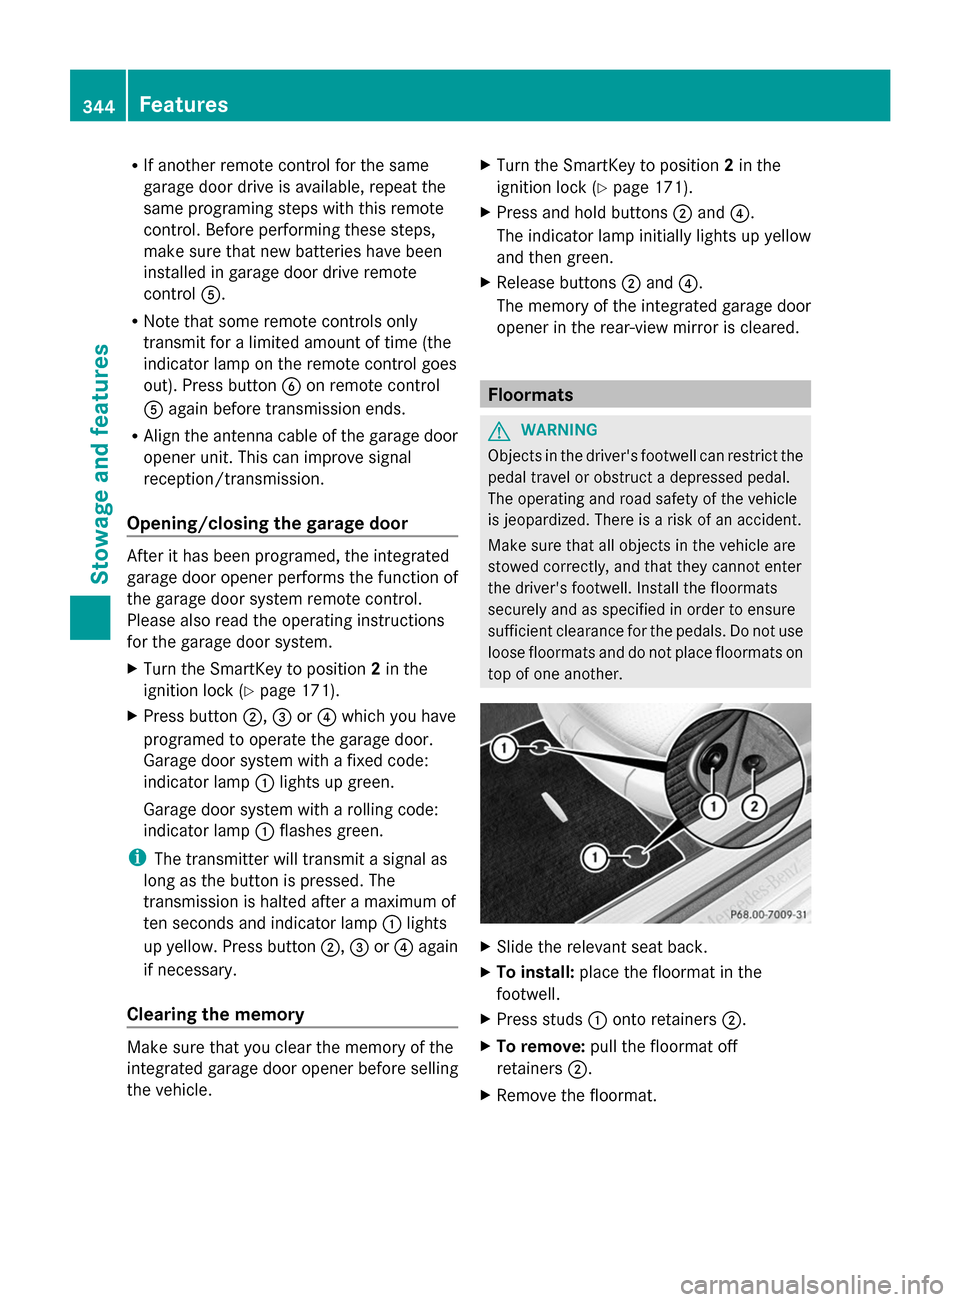
X To install: place the floormat in the
footwell.
X Press studs 0043onto retainers 0044.
X To remove: pull the floormat off
retainers 0044.
X Remove the floormat. 344
FeaturesStowage and features