2014 MERCEDES-BENZ S-CLASS COUPE ECU
[x] Cancel search: ECUPage 68 of 413

Always observe the information on suitable
positioning of the child restraint system
(Y page 65) in addition to the child restraint
system manufacturer's installation and oper- ating instructions. Suitable positioning of the child
restraint system
Introduction Only child restraint systems which are
approved in accordance with the ECE stand-
ard ECE R44 are permitted for use in the vehi-
cle.
For certain child restraint systems in weight
categories II or III, this can mean that the area of use is restricted. The maximum size setting
of the child restraint system is not possible
due to possible contact with the roof.
"Universal" category child restraint systems
can be recognised by their orange approval
label and the text "Universal". Example: approval label on the child restraint sys-
tem
"Universal" category child restraint systems
can be used on the seats indicated with U, UF
or IUF according to the tables "Suitability of
the seats for attaching belt-secured child
restraint systems" or "Suitability of the seats
for attaching an ISOFIX child restraint sys-
tem".
Semi-universal child restraint systems are
indicated by the text "Semi-universal" on the
approval label. These can be used if the vehi- cle and the seat are listed in the child restraint system manufacturer's vehicle model list. For
more information, contact the child restraint
system manufacturer or visit their website.
Child restraint system on the front-
passenger seat – if it is absolutely necessary
to secure a child in a child restraint system on the front-passenger seat:
X Always pay attention to the instructions
under "Child restraint system on the front-
passenger seat" (Y page 63).
There you will find instructions on how to
correctly route the shoulder belt strap from the vehicle seat-belt extender or belt sash
guide to the shoulder belt guide on the child
restraint system (Y page 64).
X Move the front-passenger seat as far back
as possible and fully retract the seat cush-
ion length.
If you secure a child in a forward-facing
child restraint system on the front-
passenger seat, also move the front-
passenger seat to the lowest position.
X Move the backrest to an almost vertical
position.
The entire base of the child restraint sys-
tem must always rest on the seat cushion of
the front-passenger seat. The backrest of
the forwards-facing child restraint system
must, as far as possible, be resting on the
backrest of the front-passenger seat. The
child restraint system must not touch the
roof or be put under strain by the head
restraint. Adjust the angle of the seat back- rest and the head restraint position accord-
ingly. Also observe the child restraint sys-
tem manufacturer's installation instruc-
tions.
X Move the seat cushion angle to the highest,
most vertical position.
Suitability of the seats for attaching
belt-secured child restraint systems If you use a baby car seat of category 0 or 0+
or a rearward-facing child restraint system of
category I on a rear seat, you must adjust the Children in the vehicle
65Safety Z
Page 69 of 413
driver's or front-passenger seat so that the
seat does not touch the child restraint sys-
tem.
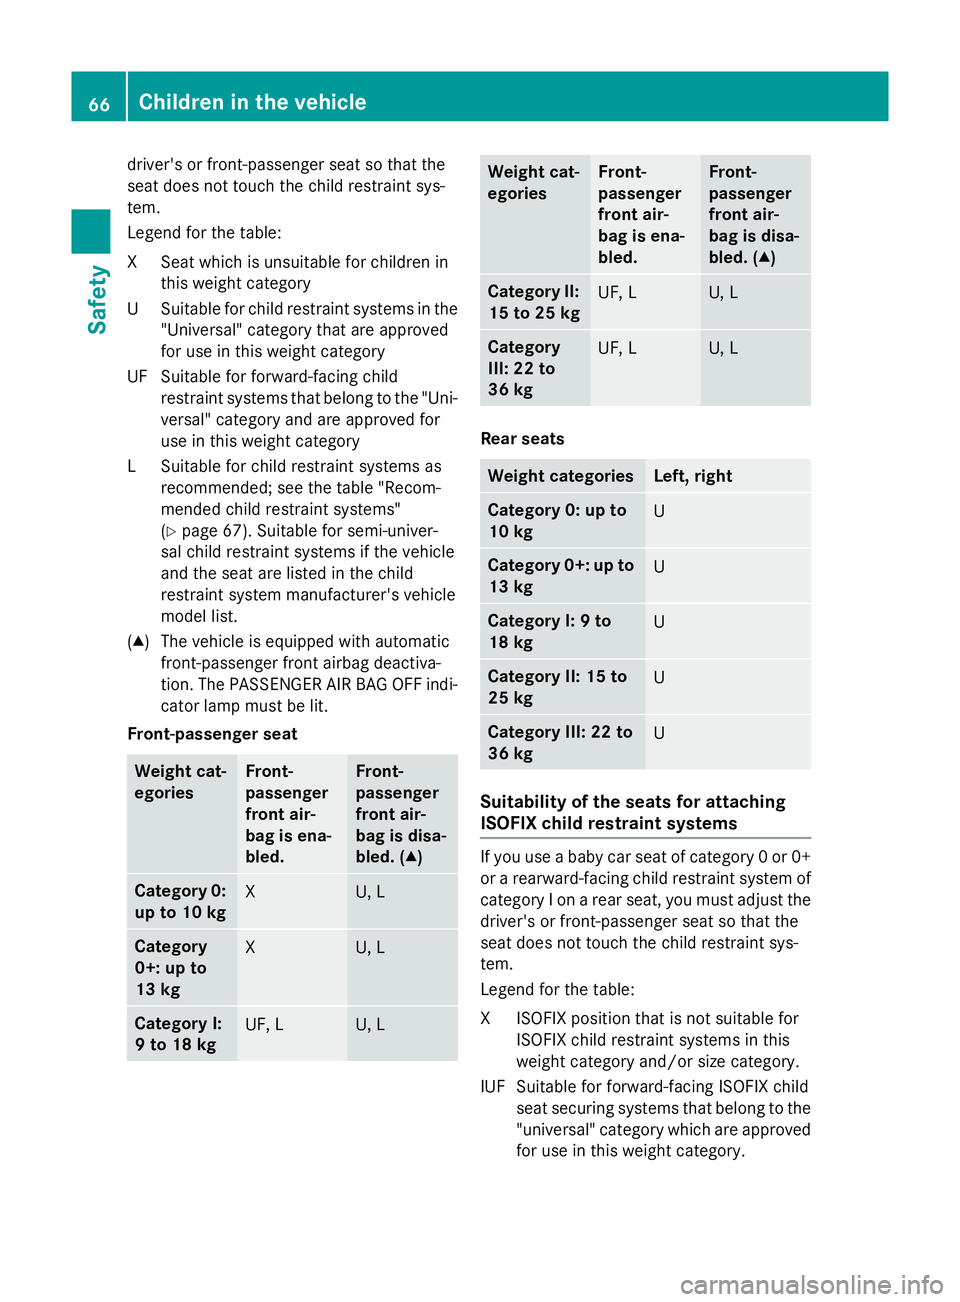
Legend for the table:
XS eat which is unsuitable for children in
this weight category
US uitable for child restraint systems in the
"Universal" category that are approved
for use in this weight category
UF Suitable for forward-facing child restraint systems that belong to the "Uni-
versal" category and are approved for
use in this weight category
LS uitable for child restraint systems as
recommended; see the table "Recom-
mended child restraint systems"
(Y page 67). Suitable for semi-univer-
sal child restraint systems if the vehicle
and the seat are listed in the child
restraint system manufacturer's vehicle
model list.
(▲) The vehicle is equipped with automatic front-passenger front airbag deactiva-
tion. The PASSENGER AIR BAG OFF indi- cator lamp must be lit.
Front-passenger seat Weight cat-
egories Front-
passenger
front air-
bag is ena-
bled. Front-
passenger
front air-
bag is disa-
bled. (▲)
Category 0:
up to 10 kg X U, L
Category
0+: up to
13 kg
X U, L
Category I:
9 to 18 kg
UF, L U, L Weight cat-
egories Front-
passenger
front air-
bag is ena-
bled. Front-
passenger
front air-
bag is disa-
bled. (▲)
Category II:
15 to 25 kg UF, L U, L
Category
III: 22 to
36 kg
UF, L U, L
Rear seats
Weight categories Left, right
Category 0: up to
10 kg
U
Category 0+: up to
13 kg U
Category I: 9 to
18 kg
U
Category II: 15 to
25 kg
U
Category III: 22 to
36 kg
U
Suitability of the seats for attaching
ISOFIX child restraint systems
If you use a baby car seat of category 0 or 0+
or a rearward-facing child restraint system of
category I on a rear seat, you must adjust the
driver's or front-passenger seat so that the
seat does not touch the child restraint sys-
tem.
Legend for the table:
XI SOFIX position that is not suitable for
ISOFIX child restraint systems in this
weight category and/or size category.
IUF Suitable for forward-facing ISOFIX child seat securing systems that belong to the"universal" category which are approved
for use in this weight category. 66
Children in the vehicleSafety
Page 72 of 413
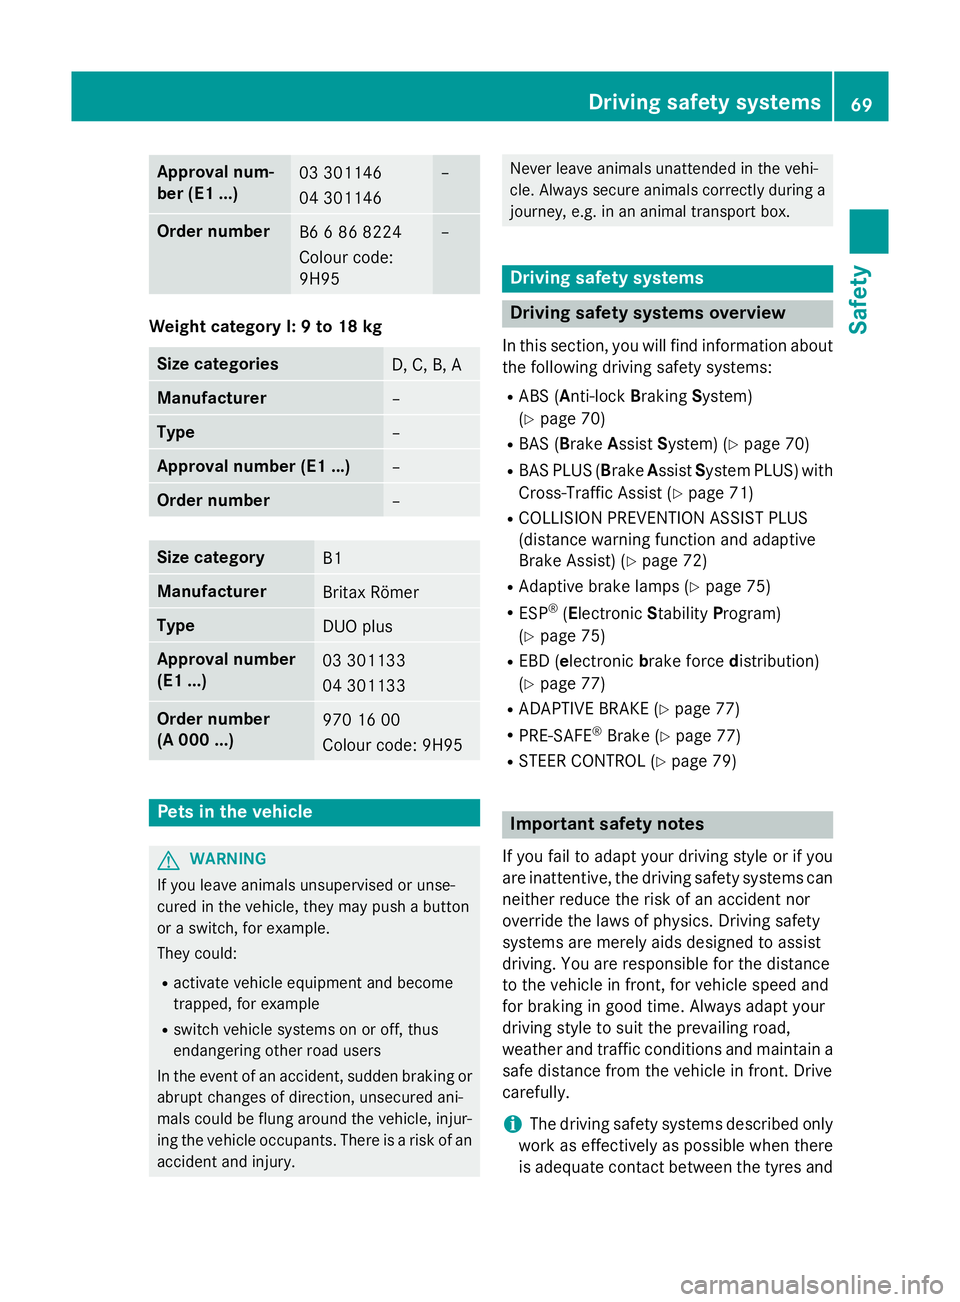
Approval num-
ber (E1 ...)
03 301146
04 301146 –
Order number
B6 6 86 8224
Colour code:
9H95 –
Weight category I: 9 to 18 kg
Size categories
D, C, B, A
Manufacturer
–
Type
–
Approval number (E1 ...)
–
Order number
–
Size category
B1
Manufacturer
Britax Römer
Type
DUO plus
Approval number
(E1 ...)
03 301133
04 301133
Order number
(A 000 ...)
970 16 00
Colour code: 9H95
Pets in the vehicle
G
WARNING
If you leave animals unsupervised or unse-
cured in the vehicle, they may push a button
or a switch, for example.
They could:
R activate vehicle equipment and become
trapped, for example
R switch vehicle systems on or off, thus
endangering other road users
In the event of an accident, sudden braking or
abrupt changes of direction, unsecured ani-
mals could be flung around the vehicle, injur-
ing the vehicle occupants. There is a risk of an accident and injury. Never leave animals unattended in the vehi-
cle. Always secure animals correctly during a
journey, e.g. in an animal transport box. Driving safety systems
Driving safety systems overview
In this section, you will find information about the following driving safety systems:
R ABS (Anti-lock BrakingSystem)
(Y page 70)
R BAS (Brake AssistSystem) (Y page 70)
R BAS PLUS (Brake AssistSystem PLUS) with
Cross-Traffic Assist (Y page 71)
R COLLISION PREVENTION ASSIST PLUS
(distance warning function and adaptive
Brake Assist) (Y page 72)
R Adaptive brake lamps (Y page 75)
R ESP ®
(Electronic StabilityProgram)
(Y page 75)
R EBD (electronic brake forcedistribution)
(Y page 77)
R ADAPTIVE BRAKE (Y page 77)
R PRE-SAFE ®
Brake (Y page 77)
R STEER CONTROL (Y page 79) Important safety notes
If you fail to adapt your driving style or if you
are inattentive, the driving safety systems can
neither reduce the risk of an accident nor
override the laws of physics. Driving safety
systems are merely aids designed to assist
driving. You are responsible for the distance
to the vehicle in front, for vehicle speed and
for braking in good time. Always adapt your
driving style to suit the prevailing road,
weather and traffic conditions and maintain a
safe distance from the vehicle in front. Drive
carefully.
i The driving safety systems described only
work as effectively as possible when there
is adequate contact between the tyres and Driving safety systems
69Safety Z
Page 97 of 413
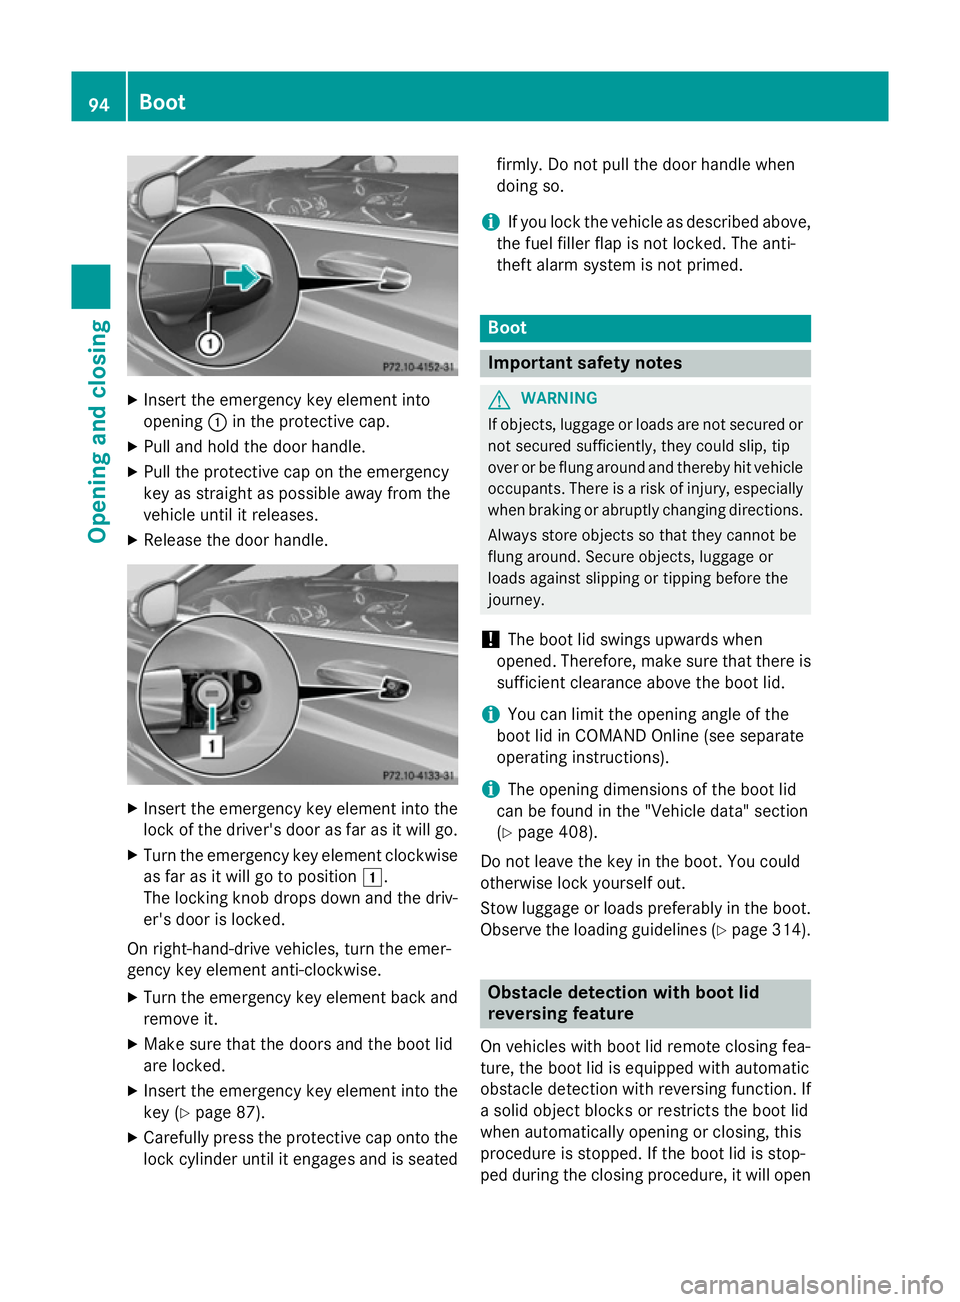
X
Insert the emergency key element into
opening :in the protective cap.
X Pull and hold the door handle.
X Pull the protective cap on the emergency
key as straight as possible away from the
vehicle until it releases.
X Release the door handle. X
Insert the emergency key element into the
lock of the driver's door as far as it will go.
X Turn the emergency key element clockwise
as far as it will go to position 1.
The locking knob drops down and the driv- er's door is locked.
On right-hand-drive vehicles, turn the emer-
gency key element anti-clockwise.
X Turn the emergency key element back and
remove it.
X Make sure that the doors and the boot lid
are locked.
X Insert the emergency key element into the
key (Y page 87).
X Carefully press the protective cap onto the
lock cylinder until it engages and is seated firmly. Do not pull the door handle when
doing so.
i If you lock the vehicle as described above,
the fuel filler flap is not locked. The anti-
theft alarm system is not primed. Boot
Important safety notes
G
WARNING
If objects, luggage or loads are not secured or not secured sufficiently, they could slip, tip
over or be flung around and thereby hit vehicle
occupants. There is a risk of injury, especially when braking or abruptly changing directions.
Always store objects so that they cannot be
flung around. Secure objects, luggage or
loads against slipping or tipping before the
journey.
! The boot lid swings upwards when
opened. Therefore, make sure that there is sufficient clearance above the boot lid.
i You can limit the opening angle of the
boot lid in COMAND Online (see separate
operating instructions).
i The opening dimensions of the boot lid
can be found in the "Vehicle data" section
(Y page 408).
Do not leave the key in the boot. You could
otherwise lock yourself out.
Stow luggage or loads preferably in the boot.
Observe the loading guidelines (Y page 314). Obstacle detection with boot lid
reversing feature
On vehicles with boot lid remote closing fea-
ture, the boot lid is equipped with automatic
obstacle detection with reversing function. If
a solid object blocks or restricts the boot lid
when automatically opening or closing, this
procedure is stopped. If the boot lid is stop-
ped during the closing procedure, it will open 94
BootOpening and closing
Page 161 of 413
Useful information
i This Owner's Manual describes all mod-
els, series and optional equipment for your
vehicle that were available at the time of
going to press. National variations are pos- sible. Note that your vehicle may not be
equipped with all of the functions descri-
bed. This is also the case for systems and
functions relevant to safety.
i Read the information on qualified special-
ist workshops: (Y page 25). Running-in notes
Important safety notes
In certain driving and driving safety systems,
the sensors adjust automatically while a cer-
tain distance is being driven after the vehicle has been delivered or after repairs. Full sys-
tem effectiveness is not reached until the end
of this teach-in procedure.
Brake pads/linings and discs that are either
new or have been replaced only achieve opti- mum braking effect after several hundred kil-
ometres of driving. Compensate for the
reduced braking effect by applying greater
force to the brake pedal. The first 1,500 km
If you treat the engine with sufficient care
from the very start, you will be rewarded with excellent performance for the remainder of
the engine's life.
R Drive at varying road speeds and engine
speeds for the first 1,500 km.
R Avoid overstraining the vehicle during this
period, e.g. driving at full throttle.
R When changing gears manually, change up
in good time, before the rev counter needle reaches
Ôof the way to the red area of the
rev counter.
R Do not shift down a gear manually in order
to brake.
R Try to avoid depressing the accelerator
pedal beyond the point of resistance (kick- down).
R All vehicles (except AMG vehicles): drive
the vehicle mainly in drive program Efor the
first 1,500 km.
Additional running-in notes for AMG vehicles:
R Do not drive at speeds above 140 km/ hfor
the first 1,500 km.
R Only allow the engine to reach a maximum
engine speed of 4,500 rpm briefly.
R Drive the vehicle mainly in drive program C
for the first 1,500 km.
After 1,500 km, you may gradually accelerate
the vehicle to full road and engine speeds.
You should also observe these notes on run-
ning-in if the engine or parts of the drive train on your vehicle have been replaced.
Always observe the applicable speed limit. Driving
Important safety notes
G
WARNING
Objects in the driver's footwell may restrict
the clearance around the pedals or block a
depressed pedal. This jeopardises the oper-
ating and road safety of the vehicle. There is a risk of an accident.
Stow all objects securely in the vehicle so that
they do not get into the driver's footwell.
Always fit the floormats securely and as pre-
scribed in order to ensure that there is always sufficient room for the pedals. Do not use
loose floormats and do not place several floor-mats on top of one another. 158
DrivingDriving and parking
Page 166 of 413
When pulling away again, the engine starts
automatically. The ECO start/stop function
thereby helps you to reduce the fuel con-
sumption and emissions of your vehicle.
Important safety notes G
WARNING
If the engine is switched off automatically and you exit the vehicle, the engine is restarted
automatically. The vehicle may begin moving. There is a risk of accident and injury.
If you wish to exit the vehicle, always turn off
the ignition and secure the vehicle against
rolling away.
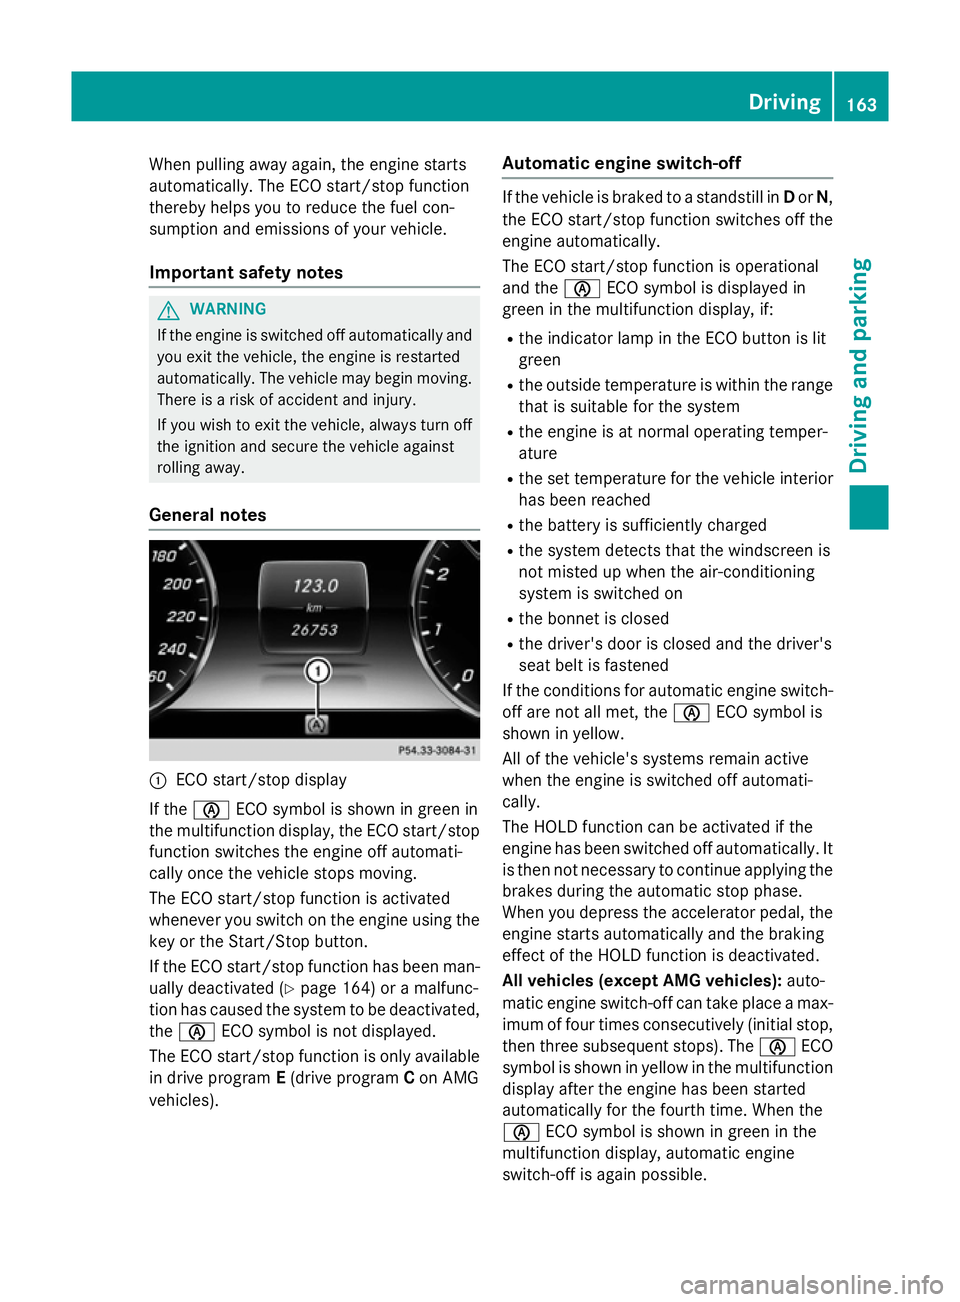
General notes :
ECO start/stop display
If the è ECO symbol is shown in green in
the multifunction display, the ECO start/stop
function switches the engine off automati-
cally once the vehicle stops moving.
The ECO start/stop function is activated
whenever you switch on the engine using the key or the Start/Stop button.
If the ECO start/stop function has been man-
ually deactivated (Y page 164) or a malfunc-
tion has caused the system to be deactivated,
the è ECO symbol is not displayed.
The ECO start/stop function is only available in drive program E(drive program Con AMG
vehicles). Automatic engine switch-off If the vehicle is braked to a standstill in
Dor N,
the ECO start/stop function switches off the engine automatically.
The ECO start/stop function is operational
and the èECO symbol is displayed in
green in the multifunction display, if:
R the indicator lamp in the ECO button is lit
green
R the outside temperature is within the range
that is suitable for the system
R the engine is at normal operating temper-
ature
R the set temperature for the vehicle interior
has been reached
R the battery is sufficiently charged
R the system detects that the windscreen is
not misted up when the air-conditioning
system is switched on
R the bonnet is closed
R the driver's door is closed and the driver's
seat belt is fastened
If the conditions for automatic engine switch- off are not all met, the èECO symbol is
shown in yellow.
All of the vehicle's systems remain active
when the engine is switched off automati-
cally.
The HOLD function can be activated if the
engine has been switched off automatically. It is then not necessary to continue applying the
brakes during the automatic stop phase.
When you depress the accelerator pedal, the engine starts automatically and the braking
effect of the HOLD function is deactivated.
All vehicles (except AMG vehicles): auto-
matic engine switch-off can take place a max-
imum of four times consecutively (initial stop,
then three subsequent stops). The èECO
symbol is shown in yellow in the multifunction
display after the engine has been started
automatically for the fourth time. When the
è ECO symbol is shown in green in the
multifunction display, automatic engine
switch-off is again possible. Driving
163Driving and parking Z
Page 167 of 413
AMG vehicles:
the number of consecutive
automatic engine stops is unlimited.
Automatic engine start The engine is started automatically if:
R you switch off the ECO start/stop function
by pressing the ECO button
R you switch to drive program Sor M
R in transmission position Dor N, the brake
pedal is released and the HOLD function is not active
R you depress the accelerator pedal
R you engage reverse gear R
R you move the transmission out of position
P
R you unfasten your seat belt or open the
driver's door
R the vehicle starts to roll
R the brake system requires this
R the temperature in the vehicle interior devi-
ates from the set range
R the system detects moisture on the wind-
screen when the air-conditioning system is
switched on
R the battery's charge status is too low
Shifting the transmission to position Pdoes
not start the engine.
If you shift the transmission from Rto D, the
ECO start/stop function is available again
once the èECO symbol reappears in
green in the multifunction display. Switching off/on the ECO start/stop
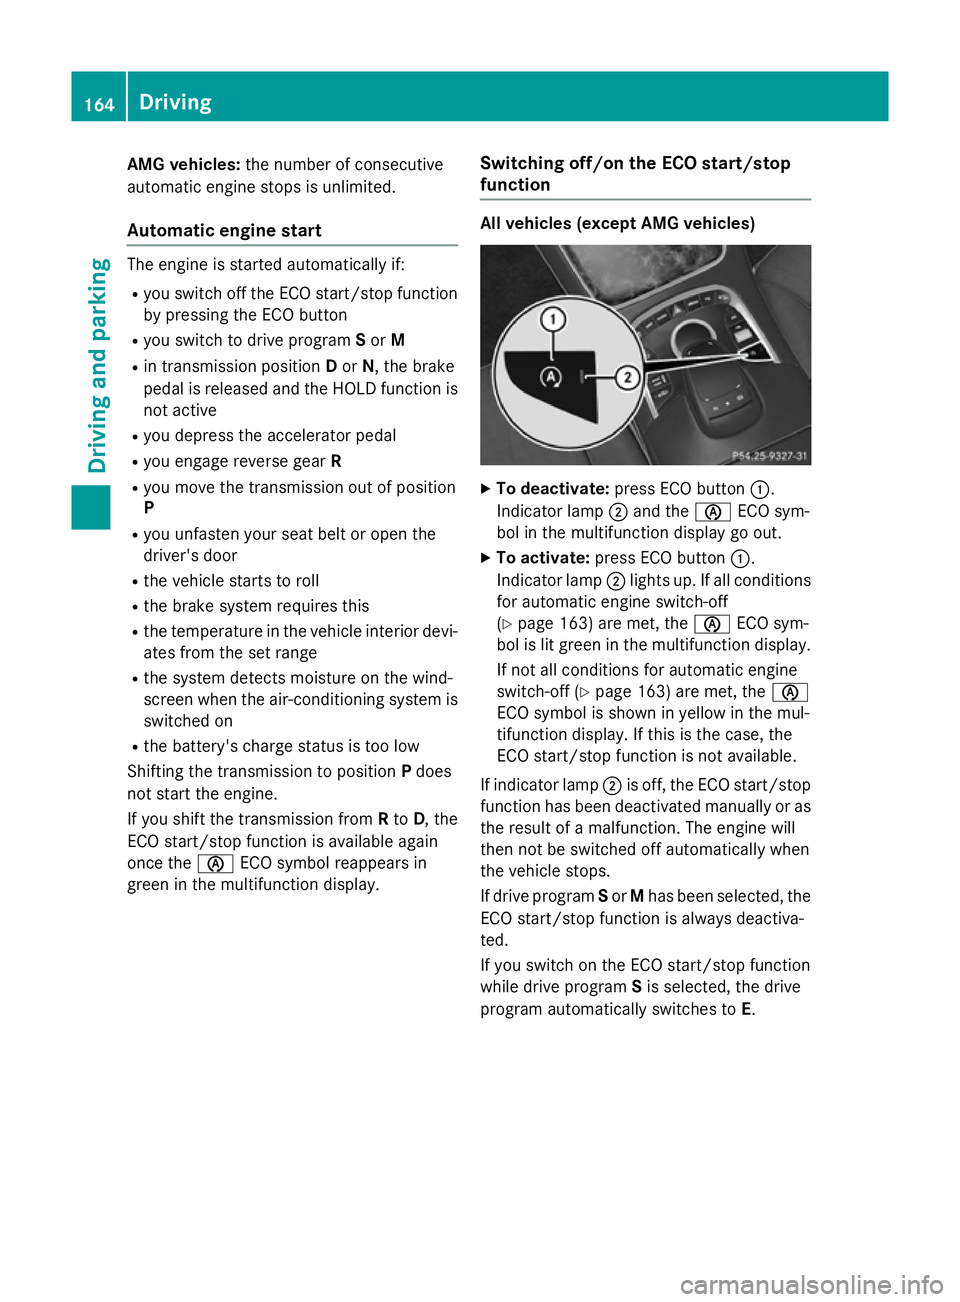
function All vehicles (except AMG vehicles)
X
To deactivate: press ECO button :.
Indicator lamp ;and the èECO sym-
bol in the multifunction display go out.
X To activate: press ECO button :.
Indicator lamp ;lights up. If all conditions
for automatic engine switch-off
(Y page 163) are met, the èECO sym-
bol is lit green in the multifunction display.
If not all conditions for automatic engine
switch-off (Y page 163) are met, the è
ECO symbol is shown in yellow in the mul-
tifunction display. If this is the case, the
ECO start/stop function is not available.
If indicator lamp ;is off, the ECO start/stop
function has been deactivated manually or as
the result of a malfunction. The engine will
then not be switched off automatically when
the vehicle stops.
If drive program Sor Mhas been selected, the
ECO start/stop function is always deactiva-
ted.
If you switch on the ECO start/stop function
while drive program Sis selected, the drive
program automatically switches to E. 164
DrivingDriving and pa
rking
Page 182 of 413
When leaving the vehicle, always take the key
with you and lock the vehicle. Never leave
children unattended in the vehicle.
! Always secure the vehicle correctly
against rolling away. Otherwise, the vehicle
or its drivetrain could be damaged.
To ensure that the vehicle is secured against rolling away unintentionally:
R the electric parking brake must be applied
R the transmission must be in position Pand
the key must be removed from the ignition lock
R the front wheels must be turned towards
the kerb on steep uphill or downhill gradi-
ents
R the empty vehicle must be secured at the
front axle with a wheel chock or similar, for example, on uphill or downhill gradients
R a laden vehicle must also be secured at the
rear axle with a wheel chock or similar, for
example, on uphill or downhill gradients Switching off the engine
Important safety notes G
WARNING
The automatic transmission switches to neu-
tral position Nwhen you switch off the engine.
The vehicle may roll away. There is a risk of an
accident.
After switching off the engine, always switch
to parking position P. Prevent the parked vehi-
cle from rolling away by applying the parking
brake.
Using the key X
Apply the electric parking brake.
X Shift the transmission to position P.
X Turn the key to position 0in the ignition
lock and remove it.
The immobiliser is activated. If you switch the engine off with the trans-
mission in position
Ror D, the automatic
transmission shifts to Nautomatically.
If you then open the driver's door or the
front-passenger door or remove the key
from the ignition, the automatic transmis-
sion shifts to P.
If you shift the automatic transmission to N
before switching off the engine, the auto-
matic transmission remains in Neven if the
driver's door or the front-passenger door is opened.
Using the Start/Stop button X
Apply the electric parking brake.
X Shift the transmission to position P.
X Press the Start/Stop button (Y page 159).
The engine stops and all the indicator
lamps in the instrument cluster go out.
When the driver's door is closed, this cor-
responds to key position 1. When the driv-
er's door is open, this corresponds to key
position 0: "key removed".
If you use the Start/Stop button to switch
off the engine, the automatic transmission
shifts to Nautomatically. If you then open
one of the front doors, the automatic trans-
mission shifts to P.
If you drive through a car wash with a con- veyor, you can:
R switch on the ignition using the Start/
Stop button and shift the transmission to
N
R insert the key into the ignition lock,
switch on the ignition and shift the trans-
mission to N
The engine can be switched off while the vehi-
cle is in motion by pressing and holding the
Start/Stop button for about three seconds.
This function operates independently of the
ECO start/stop automatic engine switch-off
function. Parking
179Driving and parking Z