2014 MERCEDES-BENZ S-CLASS COUPE roof
[x] Cancel search: roofPage 68 of 413

Always observe the information on suitable
positioning of the child restraint system
(Y page 65) in addition to the child restraint
system manufacturer's installation and oper- ating instructions. Suitable positioning of the child
restraint system
Introduction Only child restraint systems which are
approved in accordance with the ECE stand-
ard ECE R44 are permitted for use in the vehi-
cle.
For certain child restraint systems in weight
categories II or III, this can mean that the area of use is restricted. The maximum size setting
of the child restraint system is not possible
due to possible contact with the roof.
"Universal" category child restraint systems
can be recognised by their orange approval
label and the text "Universal". Example: approval label on the child restraint sys-
tem
"Universal" category child restraint systems
can be used on the seats indicated with U, UF
or IUF according to the tables "Suitability of
the seats for attaching belt-secured child
restraint systems" or "Suitability of the seats
for attaching an ISOFIX child restraint sys-
tem".
Semi-universal child restraint systems are
indicated by the text "Semi-universal" on the
approval label. These can be used if the vehi- cle and the seat are listed in the child restraint system manufacturer's vehicle model list. For
more information, contact the child restraint
system manufacturer or visit their website.
Child restraint system on the front-
passenger seat – if it is absolutely necessary
to secure a child in a child restraint system on the front-passenger seat:
X Always pay attention to the instructions
under "Child restraint system on the front-
passenger seat" (Y page 63).
There you will find instructions on how to
correctly route the shoulder belt strap from the vehicle seat-belt extender or belt sash
guide to the shoulder belt guide on the child
restraint system (Y page 64).
X Move the front-passenger seat as far back
as possible and fully retract the seat cush-
ion length.
If you secure a child in a forward-facing
child restraint system on the front-
passenger seat, also move the front-
passenger seat to the lowest position.
X Move the backrest to an almost vertical
position.
The entire base of the child restraint sys-
tem must always rest on the seat cushion of
the front-passenger seat. The backrest of
the forwards-facing child restraint system
must, as far as possible, be resting on the
backrest of the front-passenger seat. The
child restraint system must not touch the
roof or be put under strain by the head
restraint. Adjust the angle of the seat back- rest and the head restraint position accord-
ingly. Also observe the child restraint sys-
tem manufacturer's installation instruc-
tions.
X Move the seat cushion angle to the highest,
most vertical position.
Suitability of the seats for attaching
belt-secured child restraint systems If you use a baby car seat of category 0 or 0+
or a rearward-facing child restraint system of
category I on a rear seat, you must adjust the Children in the vehicle
65Safety Z
Page 70 of 413

IL Suitable for ISOFIX child restraint sys-
tems as recommended; see the follow-
ing table of "Recommended child
restraint systems" (Y page 67).
The manufacturer will also recommend a suitable ISOFIX child restraint system.
For this, your vehicle and the seat must
be listed in the child restraint system
manufacturer's model list. For more
information, contact the child restraint
system manufacturer or visit their web-
site.
(♦) If you are using a child restraint system of size category C (ISO/R3), move the
front seat to the highest position and thefront-seat backrest to an upright posi-
tion. Make sure that the seat backrest ofthe front seat does not rest against the
child restraint system.
Carry-cot weight category Size cate-
gory Equipment Rear seat,
left and right
F ISO/L1 X
G ISO/L2 X
Weight category 0: up to 10 kg, up to
approximately 6 months Size cate-
gory Equipment Rear seat,
left and
right
E ISO/R1 IL
Weight category 0+: up to 13 kg, up to
approximately 15 months
Size cate-
gory Equipment Rear seat,
left and
right
E ISO/R1 IL
D ISO/R2 IL
C ISO/R3 IL (♦) Weight category I: 9 to 18 kg, approx-
imately 9 months to 4 years
Size cate-
gory Equipment Rear seat,
left and
right
D ISO/R2 IL
C ISO/R3 IL (♦)
B ISO/F2 IUF
B1 ISO/F2X IUF
A ISO/F3 IUF
The child restraint system must not touch the
roof or be put under strain by the head
restraint. Adjust the head restraint position
accordingly. Also observe the child restraint
system manufacturer's installation instruc-
tions. Recommended child restraint sys-
tems
General notes Always observe the information in "Child
restraint systems on the front-passenger
seat" (Y
page 63) and in "Suitable positioning
of the child restraint system" (Y page 65).
You can obtain further information about the correct child restraint system from any
Mercedes-Benz Service Centre.
Recommended child restraint systems
for attaching with the vehicle seat belt Weight category 0: up to 10 kg; up to
approximately 6 months
Manufac-
turer
Britax Römer Britax Römer
Type
BABY SAFE
plus BABY SAFE
plus IIChildren in the vehicle
67Safety Z
Page 84 of 413
X
To stop the alarm using KEYLESS-GO:
grasp the outside door handle. The key
must be outside the vehicle.
The alarm is switched off.
or X Press the Start/Stop button on the dash-
board. The key must be inside the vehicle.
The alarm is switched off.
The alarm is not switched off, even if you
close the open door that has triggered it, for
example.
i If the alarm stays on for more than
30 seconds, the Mercedes‑Benz emer-
gency call system automatically sends a
message to the Customer Assistance
Centre. This is done by means of a text
message or a data connection. The emer-
gency call system sends a message or
establishes a data connection provided
that:
R you have subscribed to the
Mercedes‑Benz emergency call system
R the Mercedes‑ Benz emergency call sys-
tem has been activated properly
R the necessary mobile phone network is
available Tow-away protection
Function An audible and visual alarm is triggered if your
vehicle's angle of inclination is altered while
tow-away protection is primed. This can occur if the vehicle is jacked up on one side, for
example.
Priming X
Make sure that: R
the doors are closed
R the boot lid is closed
Only then is the tow-away protection
primed.
X Lock the vehicle with the key or KEYLESS-
GO.
Tow-away protection is primed after
approximately 60 second s.
Switching off X
Unlo ck the vehicle with the key or KEY-
LESS-GO.
or X Insert the key into the ignition lock.
Tow-away protection is switched off auto-
matically.
Deactivating You can deactivate the tow-away protection
using COMAND Online. You can find informa- tion about deactivating the tow-away protec-
tion in the separate COMAND Online operat-
ing instructions. Interior motion sensor
Function When the interior motion sensor is primed, a
visual and audible alarm is triggered if move-
ment is detected in the vehicle interior. This
can occur if someone reaches into the vehicle
interior, for example.
Priming X
Make sure that:
R the side windows are closed
R there are no objects, e.g. mascots, hang-
ing on the rear-view mirror or on the grab handles on the roof trim
This will prevent false alarms.
X Make sure that: Protection against theft
81Safety Z
Page 86 of 413
Useful information
..............................84
Key ........................................................ 84
Doors .................................................... 90
Boot ...................................................... 94
Side windows ...................................... 99
Panorama roof ................................... 102 83Opening and closing
Page 103 of 413
G
WARNING
The reversing function does not react:
R to soft, light and thin objects, e.g. small fin-
gers
R while resetting
This means that the reversing feature cannot
prevent someone being trapped in these sit-
uations. There is a risk of injury.
When closing, make sure that no parts of the
body are in the closing area. If someone
becomes trapped, press the switch to open
the side window again. Opening and closing the side win-
dows
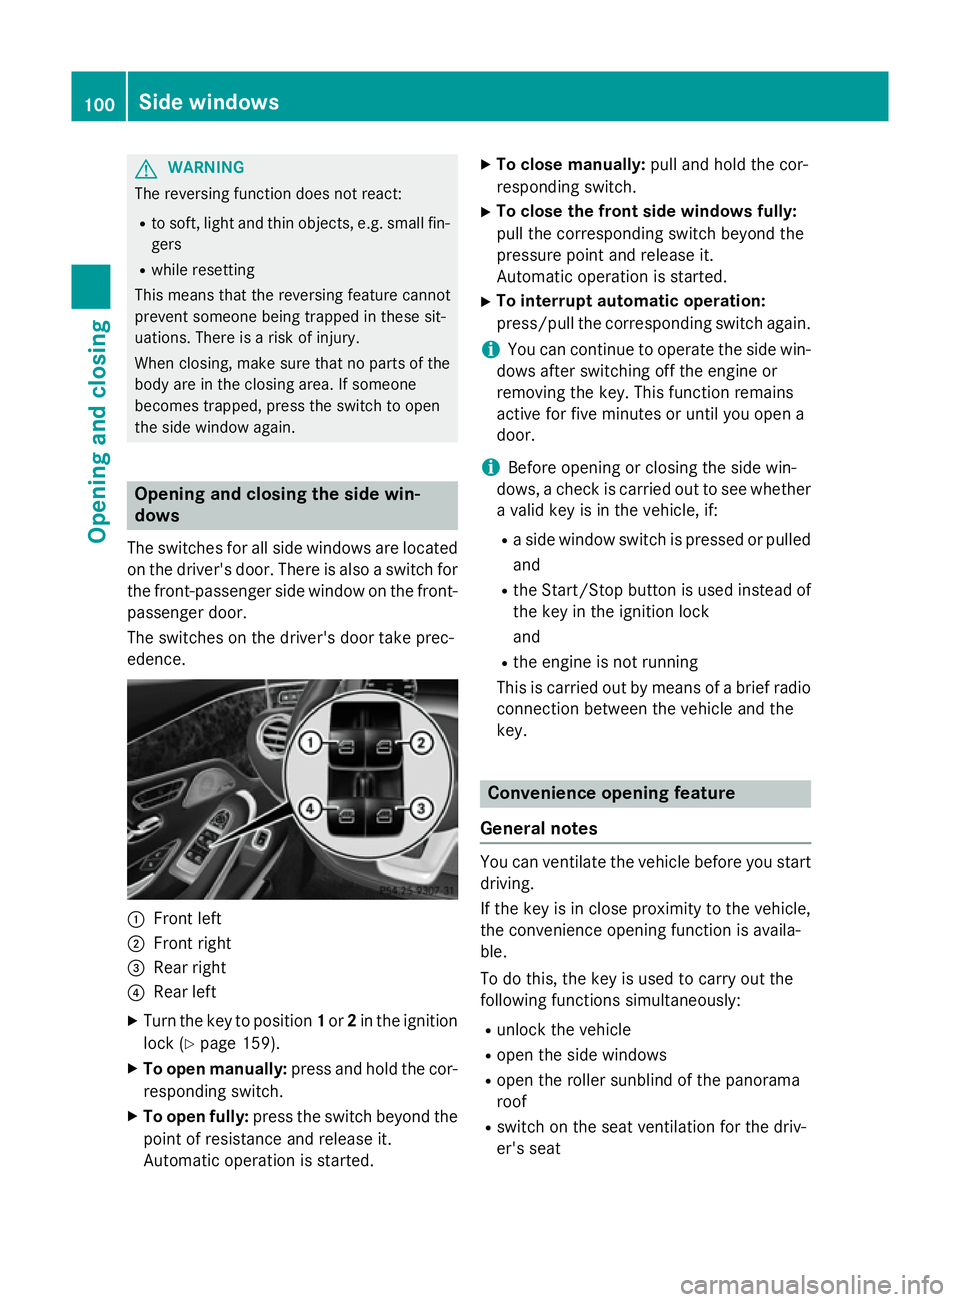
The switches for all side windows are located
on the driver's door. There is also a switch for
the front-passenger side window on the front- passenger door.
The switches on the driver's door take prec-
edence. :
Front left
; Front right
= Rear right
? Rear left
X Turn the key to position 1or 2in the ignition
lock (Y page 159).
X To open manually: press and hold the cor-
responding switch.
X To open fully: press the switch beyond the
point of resistance and release it.
Automatic operation is started. X
To close manually: pull and hold the cor-
responding switch.
X To close the front side windows fully:
pull the corresponding switch beyond the
pressure point and release it.
Automatic operation is started.
X To interrupt automatic operation:
press/pull the corresponding switch again.
i You can continue to operate the side win-
dows after switching off the engine or
removing the key. This function remains
active for five minutes or until you open a
door.
i Before opening or closing the side win-
dows, a check is carried out to see whether a valid key is in the vehicle, if:
R a side window switch is pressed or pulled
and
R the Start/Stop button is used instead of
the key in the ignition lock
and
R the engine is not running
This is carried out by means of a brief radio
connection between the vehicle and the
key. Convenience opening feature
General notes You can ventilate the vehicle before you start
driving.
If the key is in close proximity to the vehicle,
the convenience opening function is availa-
ble.
To do this, the key is used to carry out the
following functions simultaneously:
R unlock the vehicle
R open the side windows
R open the roller sunblind of the panorama
roof
R switch on the seat ventilation for the driv-
er's seat 100
Side windowsOpening and closing
Page 104 of 413
Convenience opening feature
X
Press and hold the %button until the
side windows are in the desired position.
The roller sunblind of the panorama roof
opens.
X To interrupt convenience opening:
release the %button. Convenience closing feature
Important safety notes G
WARNING
When using convenience closing, you could
become trapped within the sweep of the clos- ing window. There is a risk of injury.
Monitor the entire closing procedure when
using convenience closing. When closing,
make sure that no one has any parts of the
body within the closing area.
You can close the side windows and the roller sunblind for the panorama roof after you lock
the vehicle.
i Notes on the automatic reversing feature
for:
R the side windows (Y page 99)
R the roller sunblind (Y page 102)
Using the key X
Press and hold the &button until the
side windows and the roller sunblind of the panorama roof are fully closed.
X Make sure that all the side windows are
closed.
X To interrupt convenience closing:
release the &button.
Using KEYLESS-GO The key must be outside the vehicle. All the
doors must be closed. X
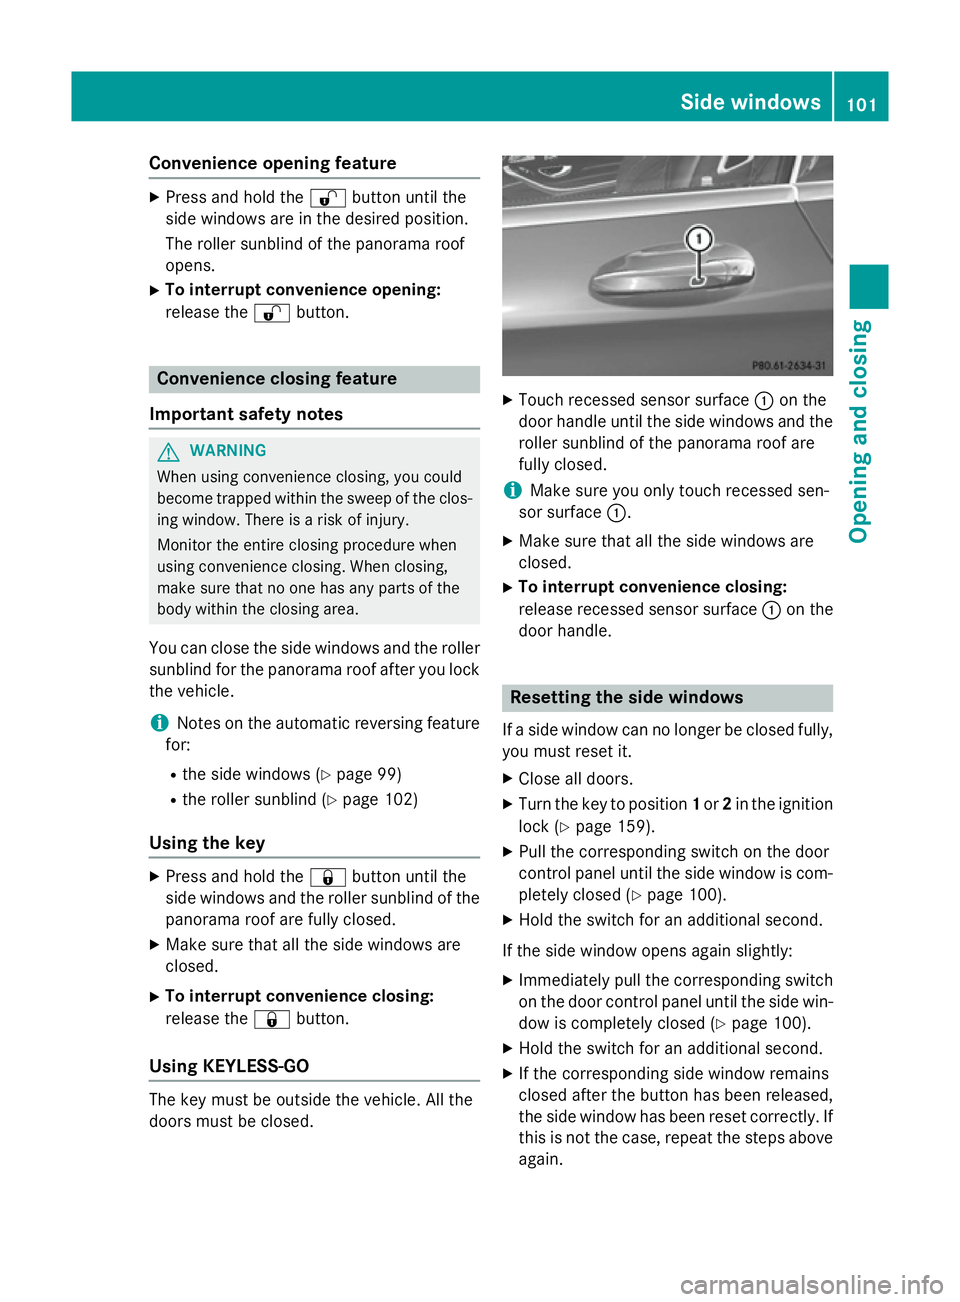
Touch recessed sensor surface :on the
door handle until the side windows and the roller sunblind of the panorama roof are
fully closed.
i Make sure you only touch recessed sen-
sor surface :.
X Make sure that all the side windows are
closed.
X To interrupt convenience closing:
release recessed sensor surface :on the
door handle. Resetting the side windows
If a side window can no longer be closed fully, you must reset it.
X Close all doors.
X Turn the key to position 1or 2in the ignition
lock (Y page 159).
X Pull the corresponding switch on the door
control panel until the side window is com- pletely closed (Y page 100).
X Hold the switch for an additional second.
If the side window opens again slightly: X Immediately pull the corresponding switch
on the door control panel until the side win-
dow is completely closed (Y page 100).
X Hold the switch for an additional second.
X If the corresponding side window remains
closed after the button has been released,
the side window has been reset correctly. If
this is not the case, repeat the steps aboveagain. Side windows
101Opening and closing Z
Page 105 of 413
Problems with the side windows
G
WARNING
If you close a side window again immediately after it has been blocked or reset, the side window
closes with increased or maximum force. The reversing function is then not active. Parts of the
body could be trapped in the closing area in the process. This poses an increased risk of injury or even fatal injury.
Make sure that no parts of the body are in the closing area. To stop the closing process, releasethe switch or push the switch again to reopen the side window. Problem
Possible causes/consequences and
M MSolutions A side window cannot
be closed because it is
blocked by objects, e.g.
leaves in the window
guide. X
Remove the objects.
X Close the side window. A side window cannot
be closed and you can-
not see the cause. If a side window is obstructed during closing and reopens again
slightly:
X Immediately after the window blocks, pull the corresponding
switch again until the side window has closed.
The side window is closed with increased force.
If a side window is obstructed again during closing and reopens
again slightly: X Immediately after the window blocks, pull the corresponding
switch again until the side window has closed.
The side window is closed without the anti-entrapment feature. Panorama roof
Operating the roller sunblind for the
panorama roof
Important safety notes G
WARNING
When opening or closing the roller sunblind,
parts of the body could be trapped between
the roller sunblind and the frame. There is a
risk of injury.
When opening or closing make sure that no
parts of the body are in the sweep of the roller sunblind. If someone is trapped:
R release the switch immediately or
R press the switch in any direction during
automatic operation
The opening/closing process is stopped.
The roller sunblind shields the vehicle interior
from sunlight.
Roller sunblind reversing feature The roller sunblind is equipped with an auto-
matic reversing feature. If an object blocks or
restricts the roller sunblind during the closing
process, the roller sunblind automatically
opens again a little. The automatic reversing 102
Panorama roofOpening and closing
Page 106 of 413
feature is only an aid, not a substitute for your
attention when closing the roller sunblind. G
WARNING
The reversing feature especially does not
react to soft, light and thin objects, such as
small fingers. This means that the reversing
feature cannot prevent someone being trap-
ped in these situations. There is a risk of
injury.
When closing make sure that no parts of the
body are in the sweep of the roller sunblind.
If someone is trapped:
R release the switch immediately or
R during automatic operation, press the
switch briefly in any direction
The closing process is stopped.
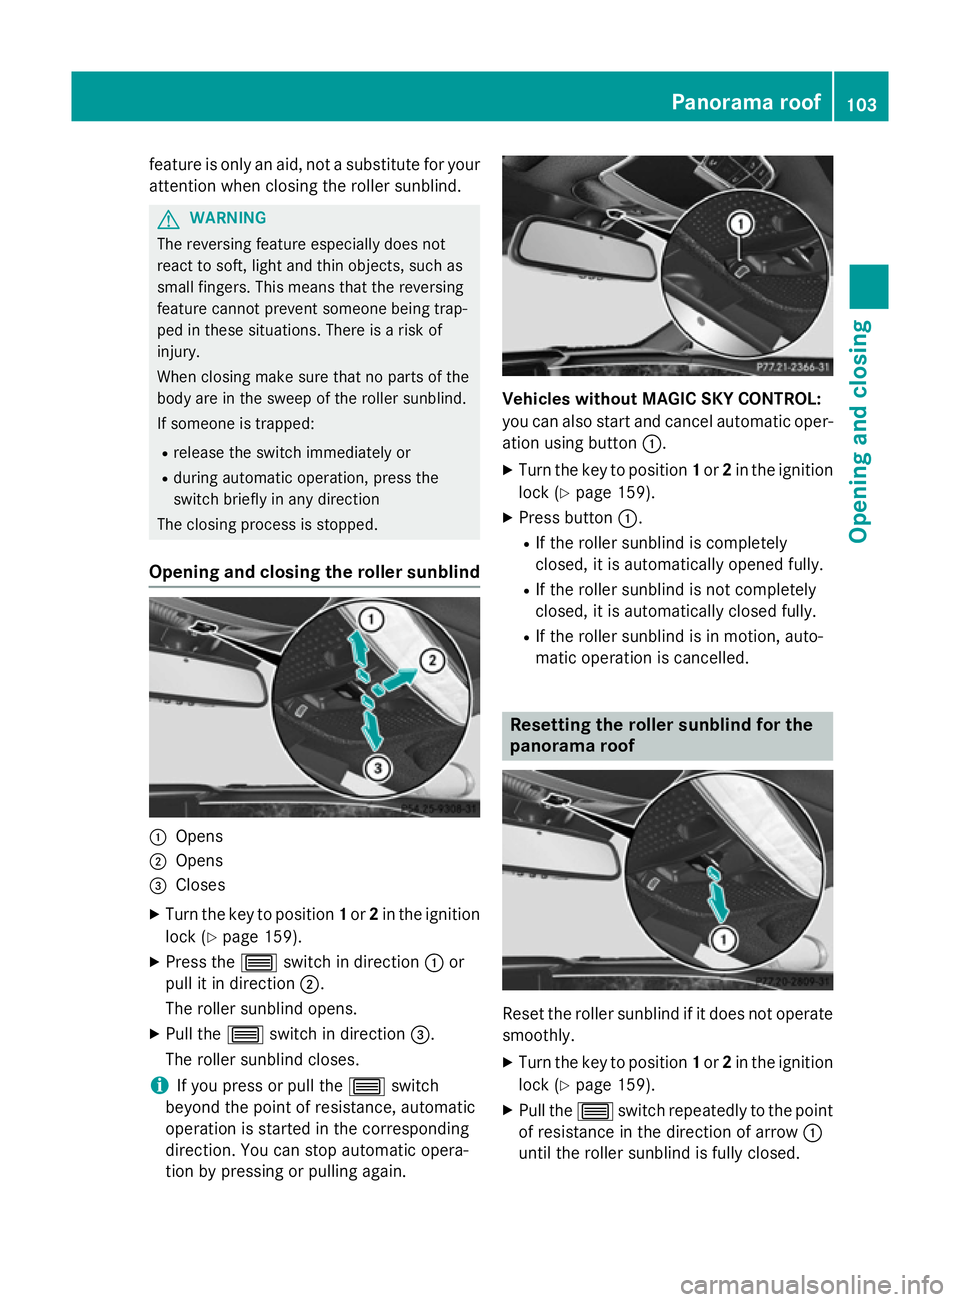
Opening and closing the roller sunblind :
Opens
; Opens
= Closes
X Turn the key to position 1or 2in the ignition
lock (Y page 159).
X Press the 3switch in direction :or
pull it in direction ;.
The roller sunblind opens.
X Pull the 3switch in direction =.
The roller sunblind closes.
i If you press or pull the
3switch
beyond the point of resistance, automatic
operation is started in the corresponding
direction. You can stop automatic opera-
tion by pressing or pulling again. Vehicles without MAGIC SKY CONTROL:
you can also start and cancel automatic oper-
ation using button :.
X Turn the key to position 1or 2in the ignition
lock (Y page 159).
X Press button :.
R If the roller sunblind is completely
closed, it is automatically opened fully.
R If the roller sunblind is not completely
closed, it is automatically closed fully.
R If the roller sunblind is in motion, auto-
matic operation is cancelled. Resetting the roller sunblind for the
panorama roof
Reset the roller sunblind if it does not operate
smoothly.
X Turn the key to position 1or 2in the ignition
lock (Y page 159).
X Pull the 3switch repeatedly to the point
of resistance in the direction of arrow :
until the roller sunblind is fully closed. Panorama roof
103Opening and closing Z