2014 MERCEDES-BENZ S-CLASS COUPE lock
[x] Cancel search: lockPage 336 of 413

America
Country Radio type approval num-
ber
Frequency range (MHz)
BB (Barba-
dos) Registration not required
MHz: 27, 40, 433, 868
CL (Chile) 38447/F-23 No.3.3634
MHz: 40, 433
3943/DFRS05165/F-50
MHz: 280 to 433
GF (French
Guyana) Article 6 of Directive
1999/5/EC R&TTE 10668
13 May 05
MHz: 27, 30, 40, 433, 868
GP (Guade-
loupe) Article 6 of Directive
1999/5/EC R&TTE 10668
13 May 05
MHz: 27, 30, 40, 433, 868
MQ (Martini-
que) Article 6 of Directive
1999/5/EC R&TTE 11 July
05
MHz: 27, 30, 40, 433, 868
MX (Mexico) MHz: 280 to 390
Asia
Country Radio type approval num-
ber
Frequency range (MHz)
AE (United
Arab Emi-
rates) 1623/5/10-2/26/76
MHz: 433
JO (Jordan) TRC/LPD/2005/23
MHz: 27, 30, 40, 433, 868
KW (Kuwait) 5 October 2005
MHz: 27, 30, 40, 418, 433,
868
SA (Saudi
Arabia) 11_02_05/5024-5-6
MHz: 418, 433 Country Radio type approval num-
ber
Frequency range (MHz)
SY (Syria) 279/4/14 / 05 March 06
TR (Turkey) National Certification 23
July 07
MHz: 433
Australia
Country Radio type approval num-
ber
Frequency range (MHz)
AU (Aus-
tralia) 28 June 2005
MHz: 27, 30, 40, 433, 868
NZ (New
Zealand) 20 March 06
MHz: 27, 30, 40, 433
Floormats
G
WARNING
Objects in the driver's footwell may restrict
the clearance around the pedals or block a
depressed pedal. This jeopardises the oper-
ating and road safety of the vehicle. There is a risk of an accident.
Stow all objects securely in the vehicle so that
they do not get into the driver's footwell.
Always fit the floormats securely and as pre-
scribed in order to ensure that there is always sufficient room for the pedals. Do not use
loose floormats and do not place several floor-mats on top of one another. Features
333Stowing and featu res Z
Page 337 of 413
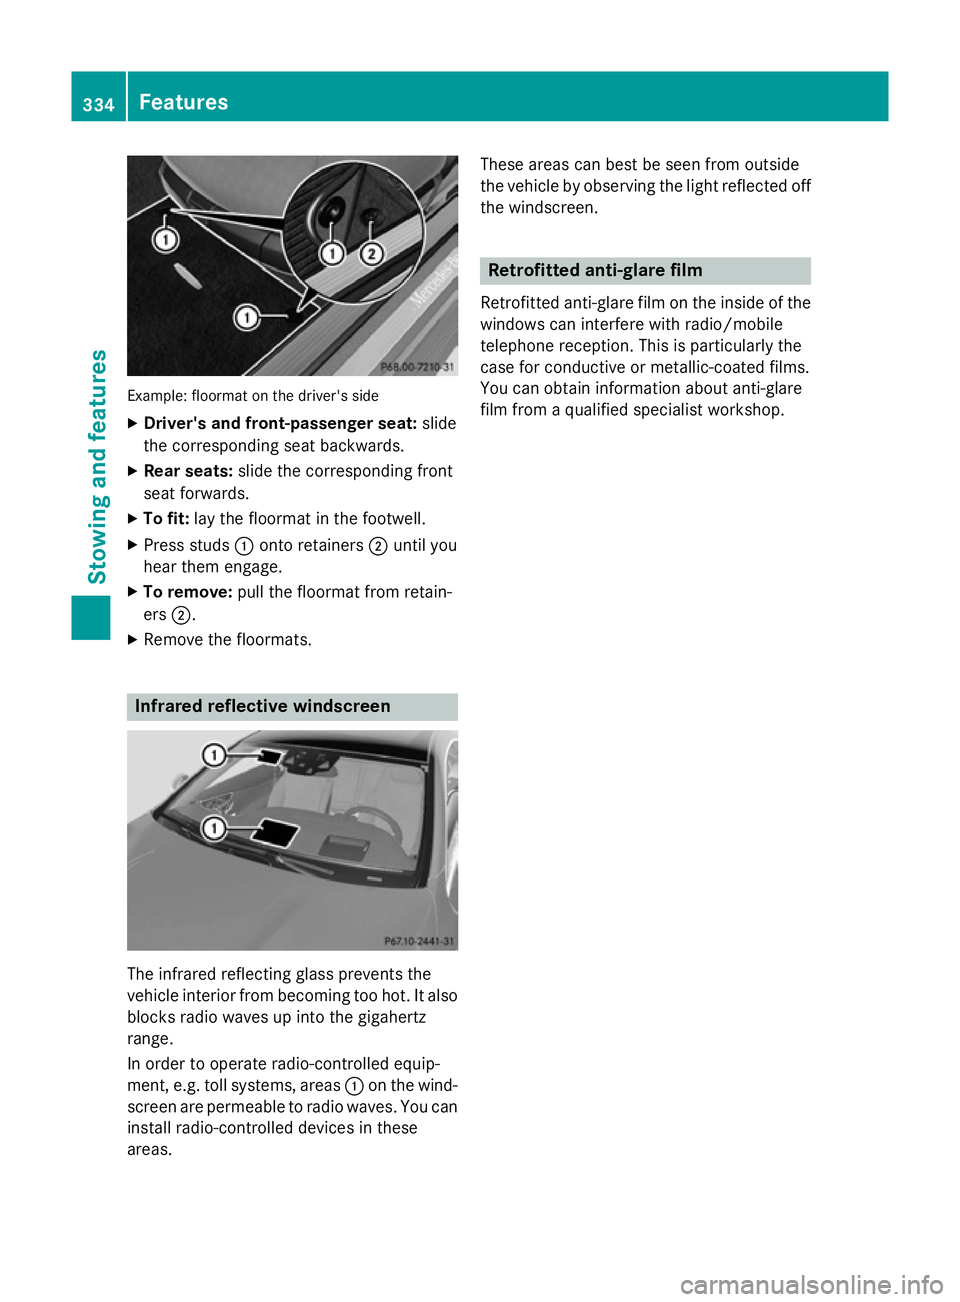
Example: floormat on the driver's side
X Driver's and front-passenger seat: slide
the corresponding seat backwards.
X Rear seats: slide the corresponding front
seat forwards.
X To fit: lay the floormat in the footwell.
X Press studs :onto retainers ;until you
hear them engage.
X To remove: pull the floormat from retain-
ers ;.
X Remove the floormats. Infrared reflective windscreen
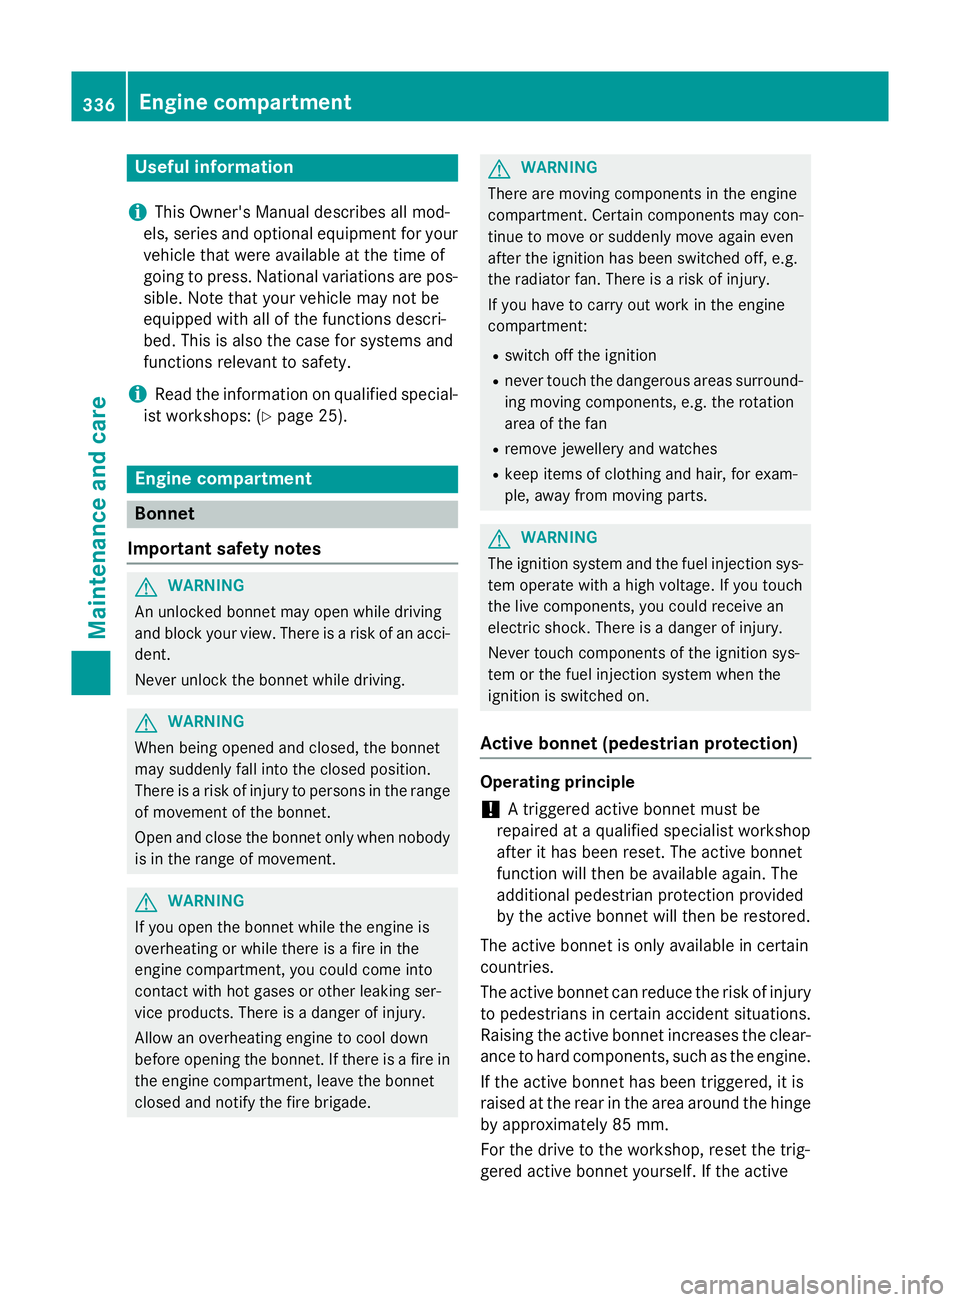
The infrared reflecting glass prevents the
vehicle interior from becoming too hot. It also
blocks radio waves up into the gigahertz
range.
In order to operate radio-controlled equip-
ment, e.g. toll systems, areas :on the wind-
screen are permeable to radio waves. You can install radio-controlled devices in these
areas. These areas can best be seen from outside
the vehicle by observing the light reflected off
the windscreen. Retrofitted anti-glare film
Retrofitted anti-glare film on the inside of the windows can interfere with radio/mobile
telephone reception. This is particularly the
case for conductive or metallic-coated films.
You can obtain information about anti-glare
film from a qualified specialist workshop. 334
FeaturesSto
wing an d features
Page 339 of 413
Useful information
i This Owner's Manual describes all mod-
els, series and optional equipment for your
vehicle that were available at the time of
going to press. National variations are pos- sible. Note that your vehicle may not be
equipped with all of the functions descri-
bed. This is also the case for systems and
functions relevant to safety.
i Read the information on qualified special-
ist workshops: (Y page 25). Engine compartment
Bonnet
Important safety notes G
WARNING
An unlocked bonnet may open while driving
and block your view. There is a risk of an acci- dent.
Never unlock the bonnet while driving. G
WARNING
When being opened and closed, the bonnet
may suddenly fall into the closed position.
There is a risk of injury to persons in the range of movement of the bonnet.
Open and close the bonnet only when nobody
is in the range of movement. G
WARNING
If you open the bonnet while the engine is
overheating or while there is a fire in the
engine compartment, you could come into
contact with hot gases or other leaking ser-
vice products. There is a danger of injury.
Allow an overheating engine to cool down
before opening the bonnet. If there is a fire in the engine compartment, leave the bonnet
closed and notify the fire brigade. G
WARNING
There are moving components in the engine
compartment. Certain components may con-
tinue to move or suddenly move again even
after the ignition has been switched off, e.g.
the radiator fan. There is a risk of injury.
If you have to carry out work in the engine
compartment:
R switch off the ignition
R never touch the dangerous areas surround-
ing moving components, e.g. the rotation
area of the fan
R remove jewellery and watches
R keep items of clothing and hair, for exam-
ple, away from moving parts. G
WARNING
The ignition system and the fuel injection sys- tem operate with a high voltage. If you touch
the live components, you could receive an
electric shock. There is a danger of injury.
Never touch components of the ignition sys-
tem or the fuel injection system when the
ignition is switched on.
Active bonnet (pedestrian protection) Operating principle
! A triggered active bonnet must be
repaired at a qualified specialist workshop
after it has been reset. The active bonnet
function will then be available again. The
additional pedestrian protection provided
by the active bonnet will then be restored.
The active bonnet is only available in certain
countries.
The active bonnet can reduce the risk of injury to pedestrians in certain accident situations.
Raising the active bonnet increases the clear- ance to hard components, such as the engine.
If the active bonnet has been triggered, it is
raised at the rear in the area around the hinge
by approximately 85 mm.
For the drive to the workshop, reset the trig-
gered active bonnet yourself. If the active 336
Engine compartmentMaintenance and care
Page 342 of 413
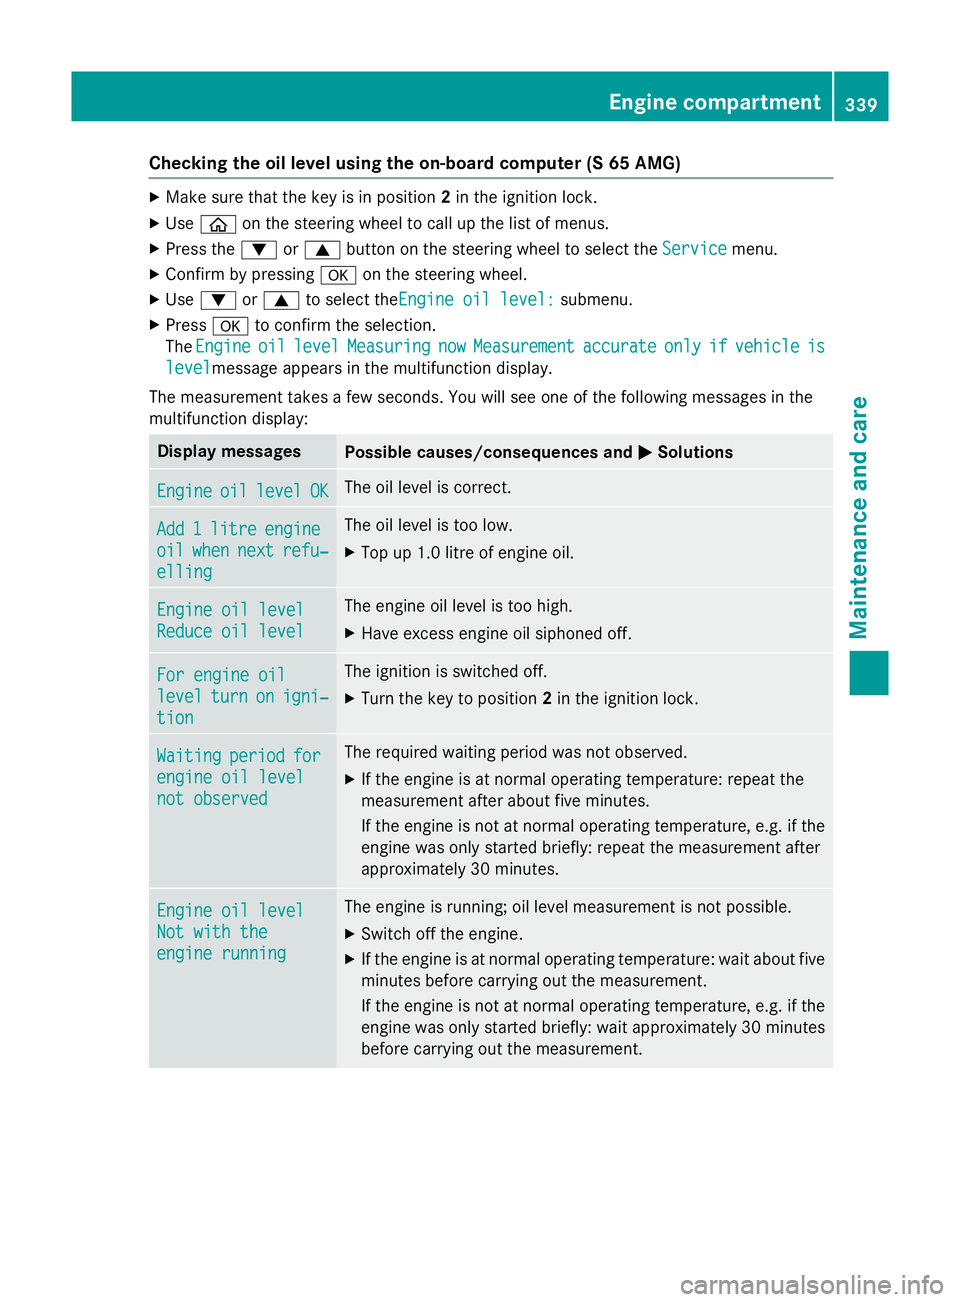
Checking the oil level using the on-board computer (S 65 AMG)
X
Make sure that the key is in position 2in the ignition lock.
X Use ò on the steering wheel to call up the list of menus.
X Press the :or9 button on the steering wheel to select the Service
Service menu.
X Confirm by pressing aon the steering wheel.
X Use : or9 to select theEngine oil level: Engine oil level: submenu.
X Press ato confirm the selection.
The Engine
Engine oil
oillevel
level Measuring
Measuring now
nowMeasurement
Measurement accurate
accurateonly
onlyif
ifvehicle
vehicle is
is
level
levelmessage appears in the multifunction display.
The measurement takes a few seconds. You will see one of the following messages in the
multifunction display: Display messages
Possible causes/consequences and
M
MSolutions Engine
Engine
oil
oillevel
level OK
OK The oil level is correct.
Add
Add
1
1litre
litre engine
engine
oil
oil when
when next
next refu‐
refu‐
elling
elling The oil level is too low.
X Top up 1.0 litre of engine oil. Engine oil level
Engine oil level
Reduce oil level Reduce oil level The engine oil level is too high.
X Have excess engine oil siphoned off. For engine oil
For engine oil
level level
turn
turnon
onigni‐
igni‐
tion
tion The ignition is switched off.
X Turn the key to position 2in the ignition lock. Waiting
Waiting
period
periodfor
for
engine oil level
engine oil level
not observed not observed The required waiting period was not observed.
X If the engine is at normal operating temperature: repeat the
measurement after about five minutes.
If the engine is not at normal operating temperature, e.g. if the
engine was only started briefly: repeat the measurement after
approximately 30 minutes. Engine oil level Engine oil level
Not with the Not with the
engine running engine running The engine is running; oil level measurement is not possible.
X Switch off the engine.
X If the engine is at normal operating temperature: wait about five
minutes before carrying out the measurement.
If the engine is not at normal operating temperature, e.g. if theengine was only started briefly: wait approximately 30 minutes before carrying out the measurement. Engine compartment
339Maintenance and care Z
Page 343 of 413
Adding engine oil
G
WARNING
Certain components in the engine compart-
ment could be very hot, e.g. the engine, the
radiator and parts of the exhaust system.
There is a risk of injury when accessing the
engine compartment.
As far as possible, allow the engine to cool
down and only touch the components descri- bed in the following. G
WARNING
If engine oil comes into contact with hot com- ponents in the engine compartment, it may
ignite. There is a risk of fire and injury.
Make sure that engine oil does not spill out
over the filler neck. Allow the engine to cool
down and thoroughly clean the components
that have come into contact with engine oil
before you start the engine. H
Environmental note
When topping up the oil, take care not to spill
any. If oil enters the soil or waterways, it is
harmful to the environment.
! Only use engine oils and oil filters that
have been approved for vehicles with a ser-
vice system. You can obtain a list of the
engine oils and oil filters tested and
approved in accordance with the
Mercedes-Benz Specifications for Service
Products at any Mercedes-Benz Service
Centre.
Damage to the engine or exhaust system is caused by the following:
R using engine oils and oil filters that have
not been specifically approved for the
service system
R changing the engine oil and oil filter after
missing the change interval required by
the service system
R using engine oil additives
! Do not add too much oil. Topping up with
too much engine oil can result in damage to the engine or to the catalytic converter.
Have excess engine oil siphoned off.
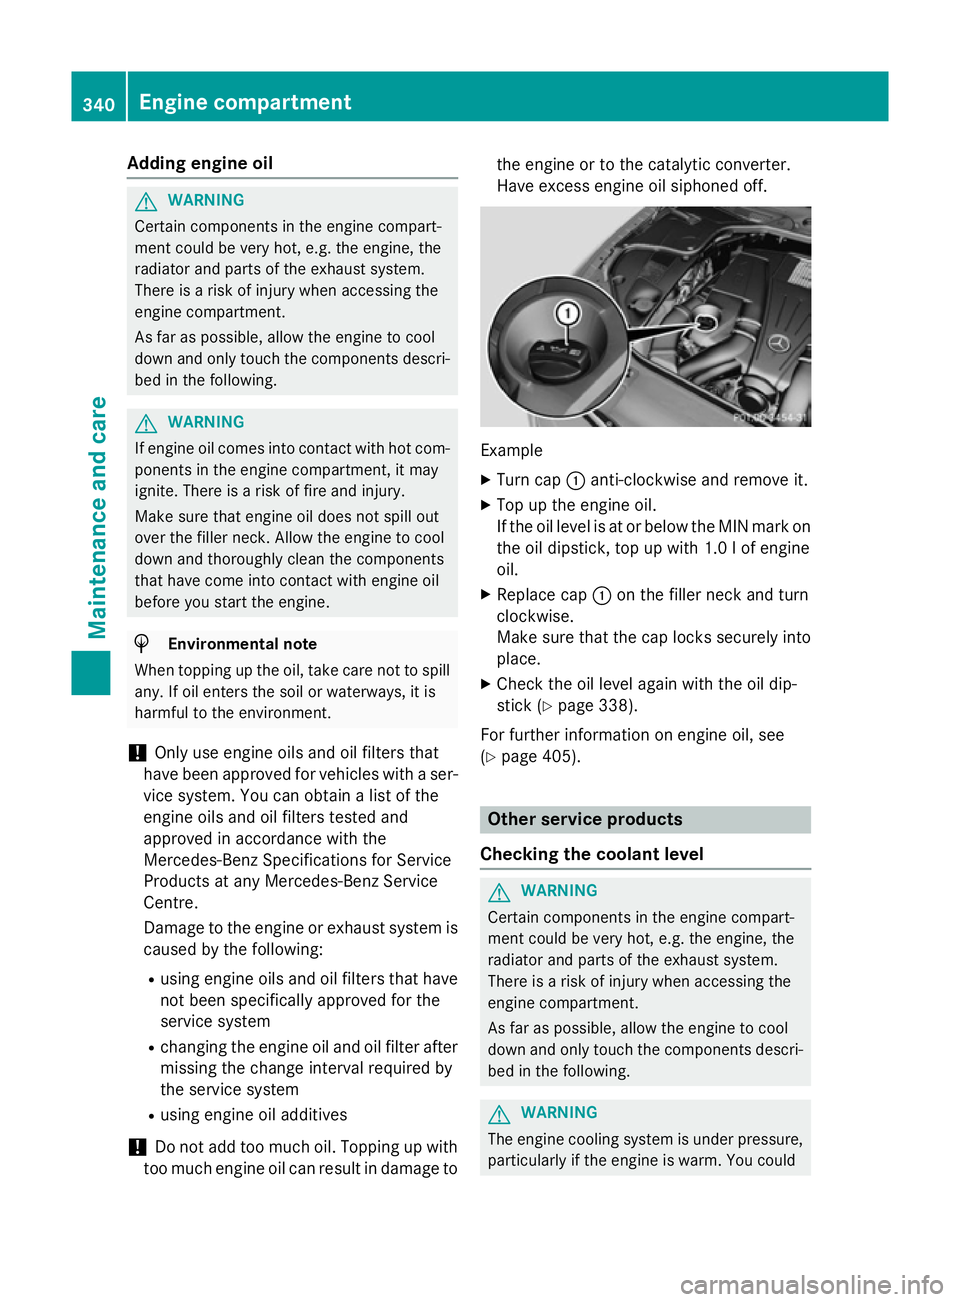
Example
X Turn cap :anti-clockwise and remove it.
X Top up the engine oil.
If the oil level is at or below the MIN mark on
the oil dipstick, top up with 1.0 l of engine
oil.
X Replace cap :on the filler neck and turn
clockwise.
Make sure that the cap locks securely into place.
X Check the oil level again with the oil dip-
stick (Y page 338).
For further information on engine oil, see
(Y page 405). Other service products
Checking the coolant level G
WARNING
Certain components in the engine compart-
ment could be very hot, e.g. the engine, the
radiator and parts of the exhaust system.
There is a risk of injury when accessing the
engine compartment.
As far as possible, allow the engine to cool
down and only touch the components descri- bed in the following. G
WARNING
The engine cooling system is under pressure, particularly if the engine is warm. You could 340
Engine compartmentMaintenance and care
Page 344 of 413
be scalded by hot coolant spraying out when
opening the cap. There is a danger of injury.
Allow the engine to cool before opening the
cap. Wear gloves and protective eyewear
when opening. Slowly turn the cap half a turn to allow pressure to escape. X
Park the vehicle on a level surface.
Only check the coolant level if the vehicle is on a level surface and the engine has
cooled down.
X Turn the key to position 2in the ignition
lock (Y page 159).
or
X Press the Start/Stop button twice
(Y page 159).
X Check the coolant temperature display in
the instrument cluster.
The coolant temperature must be below
70 †.
X Turn the key to position 0in the ignition
lock (Y page 159).
or
X Remove the Start/Stop button from the
ignition lock (Y page 159).
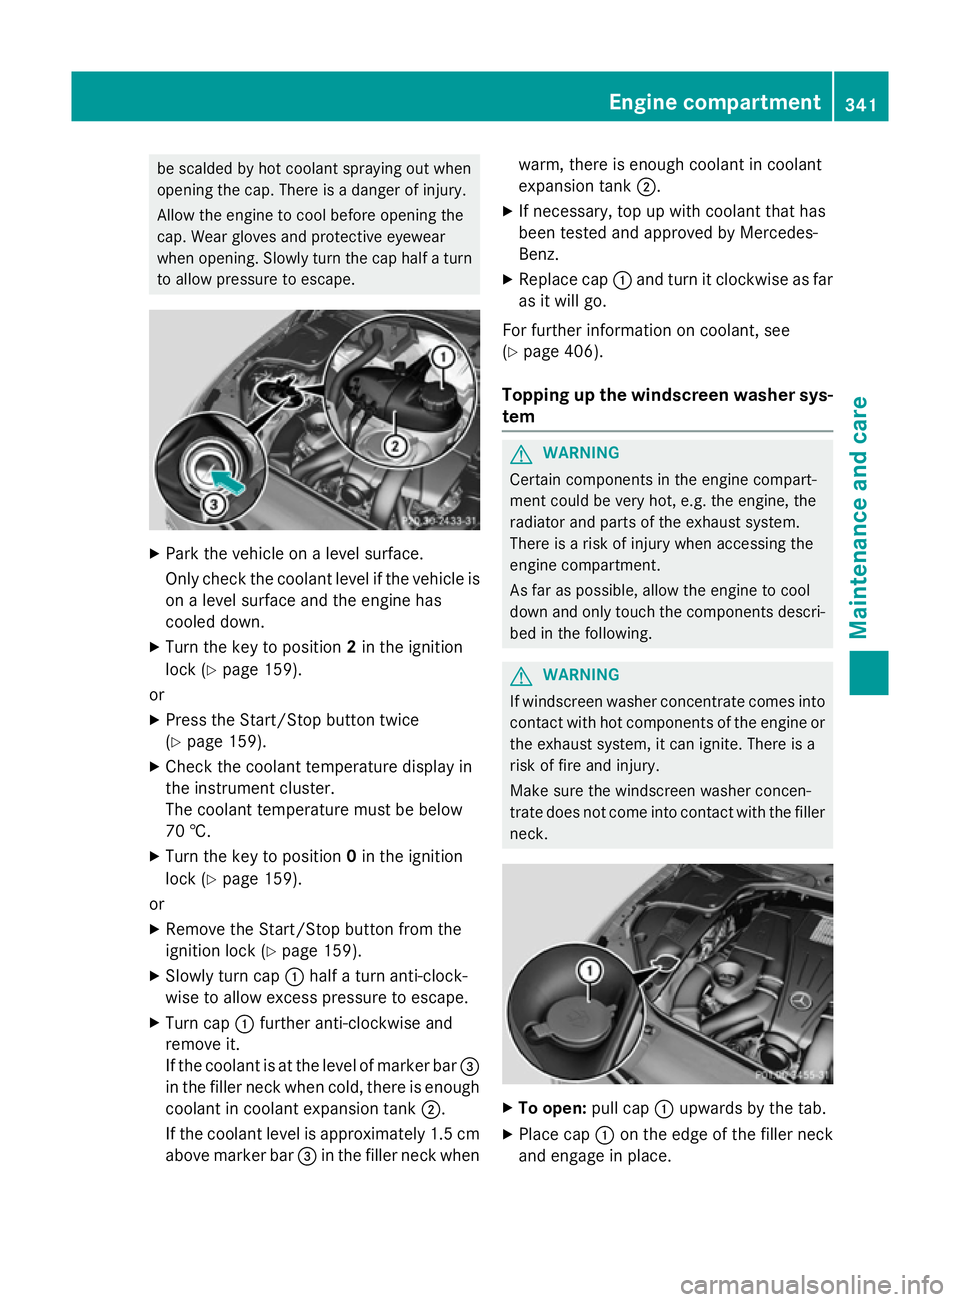
X Slowly turn cap :half a turn anti-clock-
wise to allow excess pressure to escape.
X Turn cap :further anti-clockwise and
remove it.
If the coolant is at the level of marker bar =
in the filler neck when cold, there is enough coolant in coolant expansion tank ;.
If the coolant level is approximately 1.5 cm above marker bar =in the filler neck when warm, there is enough coolant in coolant
expansion tank ;.
X If necessary, top up with coolant that has
been tested and approved by Mercedes-
Benz.
X Replace cap :and turn it clockwise as far
as it will go.
For further information on coolant, see
(Y page 406).
Topping up the windscreen washer sys-
tem G
WARNING
Certain components in the engine compart-
ment could be very hot, e.g. the engine, the
radiator and parts of the exhaust system.
There is a risk of injury when accessing the
engine compartment.
As far as possible, allow the engine to cool
down and only touch the components descri- bed in the following. G
WARNING
If windscreen washer concentrate comes into contact with hot components of the engine or
the exhaust system, it can ignite. There is a
risk of fire and injury.
Make sure the windscreen washer concen-
trate does not come into contact with the filler neck. X
To open: pull cap:upwards by the tab.
X Place cap :on the edge of the filler neck
and engage in place. Engine compartment
341Maintenance and care Z
Page 347 of 413
After washing the vehicle, brake carefully
while paying attention to the traffic conditions in order to restore full braking efficiency.
! If DISTRONIC PLUS or the HOLD function
is activated, the vehicle brakes automati-
cally in certain situations. To prevent dam-
age to the vehicle, deactivate DISTRONIC
PLUS and the HOLD function in the follow-
ing or other similar situations:
R when towing the vehicle
R in the car wash
! Make sure:
R the side windows are closed completely.
R the blower for the ventilation/heating is
switched off (OFF button is depressed).
R the windscreen wiper switch is at posi-
tion 0.
R the 360° camera or reversing camera is
switched off.
The vehicle could otherwise be damaged.
! If the key is within the rear detection
range of KEYLESS-GO, the following situa-
tions, for example, could lead to the boot lid opening unintentionally:
R using a car wash
R using a high-pressure cleaner
Make sure that the key is at least 3 m away from the vehicle.
! Make sure that the automatic transmis-
sion is in neutral position Nwhen washing
your vehicle in a tow-through car wash. The
vehicle may otherwise be damaged.
R Operating with the key:
Do not remove the key from the ignition
lock. Do not open the driver's door when the engine is switched off or at very low
speeds. Otherwise, when in transmission position Dor Rthe automatic transmis-
sion will automatically switch to park
position Pand block the wheels.
R Operating with the Start/Stop button: Do not open the driver's door when the
engine is switched off or at very low
speeds. Otherwise, when in transmission
position Dor Rthe automatic transmis-
sion will automatically switch to park
position Pand block the wheels.
Observe the following to make sure that the
automatic transmission stays in position N
neutral:
Operating with the key:
X Make sure the ignition is switched on
X Make sure that the vehicle is stationary.
X Depress and hold the brake pedal.
X Select neutral N.
X Release the brake pedal.
X Release the electric parking brake, if nec-
essary.
X Switch off the ignition and leave the key in
the ignition lock.
Operating with the Start/Stop button:
X Make sure the ignition is switched on
X Make sure that the vehicle is stationary.
X Depress and hold the brake pedal.
X Engage park position P
X Release the brake pedal.
X Remove the Start/Stop button from the
ignition lock (Y page 159).
X Insert the key into the ignition lock.
X Switch on the ignition
X Depress and hold the brake pedal.
X Select neutral N.
X Release the brake pedal.
X Release the electric parking brake, if nec-
essary.
X Switch off the ignition and leave the key in
the ignition lock.
You can wash the vehicle in an automatic car
wash from the very start.
Wash off excess dirt before cleaning the vehi-
cle in an automatic car wash.
After using an automatic car wash, wipe off
wax from the windscreen and the wiper 344
CareMaintenance and care
Page 351 of 413
X
Make sure that the vehicle is stationary and
that the key is in position 2in the ignition
lock.
X To open the cover of the reversing cam-
era: with COMAND Online activated, call up
the vehicle menu: press the Ñbutton.
X To switch to the menu bar: slide ¬the
controller.
X To select System settings
System settings: turn and
press the controller.
X To select Reversing camera
Reversing camera: turn and
press the controller.
X To select Open camera cover
Open camera cover: turn and
press the controller.
The reversing camera cover opens.
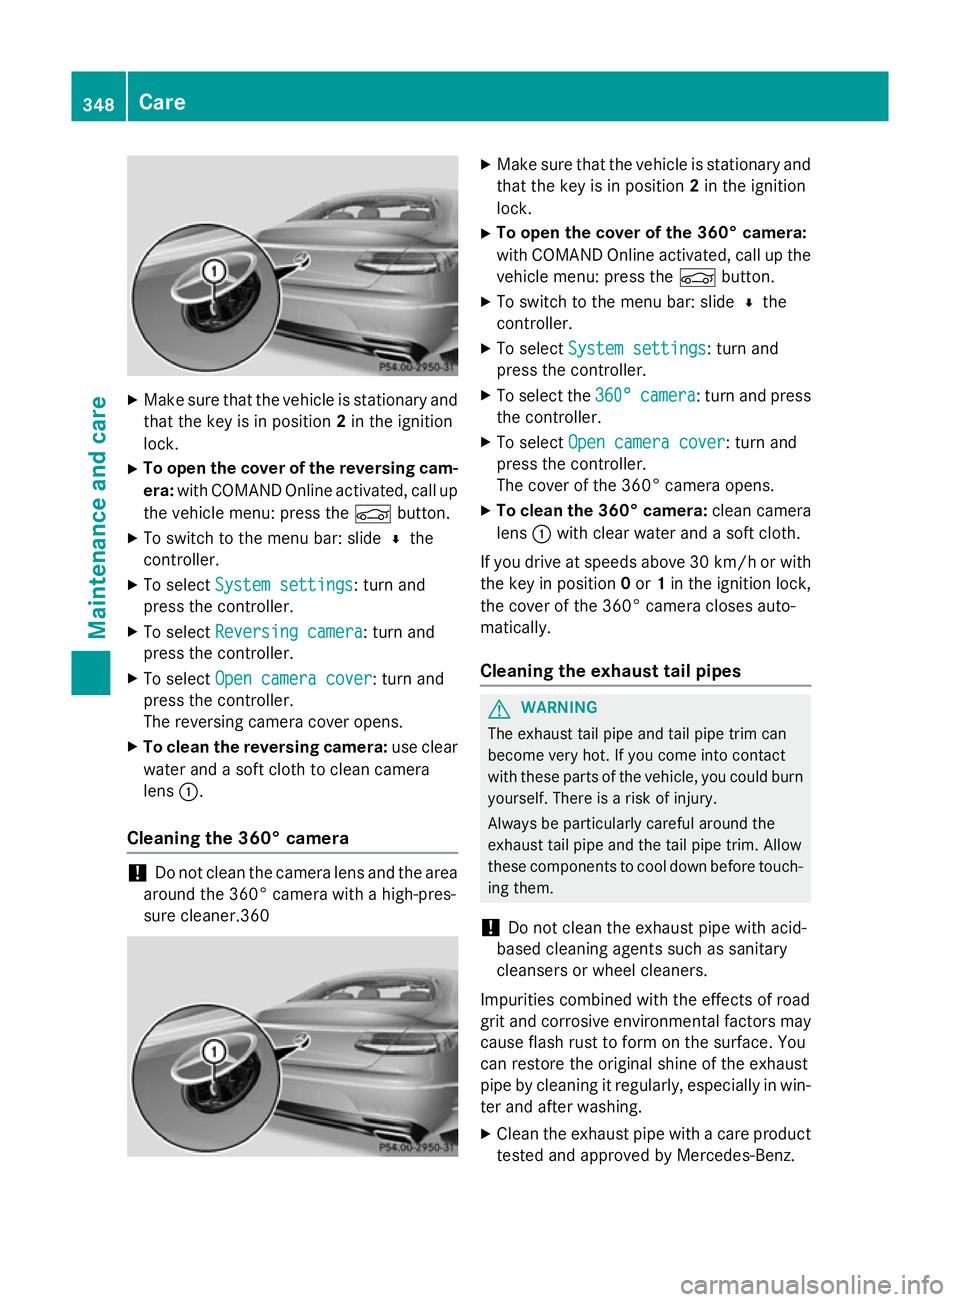
X To clean the reversing camera: use clear
water and a soft cloth to clean camera
lens :.
Cleaning the 360° camera !
Do not clean the camera lens and the area
around the 360° camera with a high-pres-
sure cleaner.360 X
Make sure that the vehicle is stationary and
that the key is in position 2in the ignition
lock.
X To open the cover of the 360° camera:
with COMAND Online activated, call up the
vehicle menu: press the Ñbutton.
X To switch to the menu bar: slide ¬the
controller.
X To select System settings System settings: turn and
press the controller.
X To select the 360°
360°camera
camera: turn and press
the controller.
X To select Open camera cover
Open camera cover: turn and
press the controller.
The cover of the 360° camera opens.
X To clean the 360° camera: clean camera
lens :with clear water and a soft cloth.
If you drive at speeds above 30 km/h or with the key in position 0or 1in the ignition lock,
the cover of the 360° camera closes auto-
matically.
Cleaning the exhaust tail pipes G
WARNING
The exhaust tail pipe and tail pipe trim can
become very hot. If you come into contact
with these parts of the vehicle, you could burn
yourself. There is a risk of injury.
Always be particularly careful around the
exhaust tail pipe and the tail pipe trim. Allow
these components to cool down before touch-
ing them.
! Do not clean the exhaust pipe with acid-
based cleaning agents such as sanitary
cleansers or wheel cleaners.
Impurities combined with the effects of road
grit and corrosive environmental factors may cause flash rust to form on the surface. You
can restore the original shine of the exhaust
pipe by cleaning it regularly, especially in win- ter and after washing.
X Clean the exhaust pipe with a care product
tested and approved by Mercedes-Benz. 348
CareMaintenance and care