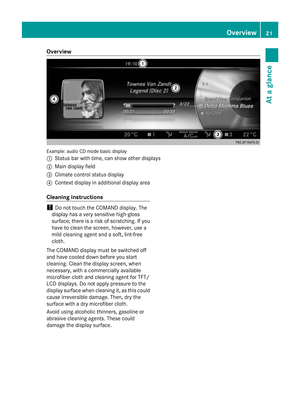
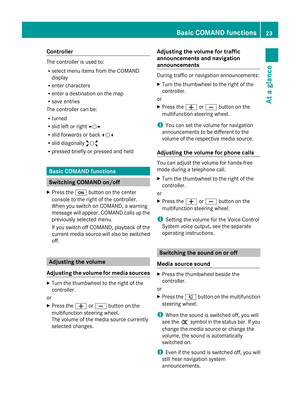
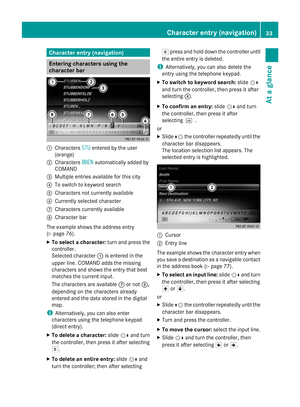
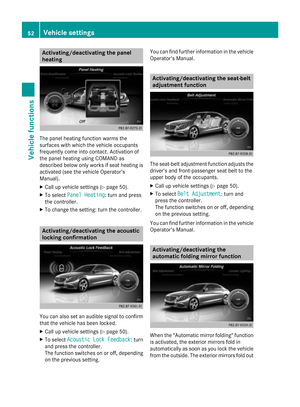
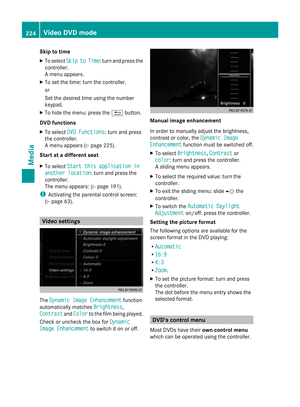
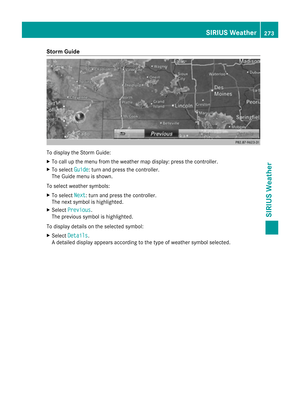
Page 249 of 278

Selecting the screen for the
headphones
X
Move push slider 0043toL(left-hand screen)
or R(right-hand screen).
Connecting additional headphones Up to two cordless headphones can be used
at the same time for each screen.
You can also connect one additional set of
corded headphones to each of the two rear-
compartment screens (Y page 241). The
socket is designed for headphones with a
3.5 mm stereo jack plug and an impedance
of 32 ohms. Replacing batteries
Notes G
WARNING
Batteries contain toxic and corrosive
substances. If batteries are swallowed, it can
result in severe health problems. There is a
risk of fatal injury.
Keep batteries out of the reach of children. If
a battery is swallowed, seek medical attention
immediately. H
Environmental note Batteries contain dangerous
substances. It is against the
law to dispose of them with
the household rubbish. They
must be collected separately
and recycled to protect the
environment.
Dispose of batteries in an
environmentally friendly
manner. Take discharged
batteries to a qualified
specialist workshop or a
special collection point for
used batteries.
Batteries are required for the remote control
and for the two sets of cordless headphones.
The batteries can be replaced. H
Environmental note
Dispose of discharged batteries in an
environmentally responsible manner.
Replacing the batteries of the remote
control 0043
Battery compartment
0044 Catch tab
0087 Battery compartment cover Rear Seat Entertainment System overview
247Rear Seat Entertainment System Z
Page 250 of 278

0085
Retaining lugs
0083 Batteries
The remote control contains two type AAA,
1.5 V batteries.
X To open the battery compartment:
remove battery compartment cover 0087on
the back of the remote control.
X Push catch tab 0044down and take off
battery compartment cover 0087.
X Remove discharged batteries 0083from the
tray.
X Insert the new batteries. Observe the
polarity markings on the batteries and
battery compartment when doing so.
Left-hand battery: the positive pole (+)
must face upwards.
Right-hand battery: the positive pole (+)
must face downwards.
X To close the battery compartment:
insert battery compartment cover 0087
starting with retaining lugs 0085into the
battery compartment and allow catch
tab 0044to engage in place.
Replacing cordless headphone
batteries The battery compartment is located on the
left headphone. The cordless headphones
require two type AAA, 1.5 V batteries.
X To open the battery compartment: turn
battery compartment cover 0043in a
clockwise direction and remove.
X Remove the discharged batteries from the
tray.
X Insert the new batteries. Observe the
polarity markings on the batteries and
battery tray when doing so.
X To close the battery compartment:
replace battery housing cover 0043and turn
it counter-clockwise until it engages.
If the batteries have been inserted
correctly, the indicator lamp will light up
green when the headphones are switched
on.
i The operating duration of the headphones
with a set of batteries is up to 40 hours. System settings
Note
You can adjust all system settings individually
for each screen without affecting the other
screen. To do this, please use the remote
control (Y page 241). Selecting the display language
X Select Vehicle Vehicle using the
006300640059 buttons on the
remote control and press the 008Bbutton to
confirm.
X Press the 0064button on the remote
control.
A menu appears.
X Select System Settings System Settings using the0064
00590065 buttons on the remote control
and press the 008Bbutton to confirm.
You see the system settings menu on the
selected rear screen. 248
System settingsRea
r Seat Entertainment System
Page 251 of 278

X
Select Language
Language using the00630064
buttons and press the 008Bbutton to confirm.
The list of languages appears. A 0036dot
indicates the current setting.
X Select the language using the 00630064
buttons and press the 008Bbutton to confirm.
The system activates the corresponding
language. Switching the display design
X Select Vehicle
Vehicle using the
006300640059 buttons on the
remote control and press the 008Bbutton to
confirm.
X Select System Settings
System Settings using the0064
00590065 buttons on the remote control
and press the 008Bbutton to confirm.
You see the system settings menu on the
selected rear screen.
X Select Display
Display using the 00630064
buttons on the remote control and press
the 008Bbutton to confirm.
X Select Day Mode
Day Mode, Night Mode Night Mode or
Automatic
Automatic using the00630064 buttons
and press the 008Bbutton to confirm.
The dot indicates the current setting. Design Explanation
Day Mode Day Mode The display is set
permanently to day
design. Night Mode
Night Mode The display is set
permanently to night
design. Automatic Automatic The display design
changes depending on
the vehicle instrument
cluster illumination. Setting the brightness
X Select Vehicle Vehicle using the
006300640059 buttons on the
remote control and press the 008Bbutton to
confirm.
X Select System Settings
System Settings using the0064
00590065 buttons on the remote control
and press the 008Bbutton to confirm.
You see the system settings menu on the
selected rear screen.
X Select Display
Display using the 00630064
buttons on the remote control and press
the 008Bbutton to confirm.
X Select Brightness Brightness using the00630064
buttons and press the 008Bbutton to confirm.
A scale appears.
X Adjust the brightness using the 00630064
buttons and press the 008Bbutton to confirm.
The brightness bar moves up or down. The
picture becomes lighter or darker in
accordance with the scale. Showing/hiding the picture
X Select Vehicle Vehicle using the
006300640059 buttons on the
remote control and press the 008Bbutton to
confirm.
X Press button 0064on the remote control.
A menu appears.
X Select Display Off
Display Off using the
006300640059 buttons and press
the 008Bbutton to confirm.
X To display the picture: press the008B
button. Adjusting sound settings
You can select the sound settings in the radio,
audio CD/audio DVD/MP3, video DVD and
AUX modes. System settings
249Rear Seat Entertainment System Z
Page 252 of 278

X
Select a medium (e.g. audio CD mode)
(Y page 254).
X To show the menu: press the 0064button
on the remote control.
X Select Sound
Soundusing the 006400590065
buttons on the remote control and press
the 008Bbutton to confirm.
X Select Treble
Treble ,Mid
Mid orBass
Bass using
the 006400590065 buttons on the remote
control and press the 008Bbutton to confirm.
X Select the desired setting using the
selector wheel on the remote control.
X To exit the menu: press the 0038button on
the remote control. Picture settings
Overview You can select the picture settings in video
DVD and AUX mode.
Adjusting the brightness, contrast and
color X
Switch on video DVD mode ( Ypage 256).
X To show the menu: press the008Bbutton
on the remote control.
X Select 00E2using the 00590065buttons
and press the 008Bto confirm.
A menu appears. X
Select Options
Options using the 006400590065
buttons and press the 008Bbutton to confirm.
X Select Video Settings Video Settings using
the 006400590065 buttons and press the
008B button to confirm.
X Select Brightness Brightness, Contrast ContrastorColor
Color
using the 00630064 buttons and press the
008B button to confirm.
An adjustment scale appears.
X Select the setting using the 00630064
buttons and press the 008Bbutton to confirm. Changing the picture format
X Switch on video DVD mode (Y page 256).
X To show the menu: press the008Bbutton
on the remote control.
X Select 00E2using the 00590065buttons
and press the 008Bto confirm.
A menu appears.
X Select Options
Options using the 006400590065
buttons and press the 008Bbutton to confirm.
X Select Video Settings
Video Settings using
the 006400590065 buttons and press the
008B button to confirm.
The dot in front of one of the menu items
16:9 16:9 or4:3
4:3 indicates the format currently
selected.
X Select the format using the 00630064
buttons and press the 008Bbutton to confirm. Vehicle settings
Changing vehicle settings
You can change the vehicle settings from the
rear compartment.
You can make the following changes:
R Extend seat heating to switch the arm rest
panel heating in the rear compartment on/
off
R Seat settings 250
Vehicle settingsRear Seat Entertainment System
Page 253 of 278

X
Changing vehicle settings: select
Vehicle
Vehicle using the 006300590065 buttons
on the remote control and press the 008B
button to confirm.
You will see a menu with the available
vehicle functions.
X Select Vehicle Settings
Vehicle Settings orSeat Seat
Settings
Settings using the buttons 00590065.
X Press button 008Bon the remote control.
Further information on seat settings
(Y page 55).
Further information on panel heating
(Y page 52).
i The panel heating in the rear
compartment is available if the key in the
ignition lock is in position 1or 2. Navitainment
Navigation mode
Navigation functions such as the compass
can be used in the rear compartment.
Calling up Drive Information
X Press the 00BEbutton on the remote
control.
You will see the current navigation
information. Calling up the compass
X
Press the 00BEbutton on the remote
control.
X Press the 0064button on the remote
control.
A menu appears.
X Using the remote control, select Menu Menu.
X Using the remote control, select Compass
Compass.
Calling up the online map display
i An Internet connection is required to use
the online map display (Y page 158).
X Press the 00BEbutton on the remote
control.
X Press the 0064button on the remote
control.
A menu appears.
X Using the remote control, select Menu Menu.
X Using the remote control, select Online
Online
Map Display
Map Display. Online and Internet functions
You can use online and Internet functions in
the rear compartment.
Internet conditions for access (Y page 158).
Options for online and Internet functions
(Y page 166).
You can choose from the following Internet
functions:
R Weather
R Internet
R Mercedes-Benz Apps
R Internet radio
R Mercedes-Benz Mobile Website
Using Internet functions:
X Press button 00A7on the remote control.
A menu appears.
X Select the online/Internet function
required. Online and Internet functions
251Rear Seat Entertainment System Z
Page 254 of 278

Calling up the Internet functions menu:
X Press the 0038button on the remote
control while using the Internet function.
Exiting the Internet functions:
X Press the 0038button on the remote
control.
A menu appears.
X Select the 00D0symbol in the menu and
press the 008Bbutton on the remote control
to confirm.
or
X Select another function (e.g. Media or
Radio).
Further information on using online and
Internet functions (Y page 158).Radio mode
Switching to radio mode
X Press button 002Aon the remote control.
Radio mode starts.
Further information on radio mode
(Y page 178). Media mode
Activating media mode
There are several ways to activate media
sources using COMAND.
The relevant sections of the Operator's
Manual describe the simplest way to activate
a media source.
This section describes all options for
activating media sources. Using the MEDIA button
X Press button 00FDon the remote control.
The menu for the last accessed media
source appears.
X To select the media source: keep
pressing the 00FDbutton on the remote control until the required media source has
been set.
If playable music files are found, they will
be played by COMAND. Switching on automatically
If COMAND is only active at one operating
position in the rear compartment, the
respective medium will switch on
automatically once connected/inserted.
If a media function is already switched on in
COMAND, this will be interrupted and the
basic display of the newly connected/
inserted medium will appear.
If COMAND is being operated in another
function, such as navigation, when an
external media source is connected/
inserted, the basic display will not change.
Only the music from the newly connected
data carrier will play. Starting media playback using the
main function bar
X
To show the menu: press the 0063button
on the remote control.
X Select Media Mediausing the 00590065 buttons
on the remote control and press the 008B
button to confirm. 252
Media modeRear Seat Entertainment System
Page 255 of 278

X
To select the media source: turn the
selector wheel on the remote control.
or
X Press the 00590065 button on the remote
control.
The menu appears with the available media
sources.
X Press button 008Bon the remote control.
If the disc contains music or video files,
these will be played. The corresponding
basic menu will be shown. Starting media using the device list
X
Press button 00FDon the remote control.
X To show the menu: press the 0064button
on the remote control.
X Using the 006400590065 buttons on the
remote control, select Devices
Devices.
The discs/devices available are shown. The
0036 dot indicates the current setting.
X Select the device/disc using the 0064
0063 buttons and press the 008Bbutton to
confirm.
If the device/disc contains music or video
files, these will be played. Music search
The media source has already been
selected: X
Press button 0064on the remote control.
The menu is shown.
X Select Search
Search using the 00590065 buttons
on the remote control and press the 008B
button to confirm.
The media source has not been selected
yet:
X To select the media source: keep pressing
the 00FD button on the remote control until
the desired media source has been set.
X Press button 0064on the remote control.
The menu is shown.
X Select Search
Search using the 00590065 buttons
on the remote control and press the 008B
button to confirm.
Further information on the music search
(Y page 200). Audio/video mode
Important safety notes
G
WARNING
The CD/DVD drive is a class 1 laser product.
If you open the CD/DVD drive housing, you
could be exposed to invisible laser radiation.
This laser radiation could damage your retina.
There is a risk of injury.
Never open the housing. Always have
maintenance and repair work carried out at a
qualified specialist workshop. General notes
You will find information on the following
topics in the Audio section:
R notes on CDs/DVDs (Y page 200)
R notes on MP3 mode (Y page 199)
R notes on copyright (Y page 200) Audio/video mode
253Rear Seat Entertainment System Z
Page 256 of 278

Inserting a CD/DVD
0043
Disc slot
0044 Disc eject button
Depending on the vehicle model and
equipment level, the CD/DVD drive is found:
R at the rear of the center console under the
automatic climate control panel or
R between the parcel shelf and skibag.
The CD/DVD drive is a single disc drive. If
there is already a disc inserted, this must be
ejected before another is inserted.
X Insert a disc into the disc slot.
The printed side of the disc must face
upwards. If neither side of the disc is
printed, the side you wish to play must face
downwards.
The CD/DVD drive draws in the disc.
The CD/DVD drive plays the disc:
R if it has been inserted correctly and is a
permissible disc, and
R once you have activated disc mode.
Data on an MP3 CD first needs to be loaded
by the drive. Loading may take some time,
depending on the number of folders and
tracks. Switching to audio/video mode
X Insert a CD/DVD (Y page 244).
The system loads the inserted disc and
starts playback.
or X
Select Media Mediausing the 006300590065
buttons on the remote control and press
the 008Bbutton to confirm.
X Select Disc Discusing the 00590065 buttons
and press the 008Bbutton to confirm.
The system plays the disc.
X Switching to other media: insert the
device into the corresponding jack (LINK).
The system searches for files on the device
that can be played back, and then plays
them. Selecting a track
Selecting by skipping to a track X
To skip forwards or backwards to a
track: press the 0059or0065 button on
the remote control.
or
X Press the 0048or0049 button.
The skip forward function skips to the next
track.
If the elapsed track time has exceeded 8
seconds, the function skips back to the
beginning of the track. If the elapsed time
is shorter, it will skip to the start of the
previous track.
If the Random Tracks Random Tracks orRandom Folder
Random Folder
playback option has been selected, the
track order is random.
Selecting by track list In audio CD mode, the track list contains all
tracks on the disc currently playing.
In MP3 mode, the track list shows all tracks
in the currently active folder as well as the
folder structure, allowing you to select any
track on the MP3 CD. 254
Audio/video modeRea
r Seat Entertainment System