2014 MERCEDES-BENZ GL tow
[x] Cancel search: towPage 388 of 462
Useful information
iThis Operator's Manual describes all
models and all standard and optional
equipment of your vehicle available at the
time of publication of the Operator's
Manual. Country-specific differences are
possible. Please note that your vehicle may
not be equipped with all features
described. This also applies to safety-
related systems and functions.
iRead the information on qualified
specialist workshops: (Ypage 28).
Where will I find...?
Vehicle tool kit
General notes
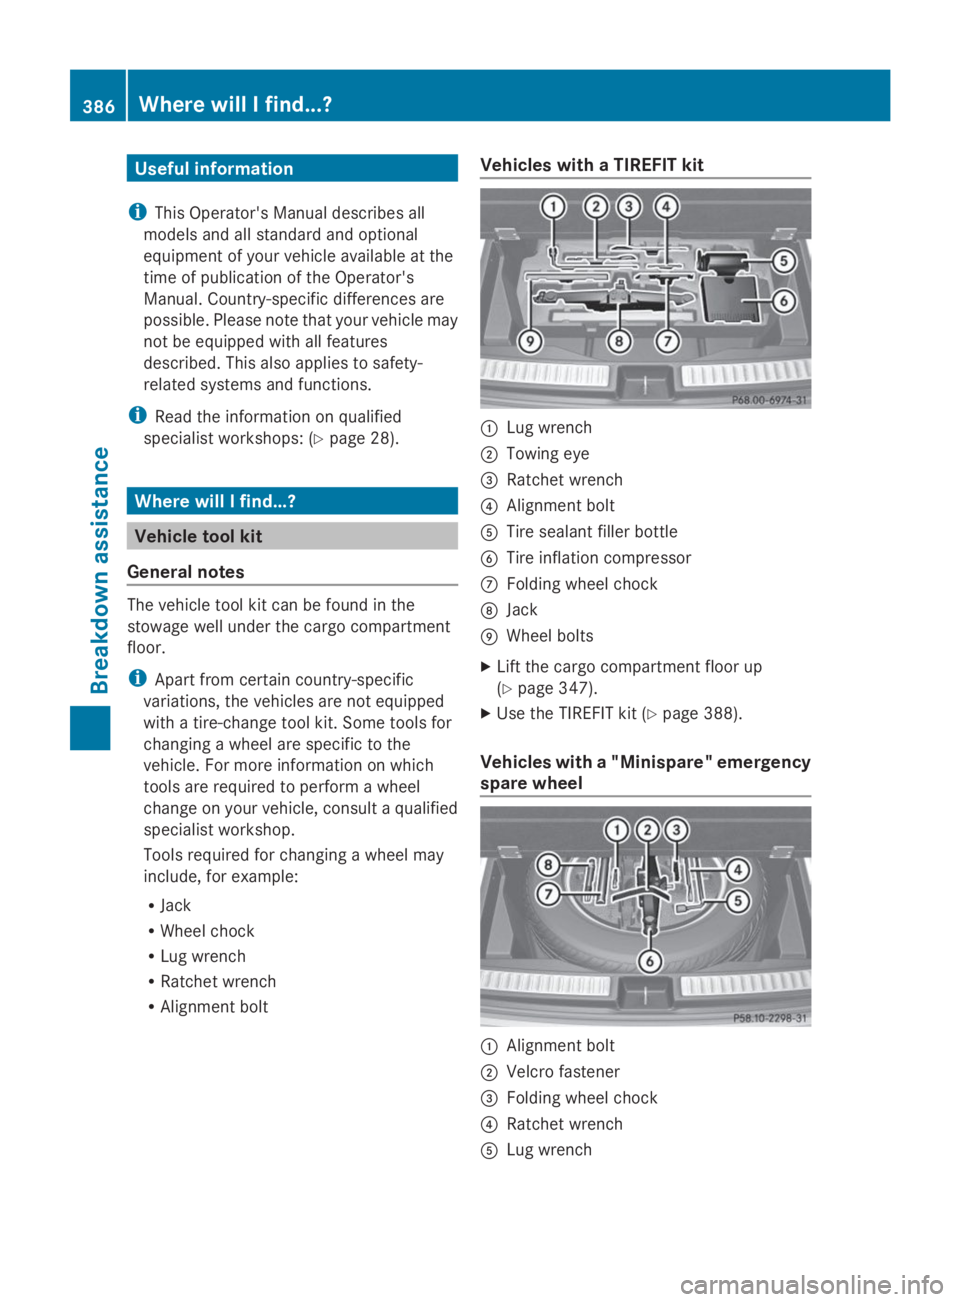
The vehicle tool kit can be found in the
stowage well under the cargo compartment
floor.
iApart from certain country-specific
variations, the vehicles are not equipped
with a tire-change tool kit. Some tools for
changing a wheel are specific to the
vehicle. For more information on which
tools are required to perform a wheel
change on your vehicle, consult a qualified
specialist workshop.
Tools required for changing a wheel may
include, for example:
RJack
RWheel chock
RLug wrench
RRatchet wrench
RAlignment bolt
Vehicles with a TIREFIT kit
�CLug wrench
�DTowing eye
�
Page 391 of 462
Do not drive the vehicle. Contact a qualified
specialist workshop.
GWARNING
The tire sealant is harmful and causes
irritation. It must not come into contact with
your skin, eyes or clothing or be swallowed.
Do not inhale TIREFIT fumes. Keep tire sealant
away from children. There is a risk of injury.
If you come into contact with the tire sealant,
observe the following:
RRinse off the tire sealant from your skin
immediately with water.
RIf the tire sealant comes into contact with
your eyes, immediately rinse them
thoroughly with clean water.
RIf tire sealant is swallowed, immediately
rinse your mouth out thoroughly and drink
plenty of water. Do not induce vomiting,
and seek medical attention immediately.
RImmediately change out of clothing which
has come into contact with tire sealant.
RIf an allergic reaction occurs, seek medical
attention immediately.
!Do not operate the tire inflation
compressor for longer than eight minutes
at a time without a break. It may otherwise
overheat.
The tire inflation compressor can be
operated again once it has cooled down.
Comply with the manufacturer’s safety
instructions on the sticker on the tire inflation
compressor.
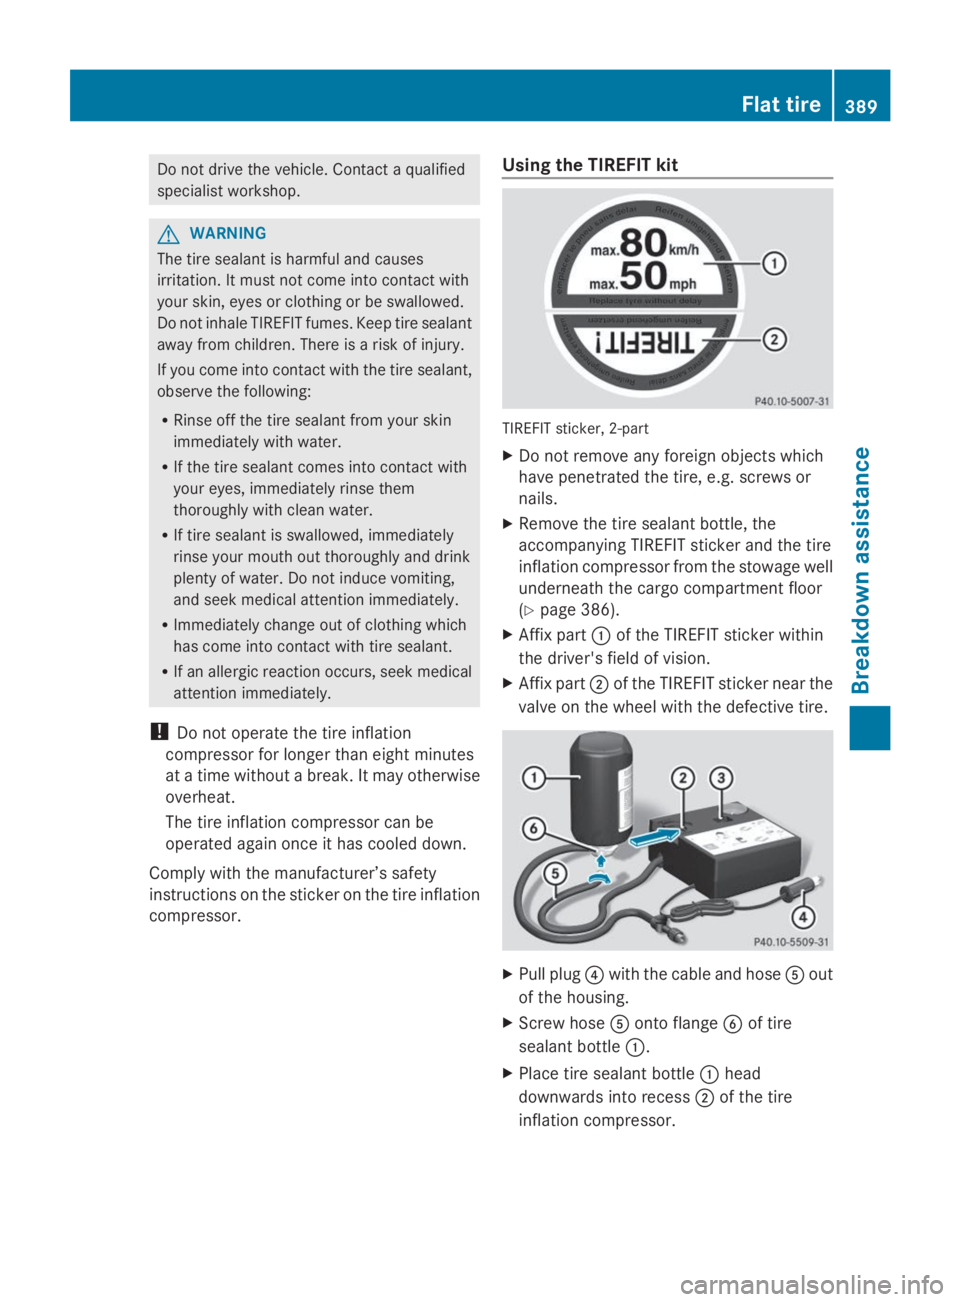
Using the TIREFIT kit
TIREFIT sticker, 2-part
XDo not remove any foreign objects which
have penetrated the tire, e.g. screws or
nails.
XRemove the tire sealant bottle, the
accompanying TIREFIT sticker and the tire
inflation compressor from the stowage well
underneath the cargo compartment floor
(Ypage 386).
XAffix part�Cof the TIREFIT sticker within
the driver's field of vision.
XAffix part�Dof the TIREFIT sticker near the
valve on the wheel with the defective tire.
XPull plug�
Page 393 of 462
If a tire pressure of 180 kPa(1.8 bar/26 psi)
has been attained after five minutes:
XSwitch off the tire inflation compressor.
XUnscrew the filler hose from the valve of
the faulty tire.
XStow the tire sealant bottle and the tire
inflation compressor.
XPull away immediately.
The maximum speed for a tire sealed with
tire sealant is 50 mph (80 km/h). The upper
part of the TIREFIT sticker must be affixed
to the instrument cluster in the driver's
field of vision.
XStop after driving for approximately ten
minutes and check the tire pressure with
the tire inflation compressor.
The tire pressure must now be at least
130 kPa (1.3 bar/19 psi).
GWARNING
If the required tire pressure is not reached
after driving for a short period, the tire is too
badly damaged. The tire sealant cannot repair
the tire in this instance. Damaged tires and a
tire pressure that is too low can significantly
impair the vehicle's braking and driving
characteristics. There is a risk of accident.
Do not continue driving. Contact a qualified
specialist workshop.
iIn cases such as the one mentioned
above, contact an authorized Mercedes-
Benz Center. Or call
1-800-FOR-MERCedes (in the USA) or
1-800-387-0100 (in Canada).
XCorrect the tire pressure if it is still at least
130 kPa(1.3 bar/19 psi). See the Tire and
Loading Information placard on the driver's
side B-pillaror the tire pressure table in the
fuel filler flap for values.
XTo increase the tire pressure:switch on
the tire inflation compressor.
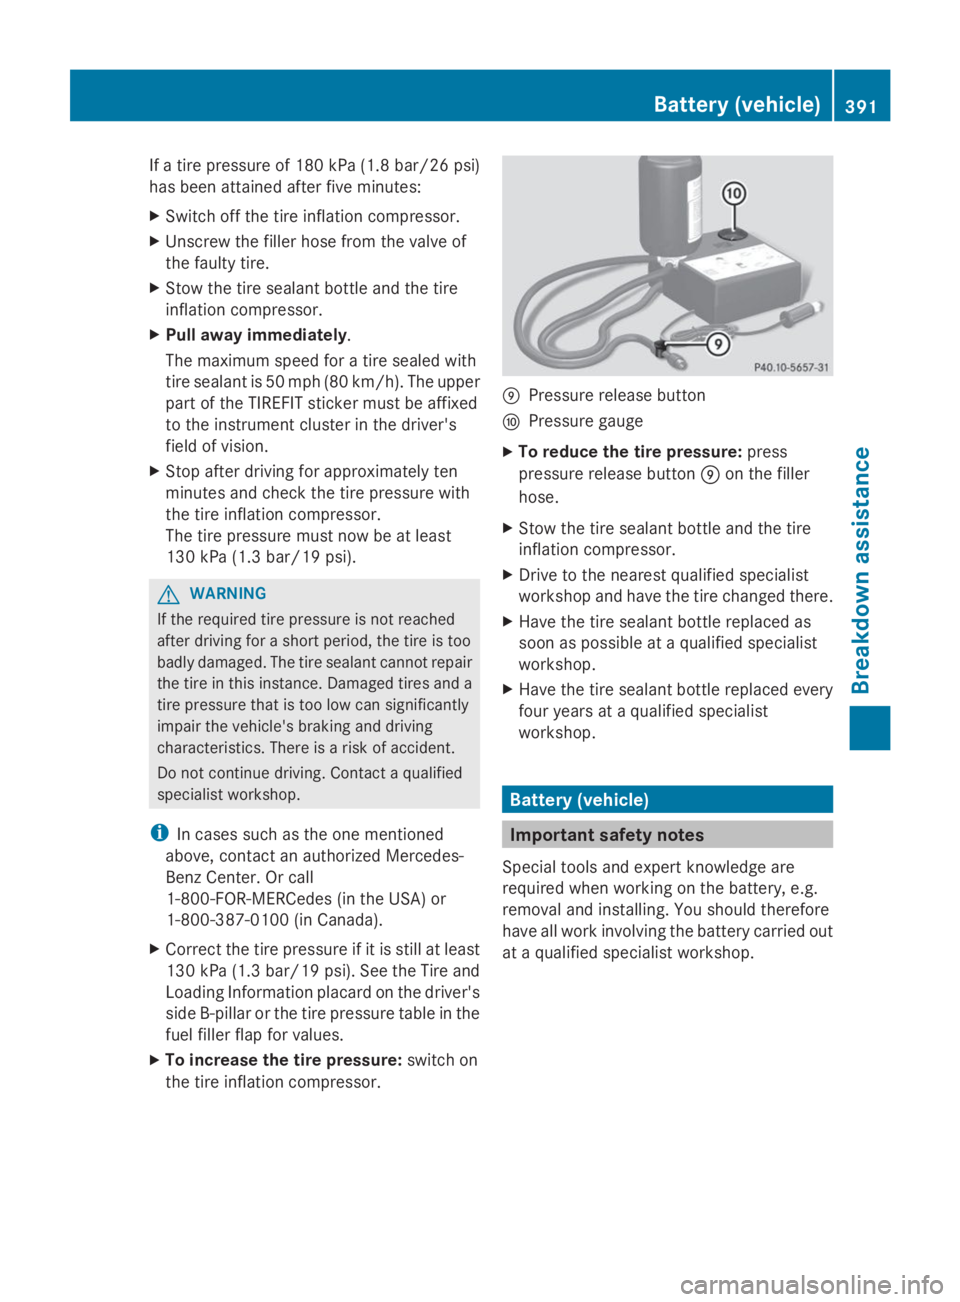
�mPressure release button
�nPressure gauge
XTo reduce the tire pressure:press
pressure release button�mon the filler
hose.
XStow the tire sealant bottle and the tire
inflation compressor.
XDrive to the nearest qualified specialist
workshop and have the tire changed there.
XHave the tire sealant bottle replaced as
soon as possible at a qualified specialist
workshop.
XHave the tire sealant bottle replaced every
four years at a qualified specialist
workshop.
Battery (vehicle)
Important safety notes
Special tools and expert knowledge are
required when working on the battery, e.g.
removal and installing. You should therefore
have all work involving the battery carried out
at a qualified specialist workshop.
Battery (vehicle)391
Breakdown assistance
Z
Page 400 of 462
!Make sure that the electric parking brake
is released. If the electric parking brake is
faulty, visit a qualified specialist workshop.
!Only secure the tow rope or tow bar at the
towing eyes, or the trailer tow hitch, if
available. You could otherwise damage the
vehicle.
!Do not use the towing eye for recovery,
this could damage the vehicle. If in doubt,
recover the vehicle with a crane.
!When towing, pull away slowly and
smoothly. If the tractive power is too high,
the vehicles could be damaged.
!When towing vehicles with KEYLESS-GO,
use the key instead of the Start/Stop
button. Otherwise, the automatic
transmission may shift to positionPwhen
the driver's or front-passenger door are
opened, which could lead to damage to the
transmission.
!Do not tow with sling-type equipment.
This could damage the vehicle.
!Vehicles with differential locks: make
sure the differential locks are in automatic
mode. When towing, the differential locks
must not be switched on. The transmission
may otherwise be damaged.
!The vehicle can be towed a maximum of
30 miles (50km). The towing speed of
30 mph (50 km/h) must not be exceeded.
If the vehicle has to be towed more than
30 miles(50km), the entire vehicle must be
raised and transported.
!If you tow or tow-start another vehicle, its
weight must not exceed the maximum
permissible gross vehicle weight of your
vehicle.
Information on your vehicle's gross vehicle
weight rating can be found on the vehicle
identification plate (Ypage 444).
iInformation on your vehicle's gross
vehicle weight rating can be found on the
vehicle identification plate; see the printed
Operator's Manual.
It is better to have the vehicle transported
than to have it towed.
If the vehicle has suffered transmission
damage, have it transported on a transporter
or trailer.
The automatic transmission must be in
positionNwhen the vehicle is being towed.
The battery must be connected and charged.
Otherwise, you:
Rcannot turn the SmartKey to position2in
the ignition lock
Rcannot release the electric parking brake
Rcannot shift the automatic transmission to
positionN
iDisarm the automatic locking feature
before the vehicle is towed (Ypage 284).
You could otherwise be locked out when
pushing or towing the vehicle.
Installing/removing the towing eye
Installing the towing eye
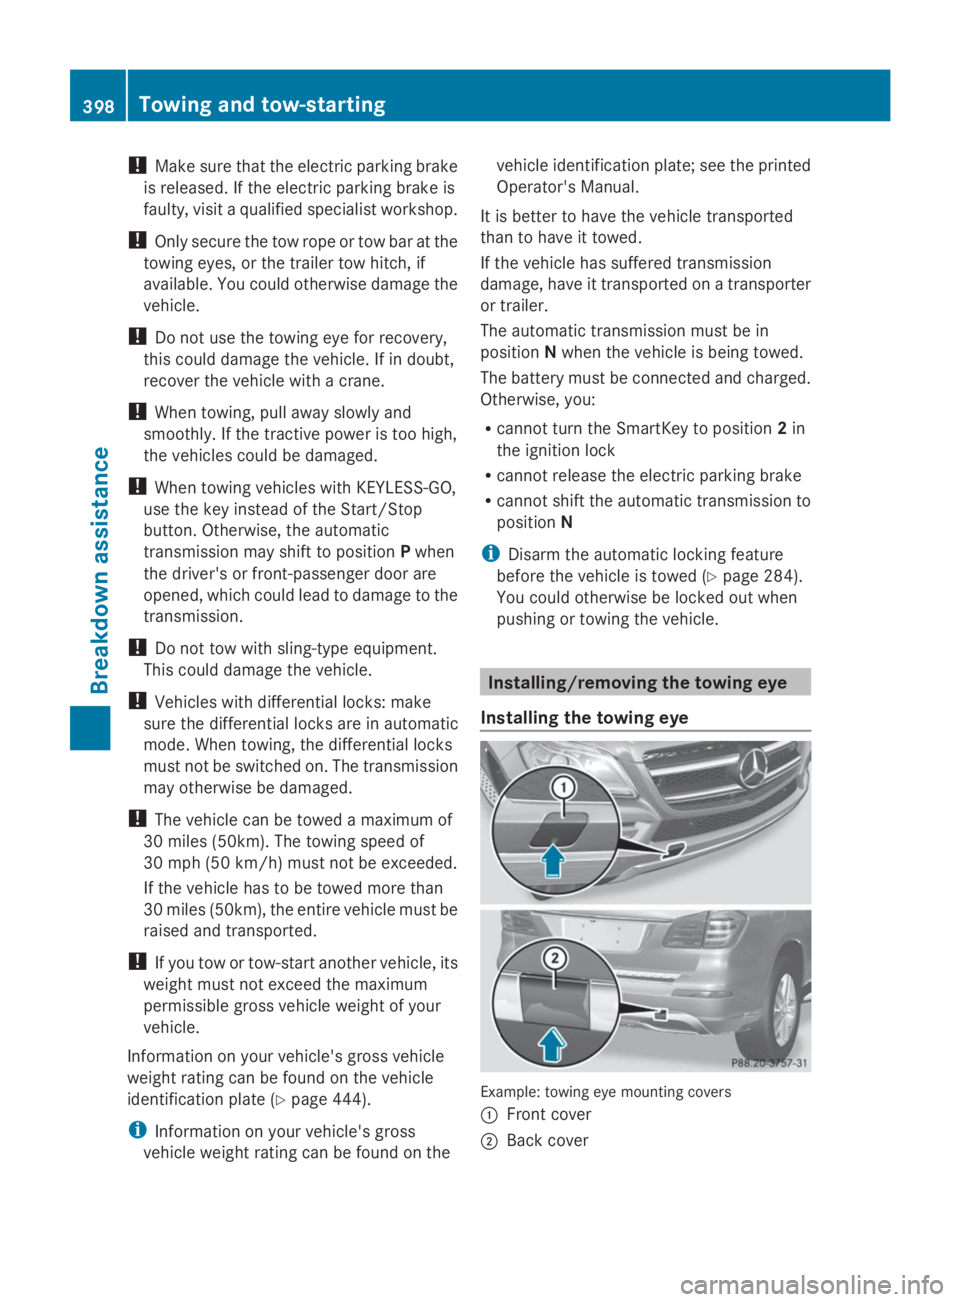
Example: towing eye mounting covers
�CFront cover
�DBack cover
398Towing and tow-starting
Breakdown assistance
Page 401 of 462
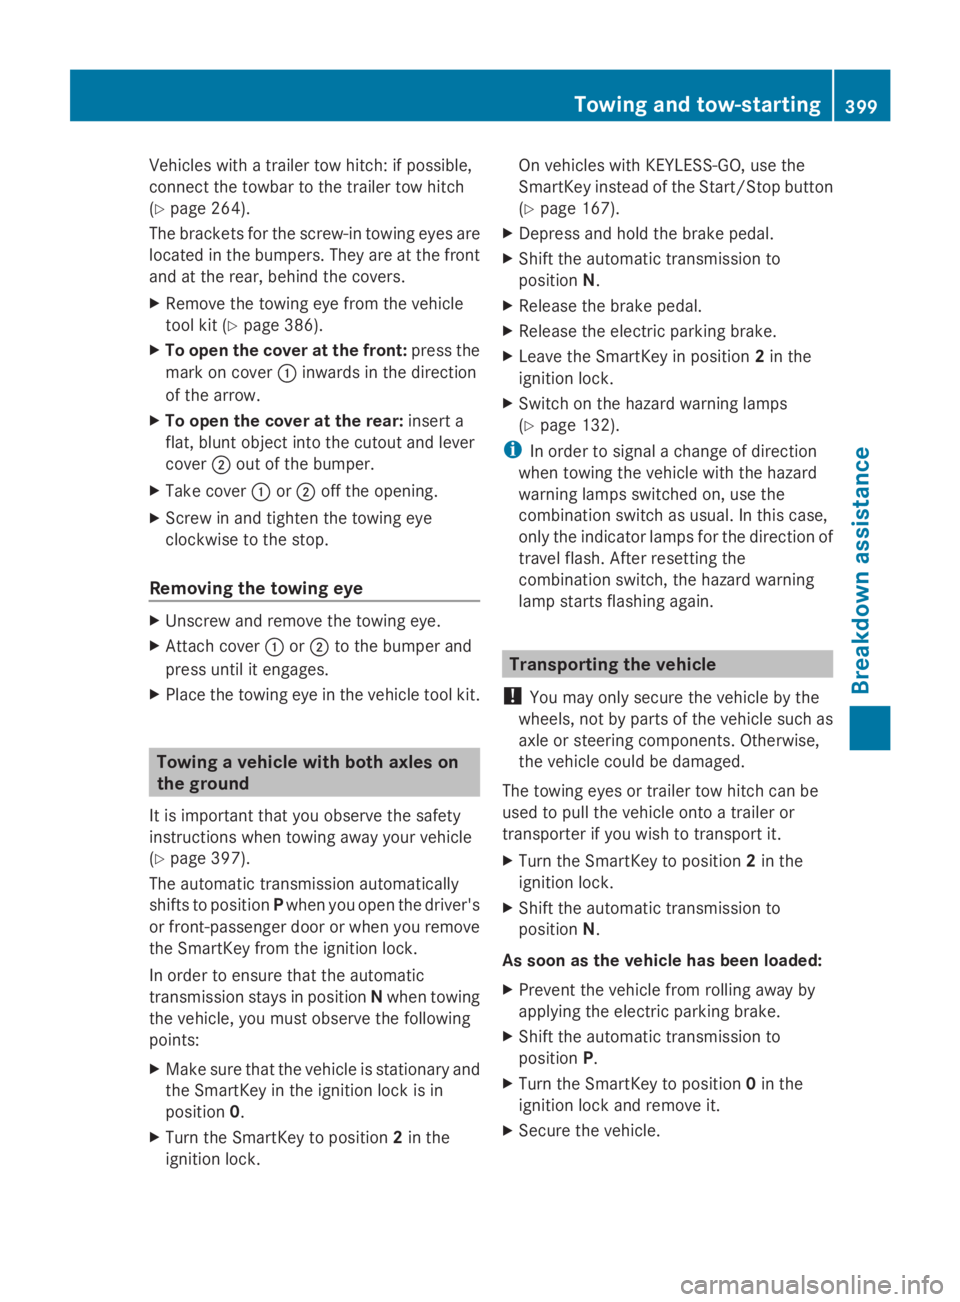
Vehicles with a trailer tow hitch: if possible,
connect the towbar to the trailer tow hitch
(Ypage 264).
The brackets for the screw-in towing eyes are
located in the bumpers. They are at the front
and at the rear, behind the covers.
XRemove the towing eye from the vehicle
tool kit (Ypage 386).
XTo open the cover at the front:press the
mark on cover�Cinwards in the direction
of the arrow.
XTo open the cover at the rear:insert a
flat, blunt object into the cutout and lever
cover�Dout of the bumper.
XTake cover�Cor�Doff the opening.
XScrew in and tighten the towing eye
clockwise to the stop.
Removing the towing eye
XUnscrew and remove the towing eye.
XAttach cover�Cor�Dto the bumper and
press until it engages.
XPlace the towing eye in the vehicle tool kit.
Towing a vehicle with both axles on
the ground
It is important that you observe the safety
instructions when towing away your vehicle
(Ypage 397).
The automatic transmission automatically
shifts to positionPwhen you open the driver's
or front-passenger door or when you remove
the SmartKey from the ignition lock.
In order to ensure that the automatic
transmission stays in positionNwhen towing
the vehicle, you must observe the following
points:
XMake sure that the vehicle is stationary and
the SmartKey in the ignition lock is in
position0.
XTurn the SmartKey to position2in the
ignition lock.
On vehicles with KEYLESS-GO, use the
SmartKey instead of the Start/Stop button
(Ypage 167).
XDepress and hold the brake pedal.
XShift the automatic transmission to
positionN.
XRelease the brake pedal.
XRelease the electric parking brake.
XLeave the SmartKey in position2in the
ignition lock.
XSwitch on the hazard warning lamps
(Ypage 132).
iIn order to signal a change of direction
when towing the vehicle with the hazard
warning lamps switched on, use the
combination switch as usual. In this case,
only the indicator lamps for the direction of
travel flash. After resetting the
combination switch, the hazard warning
lamp starts flashing again.
Transporting the vehicle
!You may only secure the vehicle by the
wheels, not by parts of the vehicle such as
axle or steering components. Otherwise,
the vehicle could be damaged.
The towing eyes or trailer tow hitch can be
used to pull the vehicle onto a trailer or
transporter if you wish to transport it.
XTurn the SmartKey to position2in the
ignition lock.
XShift the automatic transmission to
positionN.
As soon as the vehicle has been loaded:
XPrevent the vehicle from rolling away by
applying the electric parking brake.
XShift the automatic transmission to
positionP.
XTurn the SmartKey to position0in the
ignition lock and remove it.
XSecure the vehicle.
Towing and tow-starting399
Breakdown assistance
Z
Page 402 of 462

Information on 4MATIC vehicles
!Vehicles with 4MATIC must not be towed
with either the front or the rear axle raised,
as doing so will damage the transmission.
If the vehicle has transmission damage or
damage to the front or rear axle, have it
transported on a transporter or trailer.
In the event of damage to the electrical
system
If the battery is defective, the automatic
transmission will be locked in positionP. To
shift the automatic transmission to position
N, you must provide power to the vehicle's
electrical system in the same way as when
jump-starting (Ypage 395).
Have the vehicle transported on a transporter
or trailer.
Recovering a vehicle that has become
stuck
!When recovering a vehicle that has
become stuck, pull it as smoothly and
evenly as possible. Excessive tractive
power could damage the vehicles.
If the drive wheels have become stuck in
loose or muddy ground, pull the vehicle out
with extreme caution, especially so if the
vehicle is loaded.
Never attempt to recover a vehicle with a
trailer attached.
Pull out the vehicle backwards, if possible
using the tracks it made when it became
stuck.
Tow-starting (emergency engine
starting)
!Vehicles with automatic transmission
must not be tow-started. You could
otherwise damage the automatic
transmission.
iYou can find information on "Jump-
starting" under (Ypage 395).
Fuses
Important safety notes
GWARNING
If you manipulate or bridge a faulty fuse or if
you replace it with a fuse with a higher
amperage, the electric cables could be
overloaded. This could result in a fire. There
is a risk of an accident and injury.
Always replace faulty fuses with the specified
new fuses having the correct amperage.
!For the fuse boxes in the engine
compartment and under the rear bench
seat, only use fuses with the suffix "S".
Otherwise, components or systems could
be damaged.
The fuses in your vehicle serve to close down
faulty circuits. If a fuse blows, all the
components on the circuit and their functions
stop operating.
Blown fuses must be replaced with fuses of
the same rating, which you can recognize by
the color and value. The fuse ratings are listed
in the fuse allocation chart.
If a newly inserted fuse also blows, have the
cause traced and rectified at a qualified
specialist workshop, e.g. an authorized
Mercedes-Benz Center.
Before changing a fuse
Observe the important safety notes
(Ypage 400)
XSecure the vehicle against rolling away
(Ypage 188).
XSwitch off all electrical consumers.
XTurn the SmartKey to position0in the
ignition lock and remove it (Ypage 167).
On vehicles with KEYLESS-GO, make sure
the ignition is switched off (Ypage 167).
All indicator lamps in the instrument cluster
must be off.
400Fuses
Breakdown assistance
Page 414 of 462
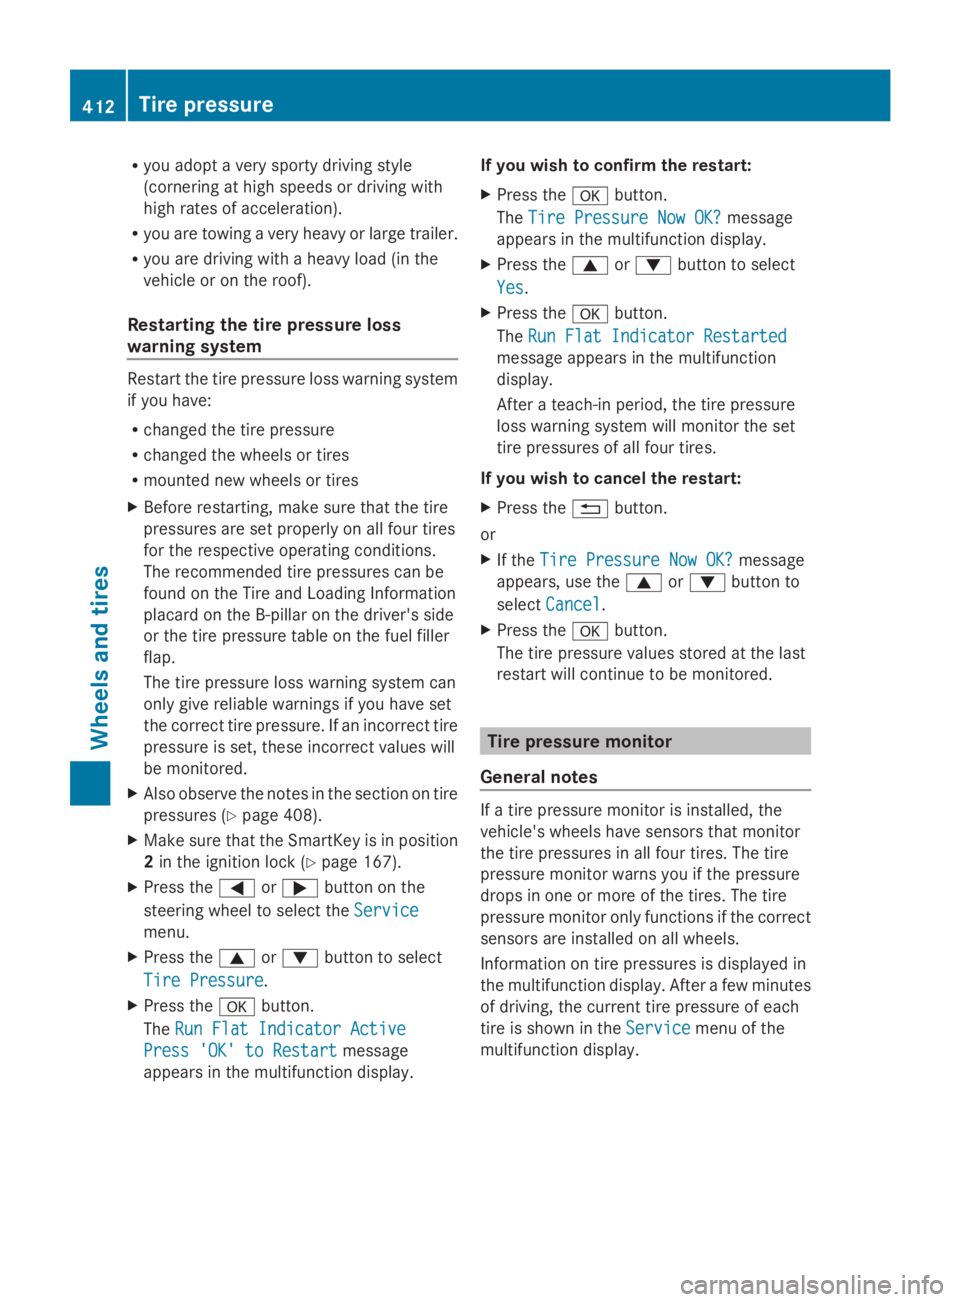
Ryou adopt a very sporty driving style
(cornering at high speeds or driving with
high rates of acceleration).
Ryou are towing a very heavy or large trailer.
Ryou are driving with a heavy load (in the
vehicle or on the roof).
Restarting the tire pressure loss
warning system
Restart the tire pressure loss warning system
if you have:
Rchanged the tire pressure
Rchanged the wheels or tires
Rmounted new wheels or tires
XBefore restarting, make sure that the tire
pressures are set properly on all four tires
for the respective operating conditions.
The recommended tire pressures can be
found on the Tire and Loading Information
placard on the B-pillar on the driver's side
or the tire pressure table on the fuel filler
flap.
The tire pressure loss warning system can
only give reliable warnings if you have set
the correct tire pressure. If an incorrect tire
pressure is set, these incorrect values will
be monitored.
XAlso observe the notes in the section on tire
pressures (Ypage 408).
XMake sure that the SmartKey is in position
2in the ignition lock (Ypage 167).
XPress the�Yor�ebutton on the
steering wheel to select theServiceService
menu.
XPress the�cor�dbutton to select
Tire PressureTire Pressure.
XPress the�vbutton.
TheRun Flat Indicator ActiveRun Flat Indicator Active
Press 'OK' to RestartPress 'OK' to Restartmessage
appears in the multifunction display.
If you wish to confirm the restart:
XPress the�vbutton.
TheTire Pressure Now OK?Tire Pressure Now OK?message
appears in the multifunction display.
XPress the�cor�dbutton to select
YesYes.
XPress the�vbutton.
TheRun Flat Indicator RestartedRun Flat Indicator Restarted
message appears in the multifunction
display.
After a teach-in period, the tire pressure
loss warning system will monitor the set
tire pressures of all four tires.
If you wish to cancel the restart:
XPress the�8button.
or
XIf theTire Pressure Now OK?Tire Pressure Now OK?message
appears, use the�cor�dbutton to
selectCancelCancel.
XPress the�vbutton.
The tire pressure values stored at the last
restart will continue to be monitored.
Tire pressure monitor
General notes
If a tire pressure monitor is installed, the
vehicle's wheels have sensors that monitor
the tire pressures in all four tires. The tire
pressure monitor warns you if the pressure
drops in one or more of the tires. The tire
pressure monitor only functions if the correct
sensors are installed on all wheels.
Information on tire pressures is displayed in
the multifunction display. After a few minutes
of driving, the current tire pressure of each
tire is shown in theServiceServicemenu of the
multifunction display.
412Tire pressure
Whe els and tires
Page 420 of 462
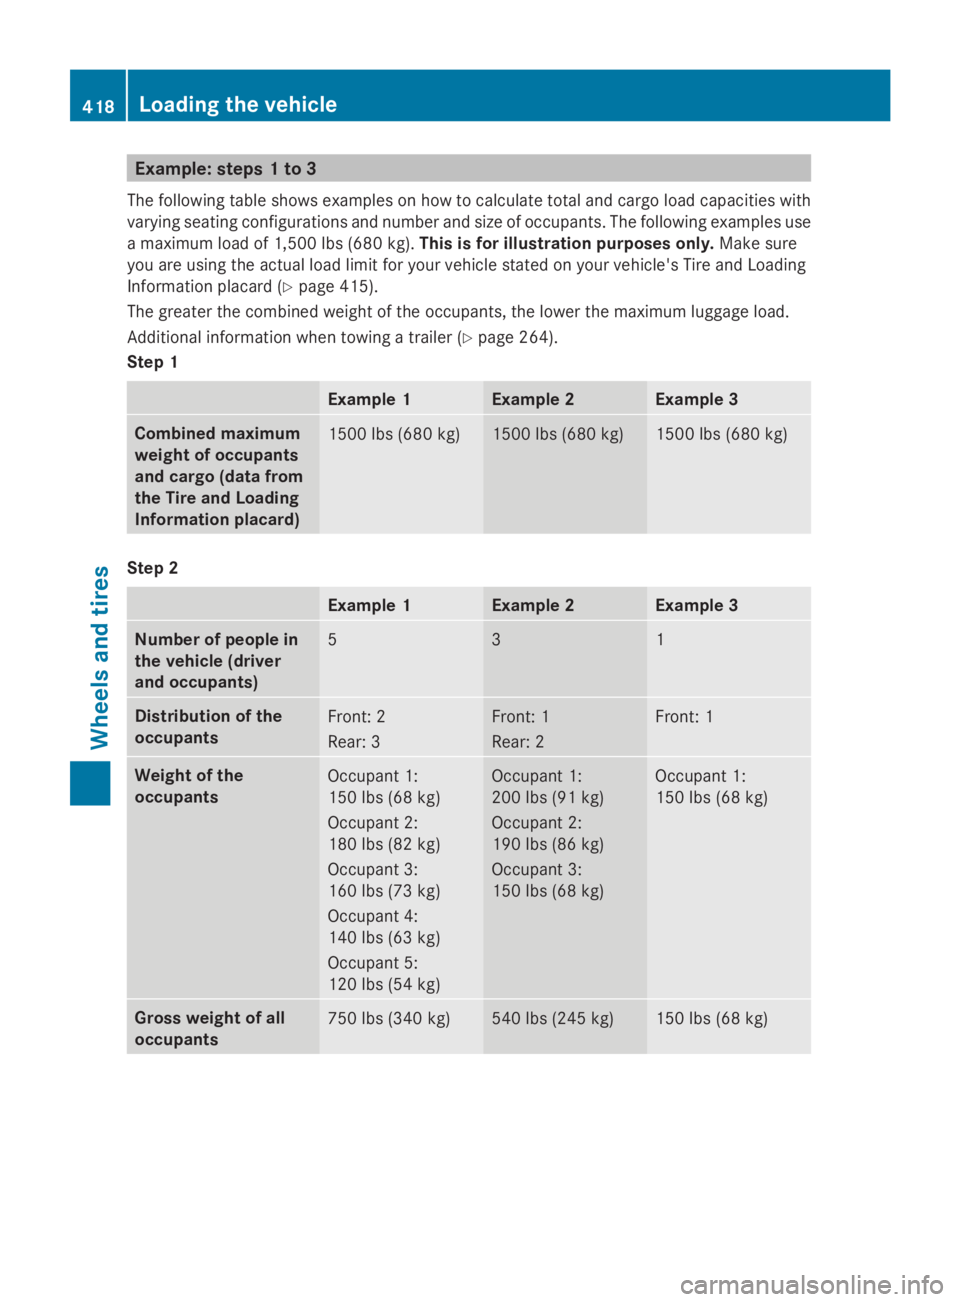
Example: steps 1 to 3
The following table shows examples on how to calculate total and cargo load capacities with
varying seating configurations and number and size of occupants. The following examples use
a maximum load of 1,500 lbs (680 kg).This is for illustration purposes only.Make sure
you are using the actual load limit for your vehicle stated on your vehicle's Tire and Loading
Information placard (Ypage 415).
The greater the combined weight of the occupants, the lower the maximum luggage load.
Additional information when towing a trailer (Ypage 264).
Step 1
Example 1Example 2Example 3
Combined maximum
weight of occupants
and cargo (data from
the Tire and Loading
Information placard)
1500 lbs (680 kg)1500 lbs (680 kg)1500 lbs (680 kg)
Step 2
Example 1Example 2Example 3
Number of people in
the vehicle (driver
and occupants)
531
Distribution of the
occupants
Front: 2
Rear: 3
Front: 1
Rear: 2
Front: 1
Weight of the
occupants
Occupant 1:
150 lbs (68 kg)
Occupant 2:
180 lbs (82 kg)
Occupant 3:
160 lbs (73 kg)
Occupant 4:
140 lbs (63 kg)
Occupant 5:
120 lbs (54 kg)
Occupant 1:
200 lbs (91 kg)
Occupant 2:
190 lbs (86 kg)
Occupant 3:
150 lbs (68 kg)
Occupant 1:
150 lbs (68 kg)
Gross weight of all
occupants
750 lbs (340 kg)540 lbs (245 kg)150 lbs (68 kg)
418Loading the vehicle
Wheels and tires