2014 MERCEDES-BENZ E-SEDAN seat adjustment
[x] Cancel search: seat adjustmentPage 113 of 430
G
WARNING
If head restraints are not installed and
adjusted correctly, they cannot provide
protection as intended. There is an increased
risk of injury in the head and neck area, e.g.
in the event of an accident or when braking.
Always drive with the head restraints
installed. Before driving off, make sure for
every vehicle occupant that the center of the
head restraint supports the back of the head
at about eye level.
General notes Observe the important safety notes regarding
the seats (Y
page 109).
Do not rotate the head restraints of the front
and rear seats. Otherwise, you cannot adjust
the height and angle of the head restraints to
the correct position.
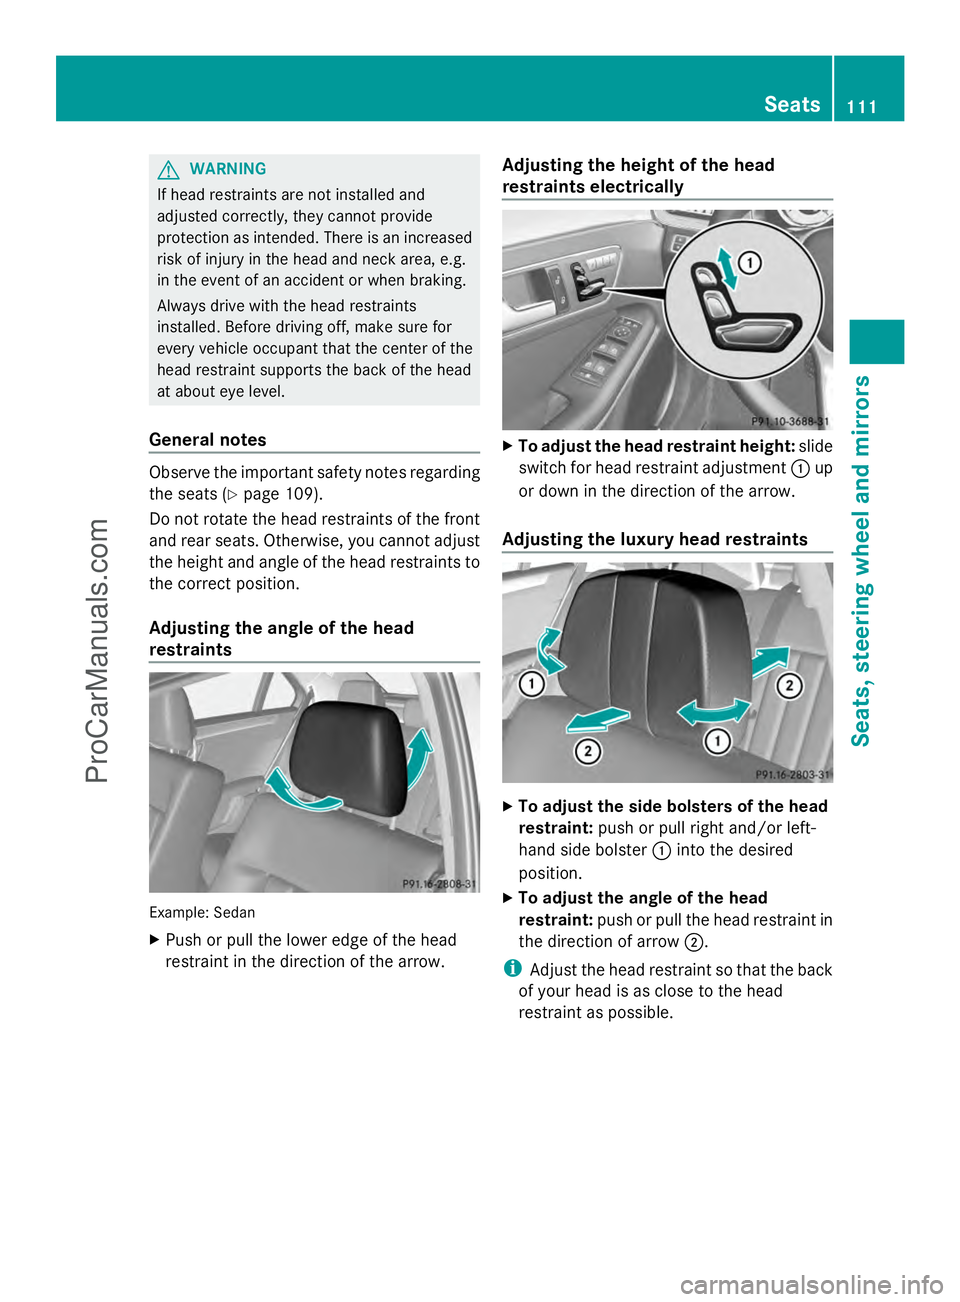
Adjusting the angle of the head
restraints Example: Sedan
X
Push or pull the lower edge of the head
restraint in the direction of the arrow. Adjusting the height of the head
restraints electrically X
To adjust the head restraint height: slide
switch for head restraint adjustment :up
or down in the direction of the arrow.
Adjusting the luxury head restraints X
To adjust the side bolsters of the head
restraint: push or pull right and/or left-
hand side bolster :into the desired
position.
X To adjust the angle of the head
restraint: push or pull the head restraint in
the direction of arrow ;.
i Adjust the head restraint so that the back
of your head is as close to the head
restraint as possible. Seats
111Seats, steering wheel and mirrors Z
ProCarManuals.com
Page 114 of 430

Rear seat head restraints
Lowering the rear seat head restraints
from the front X
Turn the SmartKey to position 2in the
ignition lock (Y page 159).
X Press button :.
Adjusting the rear seat head restraint
height Example: Sedan
X
To raise: pull the head restraint up to the
desired position.
X To lower: press release catch :and push
the head restraint down until it is in the
desired position.
i If you pull the head restraint forward
slightly, you will require less effort when
making adjustments. Adjusting the rear seat head restraint
angle
Example: Sedan
X
Pull or push the top of the head restraint
until it is in the desired position.
Removing and installing the rear seat
head restraints G
WARNING
If head restraints are not installed and
adjusted correctly, they cannot provide
protection as intended. There is an increased
risk of injury in the head and neck area, e.g.
in the event of an accident or when braking.
Always drive with the head restraints
installed. Before driving off, make sure for
every vehicle occupant that the center of the
head restraint supports the back of the head
at about eye level. Example: Sedan
The rear head restraints can only be removed
and re-installed on vehicles with the through-
loading facility.112
SeatsSeats, steering wheel and mirrors
ProCarManuals.com
Page 121 of 430
Problems with the seat ventilation
Problem Possible causes/consequences and
M
MSolutions The seat ventilation has
switched off
prematurely or cannot
be switched on. The on-board voltage is too low because too many electrical
consumers are switched on.
X
Switch off electrical consumers that you do not need, such as
the rear window defroster or interior lighting.
Once the battery is sufficiently charged, the seat ventilation will
switch back on automatically. Steering wheel
Important safety notes
G
WARNING
You could lose control of your vehicle if you
do the following while driving:
R adjust the driver's seat, head restraint,
steering wheel or mirrors
R fasten the seat belt
There is a risk of an accident.
Adjust the driver's seat, head restraint,
steering wheel and mirror and fasten your
seat belt before starting the engine. G
WARNING
Children could injure themselves if they
adjust the steering wheel. There is a risk of
injury.
When leaving the vehicle, always take the
SmartKey with you and lock the vehicle. Never
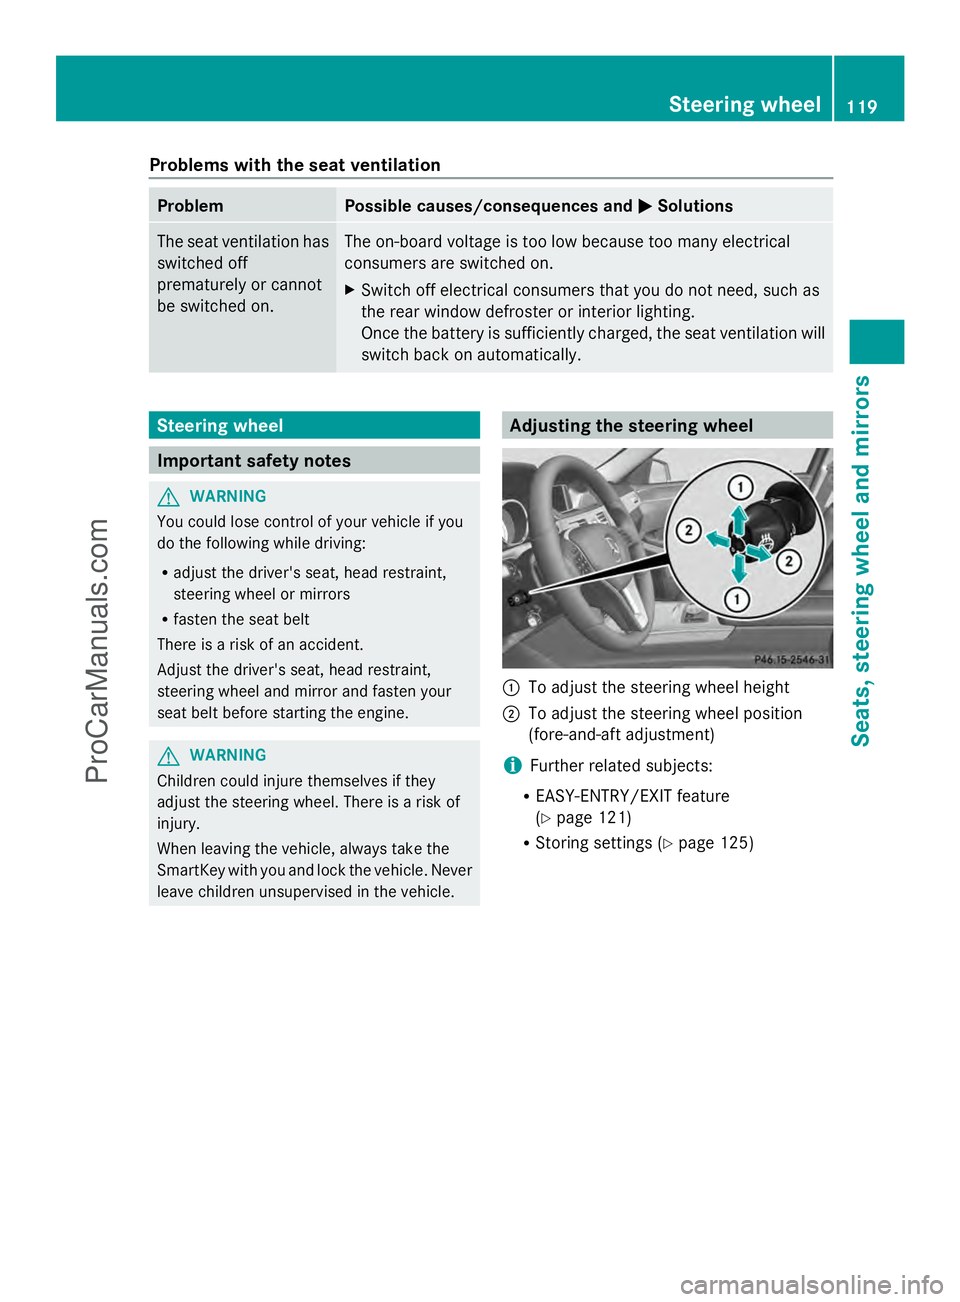
leave children unsupervised in the vehicle. Adjusting the steering wheel
:
To adjust the steering wheel height
; To adjust the steering wheel position
(fore-and-aft adjustment)
i Further related subjects:
R EASY-ENTRY/EXIT feature
(Y page 121)
R Storing settings (Y page 125) Steering wheel
119Seats, steering wheel and mirrors Z
ProCarManuals.com
Page 123 of 430
Problems with the steering wheel heating
Problem Possible causes/consequences and
M
MSolutions The steering wheel
heating has switched
off prematurely or
cannot be switched on. The on-board voltage is too low because too many electrical
consumers are switched on.
X
Switch off electrical consumers that you do not need, such as
the rear window defroster or interior lighting.
Once the battery is sufficiently charged, the steering wheel
heating will switch back on automatically. EASY-ENTRY/EXIT feature
Important safety notes G
WARNING
When the EASY-ENTRY/EXIT feature adjusts
the steering wheel, you and other vehicle
occupants – particularly children – could
become trapped. There is a risk of injury.
While the EASY-ENTRY/EXIT feature is
making adjustments, make sure that no one
has any body parts in the sweep of the
steering wheel.
If somebody becomes trapped:
R press one of the memory function position
buttons, or
R move the switch for steering wheel
adjustment in the opposite direction to that
in which the steering wheel is moving.
The adjustment process is stopped. G
WARNING
If children activate the EASY-ENTRY/EXIT
feature, they can become trapped,
particularly when unattended. There is a risk
of injury.
When leaving the vehicle, always take the
SmartKey with you and lock the vehicle. Never
leave children unsupervised in the vehicle. G
WARNING
If you drive off while the EASY-ENTRY/EXIT
feature is making adjustments, you could lose control of the vehicle. There is a risk of an
accident.
Always wait until the adjustment process is
complete before driving off.
The EASY-ENTRY/EXIT feature makes getting
in and out of your vehicle easier.
You can activate and deactivate the EASY-
ENTRY/EXIT feature in the on-board
computer (Y page 252).
Position of the steering wheel when the
EASY-ENTRY/EXIT feature is active The steering wheel swings upwards when
you:
R
remove the SmartKey from the ignition lock
R with KEYLESS-GO: open the driver's door;
KEYLESS-GO must be in position 1
R with the SmartKey: open the driver's
door; the SmartKey must be in position 0
or 1in the ignition lock (Y page 159)
i The steering wheel only moves upwards if
it has not already reached the upper end
stop. Steering wheel
121Seats, steering wheel and mirrors Z
ProCarManuals.com
Page 125 of 430
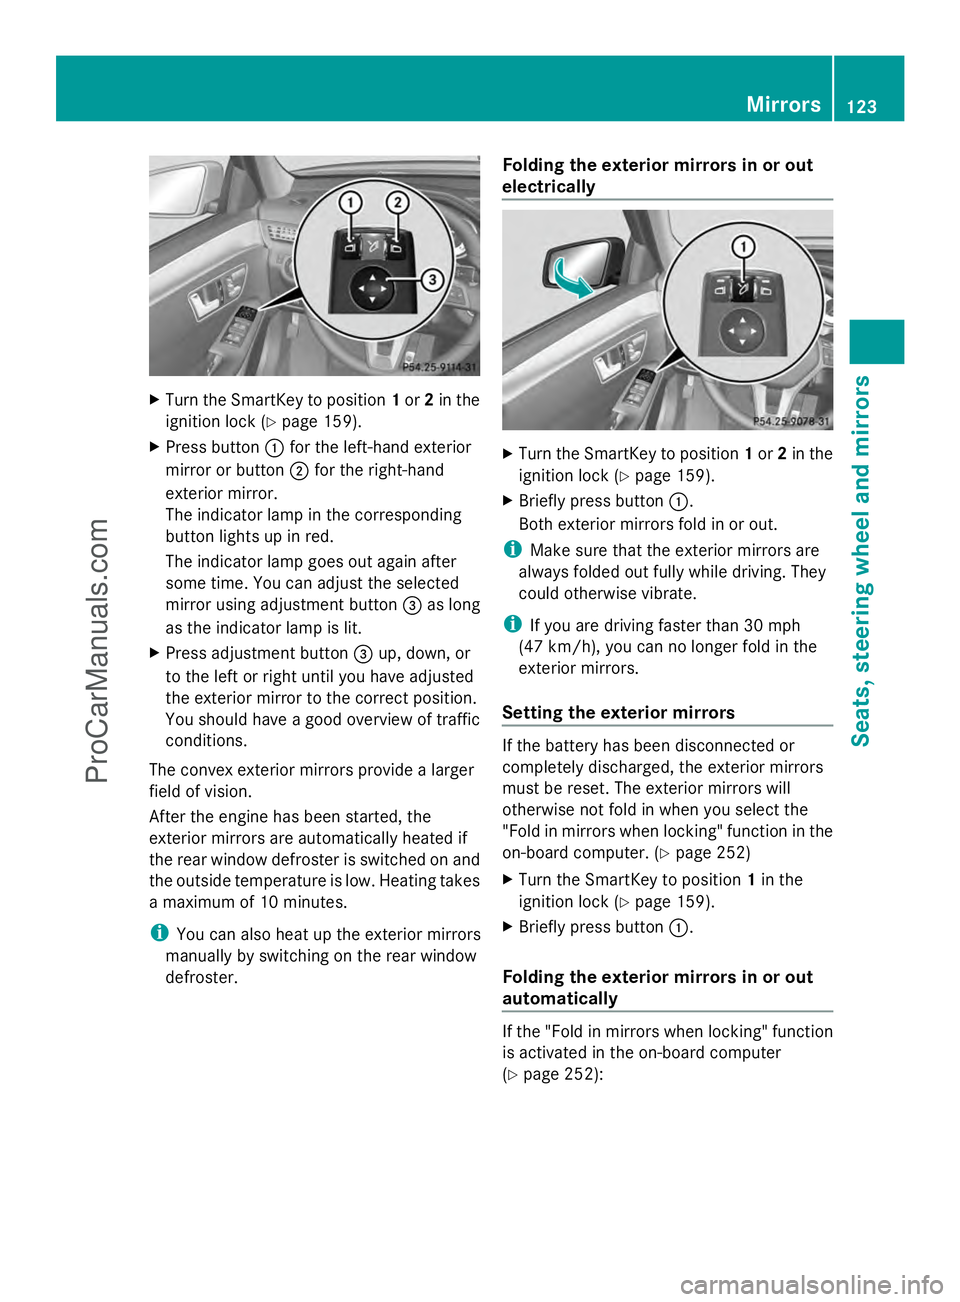
X
Turn the SmartKey to position 1or 2in the
ignition lock (Y page 159).
X Press button :for the left-hand exterior
mirror or button ;for the right-hand
exterior mirror.
The indicator lamp in the corresponding
button lights up in red.
The indicator lamp goes out again after
some time. You can adjust the selected
mirror using adjustment button =as long
as the indicator lamp is lit.
X Press adjustment button =up, down, or
to the left or right until you have adjusted
the exterior mirror to the correct position.
You should have a good overview of traffic
conditions.
The convex exterior mirrors provide a larger
field of vision.
After the engine has been started, the
exterior mirrors are automatically heated if
the rear window defroster is switched on and
the outside temperature is low. Heating takes
a maximum of 10 minutes.
i You can also heat up the exterior mirrors
manually by switching on the rear window
defroster. Folding the exterior mirrors in or out
electrically X
Turn the SmartKey to position 1or 2in the
ignition lock (Y page 159).
X Briefly press button :.
Both exterior mirrors fold in or out.
i Make sure that the exterior mirrors are
always folded out fully while driving. They
could otherwise vibrate.
i If you are driving faster than 30 mph
(47 km/h), you can no longer fold in the
exterior mirrors.
Setting the exterior mirrors If the battery has been disconnected or
completely discharged, the exterior mirrors
must be reset. The exterior mirrors will
otherwise not fold in when you select the
"Fold in mirrors when locking" function in the
on-board computer. (Y
page 252)
X Turn the SmartKey to position 1in the
ignition lock (Y page 159).
X Briefly press button :.
Folding the exterior mirrors in or out
automatically If the "Fold in mirrors when locking" function
is activated in the on-board computer
(Y
page 252): Mirrors
123Seats, steering wheel and mirrors Z
ProCarManuals.com
Page 126 of 430
R
the exterior mirrors fold in automatically as
soon as you lock the vehicle from the
outside.
R the exterior mirrors fold out again
automatically as soon as you unlock the
vehicle and then open the driver's or front-
passenger door.
i If the exterior mirrors have been folded in
manually, they do not fold out.
Exterior mirror pushed out of position If an exterior mirror has been pushed out of
position, proceed as follows:
X Vehicles without electrically folding
exterior mirrors: move the exterior mirror
into the correct position manually.
X Vehicles with electrically folding
exterior mirrors: press and hold mirror-
folding button :until you hear a click and
then the mirrors engage in position
(Y page 123).
The mirror housing is engaged again and
you can adjust the exterior mirrors as usual
(Y page 122). Automatic anti-glare mirrors
The rear-view mirror and the exterior mirror
on the driver's side automatically go into anti-
glare mode if the following conditions are met
simultaneously:
R the ignition is switched on and
R incident light from headlamps strikes the
sensor in the rear-view mirror.
The mirrors do not go into anti-glare mode if
reverse gear is engaged or if the interior
lighting is switched on. Parking position for the exterior
mirror on the front-passenger side
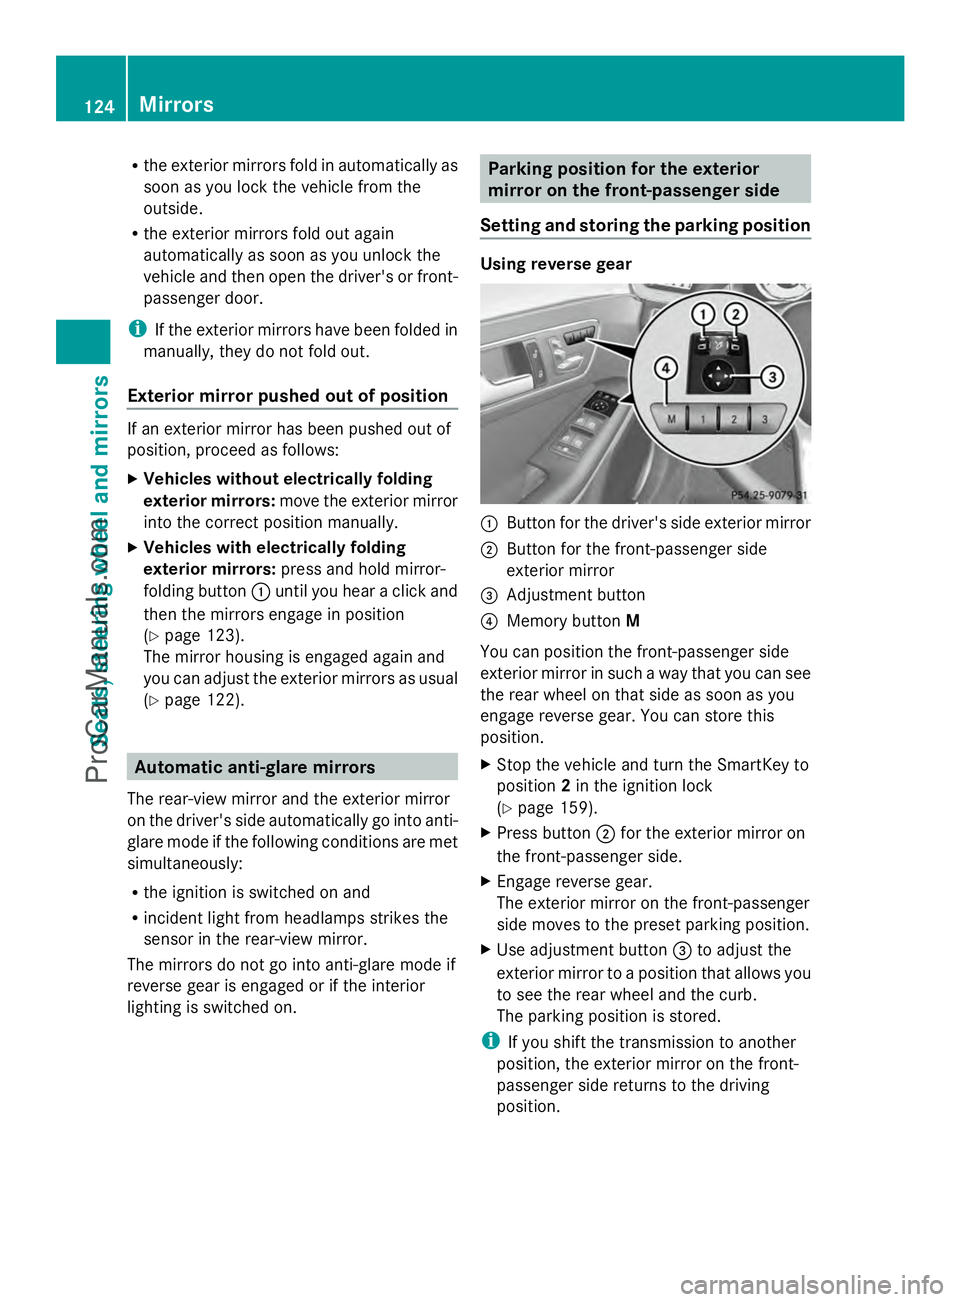
Setting and storing the parking position Using reverse gear
:
Button for the driver's side exterior mirror
; Button for the front-passenger side
exterior mirror
= Adjustment button
? Memory button M
You can position the front-passenger side
exterior mirror in such a way that you can see
the rear wheel on that side as soon as you
engage reverse gear. You can store this
position.
X Stop the vehicle and turn the SmartKey to
position 2in the ignition lock
(Y page 159).
X Press button ;for the exterior mirror on
the front-passenger side.
X Engage reverse gear.
The exterior mirror on the front-passenger
side moves to the preset parking position.
X Use adjustment button =to adjust the
exterior mirror to a position that allows you
to see the rear wheel and the curb.
The parking position is stored.
i If you shift the transmission to another
position, the exterior mirror on the front-
passenger side returns to the driving
position. 124
MirrorsSeats, steering
wheel and mirrors
ProCarManuals.com
Page 127 of 430
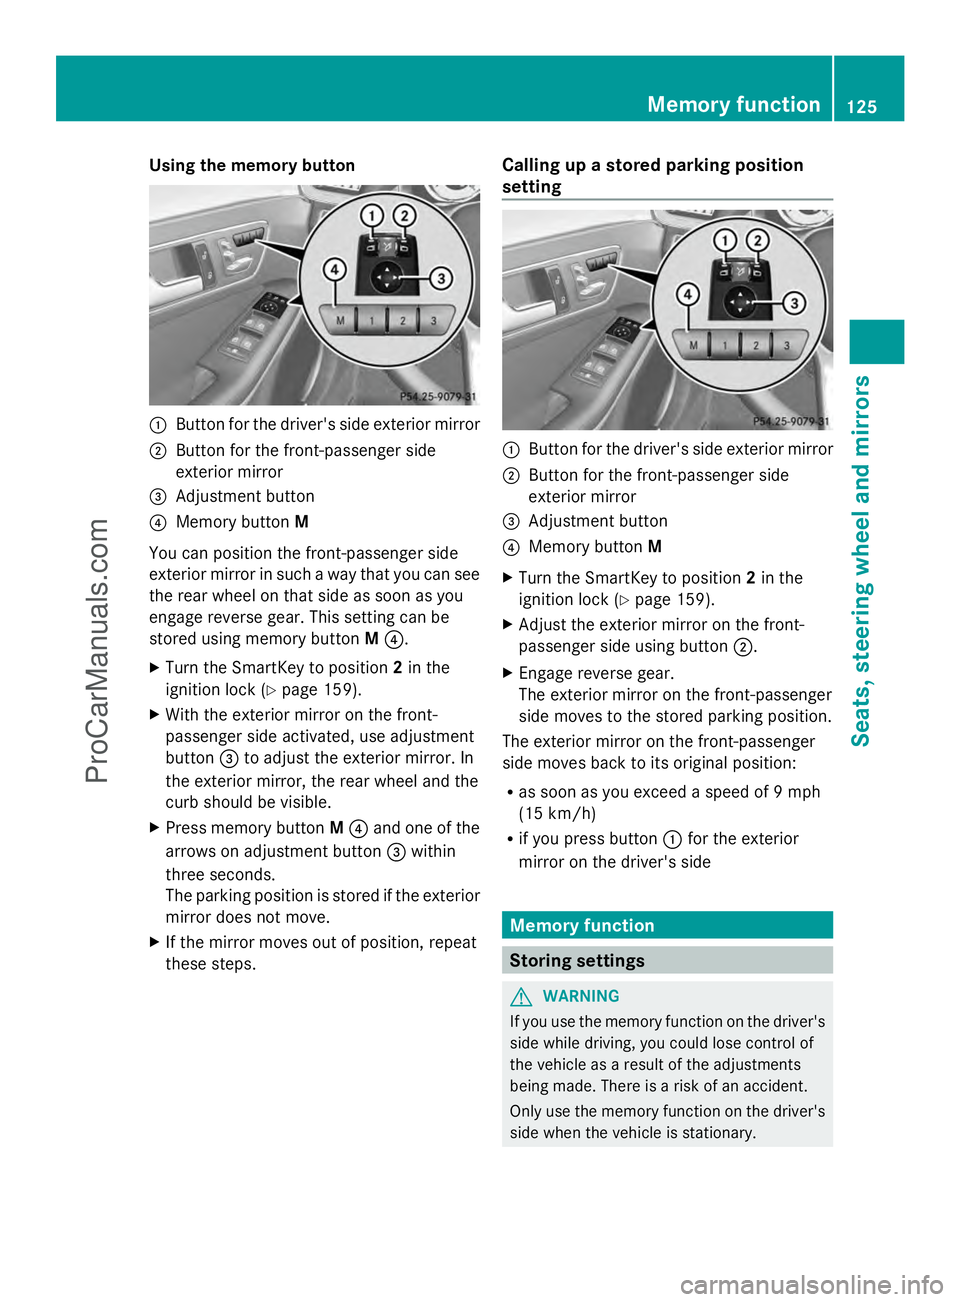
Using the memory button
:
Button for the driver's side exterior mirror
; Button for the front-passenger side
exterior mirror
= Adjustment button
? Memory button M
You can position the front-passenger side
exterior mirror in such a way that you can see
the rear wheel on that side as soon as you
engage reverse gear. This setting can be
stored using memory button M?.
X Turn the SmartKey to position 2in the
ignition lock (Y page 159).
X With the exterior mirror on the front-
passenger side activated, use adjustment
button =to adjust the exterior mirror. In
the exterior mirror, the rear wheel and the
curb should be visible.
X Press memory button M? and one of the
arrows on adjustment button =within
three seconds.
The parking position is stored if the exterior
mirror does not move.
X If the mirror moves out of position, repeat
these steps. Calling up a stored parking position
setting :
Button for the driver's side exterior mirror
; Button for the front-passenger side
exterior mirror
= Adjustment button
? Memory button M
X Turn the SmartKey to position 2in the
ignition lock (Y page 159).
X Adjust the exterior mirror on the front-
passenger side using button ;.
X Engage reverse gear.
The exterior mirror on the front-passenger
side moves to the stored parking position.
The exterior mirror on the front-passenger
side moves back to its original position:
R as soon as you exceed a speed of 9 mph
(15 km/h)
R if you press button :for the exterior
mirror on the driver's side Memory function
Storing settings
G
WARNING
If you use the memory function on the driver's
side while driving, you could lose control of
the vehicle as a result of the adjustments
being made. There is a risk of an accident.
Only use the memory function on the driver's
side when the vehicle is stationary. Memory function
125Seats, steering wheel and mirrors Z
ProCarManuals.com
Page 254 of 430
X
Press :or9 to select the Auto.
Auto.
Door Locks
Door Locks function.
When the Auto. Door Locks
Auto. Door Locks function is
activated, the vehicle doors are displayed
in orange in the multifunction display.
X Press the abutton to save the setting.
If you activate the Auto. Door Locks
Auto. Door Locks
function, the vehicle is centrally locked above
a speed of around 9 mph (15 km/h).
For further information on the automatic
locking feature, see (Y page 89).
Activating/deactivating the acoustic
locking verification signal
If you switch on the Acoustic
Acoustic Lock Lockfunction,
an acoustic signal sounds when you lock the
vehicle.
X Press the =or; button on the
steering wheel to select the Sett.
Sett. menu.
X Press :or9 to select the Vehicle Vehicle
submenu.
X Press ato confirm.
X Press the :or9 button to select the
Acoustic Lock
Acoustic Lock function.
If the Acoustic
Acoustic Lock
Lockfunction is activated,
the & symbol in the multifunction
display lights up orange.
X Press the abutton to save the setting.
Convenience Activating/deactivating the EASY-
ENTRY/EXIT feature
G
WARNING
When the EASY-ENTRY/EXIT feature adjusts
the steering wheel, you and other vehicle
occupants – particularly children – could
become trapped. There is a risk of injury.
While the EASY-ENTRY/EXIT feature is
making adjustments, make sure that no one
has any body parts in the sweep of the
steering wheel. If somebody becomes trapped:
R
press one of the memory function position
buttons, or
R move the switch for steering wheel
adjustment in the opposite direction to that
in which the steering wheel is moving.
The adjustment process is stopped.
X Press the =or; button on the
steering wheel to select the Sett. Sett.menu.
X Press the :or9 button to select the
Convenience
Convenience submenu.
X Press ato confirm.
X Press the :or9 button to select the
Easy Entry/Exit
Easy Entry/Exit function.
If the Easy Entry/Exit
Easy Entry/Exit function is
activated, the vehicle steering wheel is
displayed in orange in the multifunction
display.
X Press the abutton to save the setting.
Further information on the EASY-ENTRY/EXIT
feature (Y page 121).
Switching the belt adjustment on/off
X Press the =or; button on the
steering wheel to select the Sett.
Sett. menu.
X Press the :or9 button to select the
Convenience Convenience submenu.
X Press ato confirm.
X Press the :or9 button to select the
Belt Adjustment
Belt Adjustment function.
If the Belt Adjustment
Belt Adjustment function is
activated, the vehicle seat belt is shown in
orange in the multifunction display.
X Press the abutton to save the setting.
For further information on belt adjustment,
see (Y page 57).
Switching the fold-in mirrors with the
locking feature on/off
This function is only available on vehicles with
the memory function (Y page 125).
This function is only available in Canada. 252
Menus and submenusOn-board computer and displays
ProCarManuals.com