2014 MERCEDES-BENZ E-SEDAN ignition
[x] Cancel search: ignitionPage 214 of 430
Problems with PARKTRONIC
Problem Possible causes/consequences and
M
MSolutions Only the red segments
in the PARKTRONIC
warning displays are lit.
You also hear a warning
tone for approximately
two seconds.
PARKTRONIC is then
deactivated and the
indicator lamp on the
PARKTRONIC button
lights up. PARKTRONIC has malfunctioned and has switched off.
X
If problems persist, have PARKTRONIC checked at a qualified
specialist workshop. Only the red segments
in the PARKTRONIC
warning displays are lit.
PARKTRONIC is then
deactivated. The PARKTRONIC sensors are dirty or there is interference.
X
Clean the PARKTRONIC sensors (Y page 346).
X Switch the ignition back on. The problem may be caused by an external source of radio or
ultrasound waves.
X
See if PARKTRONIC functions in a different location. Active Parking Assist
General notes Active Parking Assist is an electronic parking
aid with ultrasound. It measures the road on
both sides of the vehicle. A parking symbol
indicates a suitable parking space. Active
steering intervention and brake application
can assist you during parking. You may also
use PARKTRONIC (Y page 208).
Important safety notes Active Parking Assist is merely an aid. It is not
a replacement for your attention to your
immediate surroundings. You are always
responsible for safe maneuvering, parking
and exiting a parking space. Make sure that
no persons, animals or objects are in the
maneuvering range.
When PARKTRONIC is switched off, Active
Parking Assist is also unavailable. G
WARNING
While parking or pulling out of a parking
space, the vehicle swings out and can drive
onto areas of the oncoming lane. This could
result in a collision with another road user.
There is a risk of an accident.
Pay attention to other road users. Stop the
vehicle if necessary or cancel the Active
Parking Assist parking procedure.
! If unavoidable, you should drive over
obstacles such as curbs slowly and not at
a sharp angle. Otherwise, you may damage
the wheels or tires.
Active Parking Assist may possibly indicate
parking spaces which are not suitable for
parking, for example:
R where parking or stopping is prohibited
R in front of driveways or entrances and exits
R on unsuitable surfaces 212
Driving systemsDriving and parking
ProCarManuals.com
Page 219 of 430
Rear view camera
General notes Example: Sedan
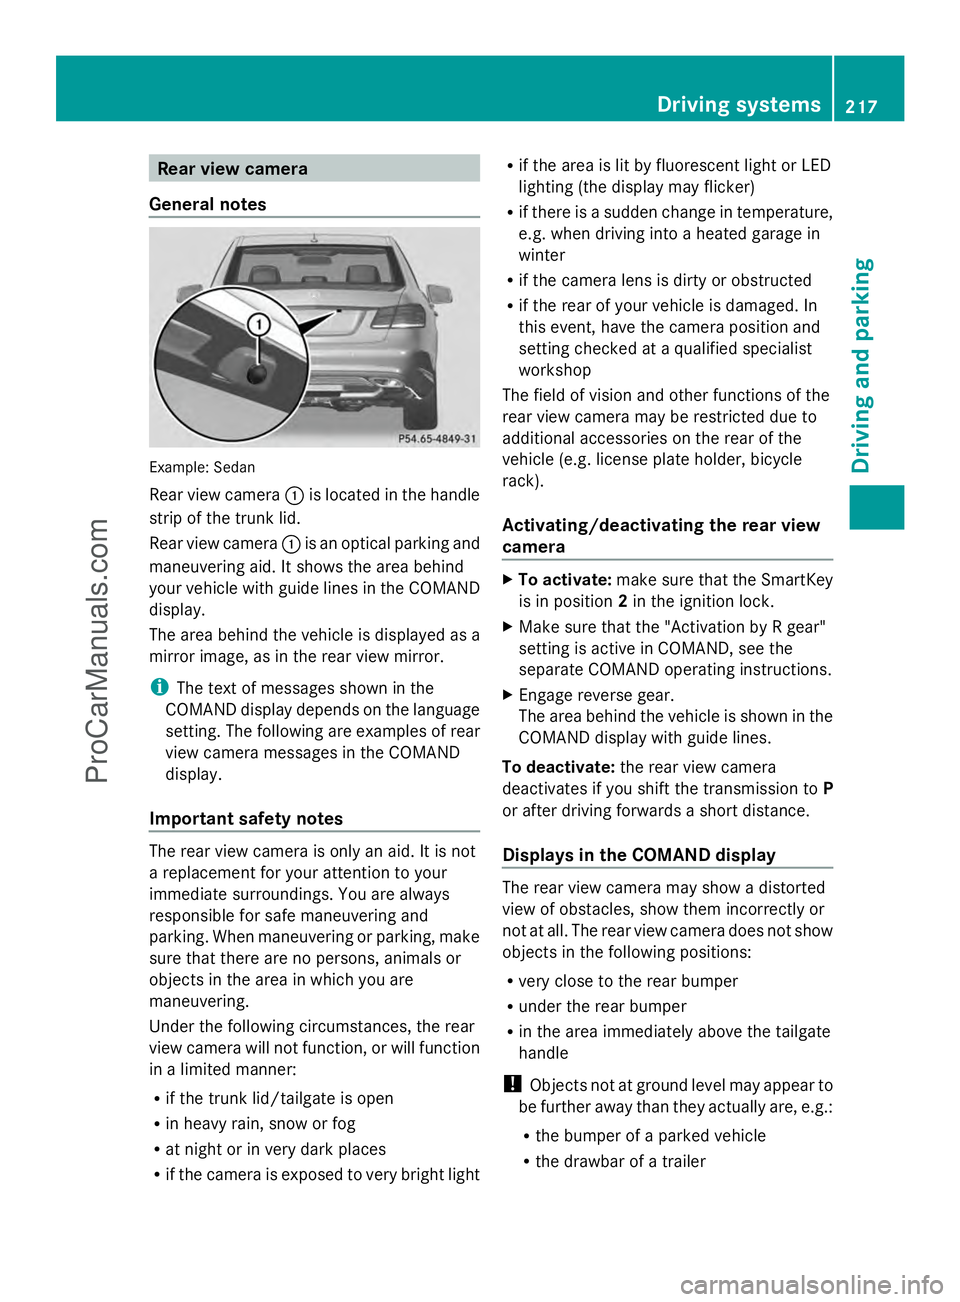
Rear view camera
:is located in the handle
strip of the trunk lid.
Rear view camera :is an optical parking and
maneuvering aid. It shows the area behind
your vehicle with guide lines in the COMAND
display.
The area behind the vehicle is displayed as a
mirror image, as in the rear view mirror.
i The text of messages shown in the
COMAND display depends on the language
setting. The following are examples of rear
view camera messages in the COMAND
display.
Important safety notes The rear view camera is only an aid. It is not
a replacement for your attention to your
immediate surroundings. You are always
responsible for safe maneuvering and
parking. When maneuvering or parking, make
sure that there are no persons, animals or
objects in the area in which you are
maneuvering.
Under the following circumstances, the rear
view camera will not function, or will function
in a limited manner:
R if the trunk lid/tailgate is open
R in heavy rain, snow or fog
R at night or in very dark places
R if the camera is exposed to very bright light R
if the area is lit by fluorescent light or LED
lighting (the display may flicker)
R if there is a sudden change in temperature,
e.g. when driving into a heated garage in
winter
R if the camera lens is dirty or obstructed
R if the rear of your vehicle is damaged. In
this event, have the camera position and
setting checked at a qualified specialist
workshop
The field of vision and other functions of the
rear view camera may be restricted due to
additional accessories on the rear of the
vehicle (e.g. license plate holder, bicycle
rack).
Activating/deactivating the rear view
camera X
To activate: make sure that the SmartKey
is in position 2in the ignition lock.
X Make sure that the "Activation by R gear"
setting is active in COMAND, see the
separate COMAND operating instructions.
X Engage reverse gear.
The area behind the vehicle is shown in the
COMAND display with guide lines.
To deactivate: the rear view camera
deactivates if you shift the transmission to P
or after driving forwards a short distance.
Displays in the COMAND display The rear view camera may show a distorted
view of obstacles, show them incorrectly or
not at all. The rear view camera does not show
objects in the following positions:
R
very close to the rear bumper
R under the rear bumper
R in the area immediately above the tailgate
handle
! Objects not at ground level may appear to
be further away than they actually are, e.g.:
R the bumper of a parked vehicle
R the drawbar of a trailer Driving systems
217Driving and parking Z
ProCarManuals.com
Page 223 of 430
incorrectly or not at all. The 360°camera is
not a substitute for attentive driving.
You are always responsible for safe
maneuvering and parking. When
maneuvering or parking, make sure that there
are no persons, animals or objects in the area
in which you are maneuvering.
You are always responsible for safety, and
must always pay attention to your
surroundings when parking and
maneuvering. This applies to the areas
behind, in front of and beside the vehicle. You
could otherwise endanger yourself and
others.
The 360° camera will not function or will
function in a limited manner:
R if the doors are open
R if the exterior mirrors are folded in
R if the trunk lid is open
R in heavy rain, snow or fog
R at night or in very dark places
R if the cameras are exposed to very bright
light
R if the area is lit by fluorescent light or LED
lighting (the display may flicker)
R if you exit a heated garage in winter,
resulting in a rapid change in temperature
R if the camera lenses are dirty or covered
R if the vehicle components in which the
cameras are installed are damaged. In this
event, have the camera position and setting
checked at a qualified specialist workshop.
Do not use the 360° camera in this case. You
can otherwise injure others or cause damage
to objects or the vehicle.
Guide lines are always shown at road level.
Activation conditions The 360° camera image can be displayed if:
R your vehicle is equipped with a 360°
camera
R the SmartKey is in position 2in the ignition
lock R
COMAND is switched on, see the separate
COMAND operating instructions
R the 360° Camera
360° Camera function is activated
Activating the 360° camera using the
SYS button X
Press and hold the Wbutton for longer
than 2 seconds, see the separate COMAND
operating instructions.
Depending on whether position Dor Ris
engaged, the following is shown:
R full screen display with the image from
the front camera
R full screen display with the image from
the rear camera
Activating the 360° camera with
COMAND X
Press the Wbutton; see the separate
COMAND operating Instructions.
or
X Select System System by turning cVdthe
COMAND controller and press Wto
confirm.
X Select 360° Camera
360° Camera and pressWto
confirm.
Depending on whether position Dor Ris
engaged, the following is shown:
R a split screen with top view and the
image from the front camera or
R a split screen with top view and the
image from the rear view camera
For further information about the COMAND
controller, see the separate COMAND
operating instructions.
Activating the 360° camera using
reverse gear The 360° camera images can be
automatically displayed by engaging reverse
gear. Driving systems
221Driving and parking Z
ProCarManuals.com
Page 224 of 430
X
Make sure that the SmartKey is in position
2 in the ignition lock.
X Make sure that the Activation by R
Activation by R
gear
gear setting is active in COMAND, see the
separate COMAND operating instructions.
X To show the 360° camera image: engage
reverse gear.
The area behind the vehicle is shown in the
COMAND display in split-screen mode. You
see the top view of the vehicle and the
image from the rear view camera.
Selecting the split-screen and full
screen displays X
To switch between split screen views:
switch to the line with the vehicle icons by
sliding ZVthe COMAND controller.
X Turn cVd the COMAND controller and
select one of the vehicle symbols.
X To switch to full screen mode: select
Full Screen
Full Screen by turningcVdthe
COMAND controller and press Wto
confirm.
i The full screen option is only available in
the following views:
R Top view with picture from the rear view
camera
R Top view with picture from the front
camera
Displays in the COMAND display Important safety notes
The camera system may show a distorted
view of obstacles, show them incorrectly or
not at all. Obstacles are not shown by the
system in the following locations:
R under the front and rear bumpers
R very close to the front and rear bumpers
R in the area immediately above the tailgate
handle/trunk lid handle R
very close to the exterior mirrors
R in the transitional areas between the
various cameras in the virtual top view
! Objects not at ground level may appear to
be further away than they actually are, e.g.:
R the bumper of a parked vehicle
R the drawbar of a trailer
R the ball coupling of a trailer tow hitch
R the rear section of an HGV
R a slanted post
Use the guidelines only for orientation.
Approach objects no further than the
bottom-most guideline.
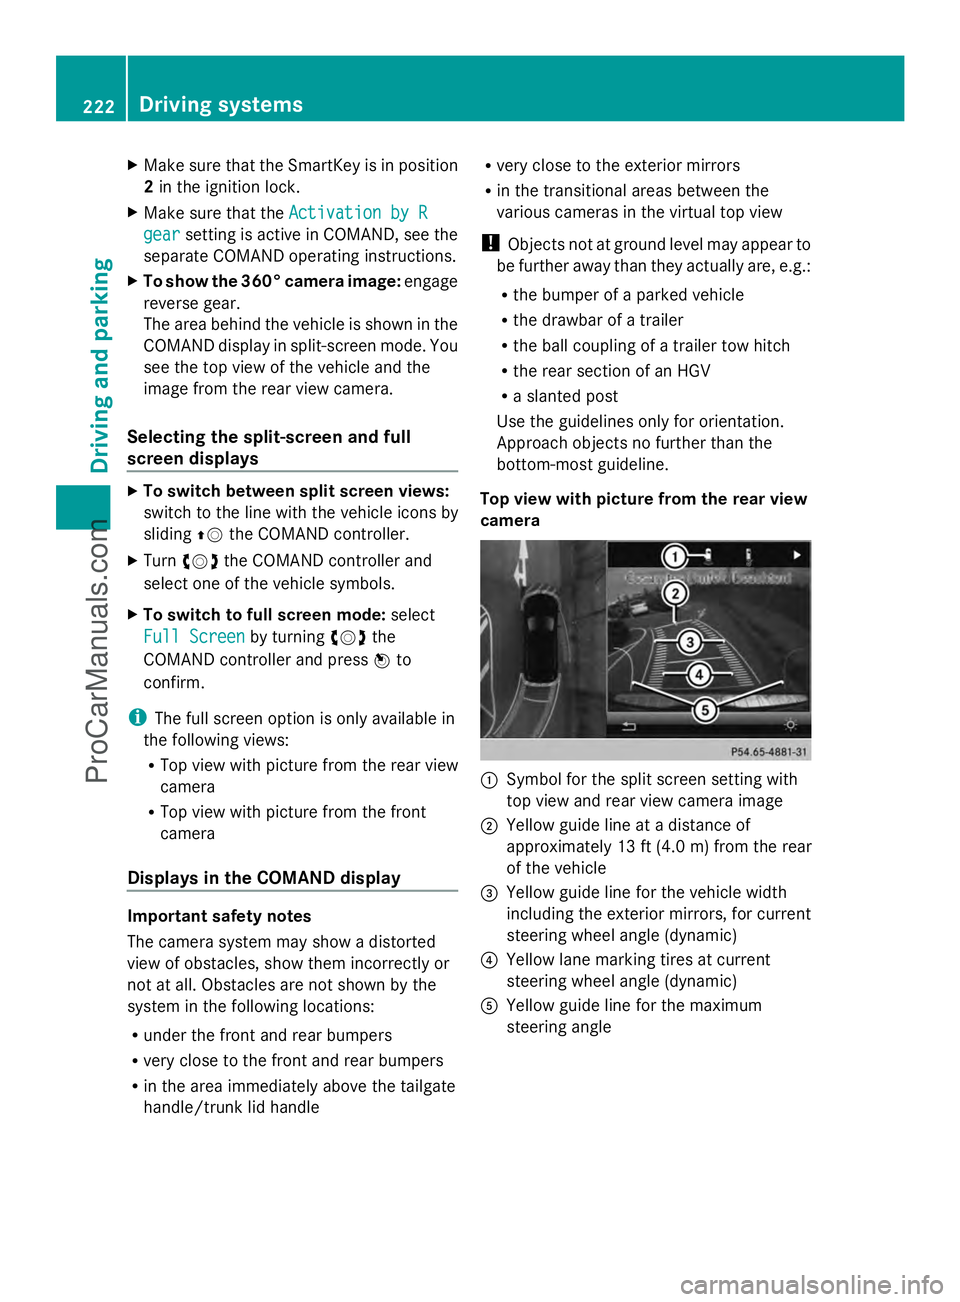
Top view with picture from the rear view
camera :
Symbol for the split screen setting with
top view and rear view camera image
; Yellow guide line at a distance of
approximately 13 ft (4.0 m) from the rear
of the vehicle
= Yellow guide line for the vehicle width
including the exterior mirrors, for current
steering wheel angle (dynamic)
? Yellow lane marking tires at current
steering wheel angle (dynamic)
A Yellow guide line for the maximum
steering angle 222
Driving systemsDriving and parking
ProCarManuals.com
Page 230 of 430
If a vehicle is detected within the blind spot
monitoring range at speeds above 20 mph
(30 km/h), warning lamp :on the
corresponding side lights up red. This warning
is always emitted when a vehicle enters the
blind spot monitoring range from behind or
from the side. When you overtake a vehicle,
the warning only occurs if the difference in
speed is less than 7 mph (12 km/h).
The yellow indicator lamp goes out if reverse
gear is engaged. In this event, Blind Spot
Assist is no longer active.
The brightness of the indicator/warning
lamps is adjusted automatically according to
the ambient light.
Collision warning
If a vehicle is detected in the monitoring range
of Blind Spot Assist and you switch on the
corresponding turn signal, a double warning
tone sounds. Red warning lamp :flashes. If
the turn signal remains on, vehicles detected
are indicated by the flashing of red warning
lamp :. There are no further warning tones.
Switching on Blind Spot Assist
X Make sure that Blind Spot Assist
(Y page 248) is activated in the on-board
computer.
X Turn the SmartKey to position 2in the
ignition lock.
Warning lamps :in the exterior mirrors
light up red for approximately
1.5 seconds and then turn yellow. Lane Keeping Assist General notes
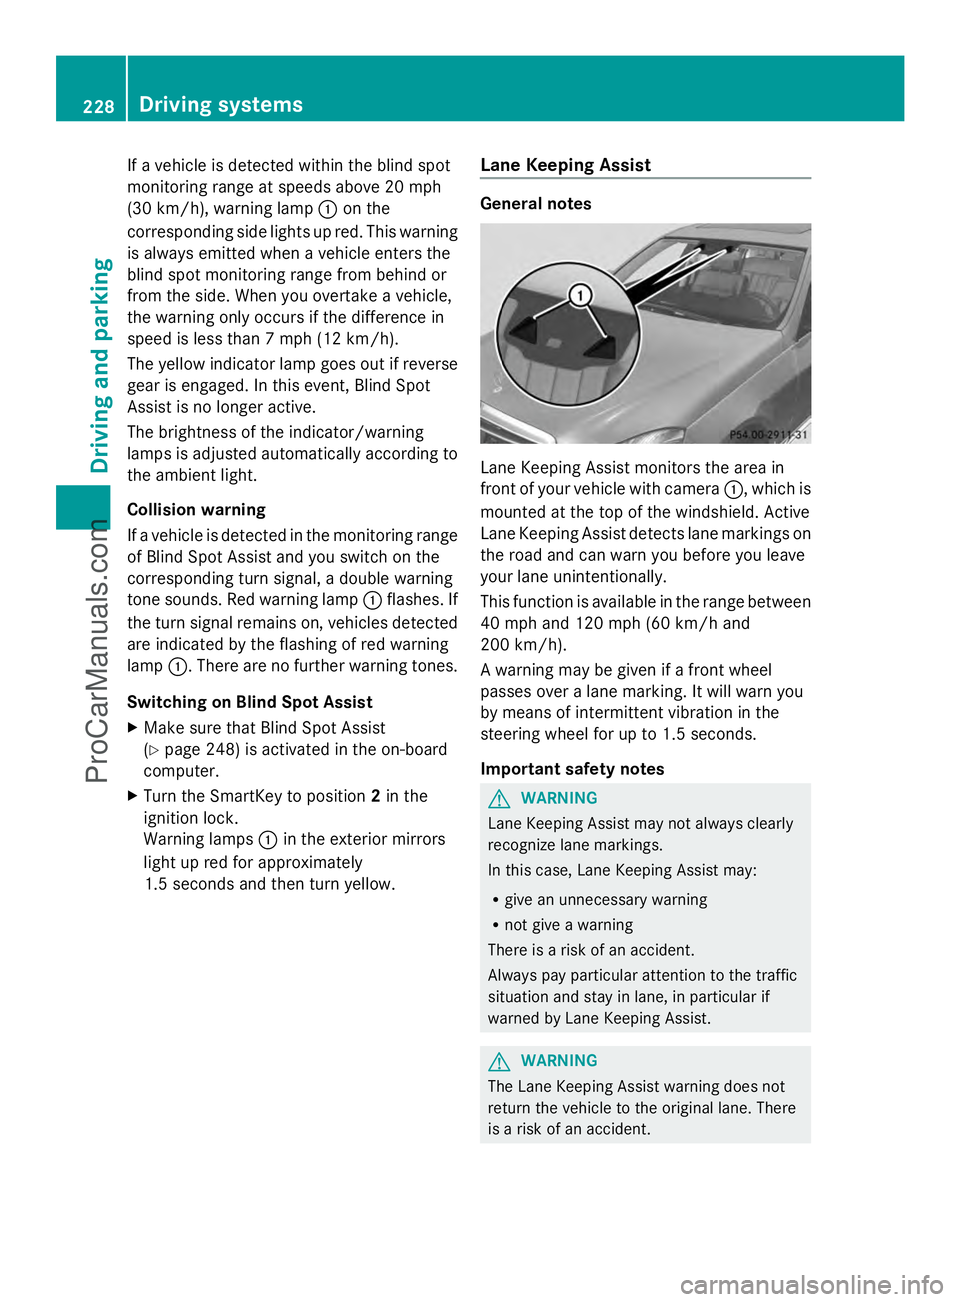
Lane Keeping Assist monitors the area in
front of your vehicle with camera
:, which is
mounted at the top of the windshield. Active
Lane Keeping Assist detects lane markings on
the road and can warn you before you leave
your lane unintentionally.
This function is available in the range between
40 mph and 120 mph (60 km/h and
200 km/h).
A warning may be given if a front wheel
passes over a lane marking. It will warn you
by means of intermittent vibration in the
steering wheel for up to 1.5 seconds.
Important safety notes G
WARNING
Lane Keeping Assist may not always clearly
recognize lane markings.
In this case, Lane Keeping Assist may:
R give an unnecessary warning
R not give a warning
There is a risk of an accident.
Always pay particular attention to the traffic
situation and stay in lane, in particular if
warned by Lane Keeping Assist. G
WARNING
The Lane Keeping Assist warning does not
return the vehicle to the original lane. There
is a risk of an accident. 228
Driving systemsDriving and parking
ProCarManuals.com
Page 234 of 430
The brightness of the indicator/warning
lamps is adjusted automatically according to
the ambient light.
Visual and acoustic collision warning
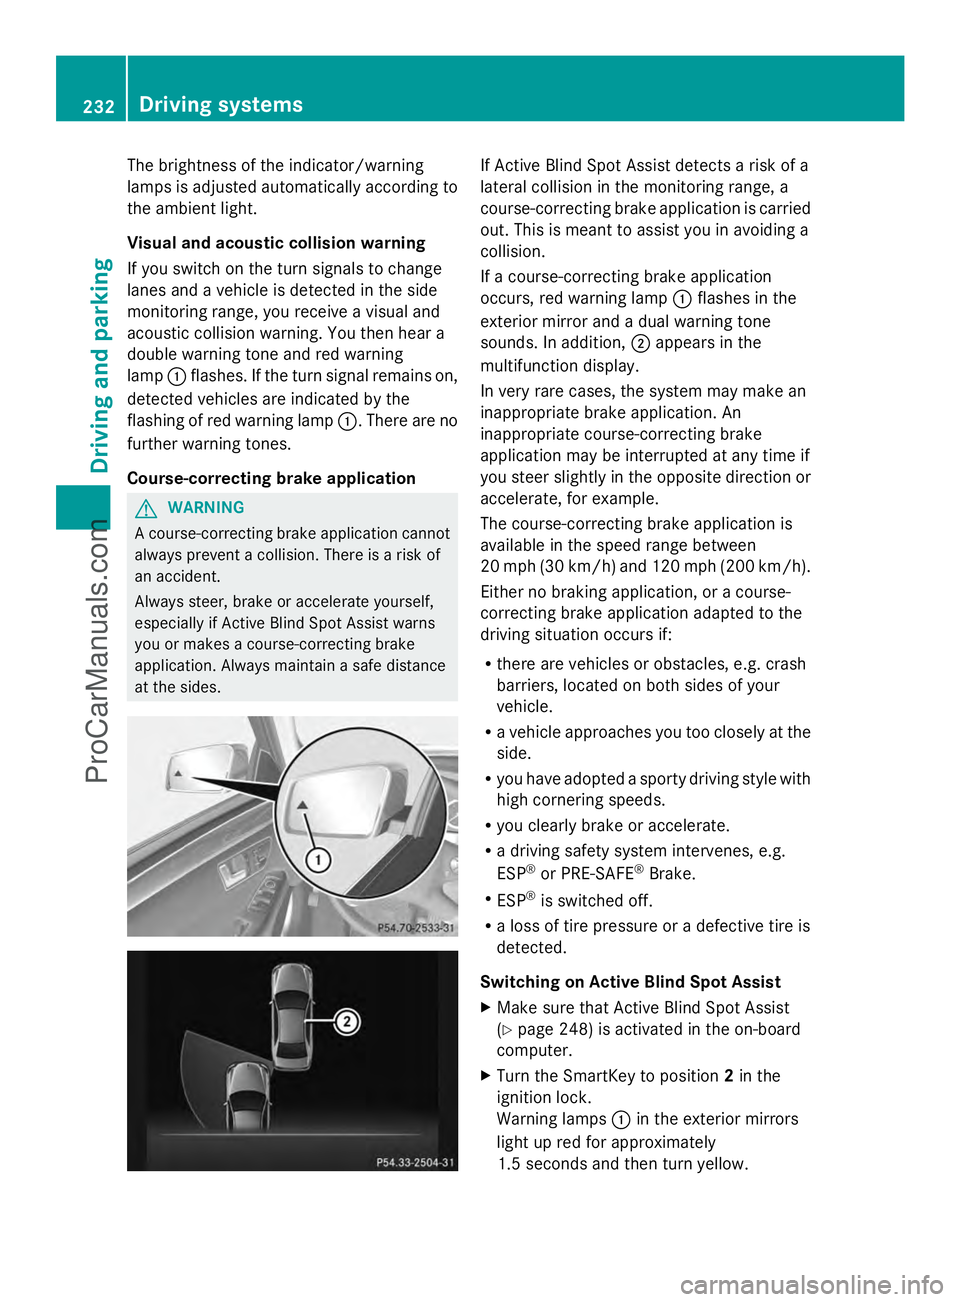
If you switch on the turn signals to change
lanes and a vehicle is detected in the side
monitoring range, you receive a visual and
acoustic collision warning. You then hear a
double warning tone and red warning
lamp :flashes. If the turn signal remains on,
detected vehicles are indicated by the
flashing of red warning lamp :. There are no
further warning tones.
Course-correcting brake application G
WARNING
A course-correcting brake application cannot
always prevent a collision. There is a risk of
an accident.
Always steer, brake or accelerate yourself,
especially if Active Blind Spot Assist warns
you or makes a course-correcting brake
application. Always maintain a safe distance
at the sides. If Active Blind Spot Assist detects a risk of a
lateral collision in the monitoring range, a
course-correcting brake application is carried
out. This is meant to assist you in avoiding a
collision.
If a course-correcting brake application
occurs, red warning lamp
:flashes in the
exterior mirror and a dual warning tone
sounds. In addition, ;appears in the
multifunction display.
In very rare cases, the system may make an
inappropriate brake application. An
inappropriate course-correcting brake
application may be interrupted at any time if
you steer slightly in the opposite direction or
accelerate, for example.
The course-correcting brake application is
available in the speed range between
20 mph (30 km/h) and 120 mph (200 km/h).
Either no braking application, or a course-
correcting brake application adapted to the
driving situation occurs if:
R there are vehicles or obstacles, e.g. crash
barriers, located on both sides of your
vehicle.
R a vehicle approaches you too closely at the
side.
R you have adopted a sporty driving style with
high cornering speeds.
R you clearly brake or accelerate.
R a driving safety system intervenes, e.g.
ESP ®
or PRE-SAFE ®
Brake.
R ESP ®
is switched off.
R a loss of tire pressure or a defective tire is
detected.
Switching on Active Blind Spot Assist
X Make sure that Active Blind Spot Assist
(Y page 248) is activated in the on-board
computer.
X Turn the SmartKey to position 2in the
ignition lock.
Warning lamps :in the exterior mirrors
light up red for approximately
1.5 seconds and then turn yellow. 232
Driving systemsDriving and parking
ProCarManuals.com
Page 241 of 430
The fuel supply is interrupted to protect the
engine when the red band is reached. Outside temperature display
You should pay special attention to road
conditions when temperatures are around
freezing point.
The outside temperature display is in the
multifunction display (Y page 240).
Changes in the outside temperature are
displayed after a short delay. Speedometer with segments
The segments in the speedometer indicate
which speed range is available.
R Cruise control activated (Y page 189):
The segments light up from the stored
speed to the maximum speed.
R DISTRONIC PLUS activated (Y page 191):
One or two segments in the set speed
range light up.
R DISTRONIC PLUS detects a vehicle in front:
The segments between the speed of the
vehicle in front and the stored speed light
up. Operating the on-board computer
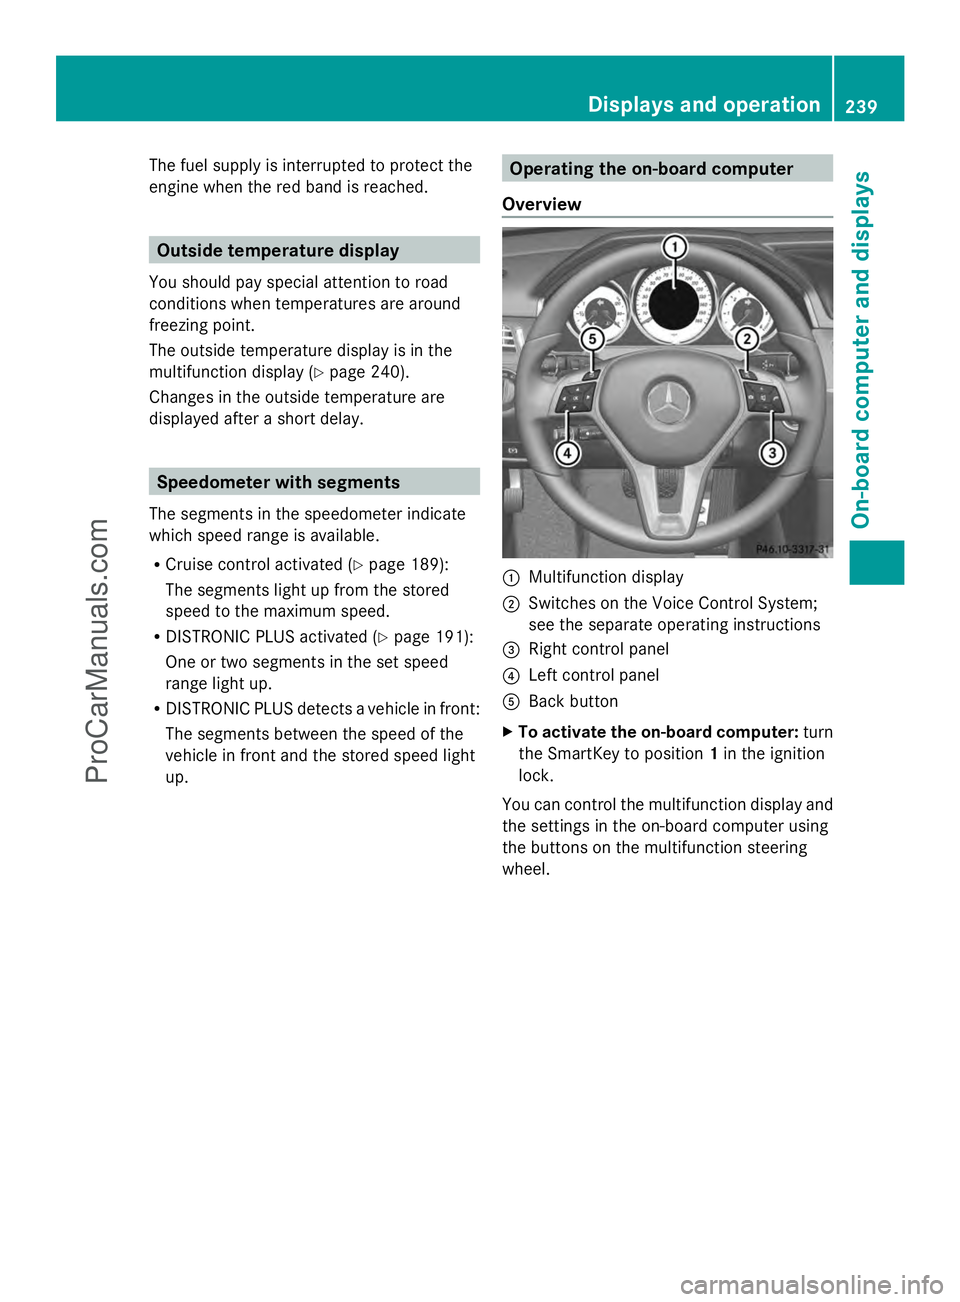
Overview :
Multifunction display
; Switches on the Voice Control System;
see the separate operating instructions
= Right control panel
? Left control panel
A Back button
X To activate the on-board computer: turn
the SmartKey to position 1in the ignition
lock.
You can control the multifunction display and
the settings in the on-board computer using
the buttons on the multifunction steering
wheel. Displays and operation
239On-board computer and displays Z
ProCarManuals.com
Page 243 of 430
Text field
:shows the selected menu or
submenu as well as display messages.
The following messages may appear in the
multifunction display:
Z Shift recommendation
(Ypage 172)
XjY Active Parking Assist (Y page 212)
CRUISE
CRUISE Cruise control (Y
page 189)
_ Adaptive Highbeam Assist
(Ypage 134)
¤ ECO start/stop function
(Ypage 163)
ë HOLD function (Y page 202) Menus and submenus
Menu overview
Press the =or; button on the
steering wheel to call up the menu bar and
select a menu.
Operating the on-board computer
(Y page 239).
Depending on the equipment installed in the
vehicle, you can call up the following menus:
R Trip Trip menu (Y page 241)
R Navi
Navi menu (navigation instructions)
(Y page 243)
R Audio
Audio menu (Y page 244)
R Tel
Tel menu (telephone) (Y page 245)
R DriveAssist
DriveAssist menu (assistance)
(Y page 246)
R Serv.
Serv. menu (Y page 249)
R Settings
Settings menu (settings) (Y page 249)
R AMG
AMG menu in AMG vehicles (Y page 253) Trip menu
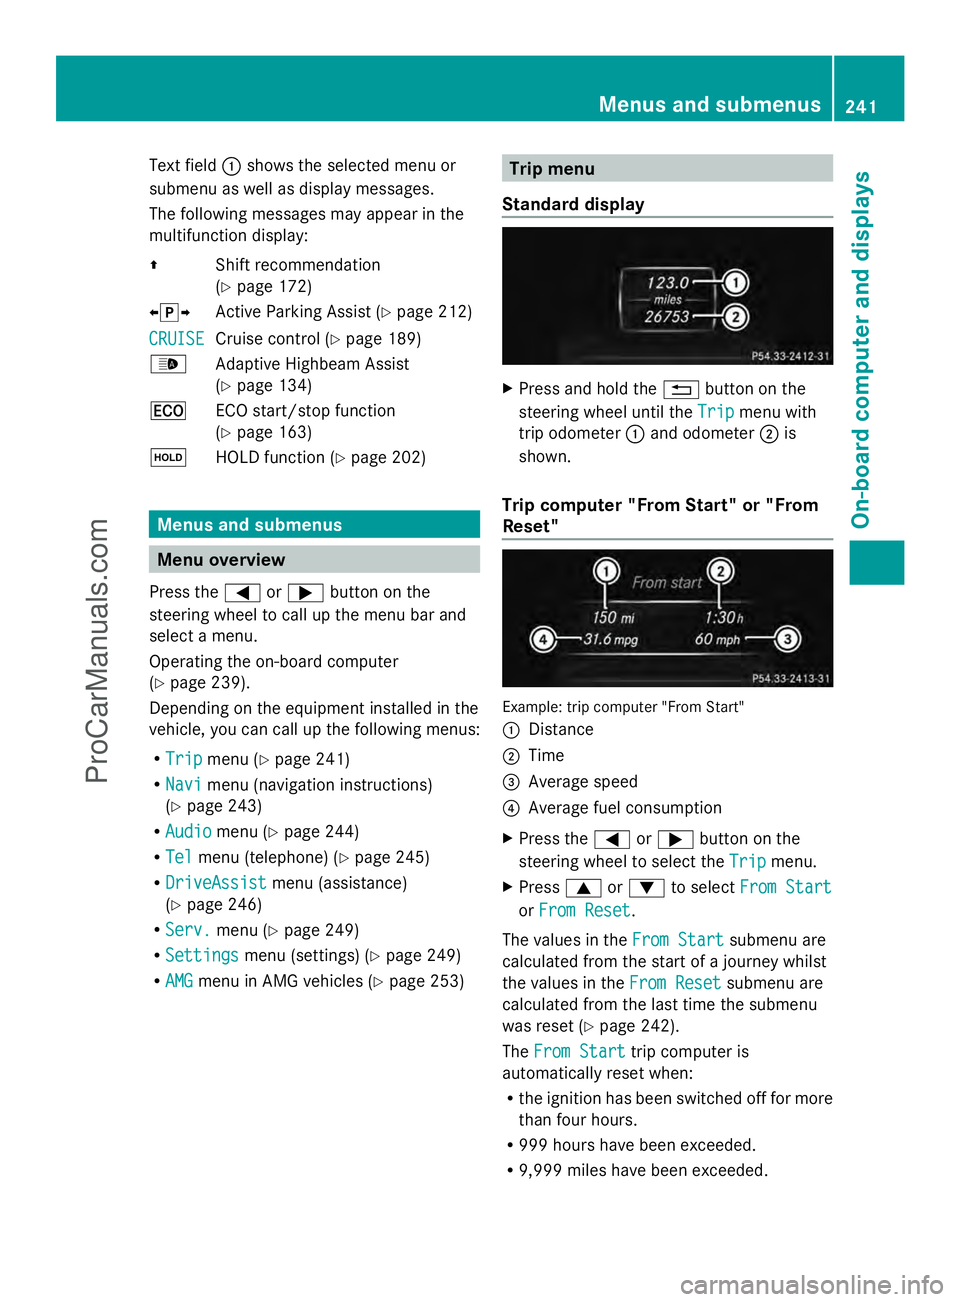
Standard display X
Press and hold the %button on the
steering wheel until the Trip
Trip menu with
trip odometer :and odometer ;is
shown.
Trip computer "From Start" or "From
Reset" Example: trip computer "From Start"
:
Distance
; Time
= Average speed
? Average fuel consumption
X Press the =or; button on the
steering wheel to select the Trip
Trip menu.
X Press 9or: to select From Start From Start
or From Reset
From Reset .
The values in the From Start
From Startsubmenu are
calculated from the start of a journey whilst
the values in the From Reset From Resetsubmenu are
calculated from the last time the submenu
was reset (Y page 242).
The From Start From Start trip computer is
automatically reset when:
R the ignition has been switched off for more
than four hours.
R 999 hours have been exceeded.
R 9,999 miles have been exceeded. Menus and submenus
241On-board computer and displays Z
ProCarManuals.com