2014 MERCEDES-BENZ E-SEDAN ignition
[x] Cancel search: ignitionPage 287 of 430
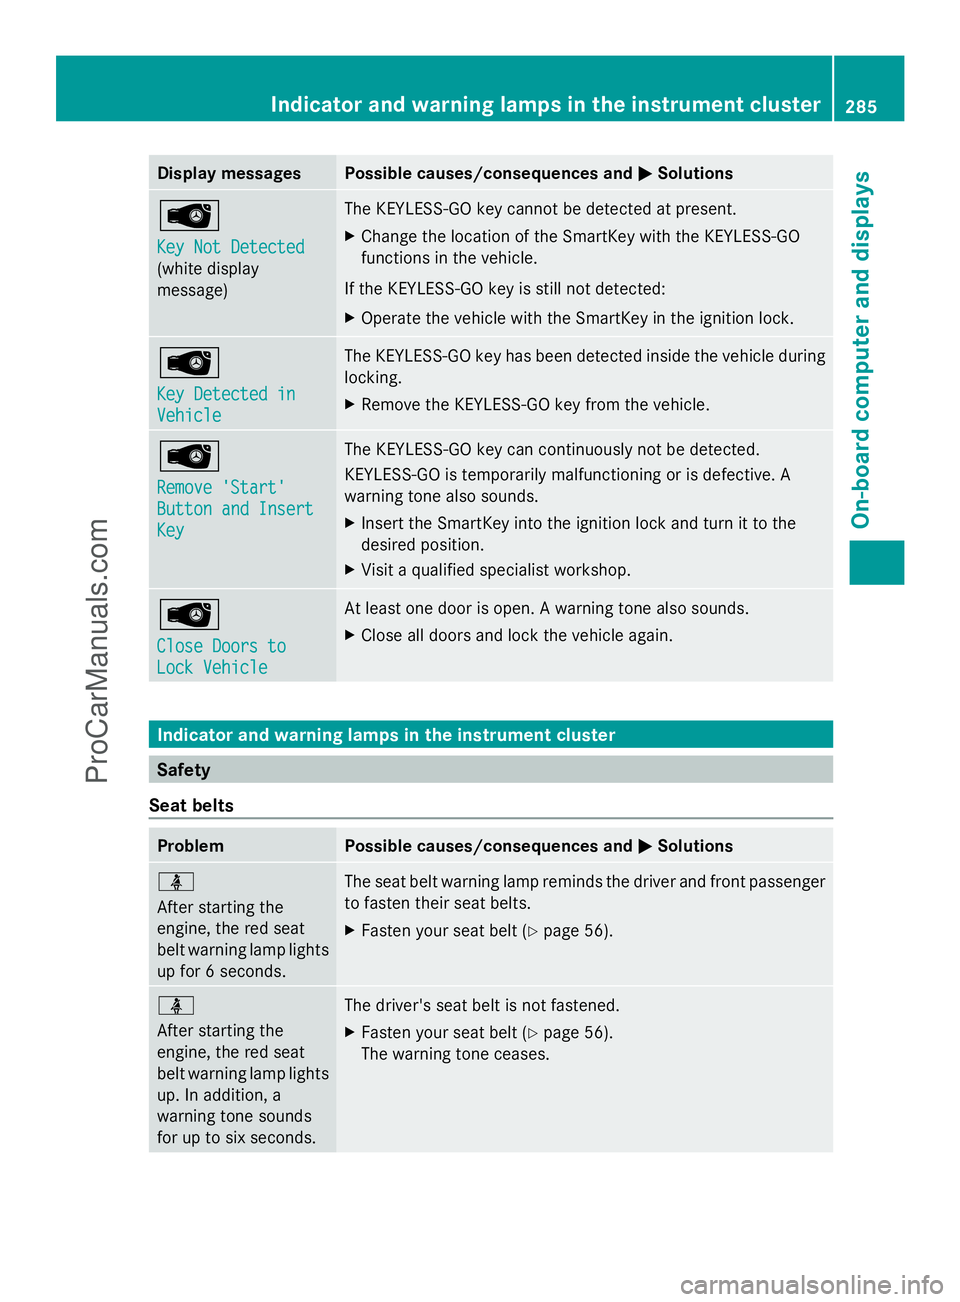
Display messages Possible causes/consequences and
M
MSolutions Â
Key Not Detected Key Not Detected
(white display
message) The KEYLESS-GO key cannot be detected at present.
X
Change the location of the SmartKey with the KEYLESS-GO
functions in the vehicle.
If the KEYLESS-GO key is still not detected:
X Operate the vehicle with the SmartKey in the ignition lock. Â
Key Detected in Key Detected in
Vehicle Vehicle The KEYLESS-GO key has been detected inside the vehicle during
locking.
X
Remove the KEYLESS-GO key from the vehicle. Â
Remove 'Start' Remove 'Start'
Button and Insert Button and Insert
Key Key The KEYLESS-GO key can continuously not be detected.
KEYLESS-GO is temporarily malfunctioning or is defective. A
warning tone also sounds.
X
Insert the SmartKey into the ignition lock and turn it to the
desired position.
X Visit a qualified specialist workshop. Â
Close Doors to Close Doors to
Lock Vehicle Lock Vehicle At least one door is open. A warning tone also sounds.
X
Close all doors and lock the vehicle again. Indicator and warning lamps in the instrument cluster
Safety
Seat belts Problem Possible causes/consequences and
M MSolutions ü
After starting the
engine, the red seat
belt warning lamp lights
up for 6 seconds.
The seat belt warning lamp reminds the driver and front passenger
to fasten their seat belts.
X
Fasten your seat belt (Y page 56).ü
After starting the
engine, the red seat
belt warning lamp lights
up. In addition, a
warning tone sounds
for up to six seconds.
The driver's seat belt is not fastened.
X
Fasten your seat belt (Y page 56).
The warning tone ceases. Indicator and warning lamps in the inst
rumentcluster
285On-board computer and displays Z
ProCarManuals.com
Page 294 of 430
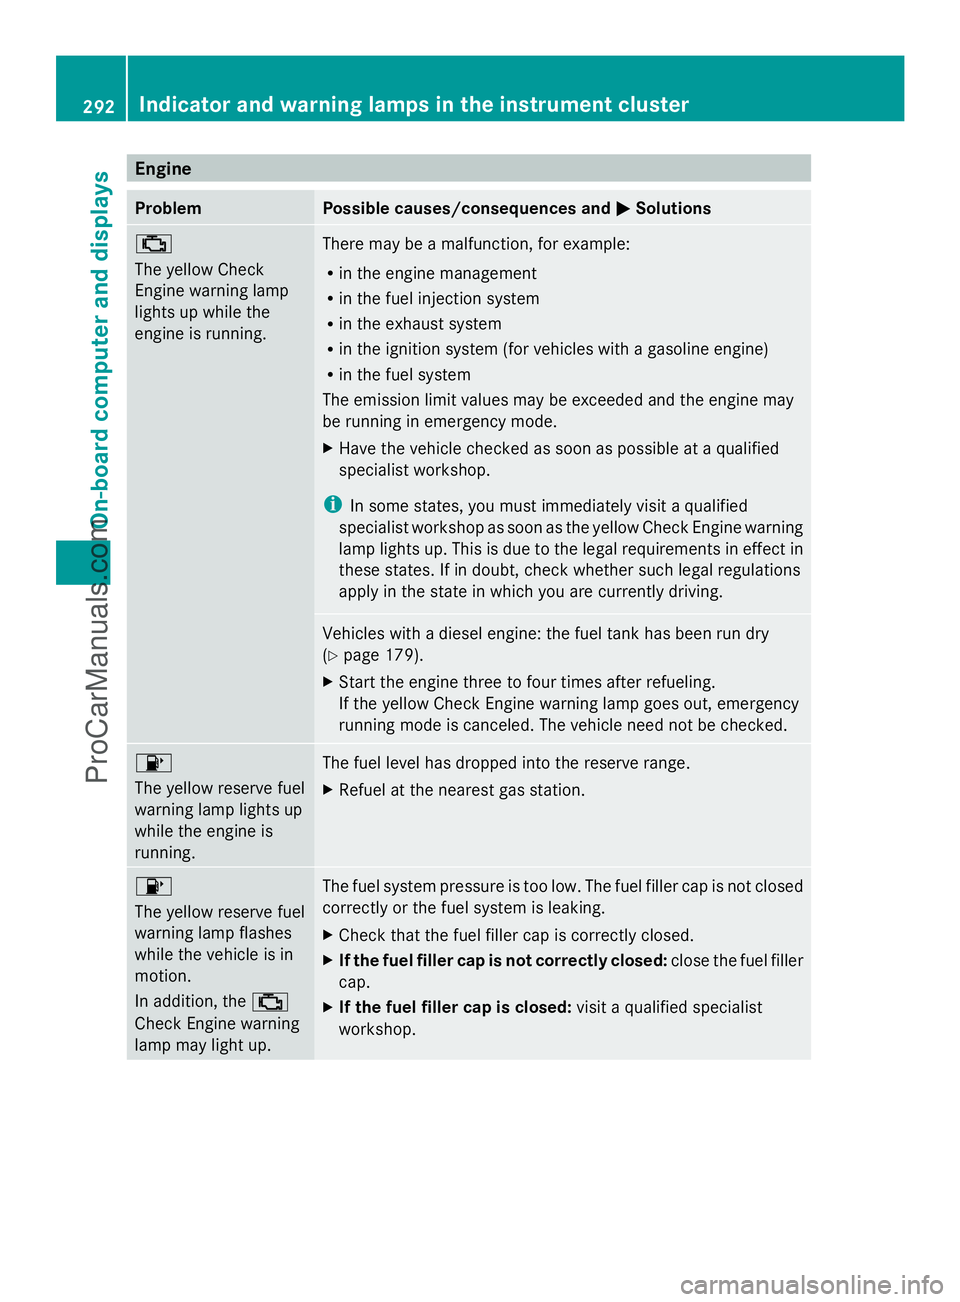
Engine
Problem Possible causes/consequences and
M
MSolutions ;
The yellow Check
Engine warning lamp
lights up while the
engine is running.
There may be a malfunction, for example:
R
in the engine management
R in the fuel injection system
R in the exhaust system
R in the ignition system (for vehicles with a gasoline engine)
R in the fuel system
The emission limit values may be exceeded and the engine may
be running in emergency mode.
X Have the vehicle checked as soon as possible at a qualified
specialist workshop.
i In some states, you must immediately visit a qualified
specialist workshop as soon as the yellow Check Engine warning
lamp lights up. This is due to the legal requirements in effect in
these states. If in doubt, check whether such legal regulations
apply in the state in which you are currently driving. Vehicles with a diesel engine: the fuel tank has been run dry
(Y
page 179).
X Start the engine three to four times after refueling.
If the yellow Check Engine warning lamp goes out, emergency
running mode is canceled. The vehicle need not be checked. 8
The yellow reserve fuel
warning lamp lights up
while the engine is
running.
The fuel level has dropped into the reserve range.
X
Refuel at the nearest gas station. 8
The yellow reserve fuel
warning lamp flashes
while the vehicle is in
motion.
In addition, the
;
Check Engine warning
lamp may light up. The fuel system pressure is too low. The fuel filler cap is not closed
correctly or the fuel system is leaking.
X Check that the fuel filler cap is correctly closed.
X If the fuel filler cap is not correctly closed: close the fuel filler
cap.
X If the fuel filler cap is closed: visit a qualified specialist
workshop. 292
Indicator and warning lamps in the instrument clusterOn-board computer and displays
ProCarManuals.com
Page 320 of 430
X
Vehicles with an additional sun visor:
slide sun visor :horizontally as desired.
X Fold down additional sun visor ;to the
windshield. Roller sunblinds on the rear side
windows
! Always guide the roller sunblind by hand.
Do not let it snap back suddenly as this
would damage the automatic roller
mechanism.
! Do not drive the vehicle with the roller
sunblind hooked in and the side windows
opened simultaneously. The roller sunblind
can jump out of the retainers and spring
back suddenly when driving at high speeds,
e.g. when driving on the freeway. This could
damage the inertia reel. Therefore, either
close the side window or retract the roller
sunblind before driving at high speeds. X
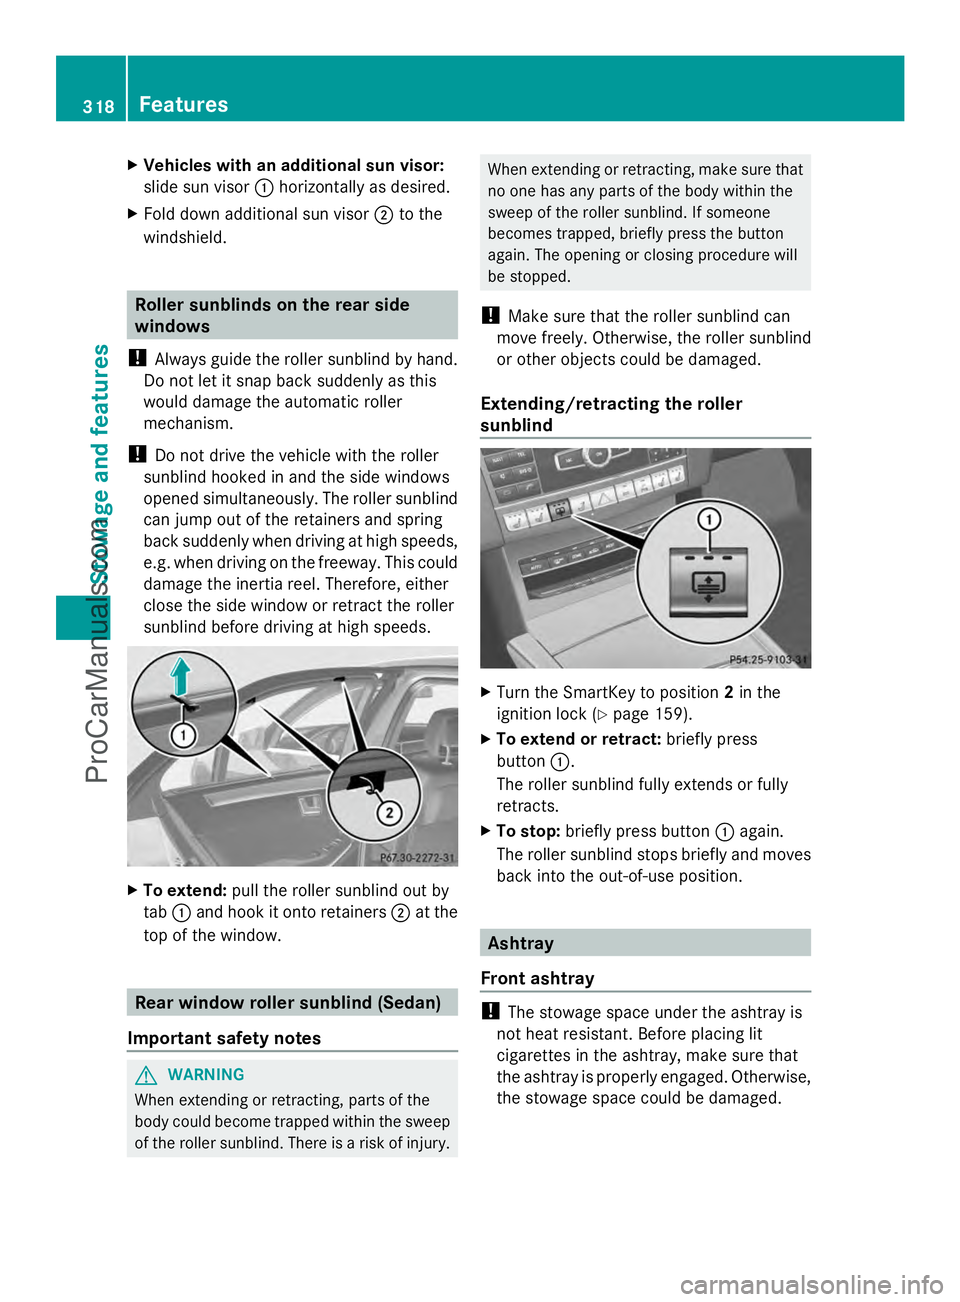
To extend: pull the roller sunblind out by
tab :and hook it onto retainers ;at the
top of the window. Rear window roller sunblind (Sedan)
Important safety notes G
WARNING
When extending or retracting, parts of the
body could become trapped within the sweep
of the roller sunblind. There is a risk of injury. When extending or retracting, make sure that
no one has any parts of the body within the
sweep of the roller sunblind. If someone
becomes trapped, briefly press the button
again. The opening or closing procedure will
be stopped.
! Make sure that the roller sunblind can
move freely. Otherwise, the roller sunblind
or other objects could be damaged.
Extending/retracting the roller
sunblind X
Turn the SmartKey to position 2in the
ignition lock (Y page 159).
X To extend or retract: briefly press
button :.
The roller sunblind fully extends or fully
retracts.
X To stop: briefly press button :again.
The roller sunblind stops briefly and moves
back into the out-of-use position. Ashtray
Front ashtray !
The stowage space under the ashtray is
not heat resistant. Before placing lit
cigarettes in the ashtray, make sure that
the ashtray is properly engaged. Otherwise,
the stowage space could be damaged. 318
FeaturesStowage and features
ProCarManuals.com
Page 321 of 430
X
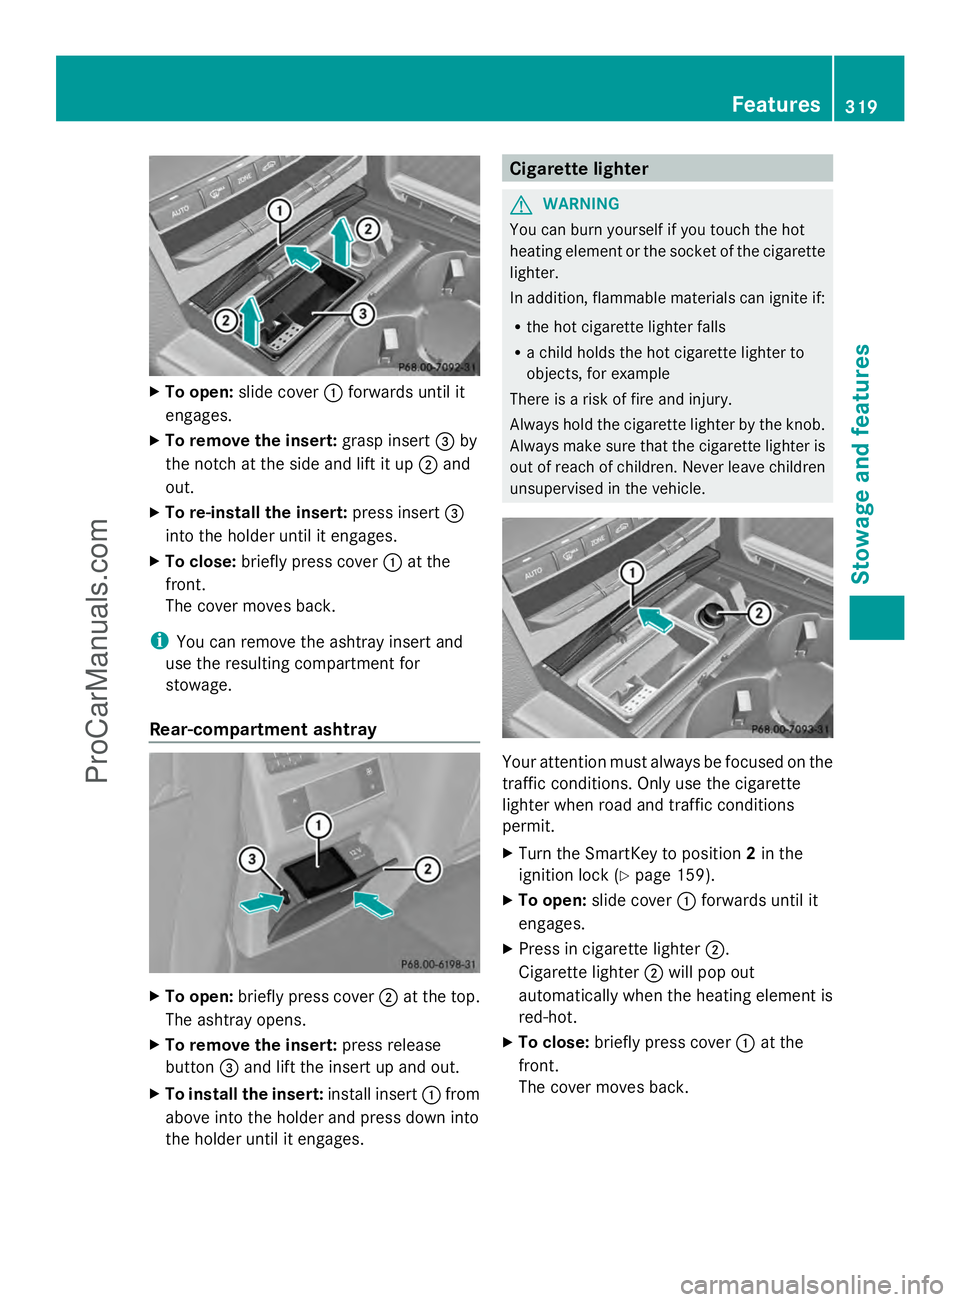
To open: slide cover :forwards until it
engages.
X To remove the insert: grasp insert=by
the notch at the side and lift it up ;and
out.
X To re-install the insert: press insert=
into the holder until it engages.
X To close: briefly press cover :at the
front.
The cover moves back.
i You can remove the ashtray insert and
use the resulting compartment for
stowage.
Rear-compartment ashtray X
To open: briefly press cover ;at the top.
The ashtray opens.
X To remove the insert: press release
button =and lift the insert up and out.
X To install the insert: install insert:from
above into the holder and press down into
the holder until it engages. Cigarette lighter
G
WARNING
You can burn yourself if you touch the hot
heating element or the socket of the cigarette
lighter.
In addition, flammable materials can ignite if:
R the hot cigarette lighter falls
R a child holds the hot cigarette lighter to
objects, for example
There is a risk of fire and injury.
Always hold the cigarette lighter by the knob.
Always make sure that the cigarette lighter is
out of reach of children. Never leave children
unsupervised in the vehicle. Your attention must always be focused on the
traffic conditions. Only use the cigarette
lighter when road and traffic conditions
permit.
X
Turn the SmartKey to position 2in the
ignition lock (Y page 159).
X To open: slide cover :forwards until it
engages.
X Press in cigarette lighter ;.
Cigarette lighter ;will pop out
automatically when the heating element is
red-hot.
X To close: briefly press cover :at the
front.
The cover moves back. Features
319Stowage an d features Z
ProCarManuals.com
Page 322 of 430
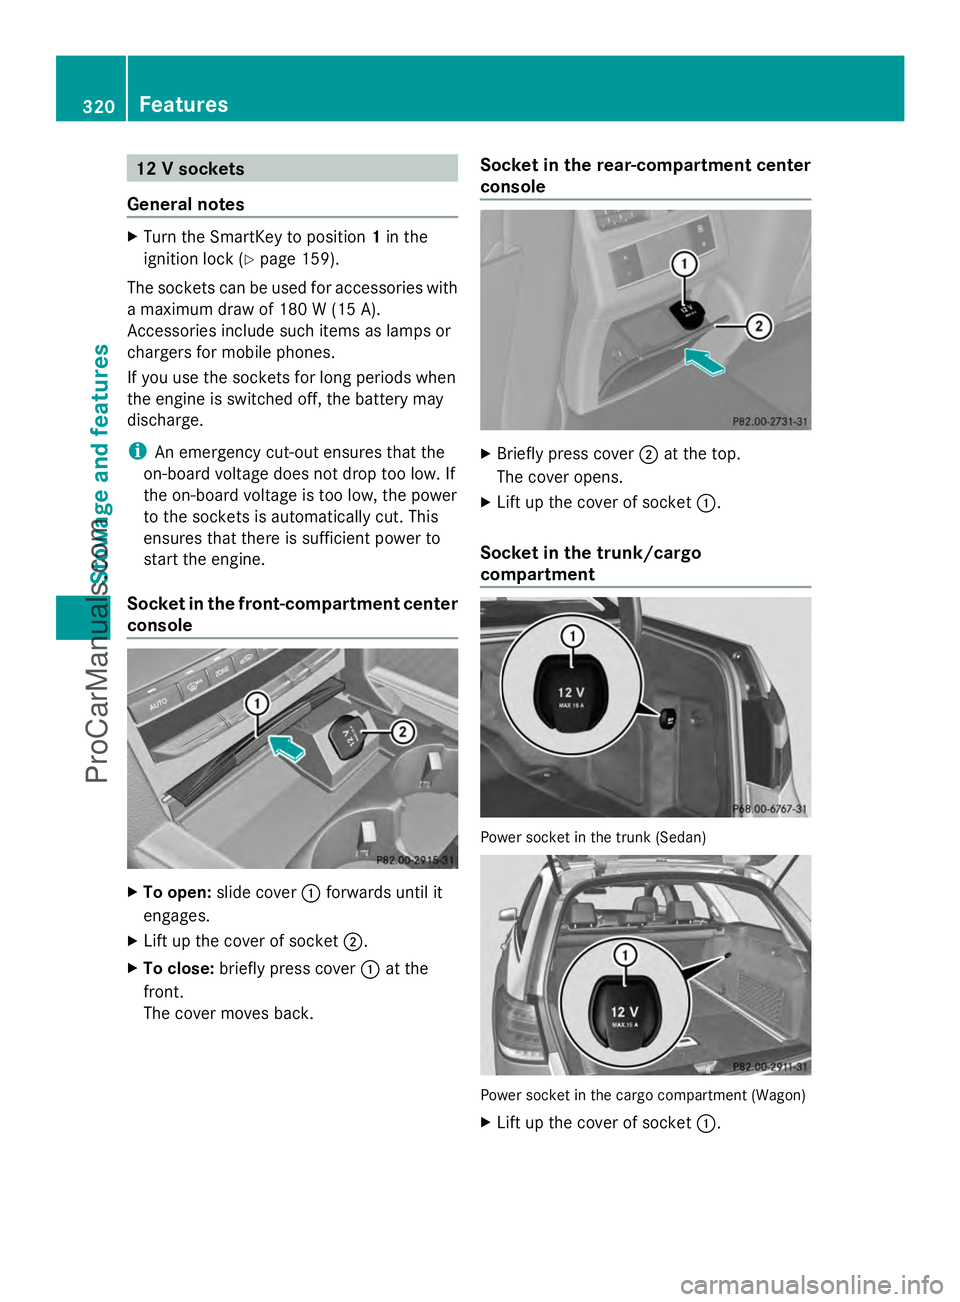
12 V sockets
General notes X
Turn the SmartKey to position 1in the
ignition lock (Y page 159).
The sockets can be used for accessories with
a maximum draw of 180 W (15 A).
Accessories include such items as lamps or
chargers for mobile phones.
If you use the sockets for long periods when
the engine is switched off, the battery may
discharge.
i An emergency cut-out ensures that the
on-board voltage does not drop too low. If
the on-board voltage is too low, the power
to the sockets is automatically cut. This
ensures that there is sufficient power to
start the engine.
Socket in the front-compartment center
console X
To open: slide cover :forwards until it
engages.
X Lift up the cover of socket ;.
X To close: briefly press cover :at the
front.
The cover moves back. Socket in the rear-compartment center
console
X
Briefly press cover ;at the top.
The cover opens.
X Lift up the cover of socket :.
Socket in the trunk/cargo
compartment Power socket in the trunk (Sedan)
Power socket in the cargo compartment (Wagon)
X
Lift up the cover of socket :.320
FeaturesStowage and features
ProCarManuals.com
Page 323 of 430
115 V socket
Important safety notes G
DANGER
When a suitable device is connected, the
115 V power socket will be carrying a high
voltage. You could receive an electric shock
if the connector cable or the 115 V power
socket is pulled out of the trim or is damaged
or wet. There is a risk of fatal injury.
R Use only connector cables that are dry and
free of damage.
R When the ignition is off, make sure that the
115 V power socket is dry.
R Have the 115 V power socket checked or
replaced immediately at a qualified
specialized workshop if it is damaged or has
been pulled out of the trim.
R Never plug the connector cable into a
115 V power socket that is damaged or has
been pulled out of the trim. G
DANGER
If you reach into the power socket or plug
inappropriate devices into the power socket,
you could receive an electric shock. There is
a risk of fatal injury.
Only connect appropriate devices to the
power socket.
! Note that work and repairs on the 115 V
power socket should only be carried out by
qualified specialist personnel.
General notes The 115 V power socket provides an
alternating voltage of 115 V so that small
electronic devices can be connected. These
devices, such as games consoles, chargers
and laptops, should not consume more than
a maximum of 150 watts altogether.
Requirements for operation of these devices:
R the electronic device that you connect has
a suitable connector and conforms to standards specific to the country you are
in.
R the plug of the electronic device is plugged
correctly into 115 V power socket.
R the maximum wattage of the device to be
connected must not exceed 150 watts.
R the on-board power supply is within a
permissible voltage range.
R the 12 V sockets in the rear and the cargo
compartment/trunk are operational
(Y page 320).
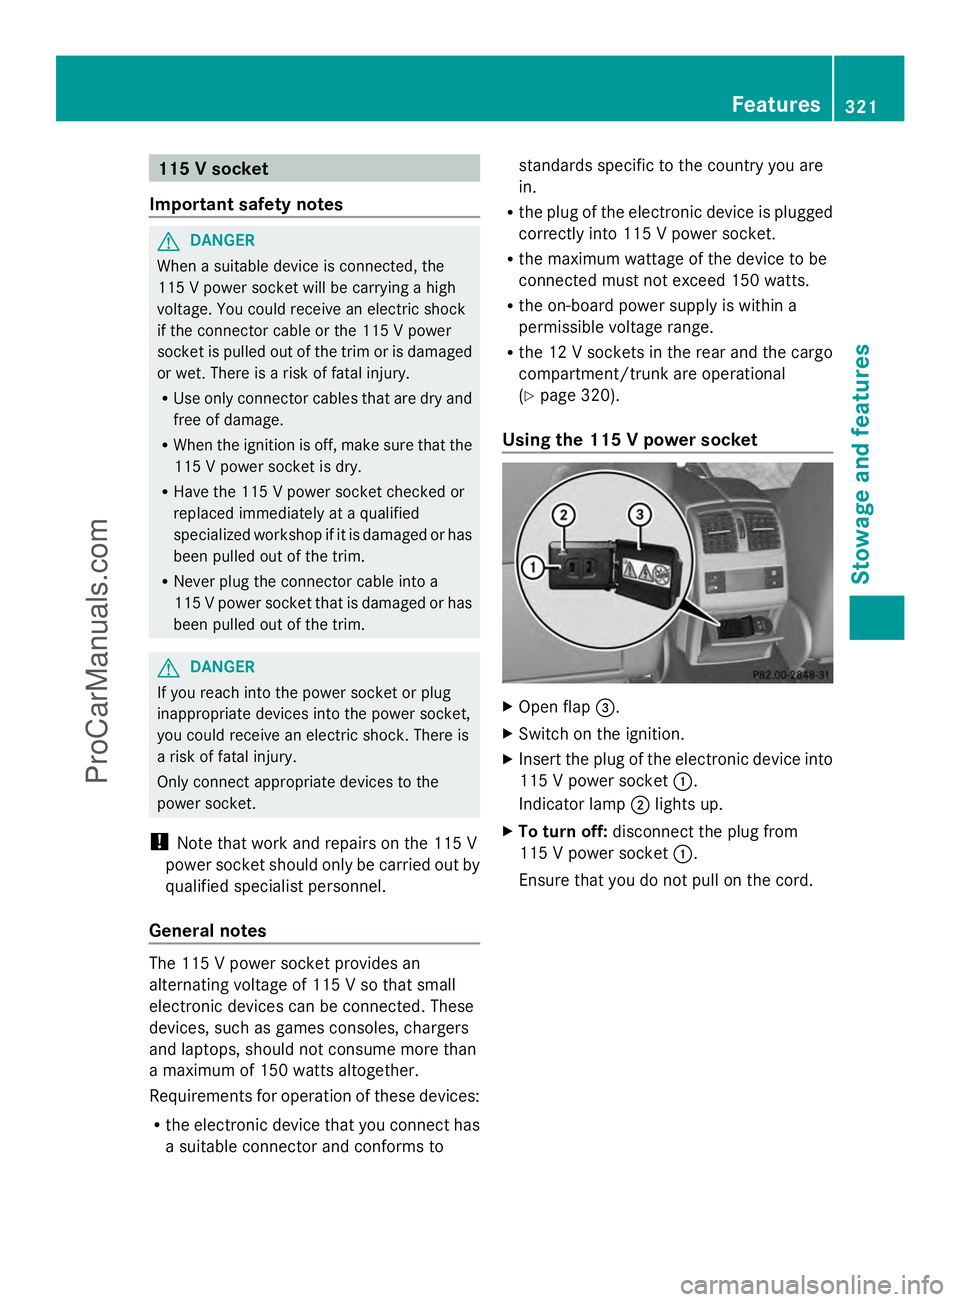
Using the 115 V power socket X
Open flap =.
X Switch on the ignition.
X Insert the plug of the electronic device into
115 V power socket :.
Indicator lamp ;lights up.
X To turn off: disconnect the plug from
115 V power socket :.
Ensure that you do not pull on the cord. Features
321Stowage and features Z
ProCarManuals.com
Page 325 of 430
The mbrace system
To adjust the volume during a call, proceed
as follows:
X Press the WorX button on the
multifunction steering wheel.
or
X Use the volume controller of the audio
system/COMAND.
The system offers various services, e.g:
R Automatic and manual emergency call
R Roadside Assistance call
R MB Info call
USA only: you can find information and a
description of all available features under
"Owners Online" at http://www.mbusa.com.
System self-test After you have switched on the ignition, the
system carries out a self-diagnosis.
A malfunction in the system has been
detected if one of the following occurs:
R The indicator lamp in the SOS button does
not come on during the system self-test.
R The indicator lamp in the FRoadside
Assistance button does not light up during
self-diagnosis of the system.
R The indicator lamp in the ïMB Info call
button does not light up during self-
diagnosis of the system.
R The indicator lamp in one or more of the
following buttons continues to light up red
after the system self-diagnosis:
- SOS button
- F Roadside Assistance call button
- ï MB Info call button
R After the system self-diagnosis, the
Inoperative
Inoperative orService Not Service Not
Activated
Activated message appears in the
multifunction display.
If a malfunction is indicated as outlined
above, the system may not operate as expected. In the event of an emergency, help
will have to be summoned by other means.
Have the system checked at the nearest
authorized Mercedes-Benz Center or contact
the following service hotlines:
R
USA: Mercedes-Benz Customer Assistance
Center at
1-800-FOR-MERCedes (1-800-367-6372)
or 1-866-990-9007
R Canada: Customer Service at
1-888-923-8367
Emergency call Important safety notes
G
WARNING
It can be dangerous to remain in the vehicle,
even if you have pressed the SOS button in an
emergency if:
R you see smoke inside or outside of the
vehicle, e.g. if there is a fire after an
accident
R the vehicle is on a dangerous section of
road
R the vehicle is not visible or cannot easily be
seen by other road users, particularly when
dark or in poor visibility conditions
There is a risk of an accident and injury.
Leave the vehicle immediately in this or
similar situations as soon as it is safe to do
so. Move to a safe location along with other
vehicle occupants. In such situations, secure
the vehicle in accordance with national
regulations, e. g. with a warning triangle.
You must have a license agreement to
activate the mbrace service. Make sure that
your system is activated and operational. To
register, press the ïMB Info call button.
If any of the steps mentioned are not carried
out, the system may not be activated. Features
323Stowage an d features Z
ProCarManuals.com
Page 329 of 430
i
The destination download function is
available if the relevant mobile phone
network is available and data transfer is
possible.
i The destination download function can
only be used if the vehicle is equipped with
a navigation system.
Route Assistance
This service is part of the mbrace PLUS
Package and cannot be purchased
separately.
i You can also use the Route Assistance
function if your vehicle is not equipped with
a navigation system.
Within the framework of this service, you
receive a professional and reliable form of
navigation support without having to leave
your vehicle.
The customer service representative finds a
suitable route depending on your vehicle's
current position and the desired destination.
You will then be guided live through the
current route section.
Search & Send General notes
i
To use "Search & Send", your vehicle
must be equipped with mbrace and a
navigation system. Additionally, an mbrace
service subscription must be completed.
"Search & Send" is a destination entry
service. A destination address which is found
on Google Maps ®
can be transferred via
mbrace directly to your vehicle's navigation
system.
Specifying and sending the destination
address
X Go to the website http://
www.maps.google.com and enter a
destination address into the entry field.
X To send the destination address to the
e-mail address of your mbrace account:
click on the corresponding
button on the website.
i Example:
If you select 'Send to vehicle' and then
'Mercedes-Benz', the destination address
will be sent to your vehicle.
X When the "Send" dialog window appears:
Enter the e-mail address you specified
when setting up your mbrace account into
the corresponding field.
X Click "Send".
i Information on specific commands such
as "Address entry" or "Send" can be found
on the website.
Calling up destination addresses
X Switch on the ignition.
The destination address is loaded into the
vehicle's navigation system.
A display message appears, asking
whether navigation should be started.
X Select Yes Yesby turning cVdor sliding
XVY the COMAND controller and press
W to confirm.
The system calculates the route and
subsequently starts the route guidance
with the address entered.
i If you select No No, the address can be saved
in the address book.
i If you have sent more than one
destination address, each individual
destination must be confirmed separately.
i Destination addresses are loaded in the
same order as the order in which they were
sent.
If you own multiple Mercedes-Benz
vehicles with mbrace and activated mbrace
accounts:
If multiple vehicles are registered under the
same e-mail address, the destination will
be sent to all the vehicles. Features
327Stowage and features Z
ProCarManuals.com