2014 MERCEDES-BENZ CLS SHOOTING BRAKE warning light
[x] Cancel search: warning lightPage 231 of 417
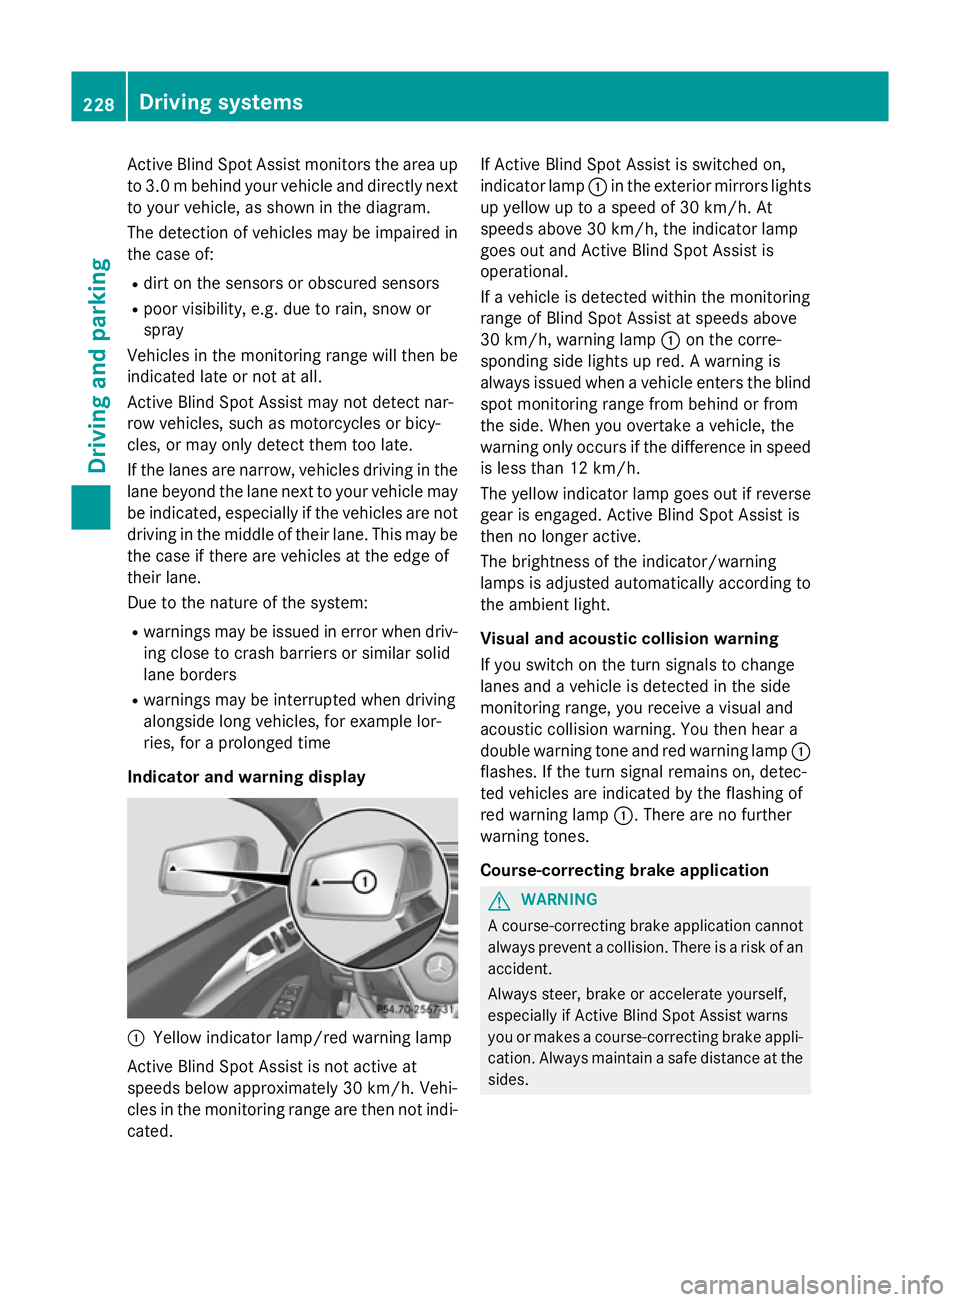
Active Blind Spot Assist monitors the area up
to 3.0 mbehind your vehicle and directly next
to your vehicle, as shown in the diagram.
The detection of vehicles may be impaired in the case of:
R dirt on the sensors or obscured sensors
R poor visibility, e.g. due to rain, snow or
spray
Vehicles in the monitoring range will then be
indicated late or not at all.
Active Blind Spot Assist may not detect nar-
row vehicles, such as motorcycles or bicy-
cles, or may only detect them too late.
If the lanes are narrow, vehicles driving in the
lane beyond the lane next to your vehicle may
be indicated, especially if the vehicles are not
driving in the middle of their lane. This may be the case if there are vehicles at the edge of
their lane.
Due to the nature of the system:
R warnings may be issued in error when driv-
ing close to crash barriers or similar solid
lane borders
R warnings may be interrupted when driving
alongside long vehicles, for example lor-
ries, for a prolonged time
Indicator and warning display :
Yellow indicator lamp/red warning lamp
Active Blind Spot Assist is not active at
speeds below approximately 30 km/h. Vehi-
cles in the monitoring range are then not indi-
cated. If Active Blind Spot Assist is switched on,
indicator lamp :in the exterior mirrors lights
up yellow up to a speed of 30 km/h. At
speeds above 30 km/h, the indicator lamp
goes out and Active Blind Spot Assist is
operational.
If a vehicle is detected within the monitoring
range of Blind Spot Assist at speeds above
30 km/h, warning lamp :on the corre-
sponding side lights up red. A warning is
always issued when a vehicle enters the blind
spot monitoring range from behind or from
the side. When you overtake a vehicle, the
warning only occurs if the difference in speed is less than 12 km/h.
The yellow indicator lamp goes out if reverse
gear is engaged. Active Blind Spot Assist is
then no longer active.
The brightness of the indicator/warning
lamps is adjusted automatically according to
the ambient light.
Visual and acoustic collision warning
If you switch on the turn signals to change
lanes and a vehicle is detected in the side
monitoring range, you receive a visual and
acoustic collision warning. You then hear a
double warning tone and red warning lamp :
flashes. If the turn signal remains on, detec-
ted vehicles are indicated by the flashing of
red warning lamp :. There are no further
warning tones.
Course-correcting brake application G
WARNING
A course-correcting brake application cannot always prevent a collision. There is a risk of an
accident.
Always steer, brake or accelerate yourself,
especially if Active Blind Spot Assist warns
you or makes a course-correcting brake appli-
cation. Always maintain a safe distance at the sides. 228
Driving systemsDriving an
d parking
Page 232 of 417
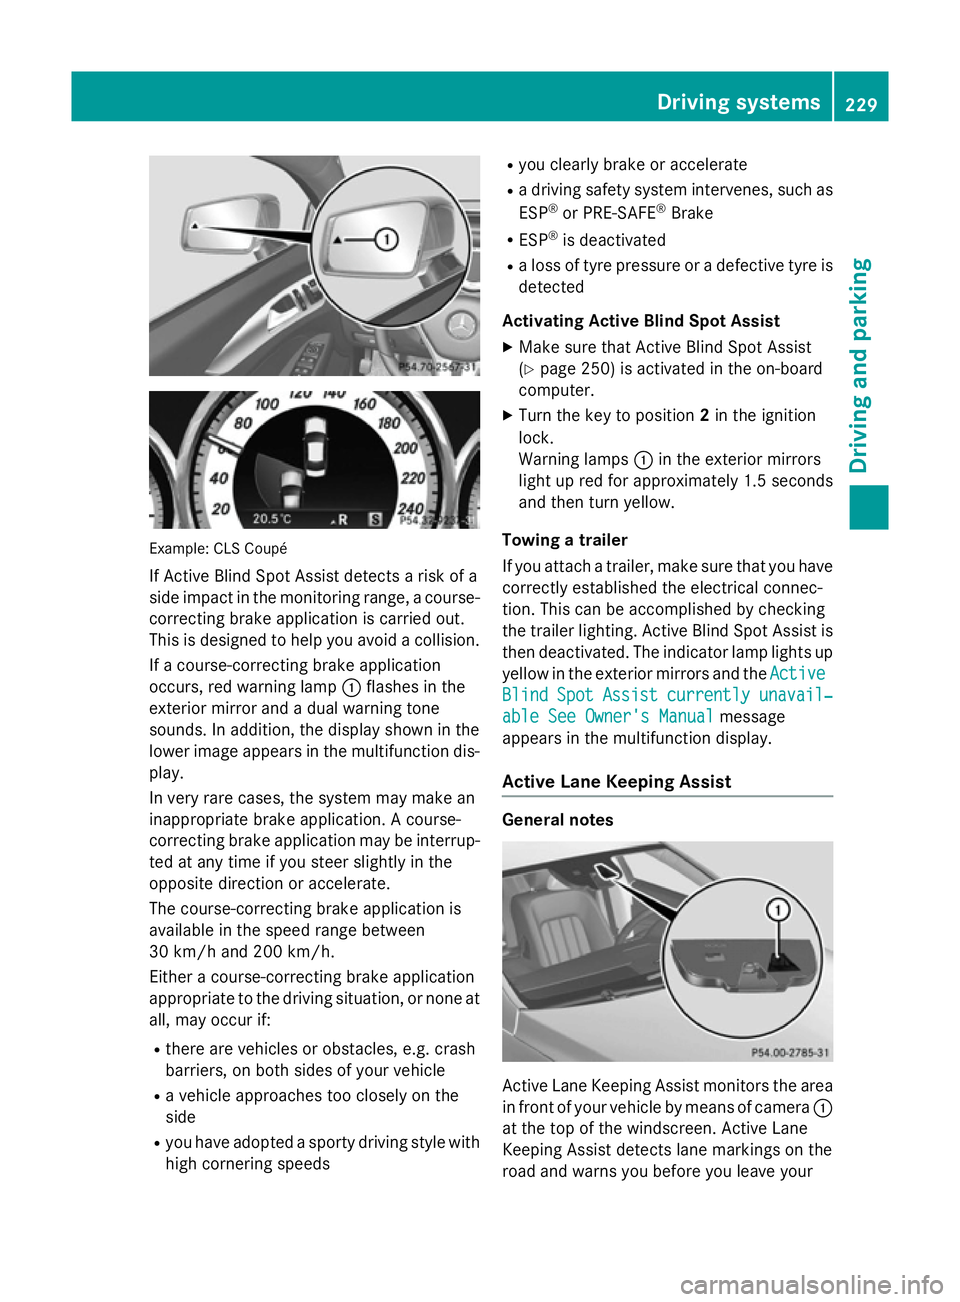
Example: CLS Coupé
If Active Blind Spot Assist detects a risk of a
side impact in the monitoring range, a course-correcting brake application is carried out.
This is designed to help you avoid a collision.
If a course-correcting brake application
occurs, red warning lamp :flashes in the
exterior mirror and a dual warning tone
sounds. In addition, the display shown in the
lower image appears in the multifunction dis- play.
In very rare cases, the system may make an
inappropriate brake application. A course-
correcting brake application may be interrup-
ted at any time if you steer slightly in the
opposite direction or accelerate.
The course-correcting brake application is
available in the speed range between
30 km/h and 200 km/h.
Either a course-correcting brake application
appropriate to the driving situation, or none at all, may occur if:
R there are vehicles or obstacles, e.g. crash
barriers, on both sides of your vehicle
R a vehicle approaches too closely on the
side
R you have adopted a sporty driving style with
high cornering speeds R
you clearly brake or accelerate
R a driving safety system intervenes, such as
ESP ®
or PRE-SAFE ®
Brake
R ESP ®
is deactivated
R a loss of tyre pressure or a defective tyre is
detected
Activating Active Blind Spot Assist
X Make sure that Active Blind Spot Assist
(Y page 250) is activated in the on-board
computer.
X Turn the key to position 2in the ignition
lock.
Warning lamps :in the exterior mirrors
light up red for approximately 1.5 seconds
and then turn yellow.
Towing a trailer
If you attach a trailer, make sure that you have
correctly established the electrical connec-
tion. This can be accomplished by checking
the trailer lighting. Active Blind Spot Assist is
then deactivated. The indicator lamp lights up
yellow in the exterior mirrors and the Active Active
Blind
Blind Spot
SpotAssist
Assist currently
currently unavail‐
unavail‐
able See Owner's Manual
able See Owner's Manual message
appears in the multifunction display.
Active Lane Keeping Assist General notes
Active Lane Keeping Assist monitors the area
in front of your vehicle by means of camera :
at the top of the windscreen. Active Lane
Keeping Assist detects lane markings on the
road and warns you before you leave your Driving systems
229Driving and parking Z
Page 234 of 417
Always steer, brake or accelerate yourself,
especially if Active Lane Keeping Assist warns
you or makes a lane-correcting brake appli-
cation. G
WARNING
Active Lane Keeping Assist does not detect
traffic conditions or road users. In very rare
cases, the system may make an inappropriate brake application, e.g. after intentionally driv-
ing over a solid lane marking. There is a risk of an accident.
An inappropriate brake application may be
interrupted at any time if you steer slightly in
the opposite direction. Always make sure that
there is sufficient distance to the side for
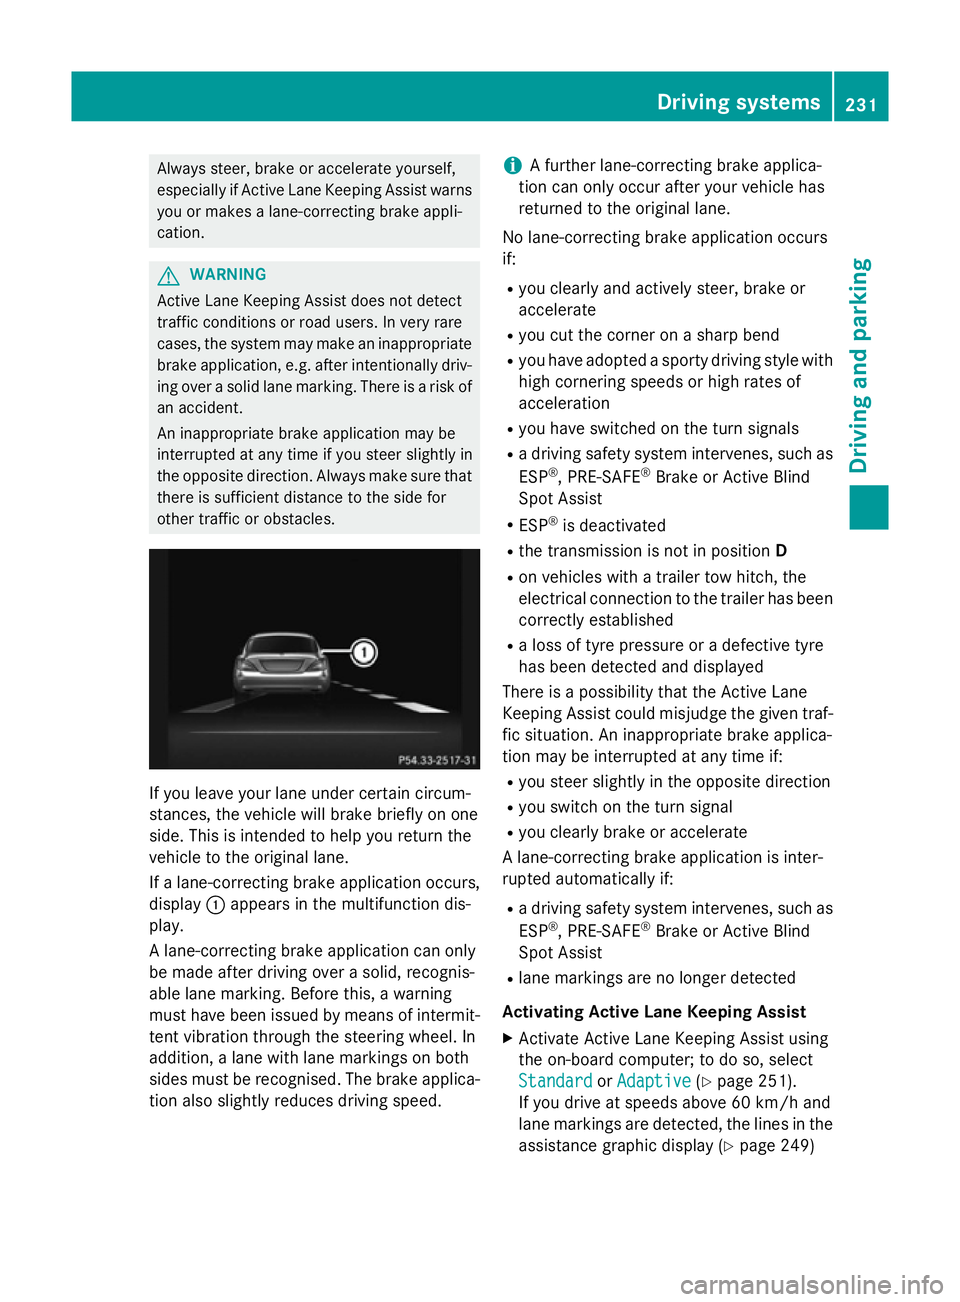
other traffic or obstacles. If you leave your lane under certain circum-
stances, the vehicle will brake briefly on one
side. This is intended to help you return the
vehicle to the original lane.
If a lane-correcting brake application occurs,
display :appears in the multifunction dis-
play.
A lane-correcting brake application can only
be made after driving over a solid, recognis-
able lane marking. Before this, a warning
must have been issued by means of intermit-
tent vibration through the steering wheel. In
addition, a lane with lane markings on both
sides must be recognised. The brake applica- tion also slightly reduces driving speed. i
A further lane-correcting brake applica-
tion can only occur after your vehicle has
returned to the original lane.
No lane-correcting brake application occurs
if: R you clearly and actively steer, brake or
accelerate
R you cut the corner on a sharp bend
R you have adopted a sporty driving style with
high cornering speeds or high rates of
acceleration
R you have switched on the turn signals
R a driving safety system intervenes, such as
ESP ®
, PRE-SAFE ®
Brake or Active Blind
Spot Assist
R ESP ®
is deactivated
R the transmission is not in position D
R on vehicles with a trailer tow hitch, the
electrical connection to the trailer has been
correctly established
R a loss of tyre pressure or a defective tyre
has been detected and displayed
There is a possibility that the Active Lane
Keeping Assist could misjudge the given traf-
fic situation. An inappropriate brake applica-
tion may be interrupted at any time if:
R you steer slightly in the opposite direction
R you switch on the turn signal
R you clearly brake or accelerate
A lane-correcting brake application is inter-
rupted automatically if:
R a driving safety system intervenes, such as
ESP ®
, PRE-SAFE ®
Brake or Active Blind
Spot Assist
R lane markings are no longer detected
Activating Active Lane Keeping Assist X Activate Active Lane Keeping Assist using
the on-board computer; to do so, select
Standard
Standard orAdaptive Adaptive (Ypage 251).
If you drive at speeds above 60 km/h and
lane markings are detected, the lines in the
assistance graphic display (Y page 249) Driving systems
231Driving and parking Z
Page 235 of 417
are shown in green. Active Lane Keeping
Assist is ready for use.
If Standard Standard is selected, no warning vibra-
tion occurs if:
R you have switched on the turn signals. In
this case, the warnings are suppressed
for a certain period of time.
R a driving safety system intervenes, such
as ABS, BAS or ESP ®
.
When Adaptive
Adaptive is selected, no warning
vibration occurs if:
R you have switched on the turn signals. In
this case, the warnings are suppressed
for a certain period of time.
R a driving safety system intervenes, such
as ABS, BAS or ESP ®
.
R you accelerate hard, e.g. kickdown.
R you brake hard.
R you steer actively, e.g. swerve to avoid an
obstacle or change lane quickly.
R you cut the corner on a sharp bend.
In order that you are warned only when nec-
essary and in good time if you cross the lane marking, the system recognises certain con-
ditions and warns you accordingly.
The warning vibration occurs earlier if:
R you approach the outer lane marking on a
bend
R the road has very wide lanes, e.g. a motor-
way
R the system recognises solid lane markings
The warning vibration occurs later if:
R the road has narrow lanes
R you cut the corner on a bend
Towing a trailer
If you attach a trailer, make sure that you have
correctly established the electrical connec-
tion. This can be accomplished by checking
the trailer lighting. Towing a trailer
Important safety notes
G
WARNING
The braking system can overheat if you leave your foot on the brake pedal while driving.
This increases the braking distance and could
even cause the braking system to fail. There is
a risk of an accident.
Never use the brake pedal as a footrest. Do
not simultaneously depress both the brake
pedal and the accelerator pedal while driving. G
WARNING
You could lose control of the vehicle/trailer
combination if it begins to swerve. The vehi-
cle/trailer combination could even overturn.
There is a risk of an accident.
On no account should you attempt to
straighten out the vehicle/trailer combina-
tion by increasing speed. Decrease your
speed and do not countersteer. Brake if nec-
essary. G
WARNING
If the maximum the permissible load for a car- rier system is exceeded, the carrier could
come loose from the vehicle and endanger
other road users. There is a risk of an accidentand injury.
Never exceed the permissible noseweight
when using a carrier.
! Depressing the brake pedal constantly
results in excessive and premature wear to
the brake pads.
If you exceed the maximum permissible nose- weight of the trailer drawbar on the ball cou-
pling, the following may become damaged:
R your vehicle
R the trailer
R the ball coupling
R Trailer tow hitch
The vehicle/trailer combination could
become unstable. 232
Towing a trailerDriving and parking
Page 238 of 417
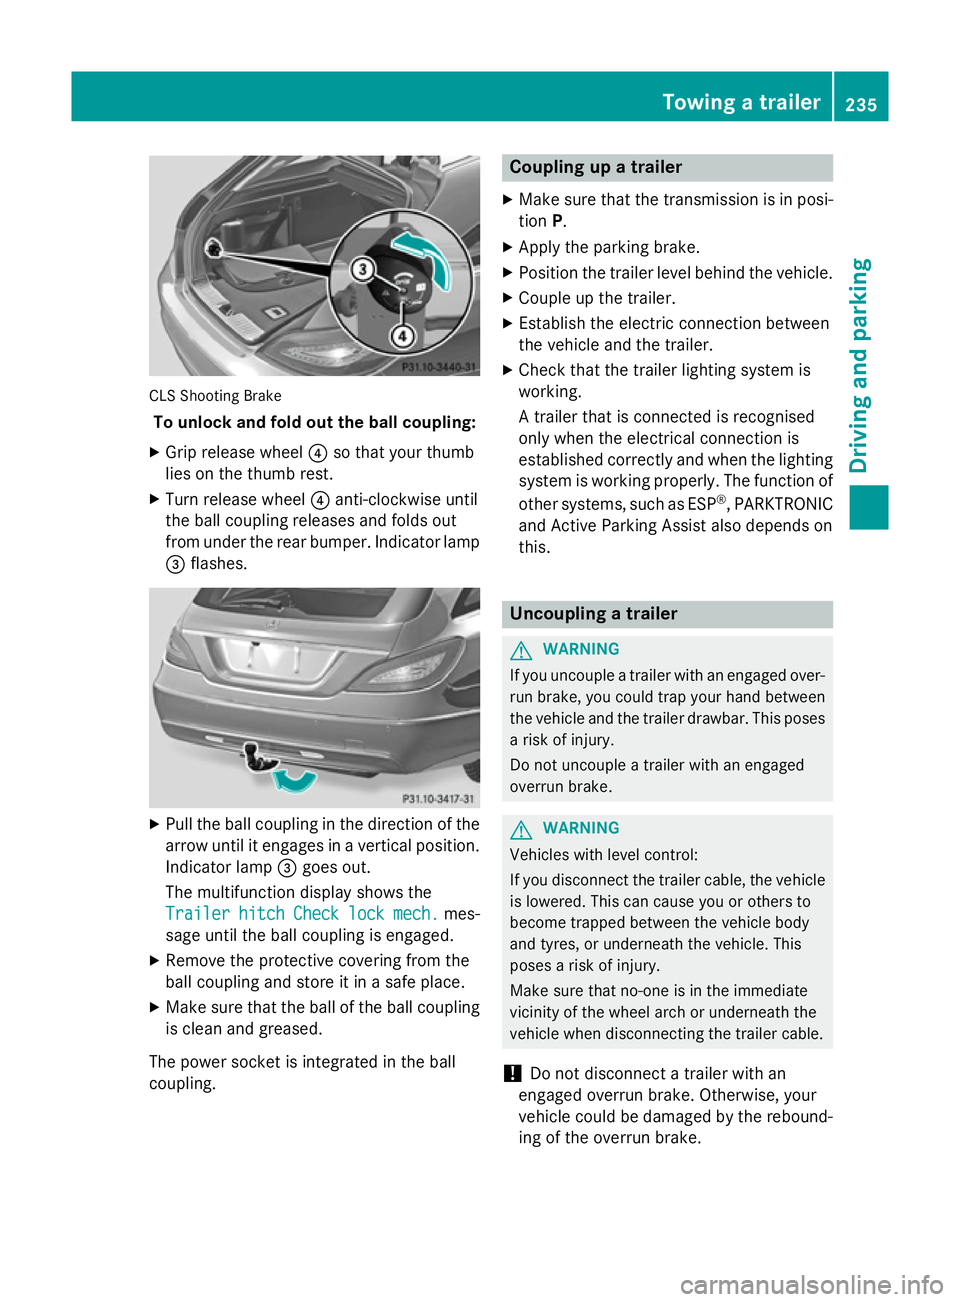
CLS Shooting Brake
To unlock and fold out the ball coupling:
X Grip release wheel ?so that your thumb
lies on the thumb rest.
X Turn release wheel ?anti-clockwise until
the ball coupling releases and folds out
from under the rear bumper. Indicator lamp = flashes. X
Pull the ball coupling in the direction of the
arrow until it engages in a vertical position.
Indicator lamp =goes out.
The multifunction display shows the
Trailer
Trailer hitch hitchCheck
Checklock
lockmech.
mech. mes-
sage until the ball coupling is engaged.
X Remove the protective covering from the
ball coupling and store it in a safe place.
X Make sure that the ball of the ball coupling
is clean and greased.
The power socket is integrated in the ball
coupling. Coupling up a trailer
X Make sure that the transmission is in posi-
tion P.
X Apply the parking brake.
X Position the trailer level behind the vehicle.
X Couple up the trailer.
X Establish the electric connection between
the vehicle and the trailer.
X Check that the trailer lighting system is
working.
A trailer that is connected is recognised
only when the electrical connection is
established correctly and when the lighting
system is working properly. The function of
other systems, such as ESP ®
, PARKTRONIC
and Active Parking Assist also depends on
this. Uncoupling a trailer
G
WARNING
If you uncouple a trailer with an engaged over- run brake, you could trap your hand between
the vehicle and the trailer drawbar. This poses a risk of injury.
Do not uncouple a trailer with an engaged
overrun brake. G
WARNING
Vehicles with level control:
If you disconnect the trailer cable, the vehicle is lowered. This can cause you or others to
become trapped between the vehicle body
and tyres, or underneath the vehicle. This
poses a risk of injury.
Make sure that no-one is in the immediate
vicinity of the wheel arch or underneath the
vehicle when disconnecting the trailer cable.
! Do not disconnect a trailer with an
engaged overrun brake. Otherwise, your
vehicle could be damaged by the rebound- ing of the overrun brake. Towing a trailer
235Driving and parking Z
Page 253 of 417
items in the multifunction display are not
shown during this time.
Deactivating/activating ESP ®i
Observe the "Important safety notes" sec-
tion in the description of ESP ®
(Y page 73). G
WARNING
If you deactivate ESP ®
, ESP ®
no longer sta-
bilises the vehicle. There is an increased risk
of skidding and an accident.
Only deactivate ESP ®
in the situations descri-
bed in the following.
It may be best to deactivate ESP ®
in the fol-
lowing situations:
R when using snow chains
R in deep snow
R on sand or gravel
Deactivating/activating ESP ®
on AMG vehi-
cles (Y page 74).
Further information about ESP ®
(Y page 72)
X Start the engine.
X Press the =or; button on the steer-
ing wheel to select the Assist.
Assist. menu.
X Press the 9or: button to select
ESP
ESP.
X Press the abutton.
The current selection is displayed.
X To activate/deactivate: press thea
button again.
ESP ®
is deactivated if the åwarning lamp
in the instrument cluster lights up continu-
ously when the engine is running.
If the ÷ warning lamp and the åwarn-
ing lamp are lit continuously, ESP ®
is not
available due to a malfunction.
Observe the information on warning lamps
(Y page 291).
Observe the information on display messages (Y page 262). Activating/deactivating PRE-SAFE
®
Brake PRE‑SAFE
®
Brake is only available in vehicles
with DISTRONIC PLUS.
X Press the =or; button on the steer-
ing wheel to select the Assist. Assist.menu.
X Press the 9or: button to select
PRE-SAFE Brake
PRE-SAFE Brake.
X Press the abutton.
The current selection is displayed.
X To activate/deactivate: press thea
button again.
When PRE-SAFE ®
Brake is deactivated, the
assistance graphic shows the æsymbol
in the multifunction display.
For more information on PRE‑SAFE ®
Brake,
see (Y page 76).
Activating/deactivating ATTENTION
ASSIST X
Press the =or; button on the steer-
ing wheel to select the Assist.
Assist. menu.
X Press the 9or: button to select
Attention Assist Attention Assist.
X Press the abutton.
The current selection is displayed.
X To activate/deactivate: press thea
button again.
When ATTENTION ASSIST is deactivated, the é symbol appears in the multifunction
display in the assistance graphic display.
For further information about ATTENTION
ASSIST, see (Y page 218).
Activating/deactivating Blind Spot
Assist X
Press the =or; button on the steer-
ing wheel to select the Assist. Assist.menu.
X Press the 9or: button to select
Blind Spot Assist
Blind Spot Assist. 250
Menus and submenusOn-board computer and displays
Page 254 of 417
X
Press the abutton.
The current selection is displayed.
X To activate/deactivate: press thea
button again.
If the Blind Spot Assist Sensors deac‐
Blind Spot Assist Sensors deac‐
tivated
tivated orAct. B. Spot Assist Sen‐
Act. B. Spot Assist Sen‐
sors deactivated
sors deactivated message appears, the
radar sensor system is deactivated.
X Switch on the radar sensor system
(Y page 255).
Further information about Blind Spot Assist
(Y page 223).
Further information about Active Blind Spot
Assist (Y page 227).
Activating/deactivating Lane Keeping
Assist X
Press the =or; button on the steer-
ing wheel to select the Assist. Assist.menu.
X Press the 9or: button to select
Lane Keep. Assist
Lane Keep. Assist
X Press the abutton.
The current selection is displayed.
X Press ato confirm.
X Press the :or9 button to set Off
Off,
Standard
Standard orAdaptive
Adaptive.
X Press the abutton to save the setting.
When Lane Keeping Assist or Active Lane
Keeping Assist is activated, the multifunc-
tion display shows the lane markings as
bright lines in the assistance graphic.
For further information about Lane Keeping
Assist, see (Y page 225).
For further information about Active Lane
Keeping Assist, see (Y page 229). Service menu
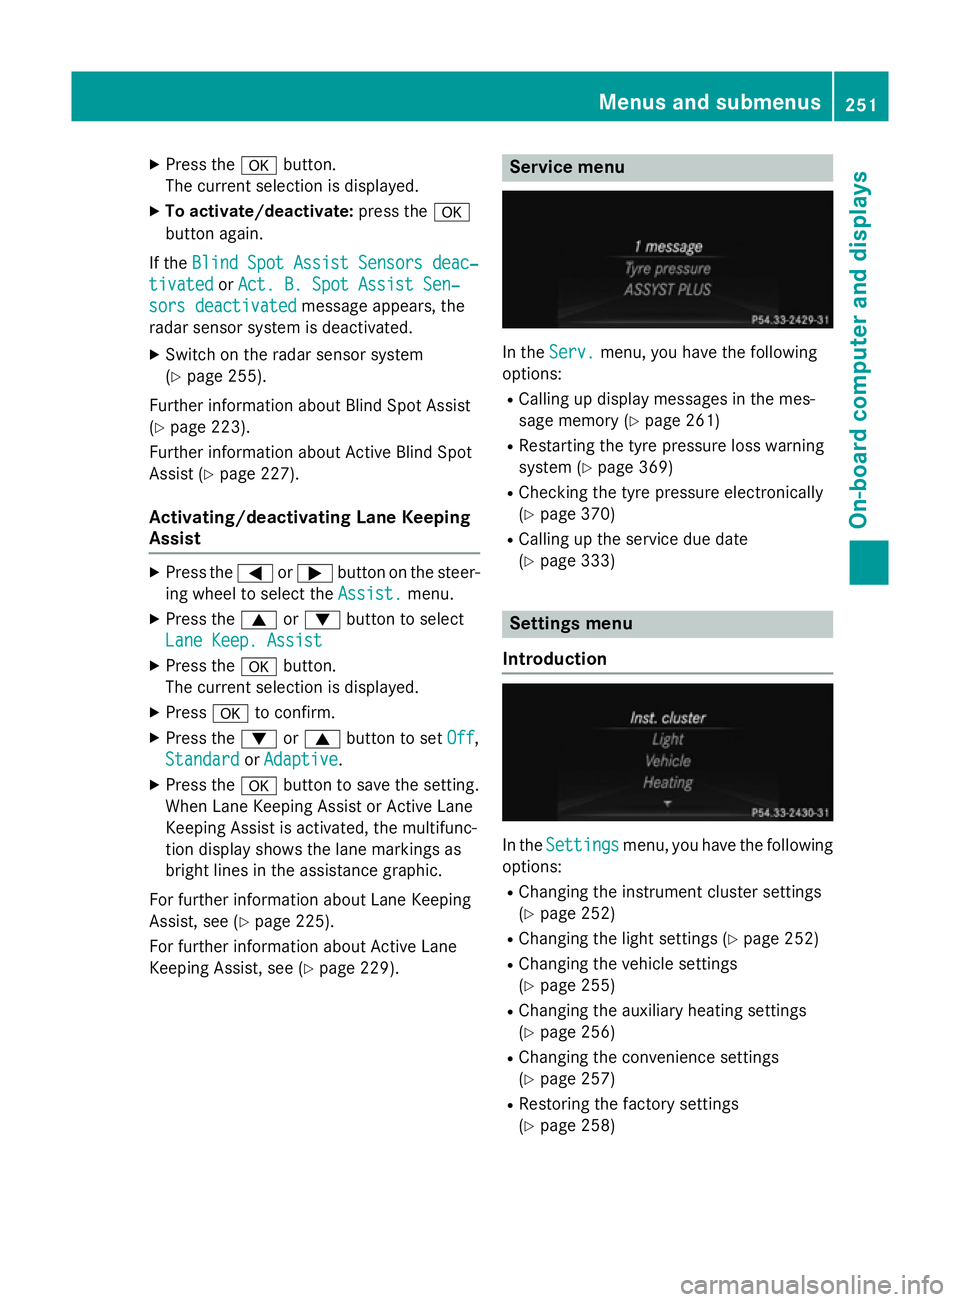
In the
Serv. Serv. menu, you have the following
options:
R Calling up display messages in the mes-
sage memory (Y page 261)
R Restarting the tyre pressure loss warning
system (Y page 369)
R Checking the tyre pressure electronically
(Y page 370)
R Calling up the service due date
(Y page 333) Settings menu
Introduction In the
Settings Settings menu, you have the following
options:
R Changing the instrument cluster settings
(Y page 252)
R Changing the light settings (Y page 252)
R Changing the vehicle settings
(Y page 255)
R Changing the auxiliary heating settings
(Y page 256)
R Changing the convenience settings
(Y page 257)
R Restoring the factory settings
(Y page 258) Menus and submenus
251On-board computer and displays Z
Page 259 of 417
Heating
Auxiliary heating departure time
G
DANGER
If the exhaust pipe is blocked or sufficient
ventilation is not possible, toxic exhaust
fumes can enter the vehicle, especially car-
bon monoxide. This is the case, e.g. in
enclosed spaces, or if the vehicle is stuck in
snow. There is a risk of fatal injuries.
You should switch off the auxiliary heating in
enclosed spaces which do not have an extrac- tion system, e.g. a garage. If the vehicle is
stuck in snow and you must leave the auxiliary
heating running, keep the exhaust pipe and
the area around the vehicle clear of snow. To guarantee a sufficient supply of fresh air, open
a window on the side of the vehicle away from the wind. G
WARNING
When the auxiliary heating is switched on,
parts of the vehicle can become very hot.
Flammable materials such as leaves, grass or twigs may ignite if they come into contact
with:
R hot parts of the exhaust system
R the exhaust gas itself
There is a risk of fire.
When the auxiliary heating is switched on,
make sure that:
R no flammable materials come into contact
with hot vehicle components
R the exhaust gas can escape from the
exhaust pipe unhindered
R the exhaust gas does not come into contact
with flammable materials.
! Operating the auxiliary heating/ventila-
tion draws on the vehicle battery. After you
have heated or ventilated the vehicle a
maximum of two times, drive for a longer
distance.
Only vehicles with auxiliary heating have this
function (Y page 150). In the
Heating
Heating submenu, you can select a
stored departure time or change a departure
time.
The auxiliary heating timer function calcu-
lates the switch-on time according to the out-
side temperature so that the vehicle is pre-
heated by the departure time. When the
departure time is reached, the auxiliary heat- ing continues to heat for a further five
minutes and then switches off. The auxiliary
heating adopts the THERMATIC or
THERMOTRONIC temperature setting.
You can switch off the auxiliary heating by
using the remote control or the auxiliary heat- ing button on the centre console.
i Switch the auxiliary heating on regularly
once a month for about ten minutes.
Selecting the departure time or deactivat-
ing a selected departure time
X Press the =or; button on the steer-
ing wheel to select the Settings
Settings menu.
X Press the :or9 button to select the
Heating Heating submenu.
X Press ato confirm.
You will see the selected setting.
X Press ato confirm.
X Press the :or9 button to select
one of the three departure times or Timer
Timer
off
off (no timer active).
X Press ato confirm.
If a departure time is selected, the yellow
indicator lamp lights up on the auxiliary
heating button.
Changing the departure time
X Press the =or; button on the steer-
ing wheel to select the Settings Settingsmenu.
X Press the :or9 button to select the
Heating
Heating submenu.
X Press ato confirm.
You will see the selected setting.
X Press ato confirm.
X Press the :or9 button to select A
A,B
B
or Change C
Change C. 256
Menus and submenusOn-board computer and displays