2014 MERCEDES-BENZ CLS SHOOTING BRAKE driver seat adjustment
[x] Cancel search: driver seat adjustmentPage 20 of 417
Refuelling
Fuel gaug e....................................... 32
Important safety notes .................. 177
Notes for AMG vehicles ................. 401
Refuelling process ......................... 178
see Fuel
Remote control
Auxiliary heating/ventilation .......... 151
Changing the batteries (auxiliary
heating) ......................................... 152
Garage door opener ....................... 320
Programming (garage door
opener) .......................................... 320
Replacing bulbs
Important safety notes .................. 131
Overview of bulb types .................. 132
Replacing the battery (auxiliary
heating remote control) .................... 152
Reserve (fuel tank)
see Fuel
Reserve fuel
Display message ............................ 272
Warning lamp ................................. 295
Residual heat (climate control) ........ 149
Restraint system
Display message ............................ 266
Introduction ..................................... 42
Warning lamp ................................. 294
Warning lamp (function) ................... 43
Rev counter ........................................ 240
Reverse gear (selector lever) ........... 168
Reversing camera
Cleaning instructions ..................... 338
Function/note s............................. 214
Switching on/of f........................... 214
Reversing feature
Side windows ................................... 96
Sliding sunroof ............................... 100
Reversing function
Boot lid/tailgate .............................. 92
Reversing lamp
Changing bulb s.............................. 132
Reversing lamp (display message) .. 269
Roller sunblind
Rear window .................................. 315
Roof carrier ........................................ 312 Roof lining and carpets (cleaning
instructions)
...................................... 341
Roof load (maximum) ........................ 407 S
Safety Child restraint systems .................... 56
Children in the vehicle ..................... 55
Safety net
Attaching ....................................... 308
Important safety information ......... 307
Safety system
see Driving safety systems
Seat
Adjusting the active multicontour
seat ............................................... 110
Adjusting the multicontour seat ..... 109
Folding the backrest (rear com-
partment) forwards/back .............. 305
Massage function .......................... 110
Seat backrest display message ..... 284
Seat belt
Centre rear-compartment sea t........ 46
Correct usage .................................. 45
Switching belt adjustment on/off
(on-board computer) ...................... 257
Seat belts
Adjusting the driver's and front-
passenger seat belt ......................... 47
Adjusting the height ......................... 46
Cleaning ......................................... 340
Display message ............................ 265
Fastening ......................................... 46
Important safety guidelines ............. 44
Introduction ..................................... 44
Rear seat belt status indicator ......... 47
Releasing ......................................... 46
Warning lamp ................................. 287
Warning lamp (function) ................... 47
Seats
Adjusting (electrically) ................... 106
Adjusting lumbar support .............. 111
Adjusting the 4-way lumbar sup-
port ................................................ 111
Adjusting the head restraint .......... 107
Cleaning the cover ......................... 340
Correct driver's seat position ........ 104 Index
17
Page 49 of 417
R
only one person is using a seat belt.
Infants and children must never travel sit-
ting on the lap of a vehicle occupant. In the
event of an accident, they could be crushed between the vehicle occupant and seat
belt.
R objects are never secured with a seat belt if
the seat belt is also being used by one of the vehicle's occupants.
Seat belts are only intended to secure and
restrain vehicle occupants. Always observe
the "Loading guidelines" for securing objects,
luggage or loads (Y page 300).
Fastening and adjusting the seat belts Observe the safety notes on the seat belt
(Y page 44) and the notes on correct use of
seat belts (Y page 45).
If the centre rear seat belt is being used, also
observe the information about the seat belt
for the centre rear seat (Y page 46).X
Adjust the seat (Y page 104).
The seat backrest must be in an almost
vertical position.
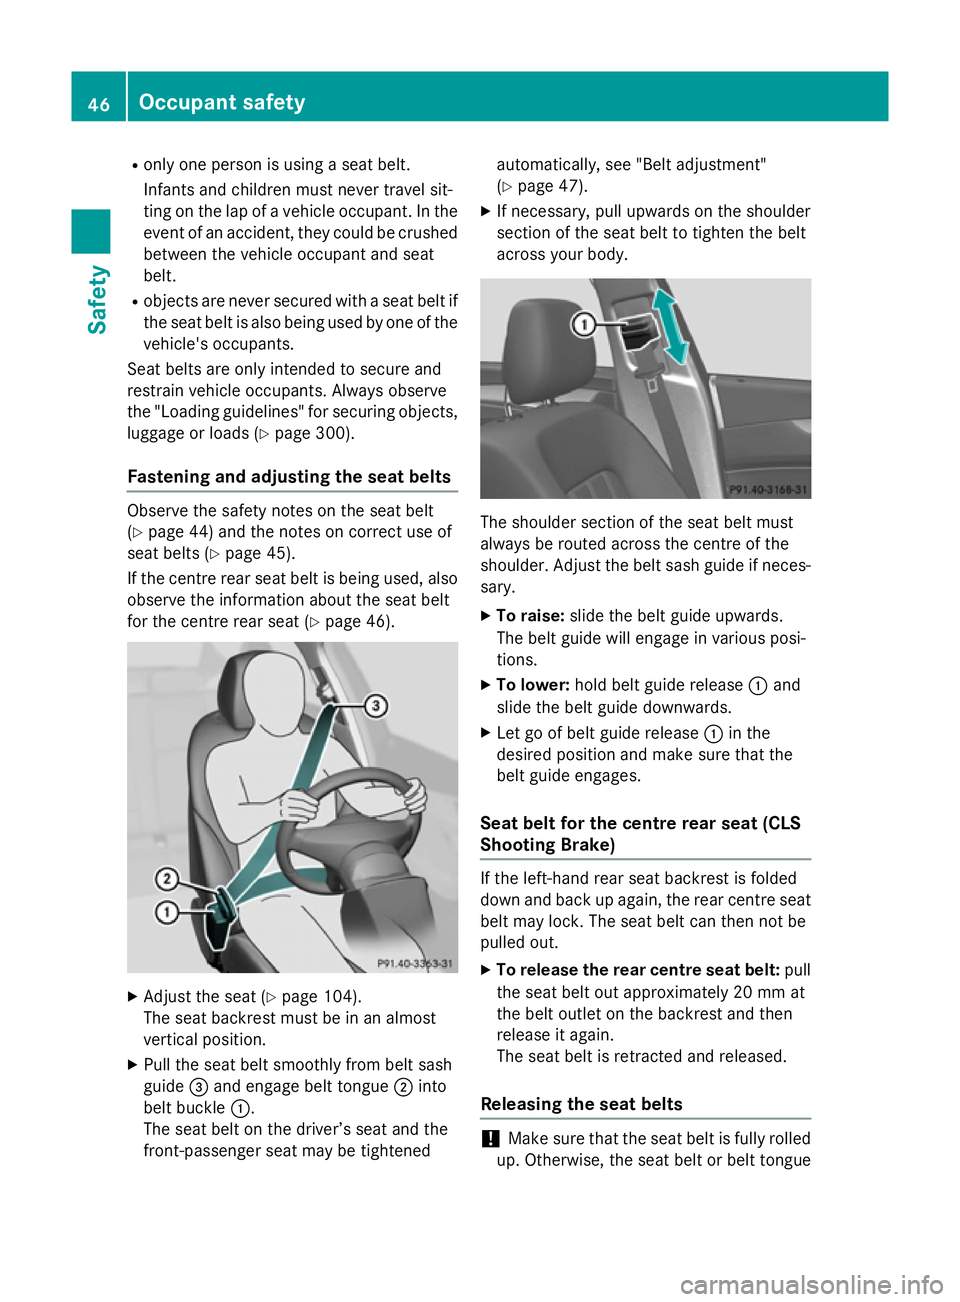
X Pull the seat belt smoothly from belt sash
guide =and engage belt tongue ;into
belt buckle :.
The seat belt on the driver’s seat and the
front-passenger seat may be tightened automatically, see "Belt adjustment"
(Y
page 47).
X If necessary, pull upwards on the shoulder
section of the seat belt to tighten the belt
across your body. The shoulder section of the seat belt must
always be routed across the centre of the
shoulder. Adjust the belt sash guide if neces-
sary.
X To raise: slide the belt guide upwards.
The belt guide will engage in various posi-
tions.
X To lower: hold belt guide release :and
slide the belt guide downwards.
X Let go of belt guide release :in the
desired position and make sure that the
belt guide engages.
Seat belt for the centre rear seat (CLS
Shooting Brake) If the left-hand rear seat backrest is folded
down and back up again, the rear centre seat
belt may lock. The seat belt can then not be
pulled out.
X To release the rear centre seat belt: pull
the seat belt out approximately 20 mm at
the belt outlet on the backrest and then
release it again.
The seat belt is retracted and released.
Releasing the seat belts !
Make sure that the seat belt is fully rolled
up. Otherwise, the seat belt or belt tongue 46
Occupant safetySafety
Page 50 of 417
will be trapped in the door or in the seat
mechanism. This could damage the door,
the door trim panel and the seat belt. Dam- aged seat belts can no longer fulfil their
protective function and must be replaced.
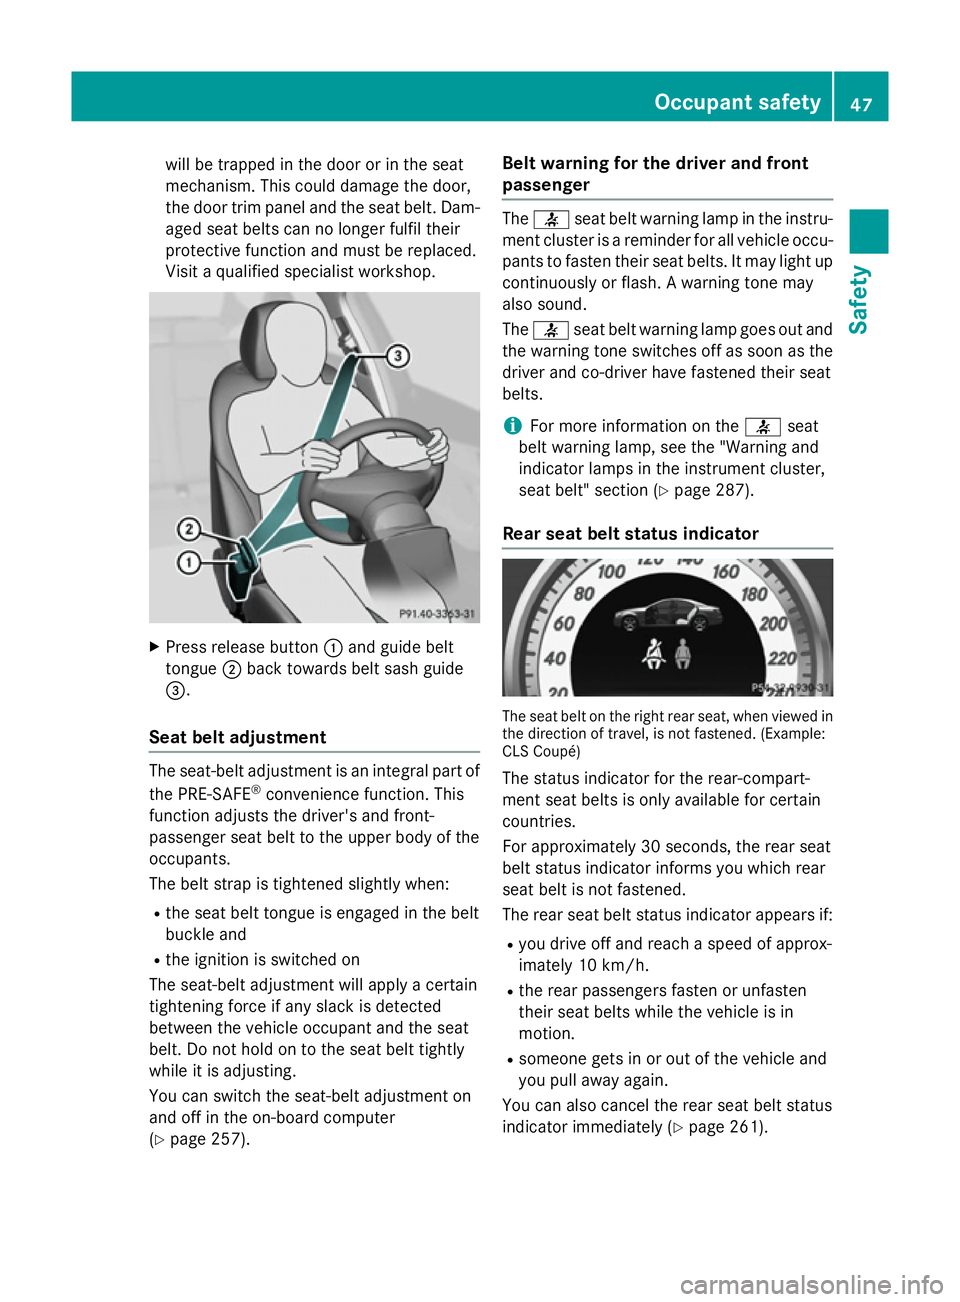
Visit a qualified specialist workshop. X
Press release button :and guide belt
tongue ;back towards belt sash guide
=.
Seat belt adjustment The seat-belt adjustment is an integral part of
the PRE-SAFE ®
convenience function. This
function adjusts the driver's and front-
passenger seat belt to the upper body of the
occupants.
The belt strap is tightened slightly when:
R the seat belt tongue is engaged in the belt
buckle and
R the ignition is switched on
The seat-belt adjustment will apply a certain
tightening force if any slack is detected
between the vehicle occupant and the seat
belt. Do not hold on to the seat belt tightly
while it is adjusting.
You can switch the seat-belt adjustment on
and off in the on-board computer
(Y page 257). Belt warning for the driver and front
passenger The
7 seat belt warning lamp in the instru-
ment cluster is a reminder for all vehicle occu-
pants to fasten their seat belts. It may light up continuously or flash. A warning tone may
also sound.
The 7 seat belt warning lamp goes out and
the warning tone switches off as soon as the driver and co-driver have fastened their seat
belts.
i For more information on the
7seat
belt warning lamp, see the "Warning and
indicator lamps in the instrument cluster,
seat belt" section (Y page 287).
Rear seat belt status indicator The seat belt on the right rear seat, when viewed in
the direction of travel, is not fastened. (Example:
CLS Coupé)
The status indicator for the rear-compart-
ment seat belts is only available for certain
countries.
For approximately 30 seconds, the rear seat
belt status indicator informs you which rear
seat belt is not fastened.
The rear seat belt status indicator appears if:
R you drive off and reach a speed of approx-
imately 10 km/h.
R the rear passengers fasten or unfasten
their seat belts while the vehicle is in
motion.
R someone gets in or out of the vehicle and
you pull away again.
You can also cancel the rear seat belt status
indicator immediately (Y page 261). Occupant safety
47Safety Z
Page 107 of 417
Useful information
i This Owner's Manual describes all mod-
els, series and optional equipment for your
vehicle that were available at the time of
going to press. National variations are pos- sible. Note that your vehicle may not be
equipped with all of the functions descri-
bed. This is also the case for systems and
functions relevant to safety.
i Read the information on qualified special-
ist workshops: (Y page 26). Correct driver's seat position
G
WARNING
You could lose control of the vehicle while
driving if you:
R adjust the driver's seat, steering wheel or
mirrors
R fasten the seat belt
There is a risk of an accident.
Adjust the driver's seat, head restraint, steer-
ing wheel and mirrors and fasten your seat
belt before starting the engine. X
Observe the safety guidelines on seat
adjustment (Y page 105).
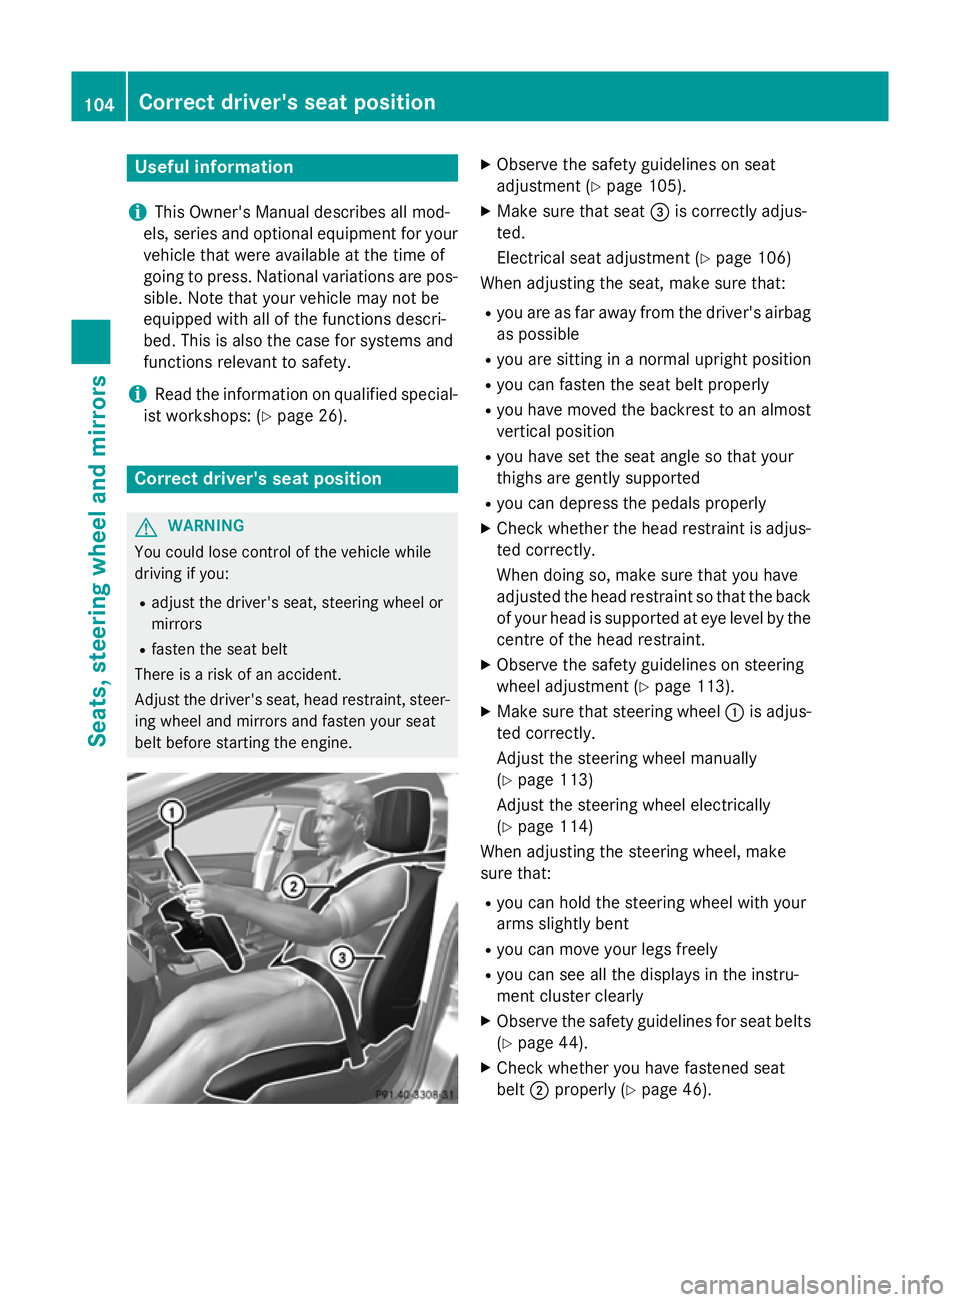
X Make sure that seat =is correctly adjus-
ted.
Electrical seat adjustment (Y page 106)
When adjusting the seat, make sure that:
R you are as far away from the driver's airbag
as possible
R you are sitting in a normal upright position
R you can fasten the seat belt properly
R you have moved the backrest to an almost
vertical position
R you have set the seat angle so that your
thighs are gently supported
R you can depress the pedals properly
X Check whether the head restraint is adjus-
ted correctly.
When doing so, make sure that you have
adjusted the head restraint so that the back
of your head is supported at eye level by the centre of the head restraint.
X Observe the safety guidelines on steering
wheel adjustment (Y page 113).
X Make sure that steering wheel :is adjus-
ted correctly.
Adjust the steering wheel manually
(Y page 113)
Adjust the steering wheel electrically
(Y page 114)
When adjusting the steering wheel, make
sure that:
R you can hold the steering wheel with your
arms slightly bent
R you can move your legs freely
R you can see all the displays in the instru-
ment cluster clearly
X Observe the safety guidelines for seat belts
(Y page 44).
X Check whether you have fastened seat
belt ;properly (Y page 46).104
Correct driver's seat positionSeats, steering wheel and mirrors
Page 108 of 417
The seat belt should:
R fit snugly across your body
R be routed across the middle of your shoul-
der
R be routed across your hips in the pelvic
area
X Before starting off, adjust the rear-view mir-
ror and the exterior mirrors so that you
have a good view of road and traffic condi-
tions (Y page 116).
X Vehicles with a memory function: save
the seat, steering wheel and exterior mirror
settings with the memory function
(Y page 119). Seats
Important safety notes
G
WARNING
If children adjust the seats, they could
become trapped, especially if they are unat-
tended. There is a risk of injury.
When leaving the vehicle, always take the key with you and lock the vehicle. Never leave
children unattended in the vehicle. G
WARNING
You could lose control of the vehicle while
driving if you:
R adjust the driver's seat, steering wheel or
mirrors
R fasten the seat belt
There is a risk of an accident.
Adjust the driver's seat, head restraint, steer-
ing wheel and mirrors and fasten your seat
belt before starting the engine. G
WARNING
If you adjust the seat height carelessly, you or other vehicle occupants could be trapped andthereby injured. Children in particular could
accidentally press the electrical seat adjust- ment buttons and become trapped. There is a
risk of injury.
While moving the seats, make sure that your
hands or other body parts do not get under the
lever assembly of the seat adjustment sys-
tem. G
WARNING
When adjusting a seat, you or another vehicle occupant could become trapped by the guiderail of the seat, for instance. There is a risk of
injury.
Make sure that no one has any part of their
body within the sweep of the seat when
adjusting it. G
WARNING
The head restraints cannot provide the inten-
ded protection unless they are fitted and
adjusted correctly. There is an increased risk of injury to the head and neck in the event of
an accident or sudden braking, for example.
Always drive with the head restraints fitted.
Ensure that the centre of the head restraints
support the back of each vehicle occupant's
head at eye level before driving off. G
WARNING
The seat belt does not offer the intended level of protection if you have not moved the back-
rest to an almost vertical position. When brak-
ing or in the event of an accident, you could
slide underneath the seat belt and sustain
abdomen or neck injuries, for example. This
poses an increased risk of injury or even fatal injury.
Adjust the seat properly before beginning
your journey. Always ensure that the backrest
is in an almost vertical position and that the
shoulder section of your seatbelt is routed
across the centre of your shoulder. Seats
105Seats, steering wheel and mirrors Z
Page 114 of 417
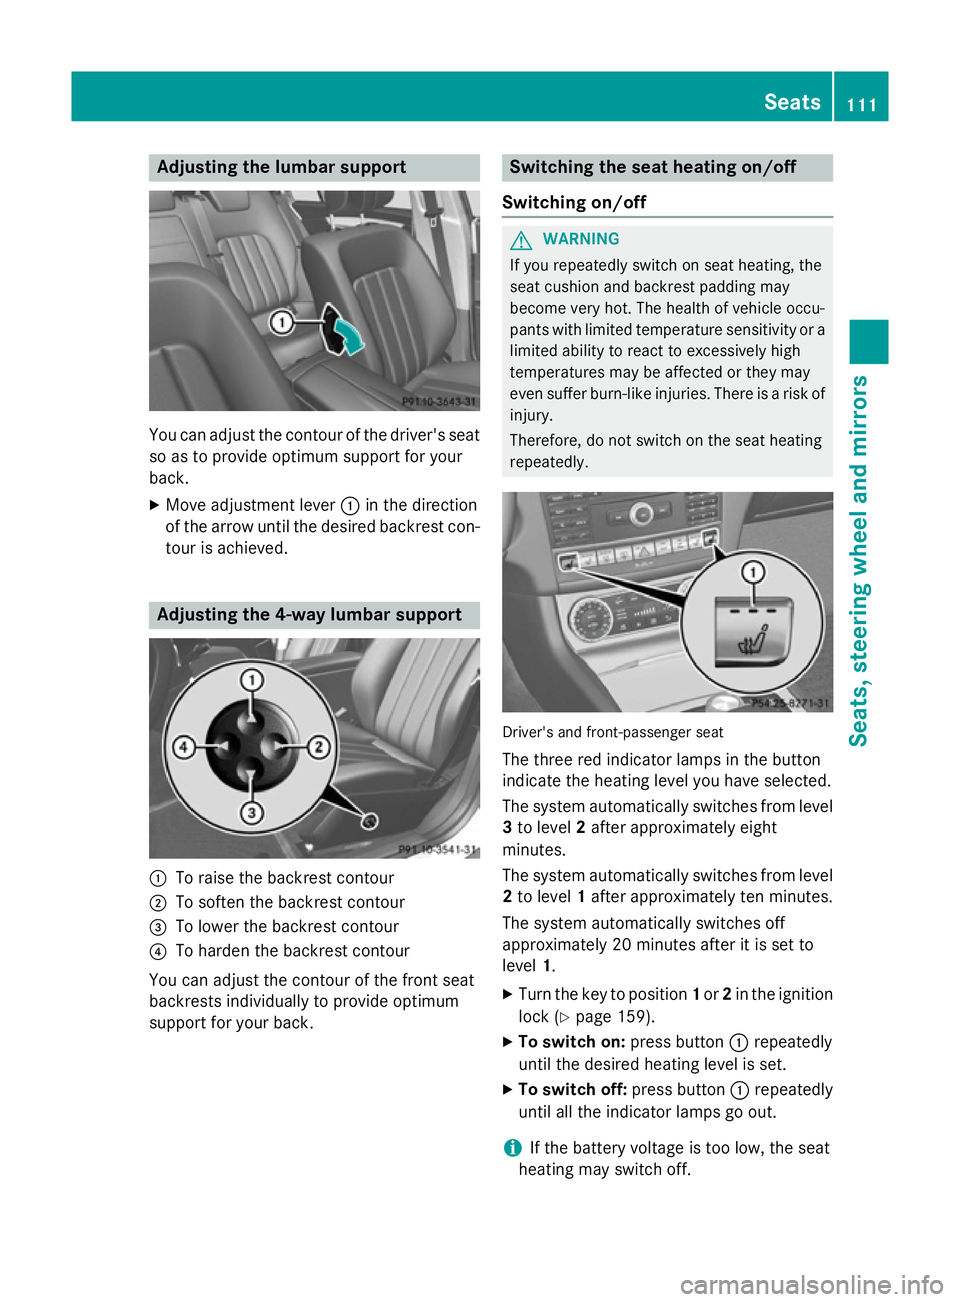
Adjusting the lumbar support
You can adjust the contour of the driver's seat
so as to provide optimum support for your
back.
X Move adjustment lever :in the direction
of the arrow until the desired backrest con- tour is achieved. Adjusting the 4-way lumbar support
:
To raise the backrest contour
; To soften the backrest contour
= To lower the backrest contour
? To harden the backrest contour
You can adjust the contour of the front seat
backrests individually to provide optimum
support for your back. Switching the seat heating on/off
Switching on/off G
WARNING
If you repeatedly switch on seat heating, the
seat cushion and backrest padding may
become very hot. The health of vehicle occu-
pants with limited temperature sensitivity or a limited ability to react to excessively high
temperatures may be affected or they may
even suffer burn-like injuries. There is a risk of
injury.
Therefore, do not switch on the seat heating
repeatedly. Driver's and front-passenger seat
The three red indicator lamps in the button
indicate the heating level you have selected.
The system automatically switches from level 3 to level 2after approximately eight
minutes.
The system automatically switches from level
2 to level 1after approximately ten minutes.
The system automatically switches off
approximately 20 minutes after it is set to
level 1.
X Turn the key to position 1or 2in the ignition
lock (Y page 159).
X To switch on: press button:repeatedly
until the desired heating level is set.
X To switch off: press button:repeatedly
until all the indicator lamps go out.
i If the battery voltage is too low, the seat
heating may switch off. Seats
111Seats, steering wheel and mirrors Z
Page 116 of 417
Problems with the seat ventilation
Problem
Possible causes/consequences and
M
MSolutions The seat ventilation has
switched off prema-
turely or cannot be
switched on. The on-board voltage is too low because too many electrical con-
sumers are switched on.
X Switch off electrical consumers that you do not need, such as
the rear window heating or interior lighting.
Once the battery is sufficiently charged, the seat ventilation will
switch back on automatically. Steering wheel
Important safety notes
G
WARNING
You could lose control of the vehicle while
driving if you:
R adjust the driver's seat, steering wheel or
mirrors
R fasten the seat belt
There is a risk of an accident.
Adjust the driver's seat, head restraint, steer-
ing wheel and mirrors and fasten your seat
belt before starting the engine. G
WARNING
Children could become trapped by the steer-
ing wheel if they adjust it. There is a risk of
injury.
When leaving the vehicle, always take the key with you and lock the vehicle. Never leave
children unattended in the vehicle. Adjusting the steering wheel man-
ually
:
Release lever
; To adjust the steering wheel height
= To adjust the steering wheel position
(fore-and-aft adjustment)
X Push release lever :down completely.
The steering column is unlocked.
X Adjust the steering wheel to the desired
position.
X Push release lever :up completely.
The steering column is locked.
X Check if the steering column is locked.
When doing so, try to push the steering
wheel up or down or try to move it in the
fore-and-aft direction. Steering wheel
113Seats, steering wheel and mirrors Z
Page 117 of 417
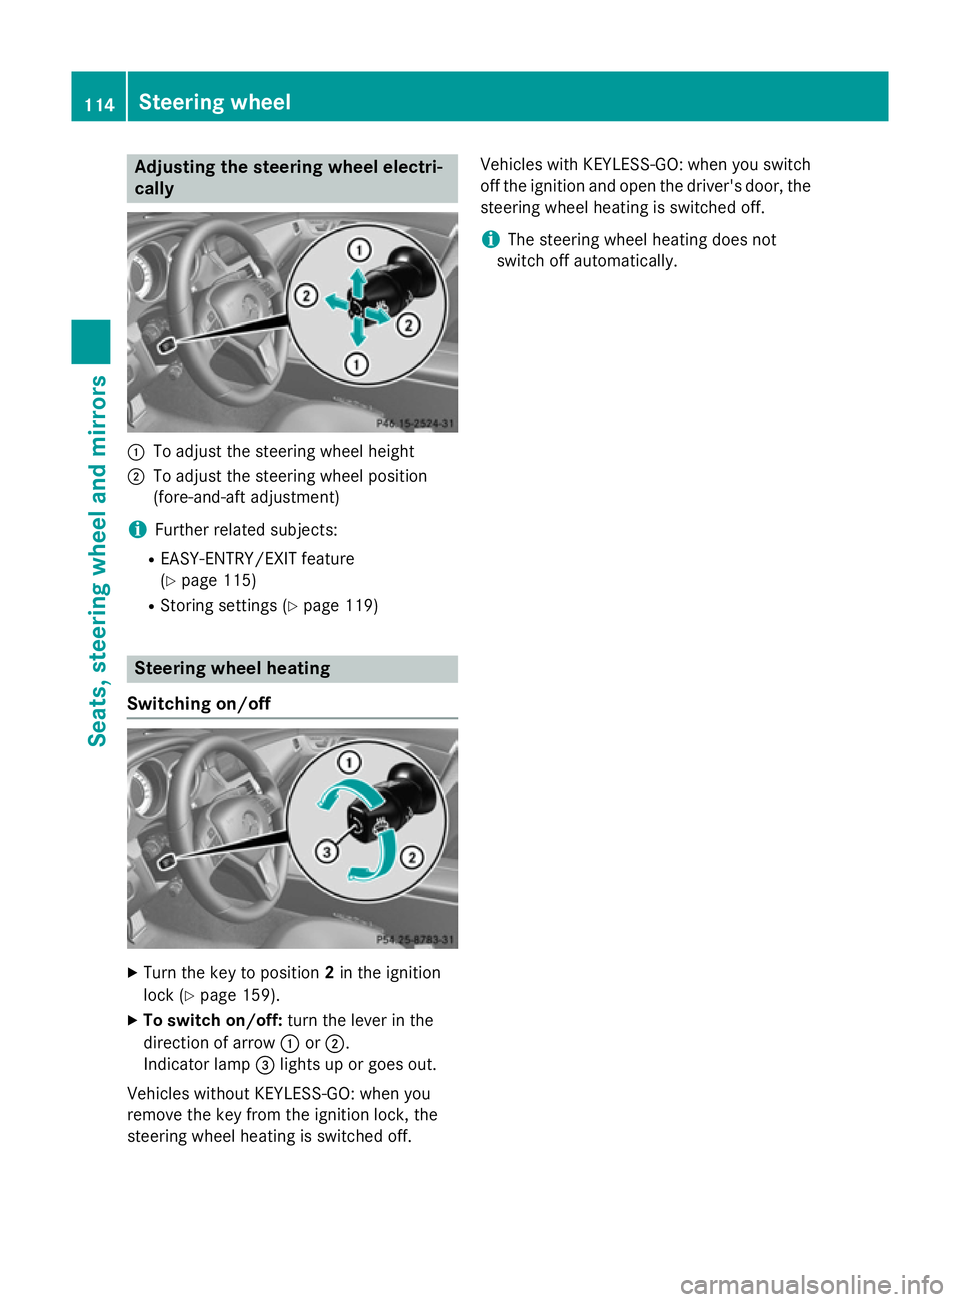
Adjusting the steering wheel electri-
cally :
To adjust the steering wheel height
; To adjust the steering wheel position
(fore-and-aft adjustment)
i Further related subjects:
R EASY-ENTRY/EXIT feature
(Y page 115)
R Storing settings (Y page 119)Steering wheel heating
Switching on/off X
Turn the key to position 2in the ignition
lock (Y page 159).
X To switch on/off: turn the lever in the
direction of arrow :or;.
Indicator lamp =lights up or goes out.
Vehicles without KEYLESS-GO: when you
remove the key from the ignition lock, the
steering wheel heating is switched off. Vehicles with KEYLESS-GO: when you switch
off the ignition and open the driver's door, the steering wheel heating is switched off.
i The steering wheel heating does not
switch off automatically. 114
Steering wheelSeats
, steering wheel and mirrors