2014 MERCEDES-BENZ CLS SHOOTING BRAKE dashboard
[x] Cancel search: dashboardPage 11 of 417
Switching the ZONE function on/
off .................................................. 146
THERMATIC automatic climate
control (2-zone) ............................. 139
THERMOTRONIC (3-zone) auto-
matic climate control ..................... 141
Coat hooks ......................................... 306
Cockpit
Overview .......................................... 30
see Instrument cluster
Collapsible emergency spare
wheel
see Emergency spare wheel
COMAND display
Cleaning ......................................... 339
COMAND Online
see separate operating instructions
Combination switch .......................... 125
Consumption statistics (on-board
computer) .......................................... 243
Convenience box ............................... 308
Convenience closing feature .............. 97
Convenience opening feature ............ 97
Convenience opening/closing (air-
recirculation mode) ........................... 148
Coolant (engine)
Checking the level ......................... 331
Display message ............................ 270
Important safety notes .................. 405
Temperature (on-board com-
puter) ............................................. 258
Temperature gaug e........................ 240
Warning lamp ................................. 295
Cooling
see Climate control
Copyright ............................................. 28
Cornering light function
Display message ............................ 267
Function/note s............................. 127
Crash-responsive emergency light-
ing ....................................................... 131
Cruise control
Activation conditions ..................... 187
Cruise control lever ....................... 186
Deactivating ................................... 188
Display message ............................ 279
Driving system ............................... 186 Important safety notes .................. 186
LIM indicator lamp ......................... 186
Selecting ........................................ 187
Setting a speed .............................. 188
Storing and maintaining current
speed ............................................. 187
Cup holder
Centre console .............................. 313
Important safety notes .................. 313
Rear centre console ....................... 313
Rear compartment ......................... 313 D
Dashboard see Instrument cluster
Data
see Technical data
Daytime driving lights
Display message ............................ 269
Function/note s............................. 123
Switching on/off (on-board com-
puter) ............................................. 253
Dealership
see Qualified specialist workshop
Declarations of conformity ................. 25
Delayed switch-off
Exterior lighting (on-board com-
puter) ............................................. 254
Interior lighting .............................. 254
Diagnostics connection ...................... 25
Diesel .................................................. 402
Digital speedometer ......................... 244
Dipped-beam headlamps
Display message ............................ 267
Setting for driving abroad (sym-
metrical) ........................................ 122
Setting for driving on the right/
left ................................................. 253
Switching on/of f........................... 123
DIRECT SELECT lever
see Automatic transmission
Display message
Driving system s............................. 274
KEYLESS-GO .................................. 285
Display messages
ASSYST PLU S................................ 332
Calling up (on-board computer) ..... 261 8
Index
Page 26 of 417
Protection of the environment
General notes
H
Environmental note
Daimler's declared policy is one of compre-
hensive environmental protection.
Our objectives are to use the natural resour-
ces which form the basis of our existence on
this planet sparingly and in a manner which
takes the requirements of both nature and
humanity into consideration.
You too can help to protect the environment
by operating your vehicle in an environmen-
tally-responsible manner.
Fuel consumption and the rate of engine,
transmission, brake and tyre wear depend on
the following factors:
R operating conditions of your vehicle
R your personal driving style
You can influence both factors. Therefore,
please bear the following in mind:
Operating conditions:
R avoid short trips, as these increase fuel
consumption.
R observe the correct tyre pressure.
R do not carry any unnecessary weight in the
vehicle.
R remove the roof rack once you no longer
need it.
R a regularly serviced vehicle will contribute
to environmental protection. You should
therefore adhere to the service intervals.
R all maintenance work should be carried out
at a qualified specialist workshop.
Personal driving style:
R do not depress the accelerator pedal when
starting the engine.
R do not warm up the engine when the vehicle
is stationary.
R drive carefully and maintain a safe distance
from the vehicle in front.
R avoid frequent, sudden acceleration and
braking. R
change gear in good time and use each gear
only up to Ôof its maximum engine speed.
R switch off the engine in stationary traffic.
R monitor the vehicle's fuel consumption. Returning an end-of-life vehicle
EU countries only:
Mercedes-Benz will take back your old vehicle to dispose of it in an environmentally-respon-sible manner in accordance with the Euro-
pean Union (EU) End of Life Vehicles Direc-
tive.
There is a network of return points and dis-
assembly plants available. You can return
your vehicle to these plants free of charge.
This makes a valuable contribution to the
recycling process and the conservation of
resources.
For further information on recycling old vehi- cles, recovery and the terms of the policy,
visit the Mercedes-Benz homepage. Genuine Mercedes-Benz parts
H
Environmental note
Daimler AG also supplies reconditioned
assemblies and parts which are of the same
quality as new parts. For these, the same war-
ranty applies as for new parts.
! Airbags and seat belt tensioners, as well
as control units and sensors for these
restraint systems, may be installed in the
following areas of your vehicle:
R doors
R door pillars
R door sills
R seats
R dashboard
R instrument cluster
R centre console Introduction
23 Z
Page 51 of 417
Airbags
Introduction The AIRBAG symbol indicates the installation
location of an airbag.
The airbag is supplementary to a correctly
fastened seatbelt. It does not replace a seat- belt. The airbag serves to provide additional
protection in an accident situation.
Not all airbags are deployed in an accident.
The various airbag systems work independ-
ently of one another (Y page 51).
However, no system available today can com- pletely eliminate injuries and fatalities.
Due to the speed of airbag deployment, it is
also not possible to entirely rule out the risk of
injuries caused by the driver's airbag deploy-
ing.
Important safety notes G
WARNING
If you deviate from the correct seat position,
the airbag cannot perform its intended pro-
tective function and can even cause addi-
tional injuries when deployed. There is an
increased risk of serious or even fatal injuries.
In order to avoid such risks, always ensure
that all vehicle occupants:
R fasten their seatbelts correctly, including
pregnant women
R are seated correctly and maintain the fur-
thest possible distance from the airbags
R observe the following notes
Always ensure that there are no objects loca-
ted between the airbag and the vehicle occu-
pant.
R Adjust the seats properly before beginning
your journey. Always make sure that the
seat is in an almost upright position. The
centre of the head restraint must support
the head at about eye level.
R Move the driver's and front-passenger
seats as far back as possible. The driver's seat position must allow the vehicle to be
driven safely.
R Only hold the steering wheel on the out-
side. This allows the airbag to be fully
deployed.
R Always lean against the backrest while driv-
ing. Do not lean forwards or lean against
the door or side window. You may other-
wise be in the deployment area of the air-
bags.
R Always keep your feet in the footwell in
front of the seat. Do not put your feet on the
dashboard, for example. Your feet may oth-
erwise be in the deployment area of the
airbag.
R For this reason, always secure persons less
than 1.50 mtall in suitable restraint sys-
tems. Up to this height, the seat belt cannot
be worn correctly.
If a child is travelling in your vehicle, also
observe the following notes:
R Always secure children under 12 years of
age and less than 1.50 mtall in suitable
child restraint systems.
R Child restraint systems should be fitted to
the rear seats.
R Only secure a child to the front-passenger
seat when the front-passenger front airbag
is disabled, and only then in a rearward-
facing child restraint system. If the
PASSENGER AIR BAG OFF indicator lamp is
permanently lit, the front-passenger front
airbag is disabled (Y page 43).
R Always observe the instructions and safety
notes on "Children in the vehicle"
(Y page 55) and on the "Child restraint
system on the front-passenger seat"
(Y page 61) in addition to the child
restraint system manufacturer's installa-
tion instructions. 48
Occupant safetySafety
Page 62 of 417
X
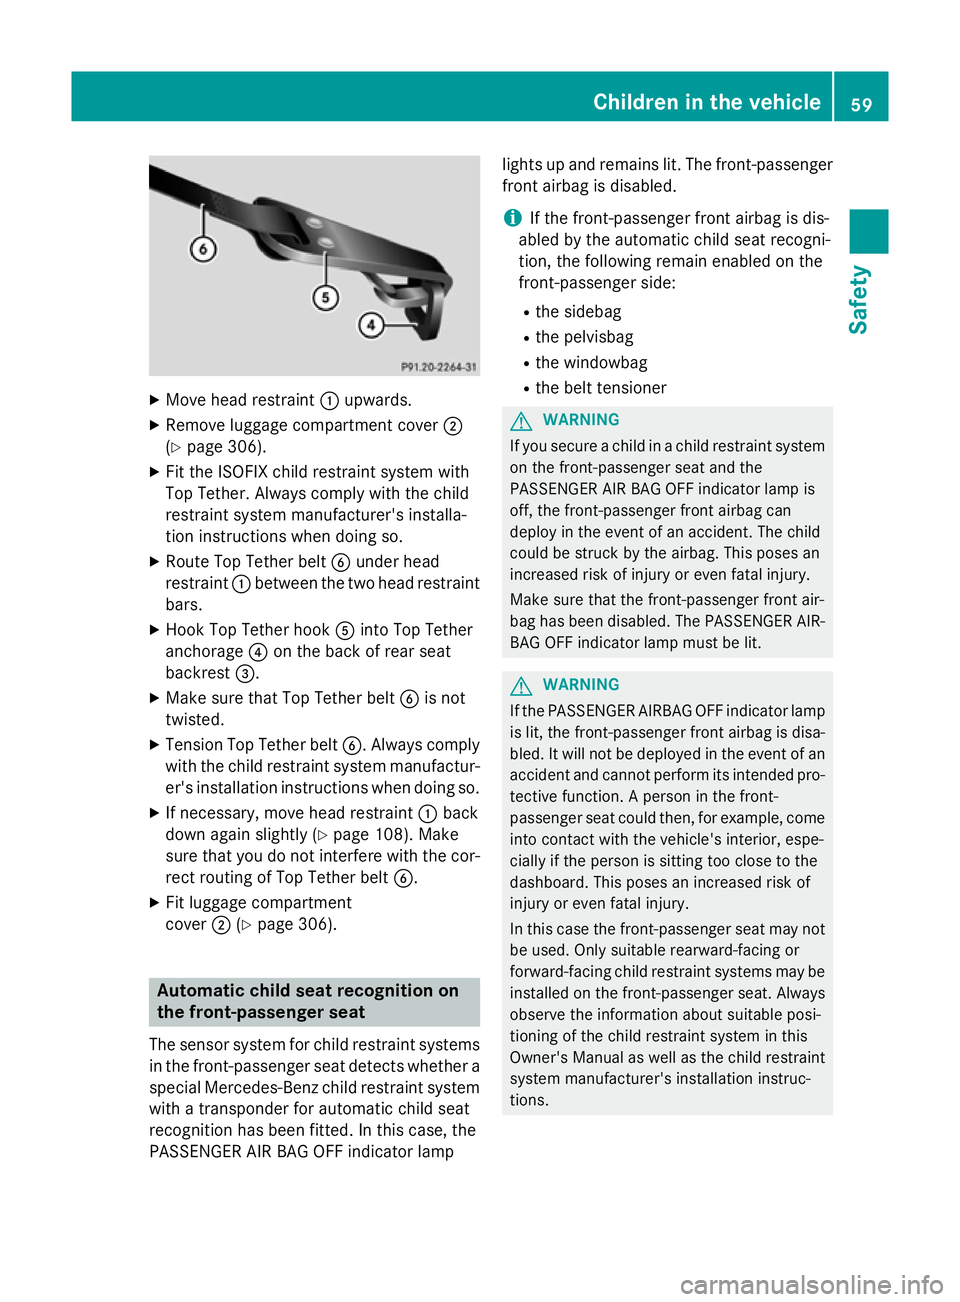
Move head restraint :upwards.
X Remove luggage compartment cover ;
(Y page 306).
X Fit the ISOFIX child restraint system with
Top Tether. Always comply with the child
restraint system manufacturer's installa-
tion instructions when doing so.
X Route Top Tether belt Bunder head
restraint :between the two head restraint
bars.
X Hook Top Tether hook Ainto Top Tether
anchorage ?on the back of rear seat
backrest =.
X Make sure that Top Tether belt Bis not
twisted.
X Tension Top Tether belt B. Always comply
with the child restraint system manufactur- er's installation instructions when doing so.
X If necessary, move head restraint :back
down again slightly (Y page 108). Make
sure that you do not interfere with the cor-
rect routing of Top Tether belt B.
X Fit luggage compartment
cover ;(Ypage 306). Automatic child seat recognition on
the front-passenger seat
The sensor system for child restraint systems
in the front-passenger seat detects whether a special Mercedes-Benz child restraint system
with a transponder for automatic child seat
recognition has been fitted. In this case, the
PASSENGER AIR BAG OFF indicator lamp lights up and remains lit. The front-passenger
front airbag is disabled.
i If the front-passenger front airbag is dis-
abled by the automatic child seat recogni-
tion, the following remain enabled on the
front-passenger side:
R the sidebag
R the pelvisbag
R the windowbag
R the belt tensioner G
WARNING
If you secure a child in a child restraint system on the front-passenger seat and the
PASSENGER AIR BAG OFF indicator lamp is
off, the front-passenger front airbag can
deploy in the event of an accident. The child
could be struck by the airbag. This poses an
increased risk of injury or even fatal injury.
Make sure that the front-passenger front air-
bag has been disabled. The PASSENGER AIR- BAG OFF indicator lamp must be lit. G
WARNING
If the PASSENGER AIRBAG OFF indicator lamp is lit, the front-passenger front airbag is disa-
bled. It will not be deployed in the event of an
accident and cannot perform its intended pro-
tective function. A person in the front-
passenger seat could then, for example, come
into contact with the vehicle's interior, espe-
cially if the person is sitting too close to the
dashboard. This poses an increased risk of
injury or even fatal injury.
In this case the front-passenger seat may not be used. Only suitable rearward-facing or
forward-facing child restraint systems may be installed on the front-passenger seat. Always
observe the information about suitable posi-
tioning of the child restraint system in this
Owner's Manual as well as the child restraint
system manufacturer's installation instruc-
tions. Children in the vehicle
59Safety Z
Page 63 of 417
G
WARNING
If you secure a child in a forward-facing child
restraint system on the front-passenger seat
and you position the front-passenger seat too close to the dashboard, in the event of an
accident, the child could:
R come into contact with the vehicle's inte-
rior if the PASSENGER AIR BAG OFF indi-
cator lamp is lit, for example
R be struck by the airbag if the PASSENGER
AIR BAG OFF indicator lamp is off
This poses an increased risk of injury or even fatal injury.
Move the front-passenger seat as far back as
possible. Always make sure that the shoulder belt strap is correctly routed from the vehicle
belt sash guide to the shoulder belt guide on
the child restraint system. The shoulder belt
strap must be routed forwards and down-
wards from the vehicle belt sash guide. If nec-
essary, adjust the vehicle belt sash guide and the front-passenger seat accordingly. Always
observe the information about suitable posi-
tioning of the child restraint system in this
Owner's Manual as well as the child restraint system manufacturer's installation instruc-
tions.
i Ensure that your vehicle is equipped with
automatic child seat recognition for the
front-passenger seat (Y page 61). If this
is not the case, always fit the child restraint
system on a suitable rear seat
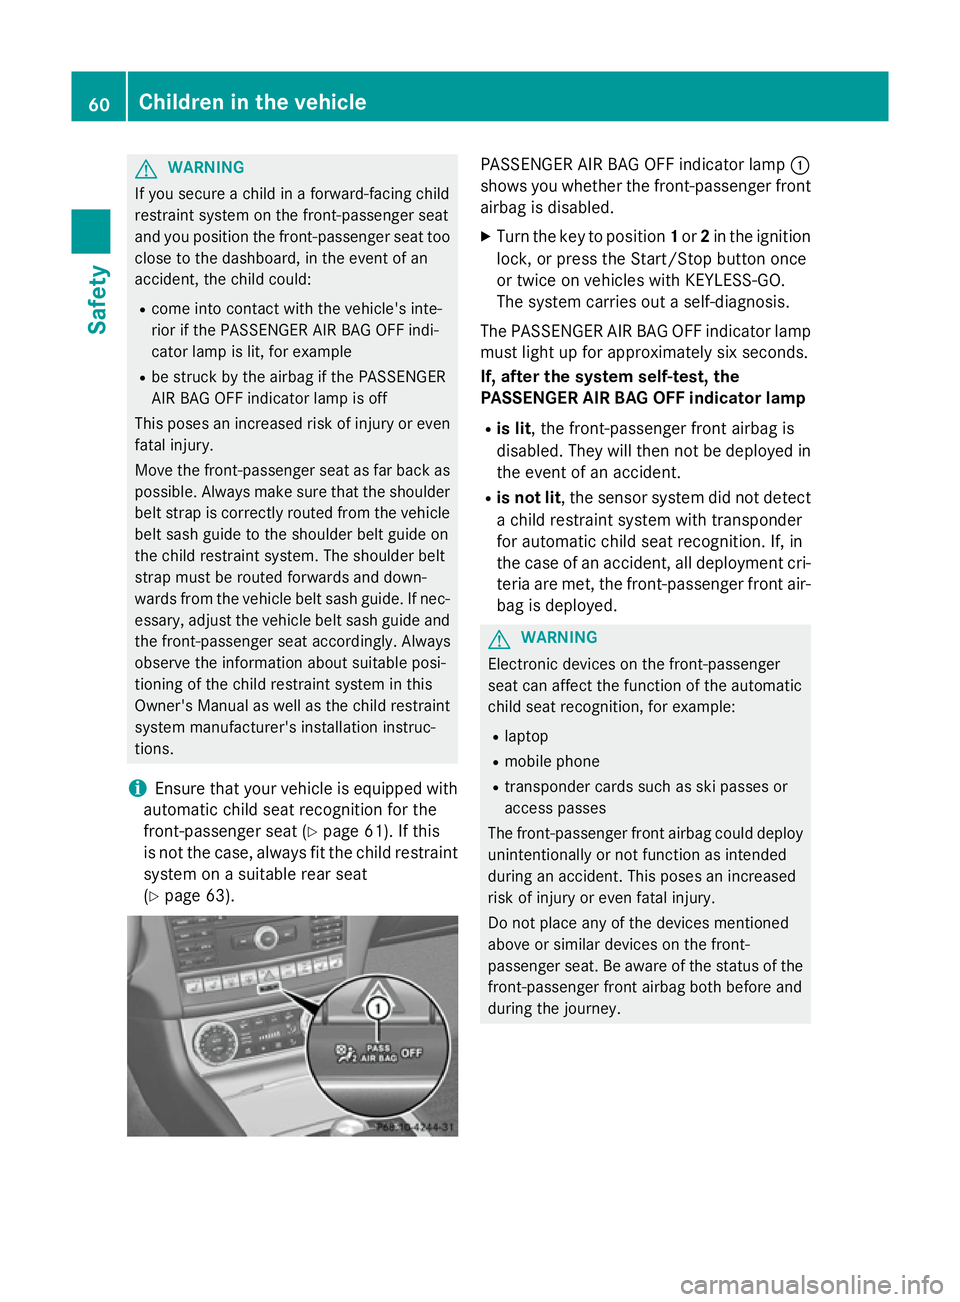
(Y page 63). PASSENGER AIR BAG OFF indicator lamp
:
shows you whether the front-passenger front airbag is disabled.
X Turn the key to position 1or 2in the ignition
lock, or press the Start/Stop button once
or twice on vehicles with KEYLESS-GO.
The system carries out a self-diagnosis.
The PASSENGER AIR BAG OFF indicator lamp
must light up for approximately six seconds.
If, after the system self-test, the
PASSENGER AIR BAG OFF indicator lamp
R is lit, the front-passenger front airbag is
disabled. They will then not be deployed in
the event of an accident.
R is not lit, the sensor system did not detect
a child restraint system with transponder
for automatic child seat recognition. If, in
the case of an accident, all deployment cri-
teria are met, the front-passenger front air-
bag is deployed. G
WARNING
Electronic devices on the front-passenger
seat can affect the function of the automatic
child seat recognition, for example:
R laptop
R mobile phone
R transponder cards such as ski passes or
access passes
The front-passenger front airbag could deploy unintentionally or not function as intended
during an accident. This poses an increased
risk of injury or even fatal injury.
Do not place any of the devices mentioned
above or similar devices on the front-
passenger seat. Be aware of the status of thefront-passenger front airbag both before and
during the journey. 60
Children in the vehicleSafety
Page 211 of 417

Example: top view
Front sensors
Centre Approx. 100 cm
Corners Approx. 60 cm
Rear sensors
Centre Approx. 120 cm
Corners Approx. 80 cm
Minimum distance
Centre Approx. 20 cm
Corners Approx. 15 cm
If there is an obstacle within this range, the
relevant warning displays light up and a warn- ing tone sounds. If the distance falls below
the minimum, the distance may no longer be
shown. Warning displays Warning display for the front area
:
Segments on the left-hand side of the
vehicle
; Segments on the right-hand side of the
vehicle
= Segments showing operational readiness
The warning displays show the distance
between the sensors and the obstacle. The
warning display for the front area is located
on the dashboard above the centre air vents.
The warning display for the rear area is loca-
ted on the roof lining in the rear compart-
ment.
The warning display for each side of the vehi-
cle is divided into five yellow and two red seg- ments. PARKTRONIC is operational if yellow
segments showing operational readiness =
light up.
The selected transmission position and the
direction in which the vehicle is rolling deter- mine which warning display is active when the
engine is running. Transmission
position Warning display
D
Front area activated
R,
Nor the vehicle
is rolling back-
wards Rear and front areas
activated
P
No areas activated208
Driving systemsDriving an
d parking