Page 217 of 417

Reversing camera
General notes Example: Coupé
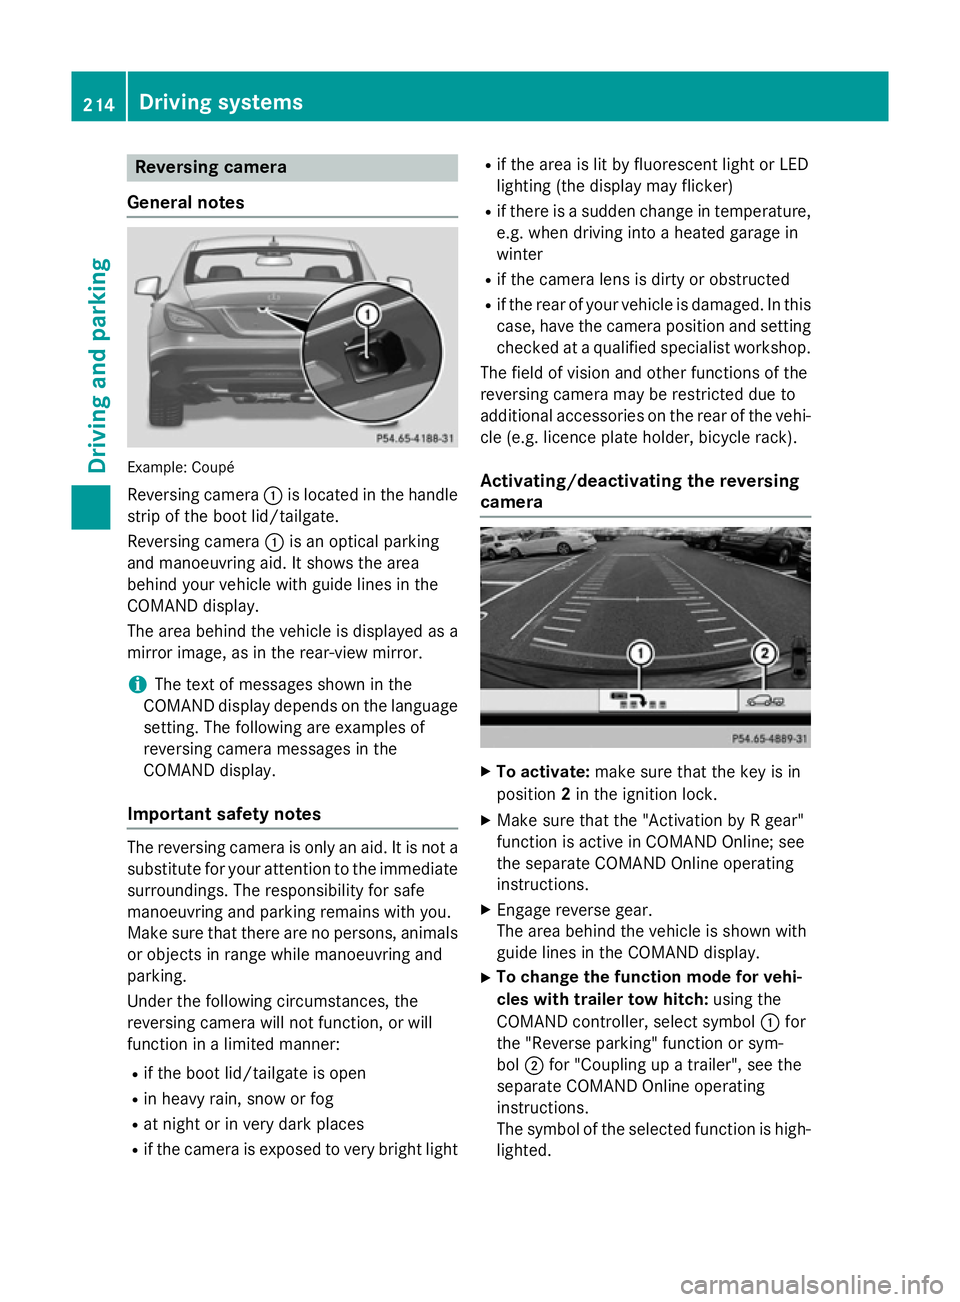
Reversing camera :is located in the handle
strip of the boot lid/tailgate.
Reversing camera :is an optical parking
and manoeuvring aid. It shows the area
behind your vehicle with guide lines in the
COMAND display.
The area behind the vehicle is displayed as a
mirror image, as in the rear-view mirror.
i The text of messages shown in the
COMAND display depends on the language setting. The following are examples of
reversing camera messages in the
COMAND display.
Important safety notes The reversing camera is only an aid. It is not a
substitute for your attention to the immediate
surroundings. The responsibility for safe
manoeuvring and parking remains with you.
Make sure that there are no persons, animals
or objects in range while manoeuvring and
parking.
Under the following circumstances, the
reversing camera will not function, or will
function in a limited manner:
R if the boot lid/tailgate is open
R in heavy rain, snow or fog
R at night or in very dark places
R if the camera is exposed to very bright light R
if the area is lit by fluorescent light or LED
lighting (the display may flicker)
R if there is a sudden change in temperature,
e.g. when driving into a heated garage in
winter
R if the camera lens is dirty or obstructed
R if the rear of your vehicle is damaged. In this
case, have the camera position and setting checked at a qualified specialist workshop.
The field of vision and other functions of the
reversing camera may be restricted due to
additional accessories on the rear of the vehi-
cle (e.g. licence plate holder, bicycle rack).
Activating/deactivating the reversing
camera X
To activate: make sure that the key is in
position 2in the ignition lock.
X Make sure that the "Activation by R gear"
function is active in COMAND Online; see
the separate COMAND Online operating
instructions.
X Engage reverse gear.
The area behind the vehicle is shown with
guide lines in the COMAND display.
X To change the function mode for vehi-
cles with trailer tow hitch: using the
COMAND controller, select symbol :for
the "Reverse parking" function or sym-
bol ;for "Coupling up a trailer", see the
separate COMAND Online operating
instructions.
The symbol of the selected function is high- lighted. 214
Driving systemsDriving and parking
Page 226 of 417

Problems with Night View Assist Plus
Problem
Possible causes/consequences and
M
MSolutions The picture quality of
Night View Assist Plus
has deteriorated. The windscreen wipers are smearing the windscreen.
X Replace the wiper blades (Y page 134). The windscreen is smeared after the vehicle has been cleaned in a
car wash.
X Clean the windscreen (Y page 337). There is windscreen chip damage in the camera's field of vision.
X Replace the windscreen. The windscreen is misted up on the inside.
X Demist the windscreen (Y page 147). The windscreen is iced up.
X De-ice the windscreen (Y page 146). There is dirt on the inside of the windscreen.
X Clean the inside of the windscreen (Y page 337).Lane Tracking package
General notes The Lane Tracking package consists of Blind
Spot Assist (Y page 223) and Lane Keeping
Assist (Y page 225).
Blind Spot Assist General notes
Blind Spot Assist uses a radar sensor system
to monitor the areas on both sides of your
vehicle. It supports you from speeds of
30 km/h. A warning display in the exterior
mirrors draws your attention to vehicles
detected in the monitored area. If you then
switch on the corresponding turn signal to
change lane, you will also receive an optical
and audible collision warning. For monitoring,
Blind Spot Assist uses sensors in the rear
bumper. Important safety notes G
WARNING
Blind Spot Assist does not react to vehicles:
R overtaken too closely on the side, placing
them in the blind spot area
R when the difference in the speed of
approach and overtaking is too great
As a result, Blind Spot Assist cannot warn
drivers in these situations. There is a risk of an accident.
Always pay careful attention to the traffic sit- uation and maintain a safe distance at the side
of the vehicle.
Blind Spot Assist is only an aid. It may fail to
detect some vehicles and is no substitute for
attentive driving. Always ensure that there is
sufficient distance to the side for other road
users and obstacles. Driving systems
223Driving and parking Z
Page 342 of 417

Interior care
Cleaning the display !
For cleaning, do not use any of the fol-
lowing:
R alcohol-based thinner or petrol
R abrasive cleaning agents
R commercially-available household clean-
ing agents
These may damage the display surface. Do not put pressure on the display surface
when cleaning. This could lead to irrepara-
ble damage to the display.
X Before cleaning the display, make sure that
it is switched off and has cooled down.
X Clean the display surface using a commer-
cially available microfibre cloth and
TFT/LCD display cleaner.
X Dry the display surface using a dry micro-
fibre cloth.
Cleaning Night View Assist Plus !
Never clean the camera lens. When clean-
ing the field of vision of the driving systems, make sure that you do not spray glass
cleaner on the camera lens. If the camera
lens is dirty, visit a qualified specialist work-
shop. X
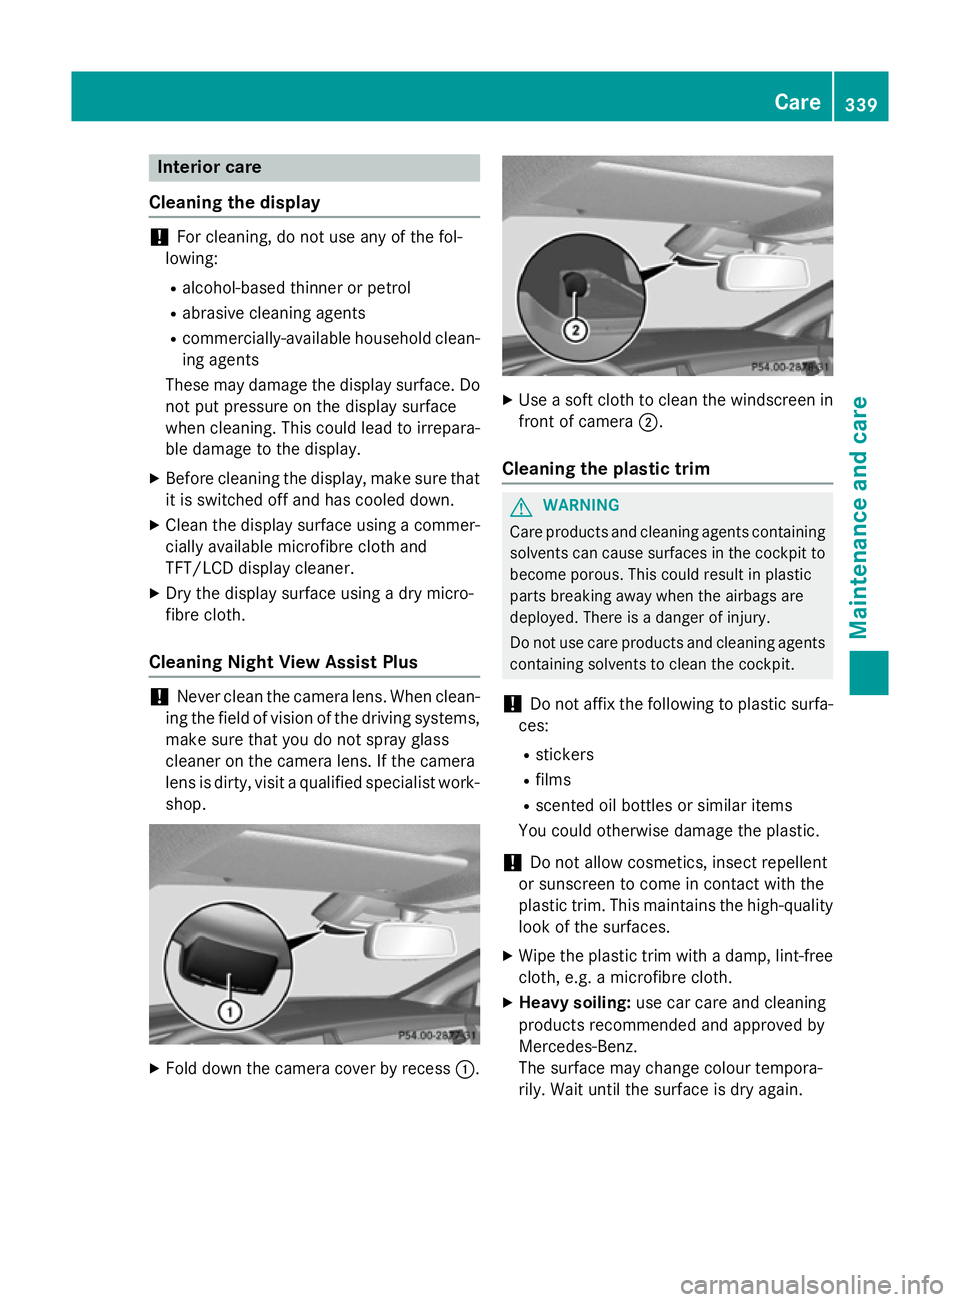
Fold down the camera cover by recess :. X
Use a soft cloth to clean the windscreen in
front of camera ;.
Cleaning the plastic trim G
WARNING
Care products and cleaning agents containing solvents can cause surfaces in the cockpit to
become porous. This could result in plastic
parts breaking away when the airbags are
deployed. There is a danger of injury.
Do not use care products and cleaning agents containing solvents to clean the cockpit.
! Do not affix the following to plastic surfa-
ces:
R stickers
R films
R scented oil bottles or similar items
You could otherwise damage the plastic.
! Do not allow cosmetics, insect repellent
or sunscreen to come in contact with the
plastic trim. This maintains the high-quality look of the surfaces.
X Wipe the plastic trim with a damp, lint-free
cloth, e.g. a microfibre cloth.
X Heavy soiling: use car care and cleaning
products recommended and approved by
Mercedes-Benz.
The surface may change colour tempora-
rily. Wait until the surface is dry again. Care
339Maintenance and care Z