2014 MERCEDES-BENZ CLS SHOOTING BRAKE Removing
[x] Cancel search: RemovingPage 100 of 417
:
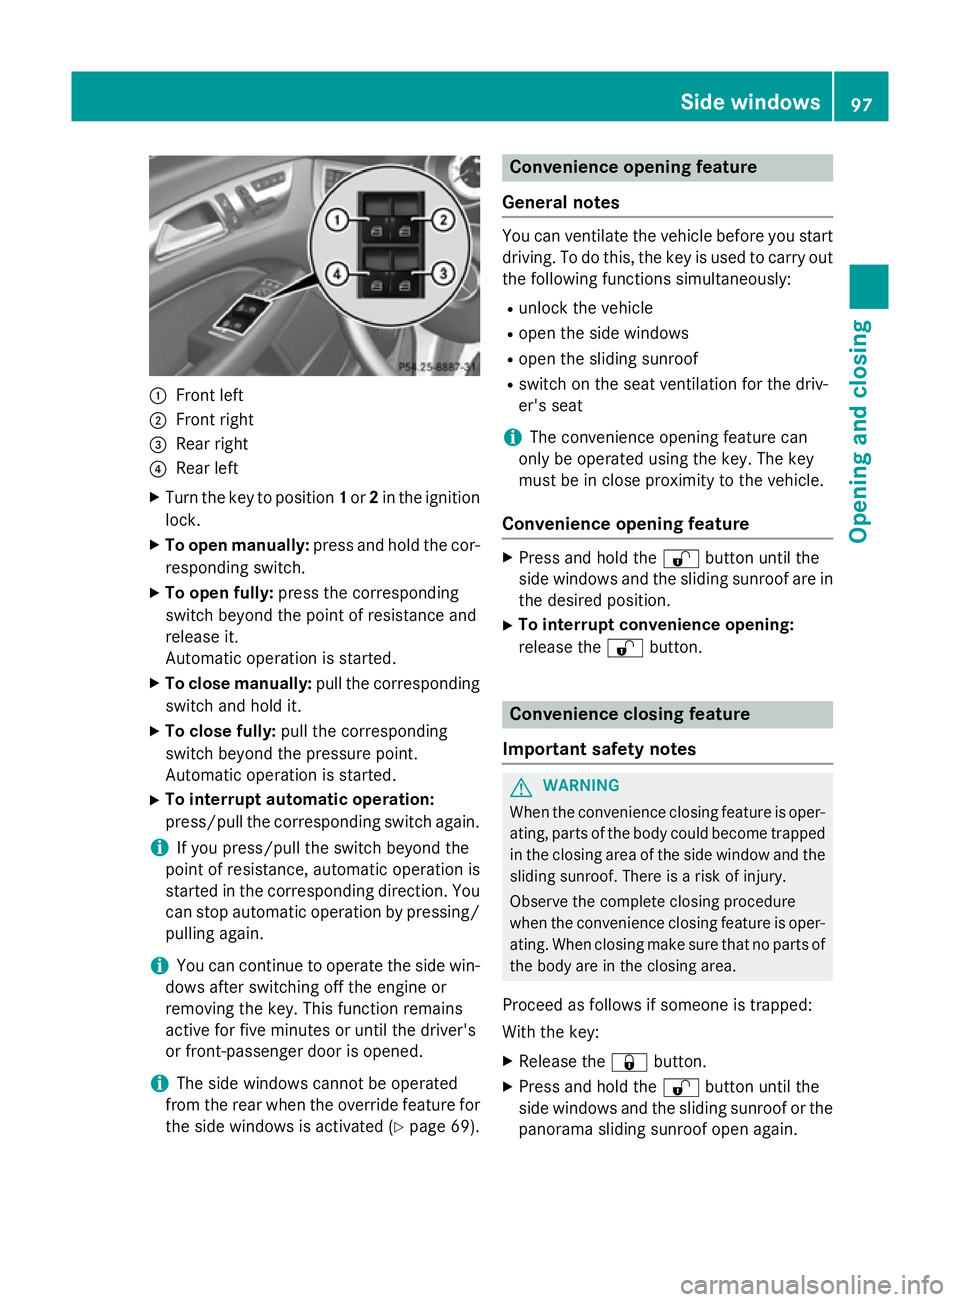
Front left
; Front right
= Rear right
? Rear left
X Turn the key to position 1or 2in the ignition
lock.
X To open manually: press and hold the cor-
responding switch.
X To open fully: press the corresponding
switch beyond the point of resistance and
release it.
Automatic operation is started.
X To close manually: pull the corresponding
switch and hold it.
X To close fully: pull the corresponding
switch beyond the pressure point.
Automatic operation is started.
X To interrupt automatic operation:
press/pull the corresponding switch again.
i If you press/pull the switch beyond the
point of resistance, automatic operation is
started in the corresponding direction. You
can stop automatic operation by pressing/ pulling again.
i You can continue to operate the side win-
dows after switching off the engine or
removing the key. This function remains
active for five minutes or until the driver's
or front-passenger door is opened.
i The side windows cannot be operated
from the rear when the override feature for
the side windows is activated (Y page 69). Convenience opening feature
General notes You can ventilate the vehicle before you start
driving. To do this, the key is used to carry out the following functions simultaneously:
R unlock the vehicle
R open the side windows
R open the sliding sunroof
R switch on the seat ventilation for the driv-
er's seat
i The convenience opening feature can
only be operated using the key. The key
must be in close proximity to the vehicle.
Convenience opening feature X
Press and hold the %button until the
side windows and the sliding sunroof are in the desired position.
X To interrupt convenience opening:
release the %button. Convenience closing feature
Important safety notes G
WARNING
When the convenience closing feature is oper- ating, parts of the body could become trapped
in the closing area of the side window and the
sliding sunroof. There is a risk of injury.
Observe the complete closing procedure
when the convenience closing feature is oper-
ating. When closing make sure that no parts of the body are in the closing area.
Proceed as follows if someone is trapped:
With the key:
X Release the &button.
X Press and hold the %button until the
side windows and the sliding sunroof or the
panorama sliding sunroof open again. Side windows
97Opening and closing Z
Page 103 of 417
Do not allow anything to protrude from the
sliding sunroof. Otherwise, the seals could
be damaged.
i Resonance noises can occur in addition to
the usual airflow noises when the sliding
sunroof is open. They are caused by minor
pressure fluctuations in the vehicle interior.
To reduce or eliminate these noises:
R change the position of the sliding sunroof
R open a side window
R open the sliding sunroof to the comfort
setting Sliding sunroof reversing feature
The sliding sunroof is equipped with an auto-
matic reversing feature. If an object blocks or restricts the sliding sunroof during the closing
process, the sliding sunroof opens again
automatically. The automatic reversing fea-
ture is however only an aid and is no substi-
tute for your attention when closing the slid-
ing roof. G
WARNING
The reversing function does not react:
R to soft, light and thin objects, e.g. small fin-
gers
R over the last 4 mm of the closing movement
R during resetting
R when closing the sliding sunroof again man-
ually immediately after automatic reversing
This means that the reversing function cannot prevent someone being trapped in these sit-
uations. There is a risk of injury.
When closing make sure that no parts of the
body are in the closing area.
If someone is trapped:
R release the switch immediately or
R during automatic operation, press the
switch briefly in any direction
The closing process is stopped. Operating the sliding sunroof
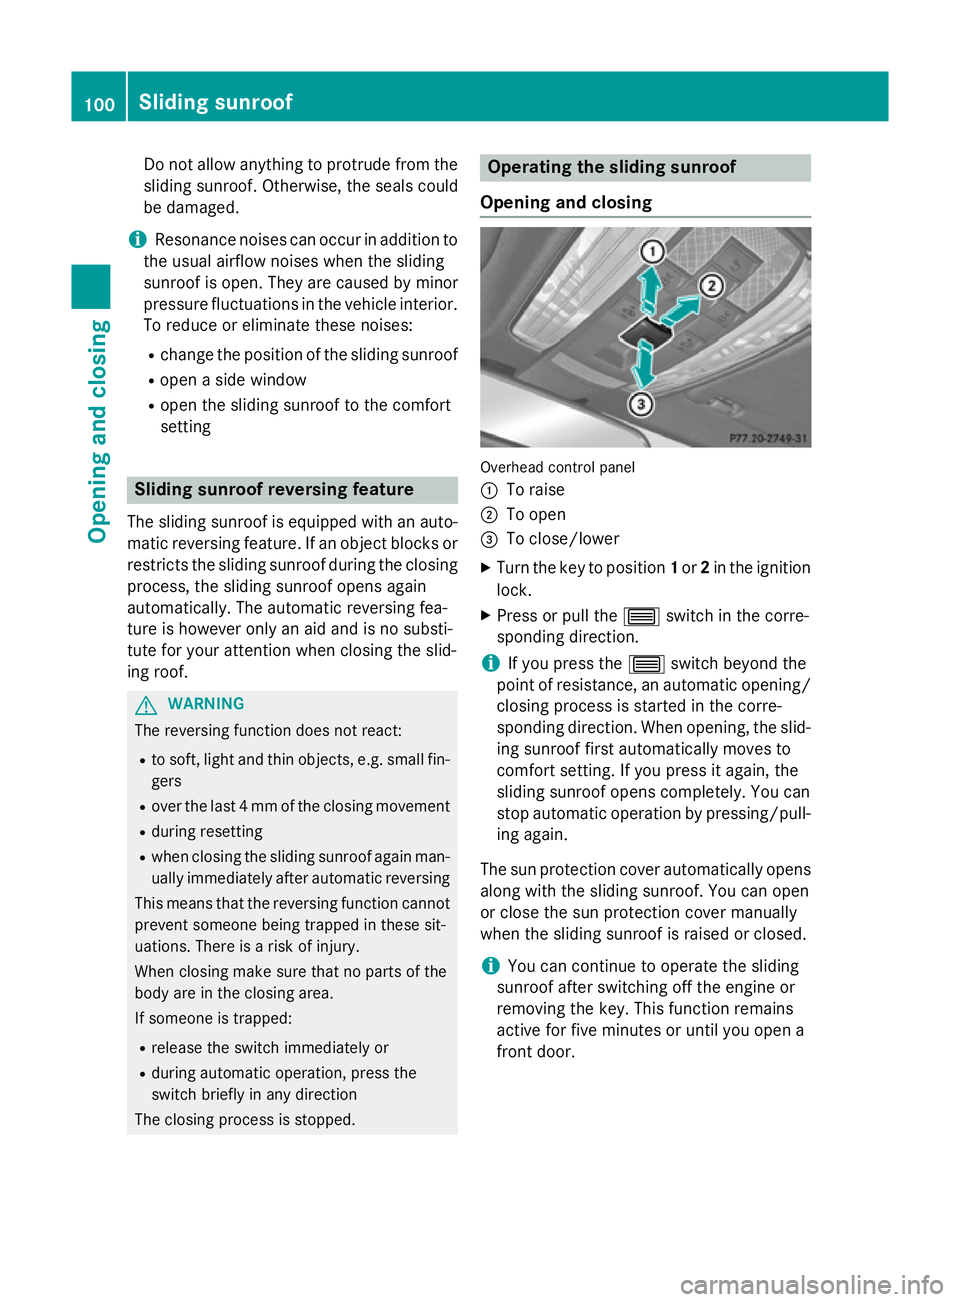
Opening and closing Overhead control panel
:
To raise
; To open
= To close/lower
X Turn the key to position 1or 2in the ignition
lock.
X Press or pull the 3switch in the corre-
sponding direction.
i If you press the
3switch beyond the
point of resistance, an automatic opening/ closing process is started in the corre-
sponding direction. When opening, the slid-
ing sunroof first automatically moves to
comfort setting. If you press it again, the
sliding sunroof opens completely. You can
stop automatic operation by pressing/pull- ing again.
The sun protection cover automatically opens
along with the sliding sunroof. You can open
or close the sun protection cover manually
when the sliding sunroof is raised or closed.
i You can continue to operate the sliding
sunroof after switching off the engine or
removing the key. This function remains
active for five minutes or until you open a
front door. 100
Sliding sunroofOpening and closing
Page 112 of 417
X
Pull or push the bottom of the head
restraint until it has reached the desired
position.
i The tilt angle can only be adjusted on the
two outer head restraints. The centre head restraint is only height-adjustable.
Removing and fitting the rear seat head
restraints G
WARNING
The head restraints cannot provide the inten-
ded protection unless they are fitted and
adjusted correctly. There is an increased risk of injury to the head and neck in the event of
an accident or sudden braking, for example.
Always drive with the head restraints fitted.
Ensure that the centre of the head restraints
support the back of each vehicle occupant's
head at eye level before driving off.
! Make sure that the rear window roller
sunblind is retracted when removing the
rear head restraints. Otherwise, you could
damage the roller sunblind. CLS Coupé
i
The head restraints can only be removed
if the rear seat folds forward.
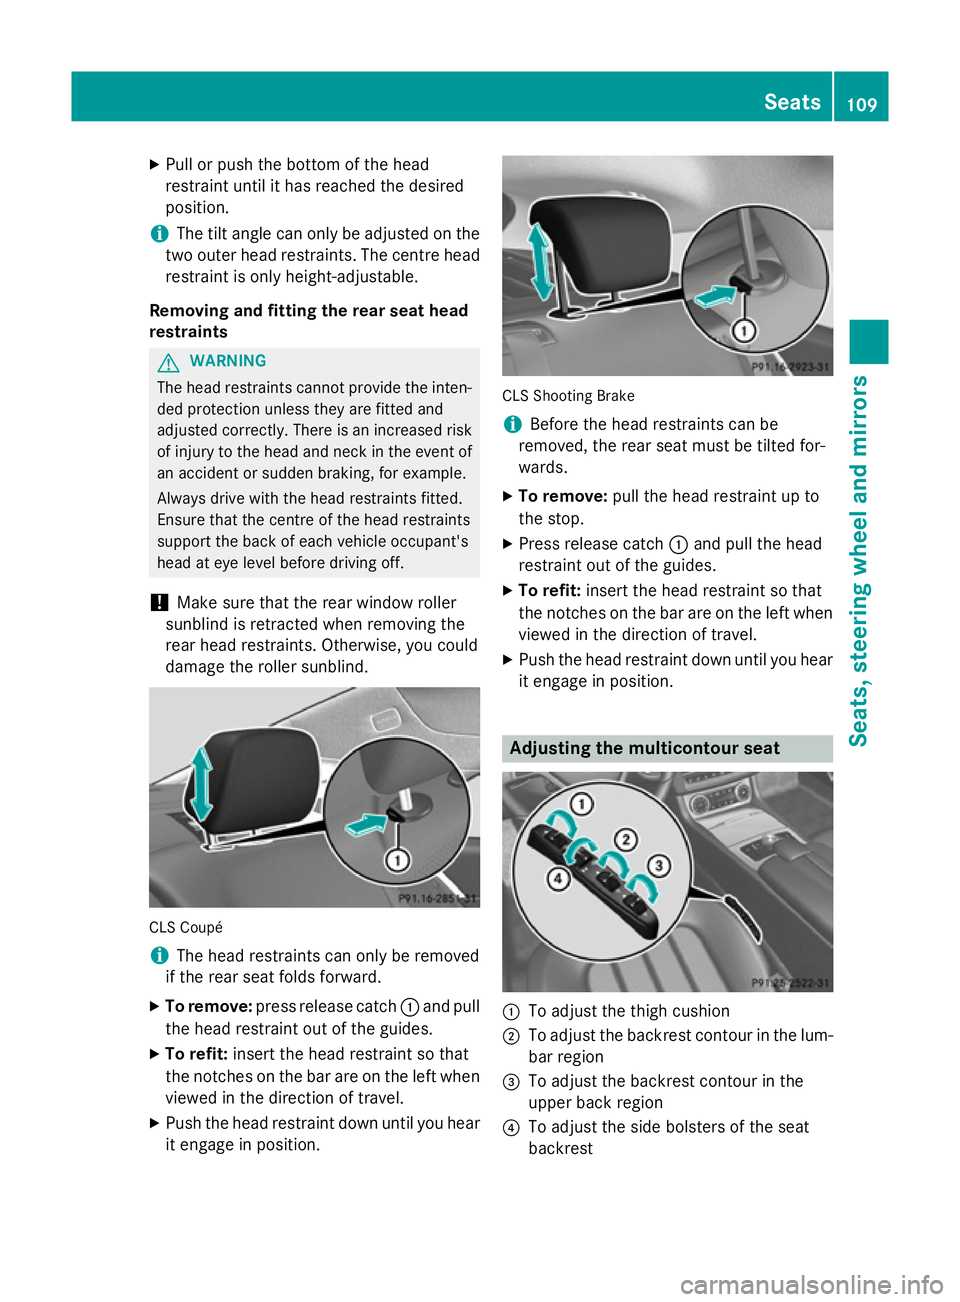
X To remove: press release catch :and pull
the head restraint out of the guides.
X To refit: insert the head restraint so that
the notches on the bar are on the left when
viewed in the direction of travel.
X Push the head restraint down until you hear
it engage in position. CLS Shooting Brake
i
Before the head restraints can be
removed, the rear seat must be tilted for-
wards.
X To remove: pull the head restraint up to
the stop.
X Press release catch :and pull the head
restraint out of the guides.
X To refit: insert the head restraint so that
the notches on the bar are on the left when viewed in the direction of travel.
X Push the head restraint down until you hear
it engage in position. Adjusting the multicontour seat
:
To adjust the thigh cushion
; To adjust the backrest contour in the lum-
bar region
= To adjust the backrest contour in the
upper back region
? To adjust the side bolsters of the seat
backrest Seats
109Seats, steering wheel and mirrors Z
Page 137 of 417
Switching the rear window wiper on/
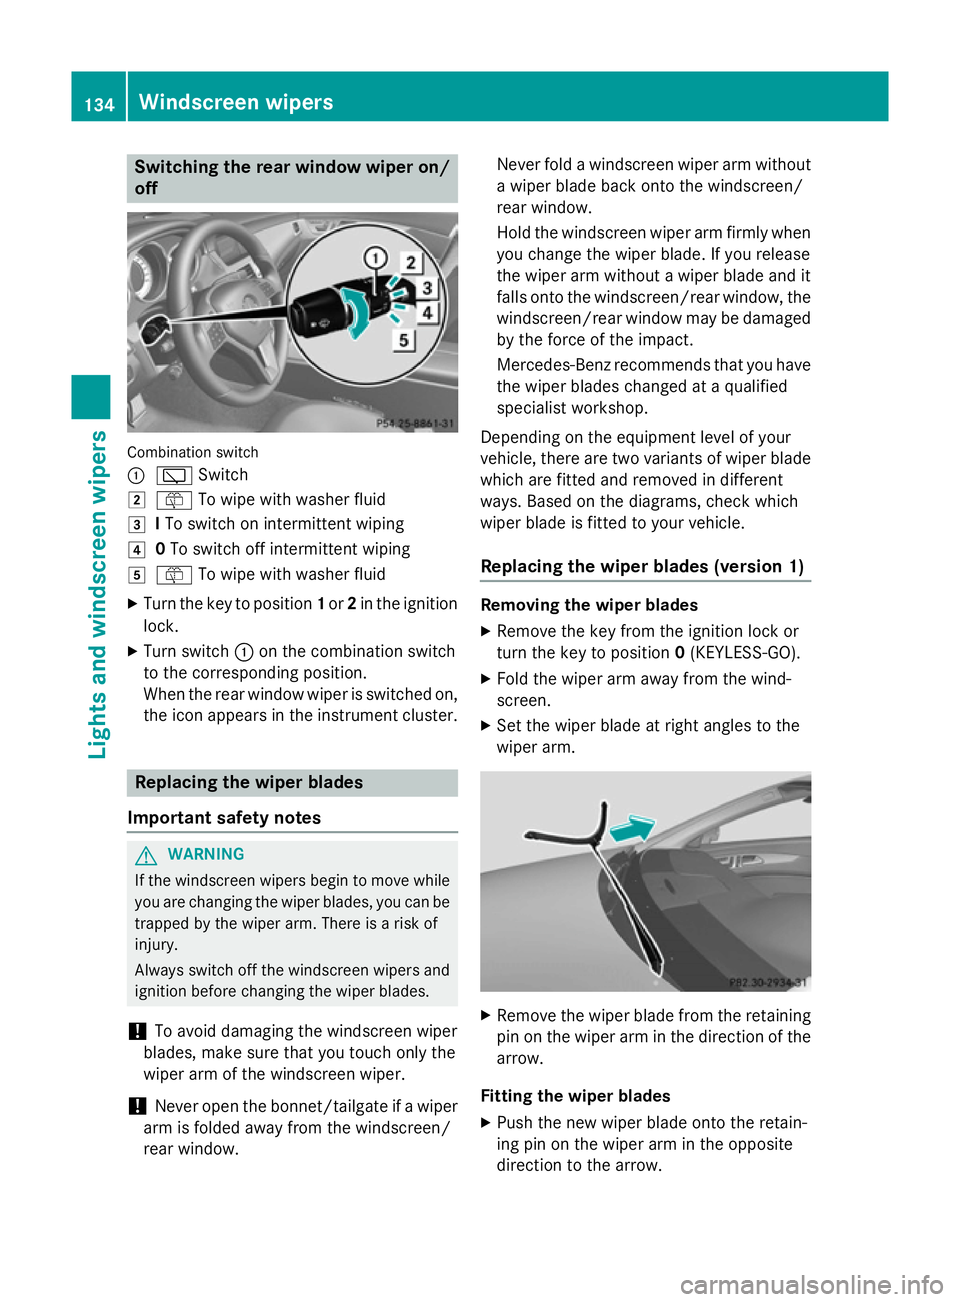
off Combination switch
:
è Switch
2 ô To wipe with washer fluid
3 ITo switch on intermittent wiping
4 0To switch off intermittent wiping
5 ô To wipe with washer fluid
X Turn the key to position 1or 2in the ignition
lock.
X Turn switch :on the combination switch
to the corresponding position.
When the rear window wiper is switched on,
the icon appears in the instrument cluster. Replacing the wiper blades
Important safety notes G
WARNING
If the windscreen wipers begin to move while
you are changing the wiper blades, you can be trapped by the wiper arm. There is a risk of
injury.
Always switch off the windscreen wipers and
ignition before changing the wiper blades.
! To avoid damaging the windscreen wiper
blades, make sure that you touch only the
wiper arm of the windscreen wiper.
! Never open the bonnet/tailgate if a wiper
arm is folded away from the windscreen/
rear window. Never fold a windscreen wiper arm without
a wiper blade back onto the windscreen/
rear window.
Hold the windscreen wiper arm firmly when
you change the wiper blade. If you release
the wiper arm without a wiper blade and it
falls onto the windscreen/rear window, the windscreen/rear window may be damaged
by the force of the impact.
Mercedes-Benz recommends that you have
the wiper blades changed at a qualified
specialist workshop.
Depending on the equipment level of your
vehicle, there are two variants of wiper blade which are fitted and removed in different
ways. Based on the diagrams, check which
wiper blade is fitted to your vehicle.
Replacing the wiper blades (version 1) Removing the wiper blades
X Remove the key from the ignition lock or
turn the key to position 0(KEYLESS-GO).
X Fold the wiper arm away from the wind-
screen.
X Set the wiper blade at right angles to the
wiper arm. X
Remove the wiper blade from the retaining
pin on the wiper arm in the direction of thearrow.
Fitting the wiper blades
X Push the new wiper blade onto the retain-
ing pin on the wiper arm in the opposite
direction to the arrow. 134
Windscreen wipersLights and windscreen wipers
Page 138 of 417
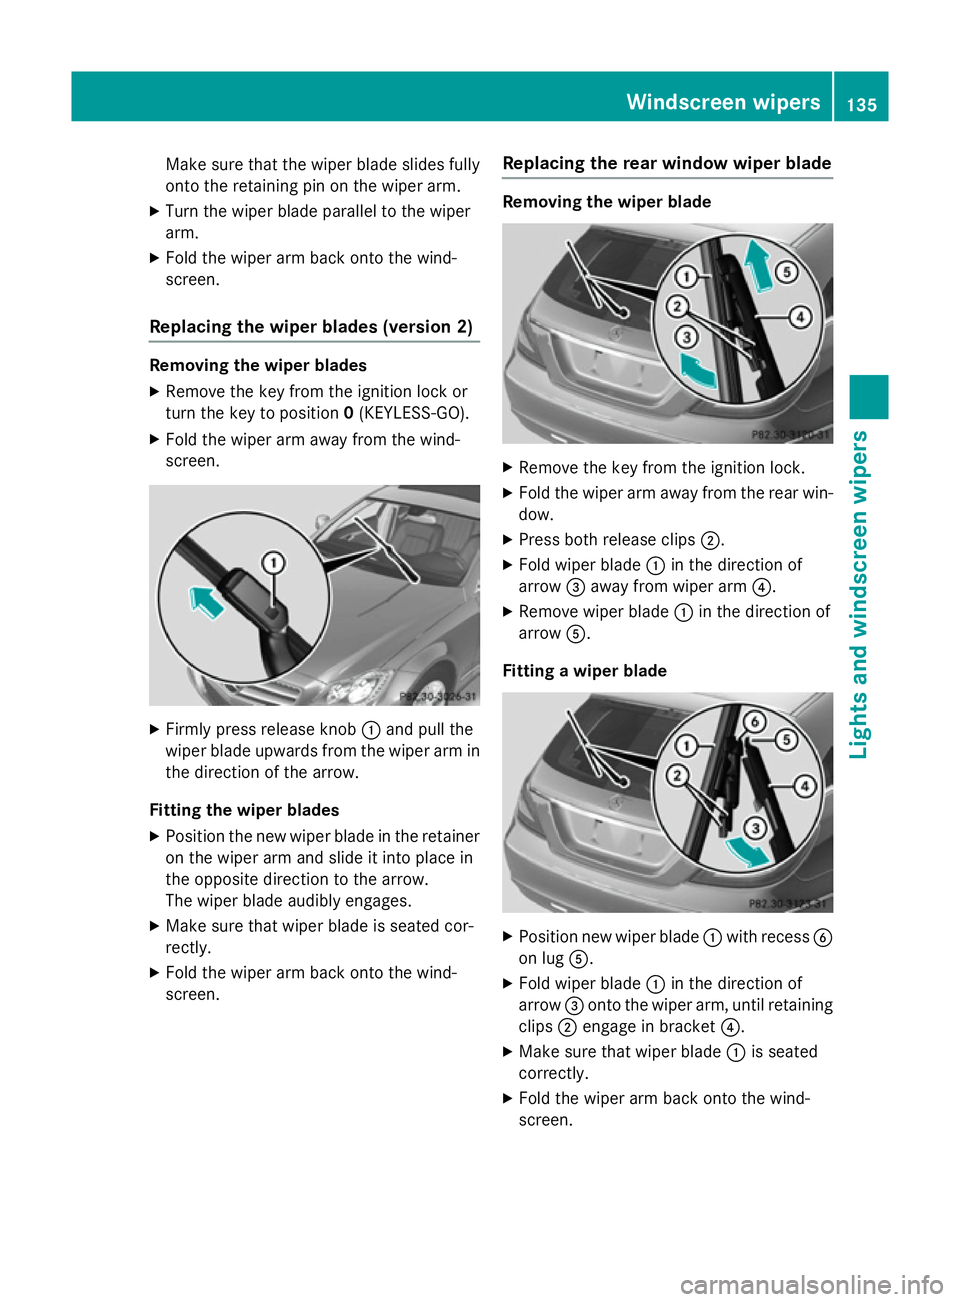
Make sure that the wiper blade slides fully
onto the retaining pin on the wiper arm.
X Turn the wiper blade parallel to the wiper
arm.
X Fold the wiper arm back onto the wind-
screen.
Replacing the wiper blades (version 2) Removing the wiper blades
X Remove the key from the ignition lock or
turn the key to position 0(KEYLESS-GO).
X Fold the wiper arm away from the wind-
screen. X
Firmly press release knob :and pull the
wiper blade upwards from the wiper arm in the direction of the arrow.
Fitting the wiper blades
X Position the new wiper blade in the retainer
on the wiper arm and slide it into place in
the opposite direction to the arrow.
The wiper blade audibly engages.
X Make sure that wiper blade is seated cor-
rectly.
X Fold the wiper arm back onto the wind-
screen. Replacing the rear window wiper blade Removing the wiper blade
X
Remove the key from the ignition lock.
X Fold the wiper arm away from the rear win-
dow.
X Press both release clips ;.
X Fold wiper blade :in the direction of
arrow =away from wiper arm ?.
X Remove wiper blade :in the direction of
arrow A.
Fitting a wiper blade X
Position new wiper blade :with recess B
on lug A.
X Fold wiper blade :in the direction of
arrow =onto the wiper arm, until retaining
clips ;engage in bracket ?.
X Make sure that wiper blade :is seated
correctly.
X Fold the wiper arm back onto the wind-
screen. Windscreen wipers
135Lights and windscreen wipers Z
Page 163 of 417
the case if you are not depressing the brake
pedal.
If you depress the brake pedal and press the
Start/Stop button, the engine starts immedi-
ately.
A check which periodically establishes a radio
connection between the vehicle and the key
determines whether a valid key is in the vehi- cle. This occurs, for example, when starting
the engine.
To start the vehicle without actively using the
key:
R the Start/Stop button must be inserted in
the ignition lock
R the key must be in the vehicle
R the vehicle must not be locked with the key
or KEYLESS-GO (Y page 83)
R do not keep the KEYLESS-GO key together
with:
- electronic devices, e.g. a mobile phone
or another key
- metallic objects, e.g. coins or metal film
R do not keep the KEYLESS-GO key together
with metallic objects, such as a metal case,
for example
This can affect the functionality of KEY-
LESS-GO.
The engine can be switched off while the vehi-
cle is in motion by pressing and holding the
Start/Stop button for three seconds. This
function operates independently of the ECO
start/stop automatic engine switch-off func-
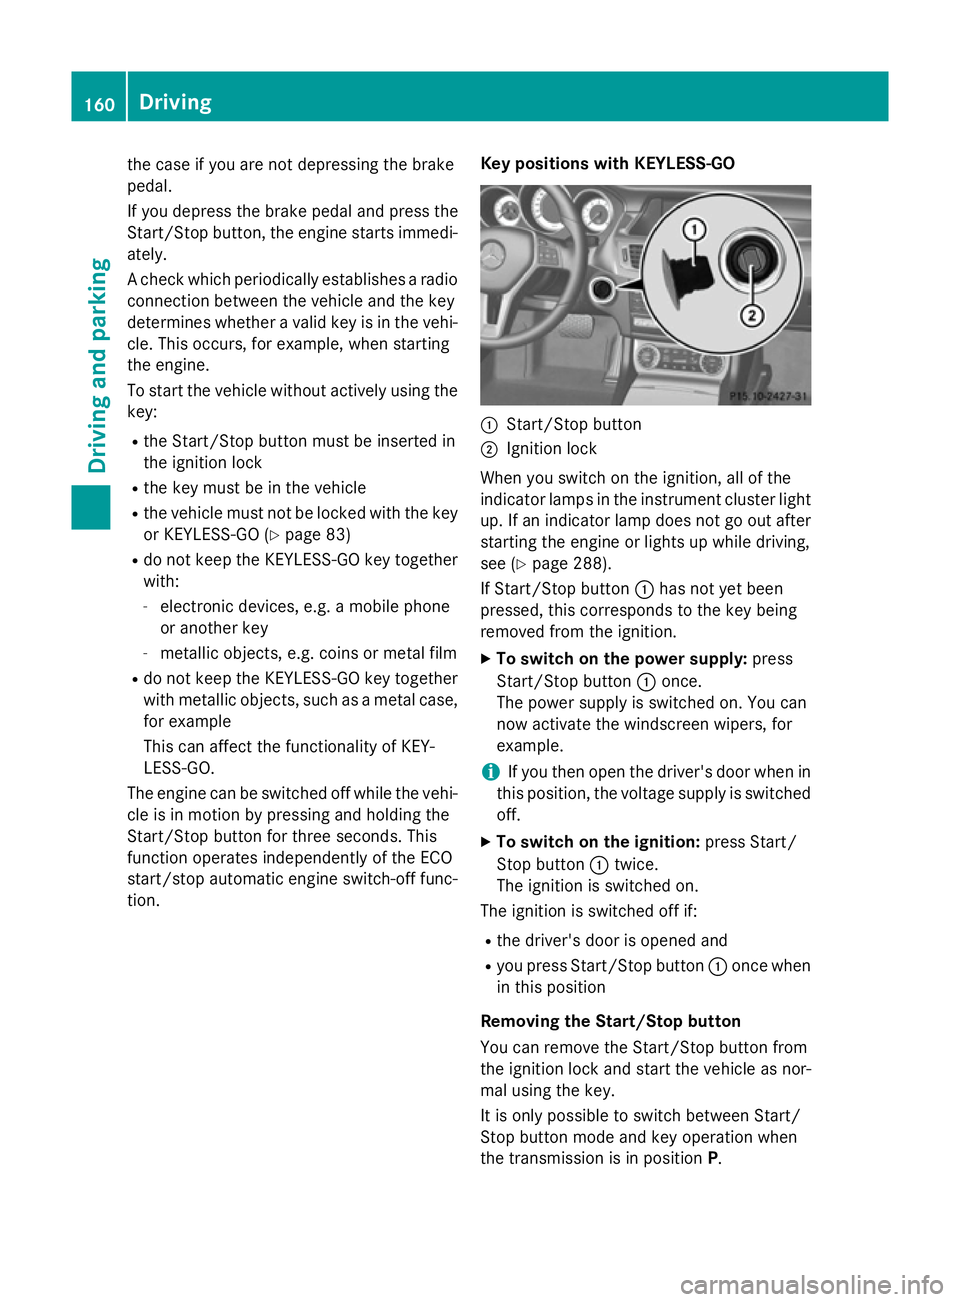
tion. Key positions with KEYLESS-GO :
Start/Stop button
; Ignition lock
When you switch on the ignition, all of the
indicator lamps in the instrument cluster light up. If an indicator lamp does not go out after
starting the engine or lights up while driving,
see (Y page 288).
If Start/Stop button :has not yet been
pressed, this corresponds to the key being
removed from the ignition.
X To switch on the power supply: press
Start/Stop button :once.
The power supply is switched on. You can
now activate the windscreen wipers, for
example.
i If you then open the driver's door when in
this position, the voltage supply is switched
off.
X To switch on the ignition: press Start/
Stop button :twice.
The ignition is switched on.
The ignition is switched off if:
R the driver's door is opened and
R you press Start/Stop button :once when
in this position
Removing the Start/Stop button
You can remove the Start/Stop button from
the ignition lock and start the vehicle as nor-
mal using the key.
It is only possible to switch between Start/
Stop button mode and key operation when
the transmission is in position P.160
DrivingDriving an
d parking
Page 310 of 417
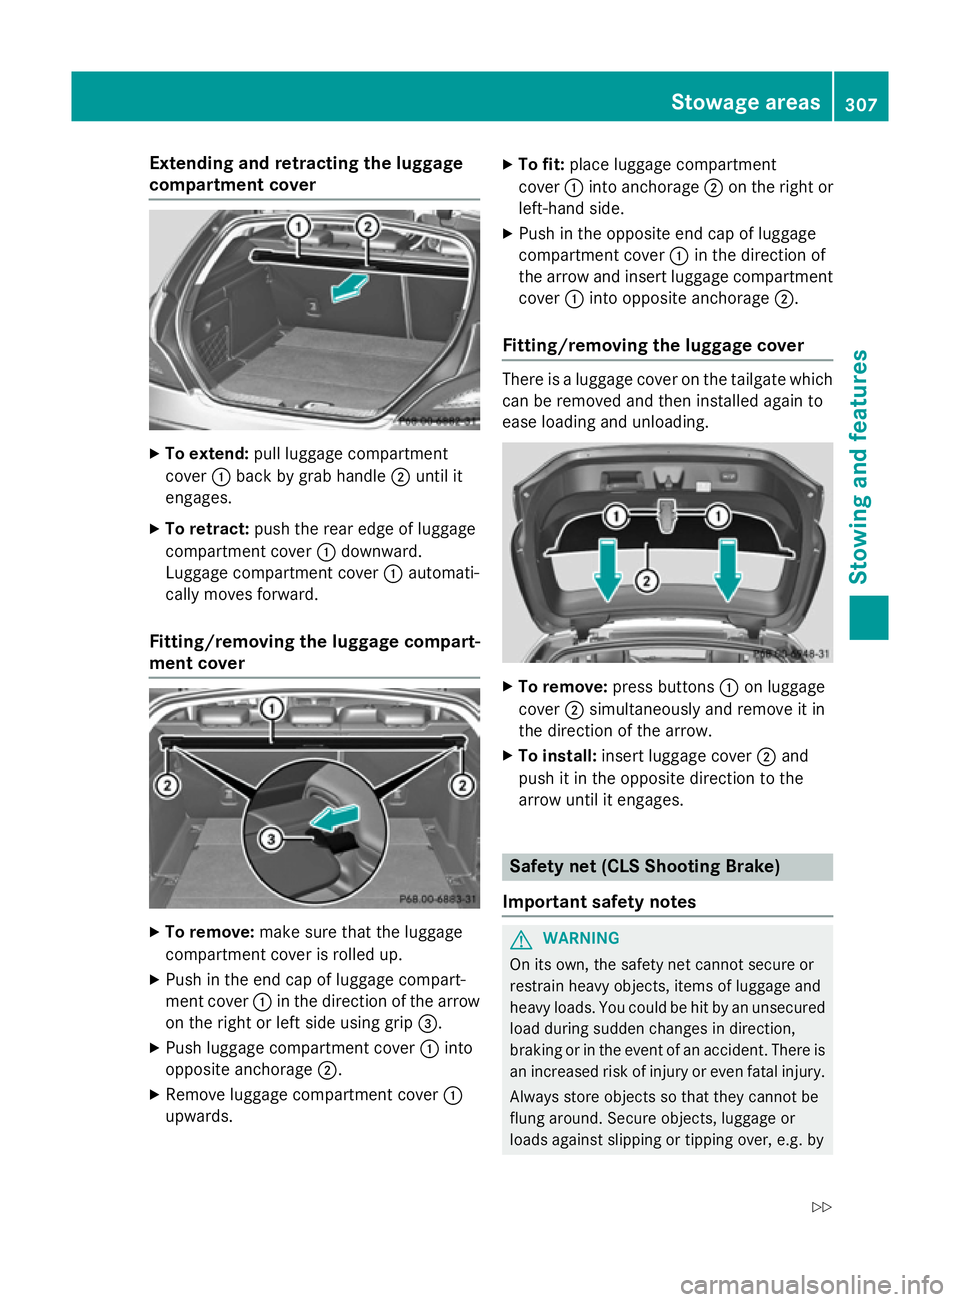
Extending and retracting the luggage
compartment cover X
To extend: pull luggage compartment
cover :back by grab handle ;until it
engages.
X To retract: push the rear edge of luggage
compartment cover :downward.
Luggage compartment cover :automati-
cally moves forward.
Fitting/removing the luggage compart-
ment cover X
To remove: make sure that the luggage
compartment cover is rolled up.
X Push in the end cap of luggage compart-
ment cover :in the direction of the arrow
on the right or left side using grip =.
X Push luggage compartment cover :into
opposite anchorage ;.
X Remove luggage compartment cover :
upwards. X
To fit: place luggage compartment
cover :into anchorage ;on the right or
left-hand side.
X Push in the opposite end cap of luggage
compartment cover :in the direction of
the arrow and insert luggage compartment cover :into opposite anchorage ;.
Fitting/removing the luggage cover There is a luggage cover on the tailgate which
can be removed and then installed again to
ease loading and unloading. X
To remove: press buttons :on luggage
cover ;simultaneously and remove it in
the direction of the arrow.
X To install: insert luggage cover ;and
push it in the opposite direction to the
arrow until it engages. Safety net (CLS Shooting Brake)
Important safety notes G
WARNING
On its own, the safety net cannot secure or
restrain heavy objects, items of luggage and
heavy loads. You could be hit by an unsecured load during sudden changes in direction,
braking or in the event of an accident. There isan increased risk of injury or even fatal injury.
Always store objects so that they cannot be
flung around. Secure objects, luggage or
loads against slipping or tipping over, e.g. by Stowage areas
307Stowing and features
Z
Page 312 of 417
Always observe the maximum permitted
load of the EASY-PACK boot box. Always
store and secure heavy objects in the boot outside of the EASY-PACK boot box.
The maximum permitted load of the EASY-
PACK boot box is 10 kg. With a load of above approximately 5 kg, the bottom of the box
moves downward until it rests on the mat of
the boot floor. Thus, overloading of the box is
avoided.
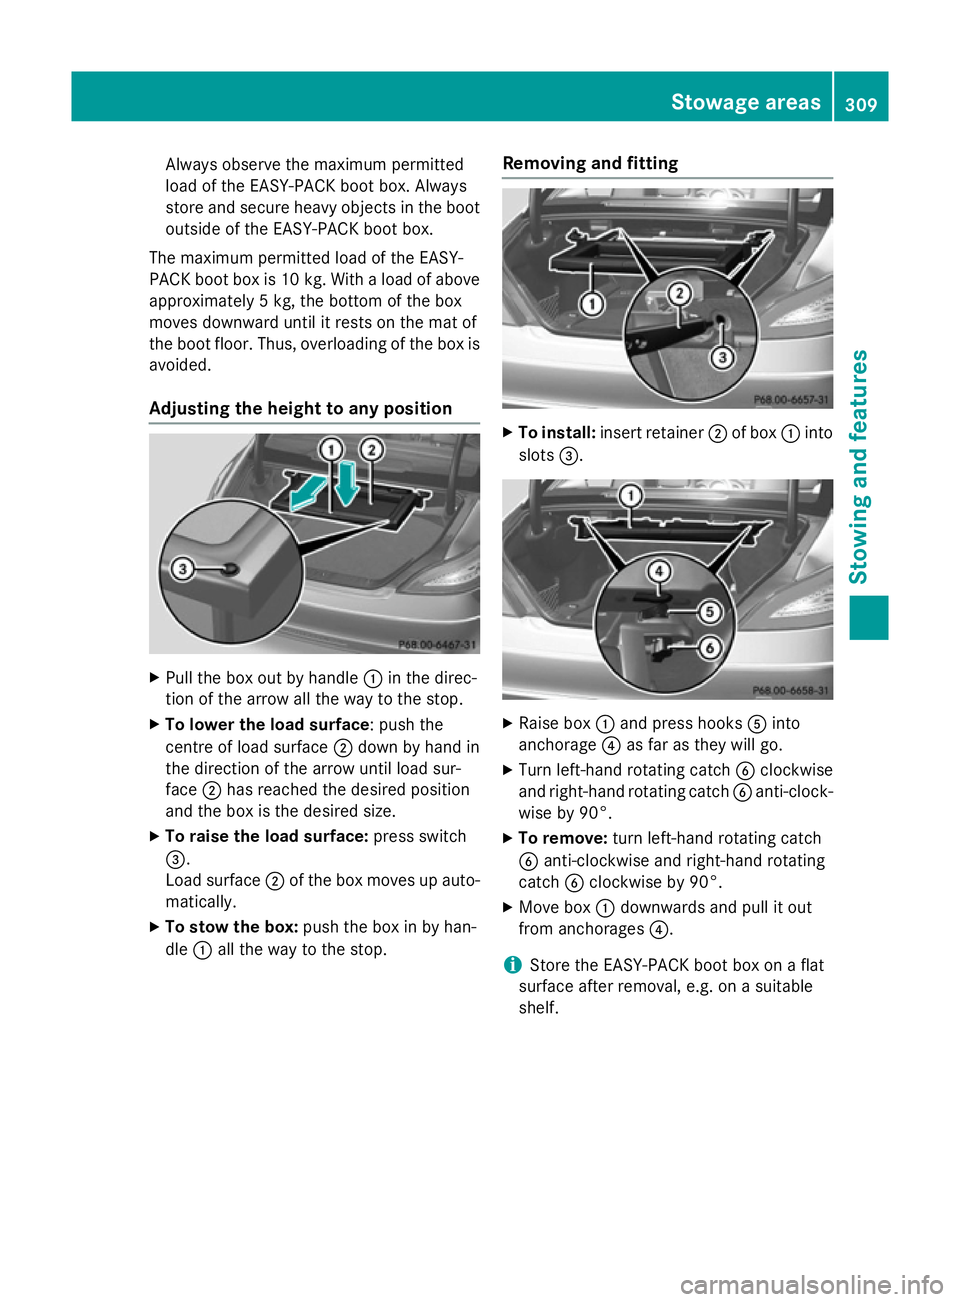
Adjusting the height to any position X
Pull the box out by handle :in the direc-
tion of the arrow all the way to the stop.
X To lower the load surface: push the
centre of load surface ;down by hand in
the direction of the arrow until load sur-
face ;has reached the desired position
and the box is the desired size.
X To raise the load surface: press switch
=.
Load surface ;of the box moves up auto-
matically.
X To stow the box: push the box in by han-
dle :all the way to the stop. Removing and fitting X
To install: insert retainer ;of box :into
slots =. X
Raise box :and press hooks Ainto
anchorage ?as far as they will go.
X Turn left-hand rotating catch Bclockwise
and right-hand rotating catch Banti-clock-
wise by 90°.
X To remove: turn left-hand rotating catch
B anti-clockwise and right-hand rotating
catch Bclockwise by 90°.
X Move box :downwards and pull it out
from anchorages ?.
i Store the EASY-PACK boot box on a flat
surface after removal, e.g. on a suitable
shelf. Stowage areas
309Stowing an d features Z