2014 MERCEDES-BENZ CLS COUPE brake light
[x] Cancel search: brake lightPage 340 of 417
should drive for a few minutes after clean-
ing. Braking heats the brake discs and the
brake pads/linings, thus drying them. The
vehicle can then be parked up.
Cleaning the windows G
WARNING
If the windscreen wipers are set in motion
when cleaning the windscreen or wiper
blades, you could become trapped. There is a danger of injury.
Always switch off the windscreen wipers and
the ignition before cleaning the windscreen or wiper blades.
! Do not use dry cloths, abrasive products,
solvents or cleaning agents containing sol- vents to clean the inside of the windows. Do
not touch the insides of the windows with
hard objects, e.g. an ice scraper or ring.
There is otherwise a risk of damaging the
windows.
! Clean the water drainage channels of the
windscreen and the rear window at regular
intervals. Deposits such as leaves, petals
and pollen may under certain circumstan-
ces prevent water from draining away. This
can lead to corrosion damage and damage to electronic components.
X Clean the inside and outside of the win-
dows with a damp cloth and a cleaning
agent that is recommended and approved
by Mercedes-Benz.
Cleaning the wiper blades G
WARNING
If the windscreen wipers are set in motion
when cleaning the windscreen or wiper
blades, you could become trapped. There is a danger of injury.
Always switch off the windscreen wipers and
the ignition before cleaning the windscreen or wiper blades. !
Do not pull on the wiper blade. Otherwise,
the wiper blade could be damaged.
! Do not clean wiper blades too often and
do not rub them too hard. Otherwise, the
graphite coating could be damaged. This
could cause wiper noise.
! Hold the wiper arm securely when folding
back. The windscreen could be damaged if
the wiper arm hits against it suddenly.
X Fold the wiper arms away from the wind-
screen.
X Clean the wiper blades carefully using a
damp cloth.
X Fold the windscreen wipers back again
before switching on the ignition.
Cleaning the exterior lighting !
Only use cleaning agents or cleaning
cloths that are suitable for plastic lenses.
Unsuitable cleaning agents or cleaning
cloths could scratch or damage the plastic lenses of the exterior lighting.
X Clean the plastic lenses of the exterior
lighting using a wet sponge and a mild
cleaning agent, e.g. Mercedes-Benz car
shampoo or cleaning cloths.
Mirror turn signals !
Only use cleaning agents or cleaning
cloths that are suitable for plastic lenses.
Unsuitable cleaning agents or cleaning
cloths could scratch or damage the plastic lenses of the mirror turn signals.
X Clean the plastic lenses of the mirror turn
signals in the exterior mirror housing using
a wet sponge and mild cleaning agent, e.g.
Mercedes-Benz car shampoo or cleaning
cloths.
Cleaning the sensors !
If you clean the sensors with a high-pres-
sure cleaner, make sure that you keep a
distance of at least 30 cm between the Care
337Maintenance and care Z
Page 341 of 417
vehicle and the high-pressure cleaner noz-
zle. Information about the correct distance is available from the equipment manufac-
turer. X
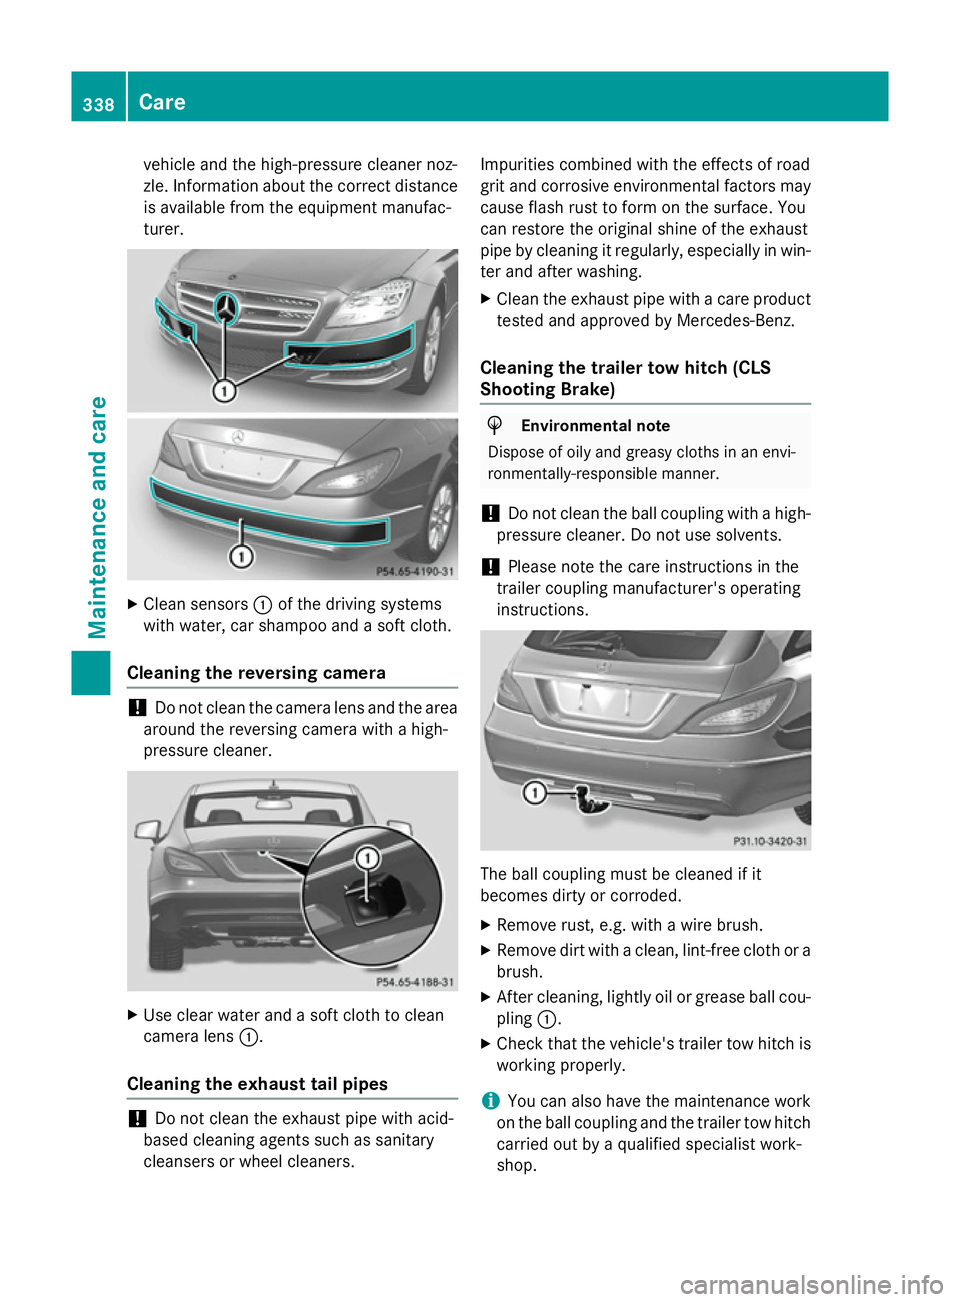
Clean sensors :of the driving systems
with water, car shampoo and a soft cloth.
Cleaning the reversing camera !
Do not clean the camera lens and the area
around the reversing camera with a high-
pressure cleaner. X
Use clear water and a soft cloth to clean
camera lens :.
Cleaning the exhaust tail pipes !
Do not clean the exhaust pipe with acid-
based cleaning agents such as sanitary
cleansers or wheel cleaners. Impurities combined with the effects of road
grit and corrosive environmental factors may
cause flash rust to form on the surface. You
can restore the original shine of the exhaust
pipe by cleaning it regularly, especially in win-
ter and after washing.
X Clean the exhaust pipe with a care product
tested and approved by Mercedes-Benz.
Cleaning the trailer tow hitch (CLS
Shooting Brake) H
Environmental note
Dispose of oily and greasy cloths in an envi-
ronmentally-responsible manner.
! Do not clean the ball coupling with a high-
pressure cleaner. Do not use solvents.
! Please note the care instructions in the
trailer coupling manufacturer's operating
instructions. The ball coupling must be cleaned if it
becomes dirty or corroded.
X Remove rust, e.g. with a wire brush.
X Remove dirt with a clean, lint-free cloth or a
brush.
X After cleaning, lightly oil or grease ball cou-
pling :.
X Check that the vehicle's trailer tow hitch is
working properly.
i You can also have the maintenance work
on the ball coupling and the trailer tow hitch
carried out by a qualified specialist work-
shop. 338
CareMaintenance and care
Page 359 of 417
R
Jump-starting may only be performed using batteries with a nominal voltage of 12 V.
R Only use jump leads that have a sufficient cross-section and insulated terminal clamps.
R If the battery is fully discharged, leave the battery that is being used to jump-start connected
for a few minutes before attempting to start. This charges the empty battery a little.
R Make sure that the two vehicles do not touch.
Make sure that:
R The jump leads are not damaged.
R Non-insulated parts of the terminal clamps do not come into contact with other metal parts
while the jump leads are connected to the battery.
R The jump leads cannot come into contact with parts which can move when the engine is
running, such as the V-belt pulley or the fan.
X Firmly depress the parking brake.
X Shift the transmission to position P.
X Switch off all electrical consumers, e.g. rear window heating, lighting etc.
X Open the bonnet.
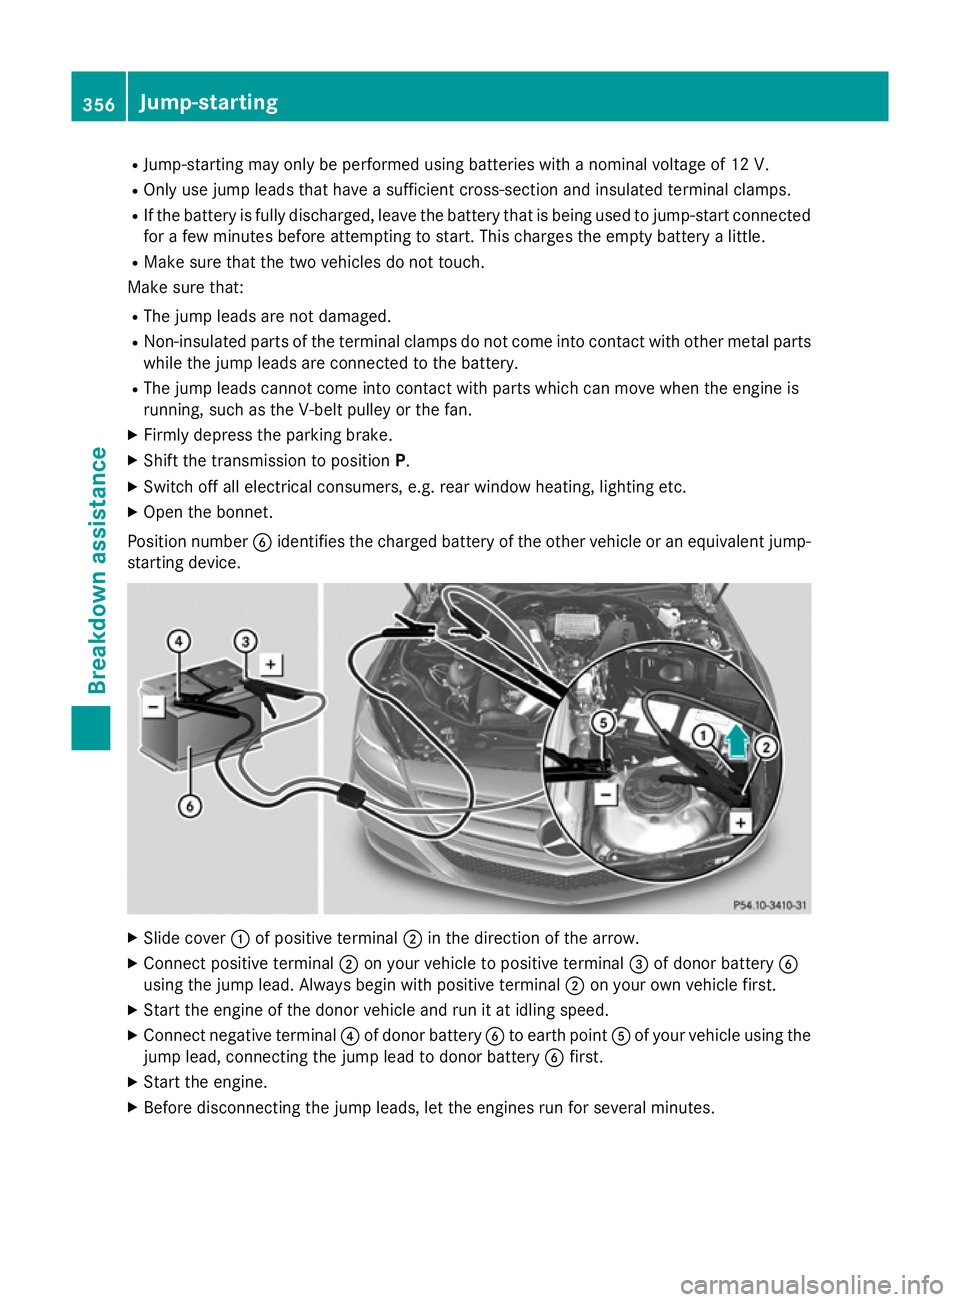
Position number Bidentifies the charged battery of the other vehicle or an equivalent jump-
starting device. X
Slide cover :of positive terminal ;in the direction of the arrow.
X Connect positive terminal ;on your vehicle to positive terminal =of donor battery B
using the jump lead. Always begin with positive terminal ;on your own vehicle first.
X Start the engine of the donor vehicle and run it at idling speed.
X Connect negative terminal ?of donor battery Bto earth point Aof your vehicle using the
jump lead, connecting the jump lead to donor battery Bfirst.
X Start the engine.
X Before disconnecting the jump leads, let the engines run for several minutes. 356
Jump-startingBreakdown assistance
Page 383 of 417
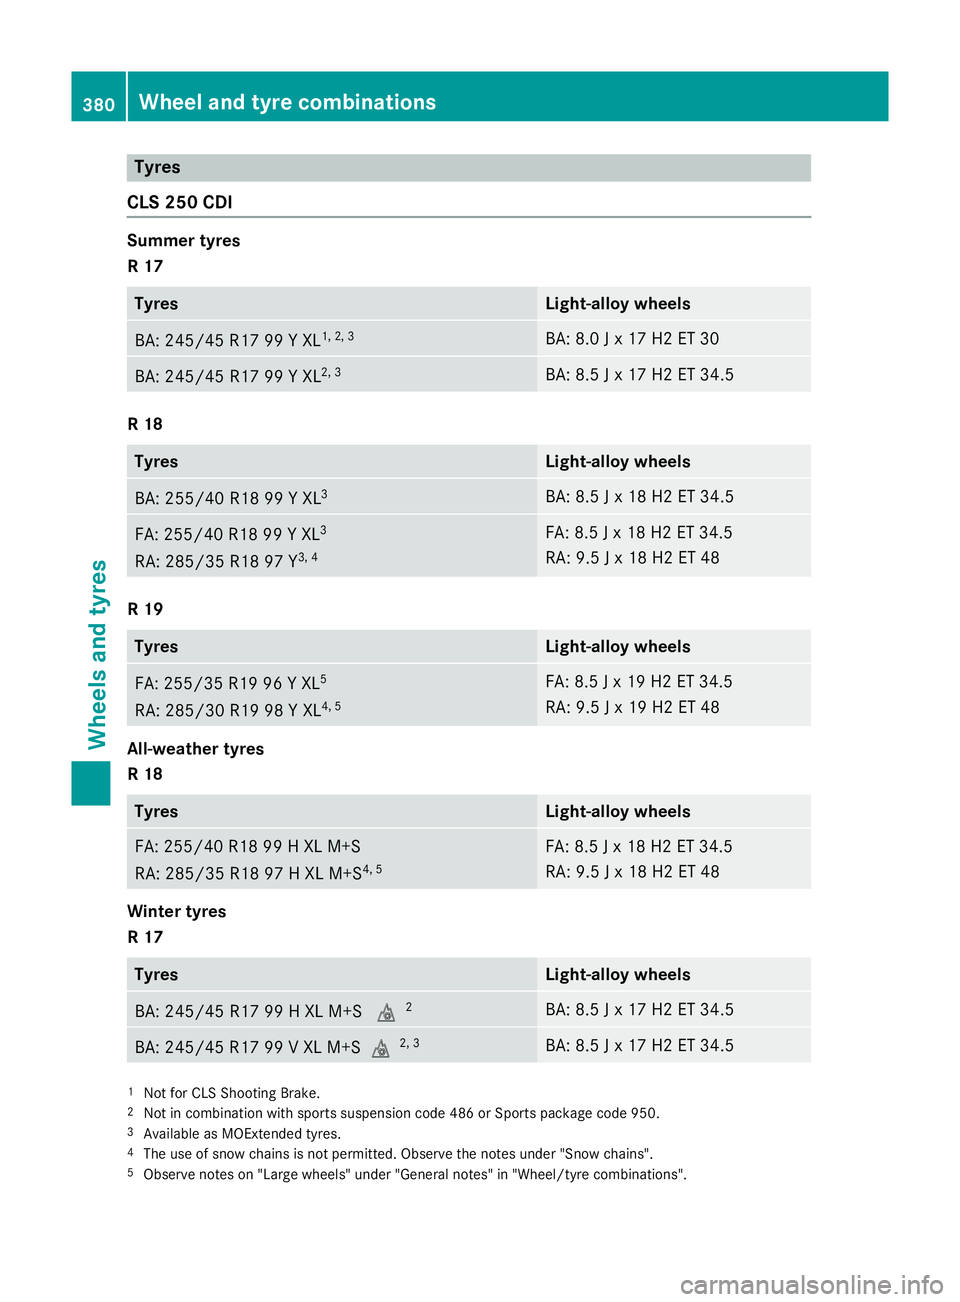
Tyres
CLS 250 CDI Summer tyres
R 17
Tyres Light-alloy wheels
BA: 245/4
5 R17 99 Y XL 1, 2, 3 BA: 8.0 J x 17 H2 ET 30
BA: 245/45 R17 99 Y XL
2, 3 BA: 8.5 J x 17 H2 ET 34.5
R 18
Tyres Light-alloy wheels
BA: 255/40 R18 99 Y XL
3 BA: 8.5 J x 18 H2 ET 34.5
FA: 255/40 R18 99 Y XL
3
RA: 285/35 R18 97 Y 3, 4 FA: 8.5 J x 18 H2 ET 34.5
RA: 9.5 J x 18 H2 ET 48
R 19
Tyres Light-alloy wheels
FA: 255/35 R19 96 Y XL
5
RA: 285/30 R19 98 Y XL 4, 5 FA: 8.5 J x 19 H2 ET 34.5
RA: 9.5 J x 19 H2 ET 48
All-weather tyres
R 18 Tyres Light-alloy wheels
FA: 255/40 R18 99 H XL M+S
RA: 285/35 R18 97 H XL M+S
4, 5 FA: 8.5 J x 18 H2 ET 34.5
RA: 9.5 J x 18 H2 ET 48
Winter tyres
R 17
Tyres Light-alloy wheels
BA: 245/45 R17 99 H XL M+S
i2 BA: 8.5 J x 17 H2 ET 34.5
BA: 245/45 R17 99 V XL M+Si
2, 3 BA: 8.5 J x 17 H2 ET 34.5
1
Not for CLS Shooting Brake.
2 Not in combination with sports suspension code 486 or Sports package code 950.
3 Available as MOExtended tyres.
4 The use of snow chains is not permitted. Observe the notes under "Snow chains".
5 Observe notes on "Large wheels" under "General notes" in "Wheel/tyre combinations". 380
Wheel and tyre combinationsWheels and tyres
Page 392 of 417
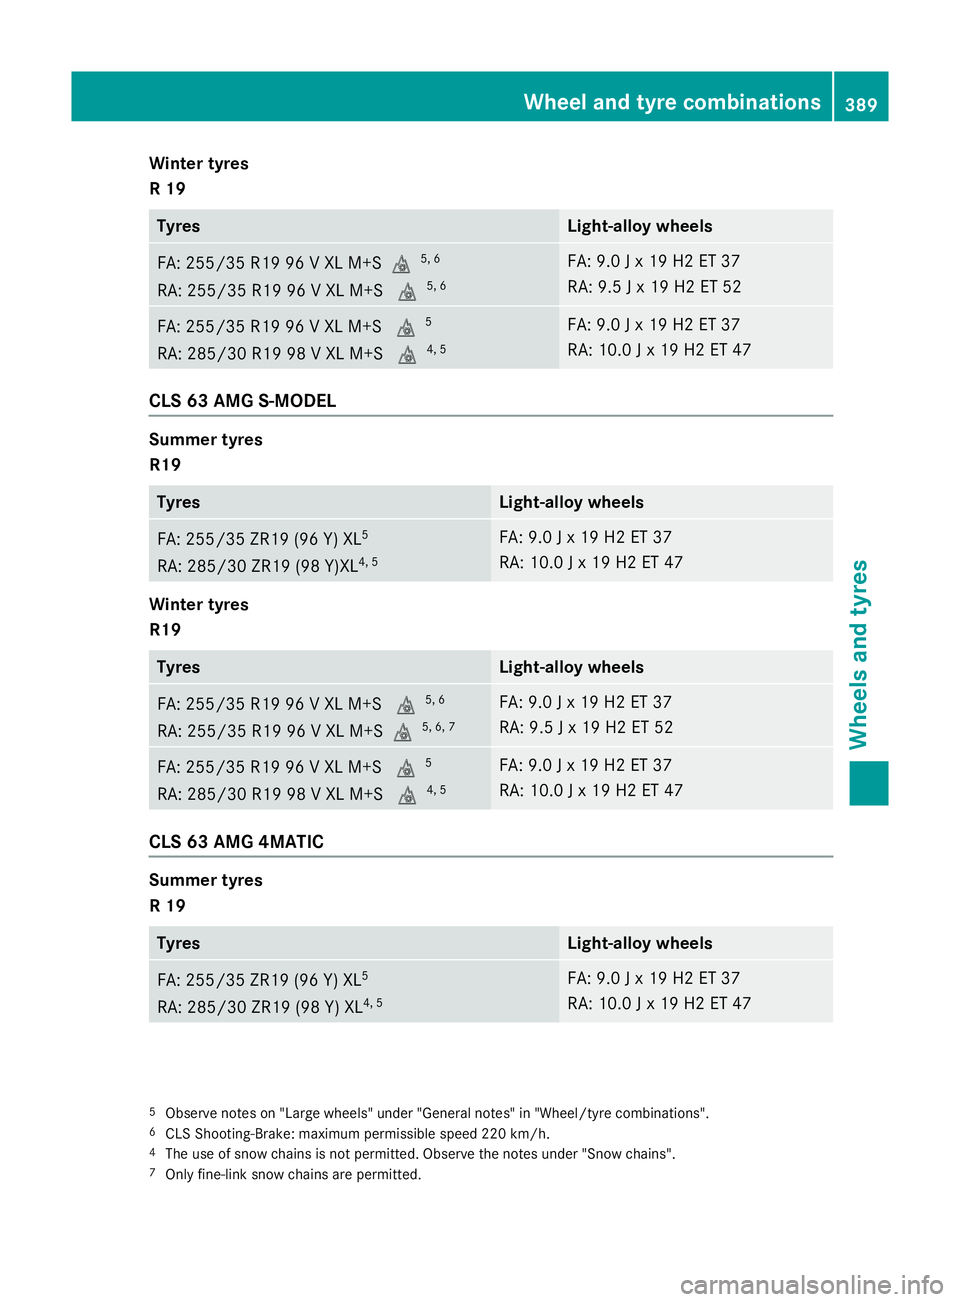
Winter tyres
R 19
Tyres Light-alloy wheels
FA: 255/35 R19 96 V XL M+Si
5, 6
RA: 255/35 R19 96 V XL M+S i5, 6 FA: 9.0 J x 19 H2 ET 37
RA: 9.5 J x 19 H2 ET 52
FA: 255/35 R19 96 V XL M+S
i5
RA: 285/30 R19 98 V XL M+S i4, 5 FA: 9.0 J x 19 H2 ET 37
RA: 10.0 J x 19 H2 ET 47
CLS 63 AMG S-MODEL
Summer tyres
R19
Tyres Light-alloy wheels
FA: 255/35 ZR19 (96 Y) XL
5
RA: 285/30 ZR19 (98 Y)XL 4, 5 FA: 9.0 J x 19 H2 ET 37
RA: 10.0 J x 19 H2 ET 47
Winter tyres
R19
Tyres Light-alloy wheels
FA: 255/35 R19 96 V XL M+S
i5, 6
RA: 255/35 R19 96 V XL M+Si 5, 6, 7 FA: 9.0 J x 19 H2 ET 37
RA: 9.5 J x 19 H2 ET 52
FA: 255/35 R19 96 V XL M+S
i5
RA: 285/30 R19 98 V XL M+S i4, 5 FA: 9.0 J x 19 H2 ET 37
RA: 10.0 J x 19 H2 ET 47
CLS 63 AMG 4MATIC
Summer tyres
R 19
Tyres Light-alloy wheels
FA: 255/35 ZR19 (96 Y) XL
5
RA: 285/30 ZR19 (98 Y) XL 4, 5 FA: 9.0 J x 19 H2 ET 37
RA: 10.0 J x 19 H2 ET 47
5
Observe notes on "Large wheels" under "General notes" in "Wheel/tyre combinations".
6 CLS Shooting-Brake: maximum permissible speed 220 km/h.
4 The use of snow chains is not permitted. Observe the notes under "Snow chains".
7 Only fine-link snow chains are permitted. Wheel and tyre combinations
389Wheels and tyres Z
Page 393 of 417
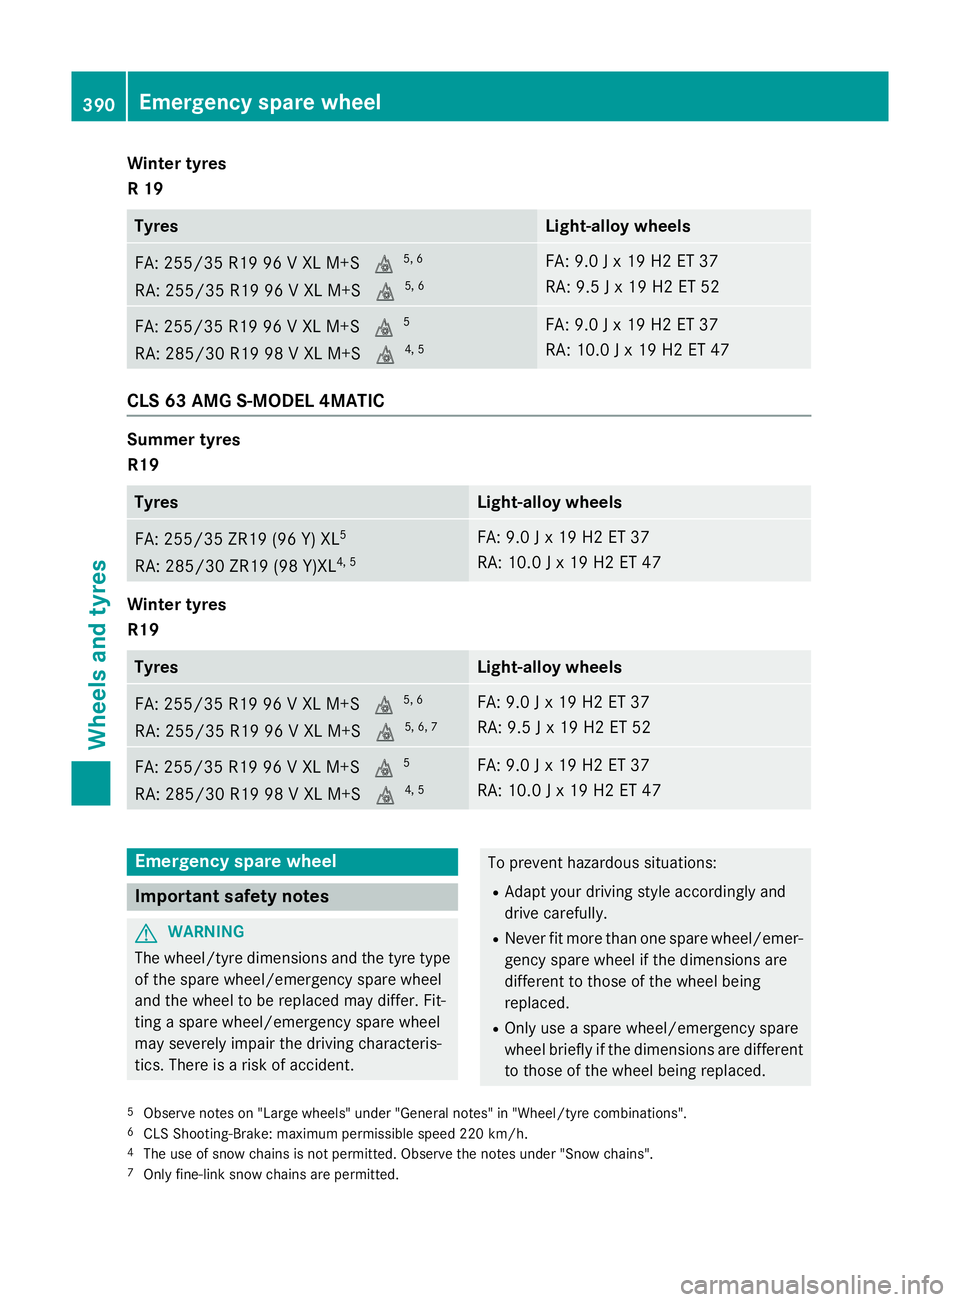
Winter tyres
R 19
Tyres Light-alloy wheels
FA: 255/35 R19 96 V XL M+S
i5, 6
RA: 255/35 R19 96 V XL M+S i5, 6 FA: 9.0 J x 19 H2 ET 37
RA: 9.5 J x 19 H2 ET 52
FA: 255/35 R19 96 V XL M+S
i5
RA: 285/30 R19 98 V XL M+S i4, 5 FA: 9.0 J x 19 H2 ET 37
RA: 10.0 J x 19 H2 ET 47
CLS 63 AMG S-MODEL 4MATIC
Summer tyres
R19
Tyres Light-alloy wheels
FA: 255/35 ZR19 (96 Y) XL
5
RA: 285/30 ZR19 (98 Y)XL 4, 5 FA: 9.0 J x 19 H2 ET 37
RA: 10.0 J x 19 H2 ET 47
Winter tyres
R19
Tyres Light-alloy wheels
FA: 255/35 R19 96 V XL M+S
i5, 6
RA: 255/35 R19 96 V XL M+S i5, 6, 7 FA: 9.0 J x 19 H2 ET 37
RA: 9.5 J x 19 H2 ET 52
FA: 255/35 R19 96 V XL M+S
i5
RA: 285/30 R19 98 V XL M+S i4, 5 FA: 9.0 J x 19 H2 ET 37
RA: 10.0 J x 19 H2 ET 47
Emergency spare wheel
Important safety notes
G
WARNING
The wheel/tyre dimensions and the tyre type of the spare wheel/emergency spare wheel
and the wheel to be replaced may differ. Fit-
ting a spare wheel/emergency spare wheel
may severely impair the driving characteris-
tics. There is a risk of accident. To prevent hazardous situations:
R Adapt your driving style accordingly and
drive carefully.
R Never fit more than one spare wheel/emer-
gency spare wheel if the dimensions are
different to those of the wheel being
replaced.
R Only use a spare wheel/emergency spare
wheel briefly if the dimensions are different
to those of the wheel being replaced.
5 Observe notes on "Large wheels" under "General notes" in "Wheel/tyre combinations".
6 CLS Shooting-Brake: maximum permissible speed 220 km/h.
4 The use of snow chains is not permitted. Observe the notes under "Snow chains".
7 Only fine-link snow chains are permitted. 390
Emergency spare wheelWheels and tyres