2014 MERCEDES-BENZ CLS COUPE battery
[x] Cancel search: batteryPage 9 of 417

Auxiliary ventilation
Activating/deactivating ................ .150
Activating/deactivating (on the
centre console ).............................. 151
Problem (display message) ............ 154
Remote control .............................. 151
Axle load, permissible (trailer tow-
ing) ...................................................... 410 B
Ball coupling Folding in ....................................... 236
Folding out ..................................... 234
BAS (Brake Assist System) ................. 70
BAS PLUS (Brake Assist System
PLUS) .................................................... 71
Battery (key)
Checking .......................................... 85
Important safety notes .................... 85
Replacing ......................................... 86
Battery (vehicle)
Charging ........................................ 353
Display message ............................ 271
Important safety notes .................. 351
Jump starting ................................. 355
Belt
see Seat belts
Belt tensioner
Activation ......................................... 51
Blind Spot Assist
Activating/deactivating ................. 250
Display message ............................ 276
Notes/function .............................. 223
Trailer towing ................................. 225
see Active Blind Spot Assist
BlueTEC (AdBlue®) ............................ 403
Bluetooth® SAP V3 telephone
module
see Separate operating instructions
Bonnet
Closing ........................................... 329
Display message ............................ 283
Important safety notes .................. 328
Opening ......................................... 328
Boot
Emergency release .......................... 95
Important safety notes .................... 91 Opening/closing (automatically
from inside) ...................................... 94
Opening/closing (automatically
from outside) ................................... 92
Opening/closing (manually from
outside) ............................................ 92
Boot lid
Display message ............................ 283
Opening dimensions ...................... 407
Boot load (maximum) ........................ 407
Bottle holders .................................... 314
Box (boot) ........................................... 308
Brake Assist
see BAS (Brake Assist System)
Brake fluid
Display message ............................ 264
Notes ............................................. 405
Brake lamps
Adaptive ........................................... 72
Display message ............................ 268
Brakes
ABS .................................................. 70
BAS .................................................. 70
BAS PLUS ........................................ 71
Brake fluid (notes) ......................... 405
Display message ............................ 262
Driving tips .................................... 183
High-performance brake system .... 184
HOLD function ............................... 200
Important safety notes .................. 183
Parking brake ................................ 181
Warning lamp ................................. 288
Breakdown
see Flat tyre
see Towing away
Bulbs
see Replacing bulbs C
Calling up a fault see Display messages
Car
see Vehicle
Car key
see Key
Car wash (care) ................................. 3346
Index
Page 16 of 417

Insect protection on the radiator
.... 329
Instrument cluster
Overview .......................................... 32
Settings ........................................ .252
Warning and indicator lamps ........... 34
Instrument cluster lighting .............. 252
Intelligent Light System
Activating/deactivating ................. 253
Display message ............................ 269
Overview ........................................ 127
Setting the dipped-beam head-
lamps for driving on the right/left .. 253
Interior lighting
Automatic control system .............. 130
Delayed switch-off (on-board
computer) ...................................... 254
Emergency lighting ........................ 131
Manual control ............................... 131
Overview ........................................ 130
Reading lamp ................................. 130
Setting brightness for display/
switches (on-board computer) ....... 252
Setting the ambient lighting
brightness (on-board computer) .... 253
Setting the ambient lighting col-
our (on-board computer) ................ 254
Interior motion sensor
Deactivating ..................................... 80
Function .......................................... .79
Priming ............................................ 79
Switching off .................................... 80
ISOFIX child seat securing system ....57J
Jack Storage location ............................3 45
Using ............................................. 375
Jump starting (engine) ......................355 K
Key Changing the battery ....................... 86
Checking the battery ....................... 85
Convenience closing feature ............ 98
Convenience opening feature .......... 97
Display message ............................ 285 Door central locking/unlocking ....... 83
Emergency key element ................... 84
Important safety notes .................... 82
Loss ................................................. 87
Modifying the programming ............. 84
Overview .......................................... 82
Positions (ignition lock) ................. 159
Problem (malfunction) ..................... 87
Starting the engine ........................ 161
Key positions
Key ................................................ 159
KEYLESS GO .................................. 159
KEYLESS-GO
Convenience closing ........................ 98
Display message ............................ 285
Locking ............................................ 83
Removing the Start/Stop button ... 160
Start/Stop button .......................... 159
Starting the engine ........................ 162
Unlocking ......................................... 83
Kickdown
Driving tips ................................... .171
Manual drive program .................... 176
Kneebag ............................................... 49 L
Lamps see Warning and indicator lamps
Lane Keeping Assist
Activating/deactivating ................. 251
Display message ............................ 275
Function/informatio n.................... 225
Lane package ..................................... 223
Lap time (RACETIMER) ...................... 259
Lashing eyelets ................................. 306
Licence plate lamp (display mes-
sage) ................................................... 268
Light sensor (display message) ....... 269
Lighting
see Lights
Lights
Activating/deactivating the Intel-
ligent Light System ........................ 253
Activating/deactivating the inte-
rior lighting delayed switch-off ....... 254
Active light function ....................... 127
Adaptive Highbeam Assist ............. 128 Index
13
Page 20 of 417
Refuelling
Fuel gaug e....................................... 32
Important safety notes .................. 177
Notes for AMG vehicles ................. 401
Refuelling process ......................... 178
see Fuel
Remote control
Auxiliary heating/ventilation .......... 151
Changing the batteries (auxiliary
heating) ......................................... 152
Garage door opener ....................... 320
Programming (garage door
opener) .......................................... 320
Replacing bulbs
Important safety notes .................. 131
Overview of bulb types .................. 132
Replacing the battery (auxiliary
heating remote control) .................... 152
Reserve (fuel tank)
see Fuel
Reserve fuel
Display message ............................ 272
Warning lamp ................................. 295
Residual heat (climate control) ........ 149
Restraint system
Display message ............................ 266
Introduction ..................................... 42
Warning lamp ................................. 294
Warning lamp (function) ................... 43
Rev counter ........................................ 240
Reverse gear (selector lever) ........... 168
Reversing camera
Cleaning instructions ..................... 338
Function/note s............................. 214
Switching on/of f........................... 214
Reversing feature
Side windows ................................... 96
Sliding sunroof ............................... 100
Reversing function
Boot lid/tailgate .............................. 92
Reversing lamp
Changing bulb s.............................. 132
Reversing lamp (display message) .. 269
Roller sunblind
Rear window .................................. 315
Roof carrier ........................................ 312 Roof lining and carpets (cleaning
instructions)
...................................... 341
Roof load (maximum) ........................ 407 S
Safety Child restraint systems .................... 56
Children in the vehicle ..................... 55
Safety net
Attaching ....................................... 308
Important safety information ......... 307
Safety system
see Driving safety systems
Seat
Adjusting the active multicontour
seat ............................................... 110
Adjusting the multicontour seat ..... 109
Folding the backrest (rear com-
partment) forwards/back .............. 305
Massage function .......................... 110
Seat backrest display message ..... 284
Seat belt
Centre rear-compartment sea t........ 46
Correct usage .................................. 45
Switching belt adjustment on/off
(on-board computer) ...................... 257
Seat belts
Adjusting the driver's and front-
passenger seat belt ......................... 47
Adjusting the height ......................... 46
Cleaning ......................................... 340
Display message ............................ 265
Fastening ......................................... 46
Important safety guidelines ............. 44
Introduction ..................................... 44
Rear seat belt status indicator ......... 47
Releasing ......................................... 46
Warning lamp ................................. 287
Warning lamp (function) ................... 47
Seats
Adjusting (electrically) ................... 106
Adjusting lumbar support .............. 111
Adjusting the 4-way lumbar sup-
port ................................................ 111
Adjusting the head restraint .......... 107
Cleaning the cover ......................... 340
Correct driver's seat position ........ 104 Index
17
Page 29 of 417
G
WARNING
If you connect equipment to a diagnostics
connection in the vehicle, it can affect the
operation of the vehicle systems. This may
affect the operating safety of the vehicle.
There is a risk of an accident.
Do not connect any equipment to a diagnos-
tics connection in the vehicle. G
WARNING
Objects in the driver's footwell may restrict
the clearance around the pedals or block a
depressed pedal. This jeopardises the oper-
ating and road safety of the vehicle. There is a risk of an accident.
Stow all objects securely in the vehicle so that
they do not get into the driver's footwell.
Always fit the floormats securely and as pre-
scribed in order to ensure that there is always sufficient room for the pedals. Do not use
loose floormats and do not place several floor- mats on top of one another.
! If the engine is switched off and equip-
ment on the diagnostics connection is
used, the starter battery may discharge.
Connecting equipment to the diagnostics
connection can lead to emissions monitoring information being reset, for example. This
may lead to the vehicle failing to meet the
requirements of the next emissions test dur-
ing the main inspection. Qualified specialist workshop
A qualified specialist workshop has the nec-
essary special skills, tools and qualifications
to correctly carry out any necessary work on
your vehicle. This particularly applies to work
relevant to safety.
Observe the notes in the Service Booklet.
Always have the following work carried out at a qualified specialist workshop:
R work relevant to safety
R service and maintenance work R
repair work
R modifications, installations and conver-
sions
R work on electronic components
Mercedes-Benz recommends that you use a
Mercedes-Benz Service Centre. Vehicle registration
Mercedes-Benz may ask its Service Centres
to carry out technical inspections on certain
vehicles. The quality or safety of the vehicle is
improved as a result of the inspection.
Mercedes-Benz can only inform you about
vehicle checks if it has your registration data.
It is possible that your vehicle has not yet
been registered in your name in the following
cases:
R if your vehicle was not purchased at an
authorised specialist dealer.
R if your vehicle has not yet been examined at
a Mercedes-Benz Service Centre.
It is advisable to register your vehicle with a
Mercedes-Benz Service Centre.
Inform Mercedes-Benz as soon as possible
about any change in address or vehicle own-
ership. You can do this at a Mercedes-Benz
Service Centre, for example. Correct use
If you remove any warning stickers, you or
others could fail to recognise certain dangers.
Leave warning stickers in position.
Observe the following information when driv- ing your vehicle:
R the safety notes in this manual
R the technical data in this manual
R traffic rules and regulations
R laws and safety standards pertaining to
motor vehicles 26
Introduction
Page 87 of 417
X
To unlock the vehicle: touch the inner
surface of the door handle.
X To lock the vehicle: touch sensor sur-
face :.
X Convenience closing feature: touch
recessed sensor surface ;for an exten-
ded period.
For further information on the convenience
closing feature (Y page 97).
X To unlock the boot lid/tailgate: pull the
handle on the boot lid/tailgate.
The vehicle only unlocks the boot lid/tail-
gate. Changing the settings of the locking
system
You can change the settings of the locking
system. This means that only the driver's door
and the fuel filler flap are unlocked when the
vehicle is unlocked. This is useful if you fre-
quently travel alone.
X To change the setting: simultaneously
press the %and& buttons on the
key for approximately six seconds until the
battery check lamp flashes twice
(Y page 85).
i If the setting of the locking system is
changed within the signal range of the vehi- cle, pressing the &or% button:
R locks or
R unlocks the vehicle
The key now functions as follows:
X To unlock the driver's door: press the
% button once.
X To unlock centrally: press the%but-
ton twice.
X To lock centrally: press the&button. The KEYLESS-GO function is changed as fol-
lows:
X To unlock the driver's door: touch the
inner surface of the door handle on the
driver's door.
X To unlock centrally: touch the inner sur-
face of the door handle on the front-
passenger door or the rear door.
X To lock centrally: touch the outer sensor
surface on one of the door handles.
X To restore the factory settings: press
and hold down the %and& buttons
simultaneously for approximately six sec-
onds until the battery check lamp flashes
twice (Y page 85). Emergency key element
General notes If the vehicle can no longer be locked or
unlocked with the key, use the emergency
key element.
If you use the emergency key element to
unlock and open the driver's door or the boot
lid/tailgate, the anti-theft alarm system will
be triggered (Y page 78).
There are several ways to deactivate the
alarm:
X To deactivate the alarm with the key:
press the %or& button on the key.
or
X Insert the key into the ignition lock.
or
X To deactivate the alarm with KEYLESS-
GO: press the Start/Stop button in the igni-
tion lock. The key must be in the vehicle.
or
X Lock or unlock the vehicle using KEYLESS-
GO. The key must be outside the vehicle. 84
KeyOpening and closing
Page 88 of 417
If you unlock the vehicle using the emergency
key element, the fuel filler flap will not be
unlocked automatically.
X To unlock the fuel filler flap: insert the
key into the ignition lock.
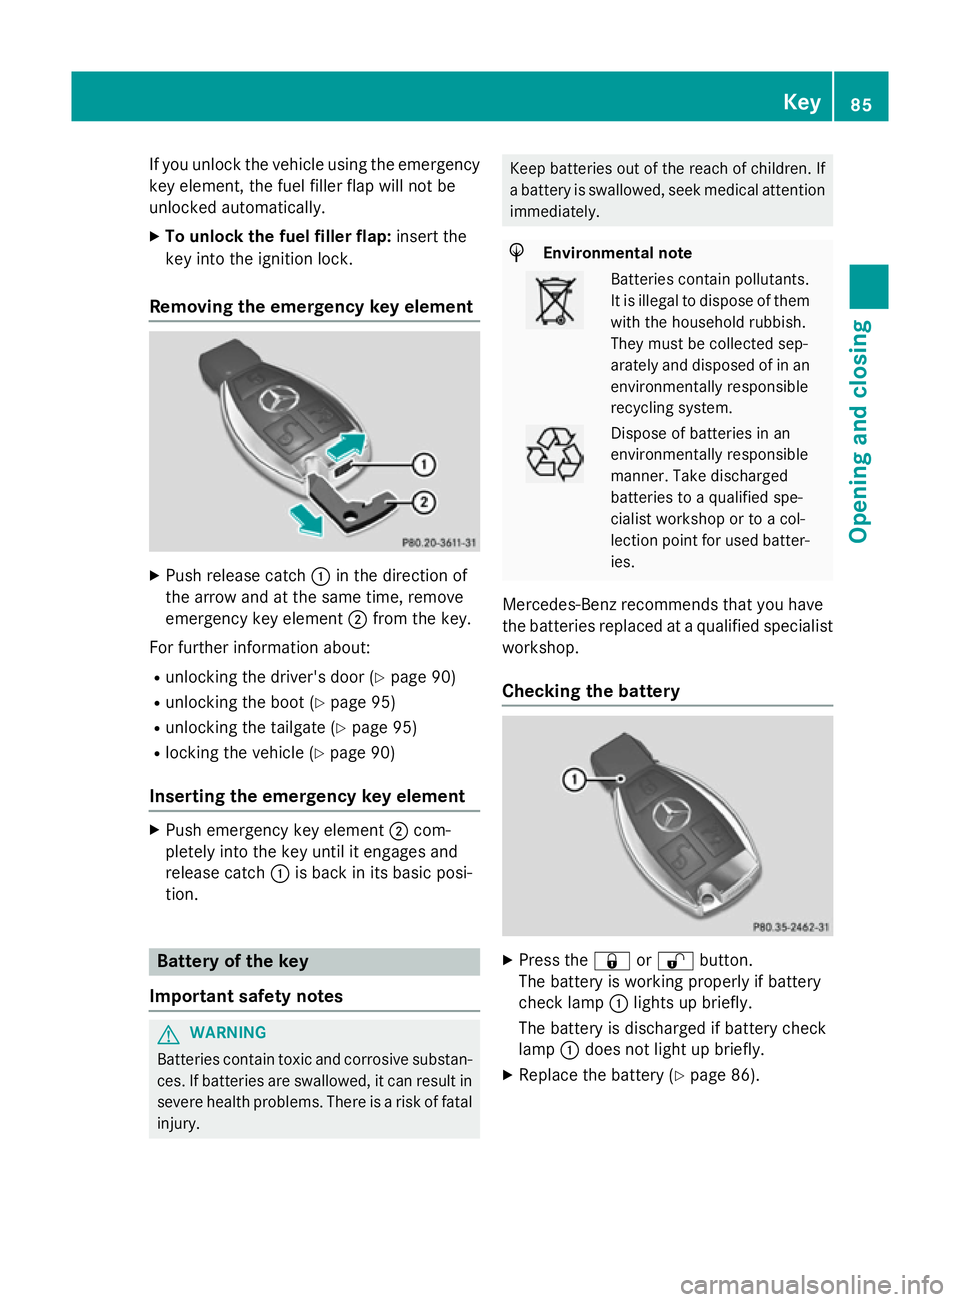
Removing the emergency key element X
Push release catch :in the direction of
the arrow and at the same time, remove
emergency key element ;from the key.
For further information about: R unlocking the driver's door (Y page 90)
R unlocking the boot (Y page 95)
R unlocking the tailgate (Y page 95)
R locking the vehicle (Y page 90)
Inserting the emergency key element X
Push emergency key element ;com-
pletely into the key until it engages and
release catch :is back in its basic posi-
tion. Battery of the key
Important safety notes G
WARNING
Batteries contain toxic and corrosive substan- ces. If batteries are swallowed, it can result in
severe health problems. There is a risk of fatal injury. Keep batteries out of the reach of children. If
a battery is swallowed, seek medical attention
immediately. H
Environmental note Batteries contain pollutants.
It is illegal to dispose of them
with the household rubbish.
They must be collected sep-
arately and disposed of in anenvironmentally responsible
recycling system. Dispose of batteries in an
environmentally responsible
manner. Take discharged
batteries to a qualified spe-
cialist workshop or to a col-
lection point for used batter-
ies.
Mercedes-Benz recommends that you have
the batteries replaced at a qualified specialist workshop.
Checking the battery X
Press the &or% button.
The battery is working properly if battery
check lamp :lights up briefly.
The battery is discharged if battery check
lamp :does not light up briefly.
X Replace the battery (Y page 86). Key
85Opening and closing Z
Page 89 of 417
i
If the battery of the key is checked within
the signal reception range of the vehicle,
pressing the &or% button:
R locks or
R unlocks the vehicle
i You can obtain a battery from any quali-
fied specialist workshop.
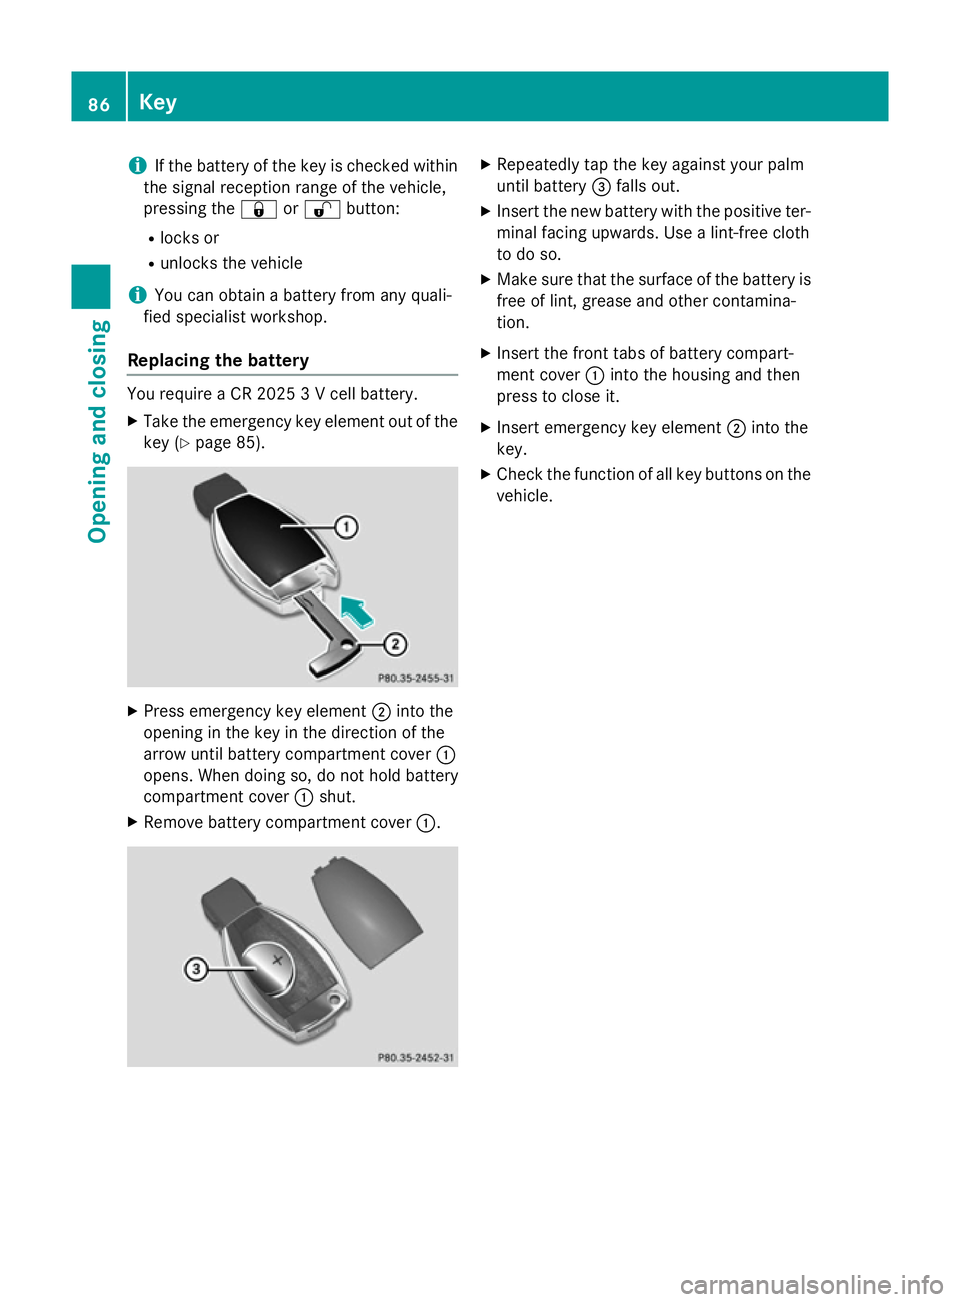
Replacing the battery You require a CR 2025 3 V cell battery.
X Take the emergency key element out of the
key (Y page 85). X
Press emergency key element ;into the
opening in the key in the direction of the
arrow until battery compartment cover :
opens. When doing so, do not hold battery
compartment cover :shut.
X Remove battery compartment cover :. X
Repeatedly tap the key against your palm
until battery =falls out.
X Insert the new battery with the positive ter-
minal facing upwards. Use a lint-free cloth
to do so.
X Make sure that the surface of the battery is
free of lint, grease and other contamina-
tion.
X Insert the front tabs of battery compart-
ment cover :into the housing and then
press to close it.
X Insert emergency key element ;into the
key.
X Check the function of all key buttons on the
vehicle. 86
KeyOpening and closing
Page 90 of 417
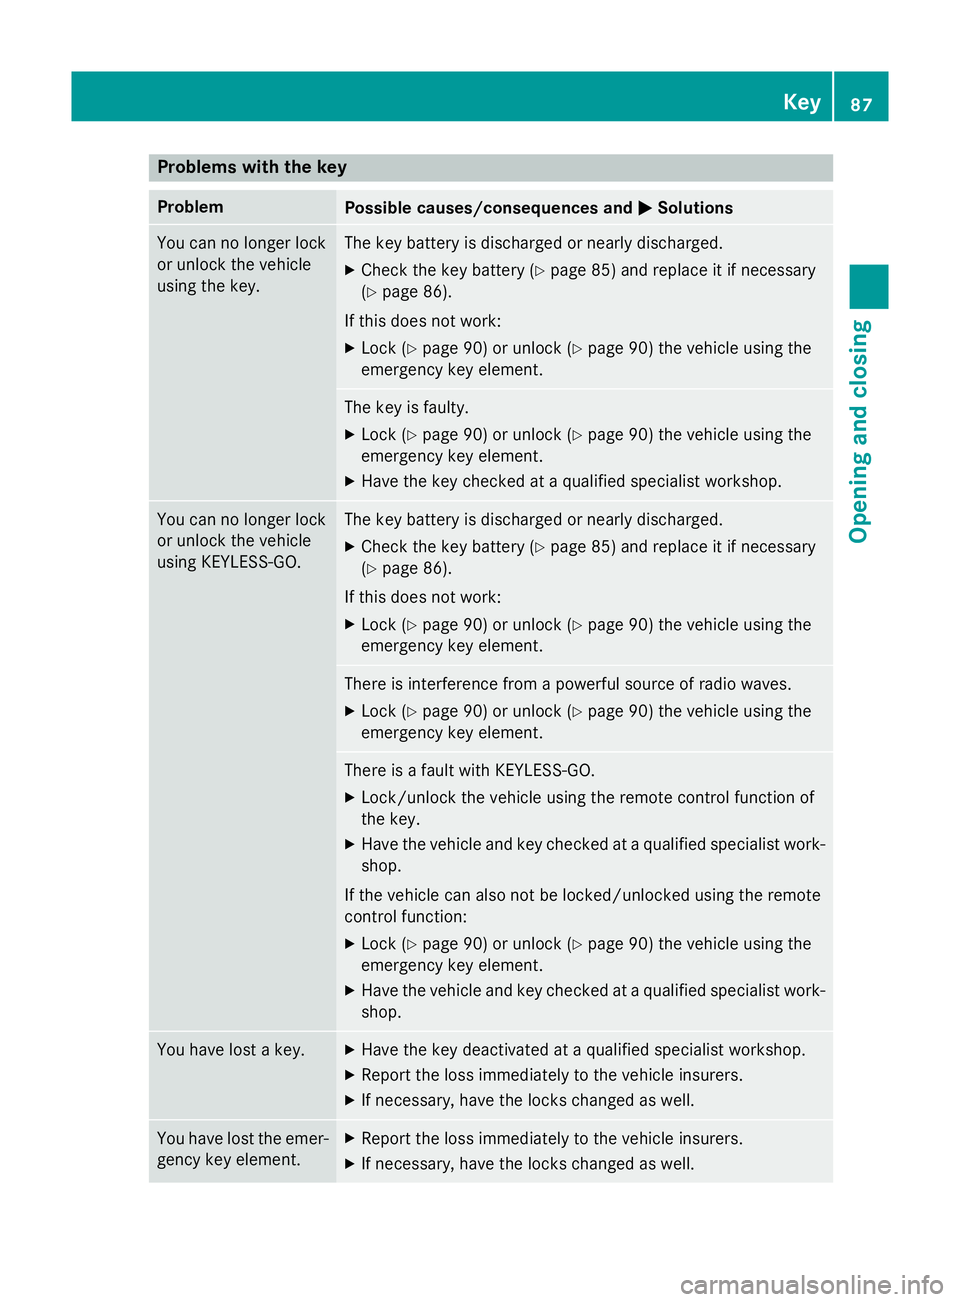
Problems with the key
Problem
Possible causes/consequences and
M
MSolutions You can no longer lock
or unlock the vehicle
using the key. The key battery is discharged or nearly discharged.
X Check the key battery (Y page 85) and replace it if necessary
(Y page 86).
If this does not work: X Lock (Y page 90) or unlock (Y page 90) the vehicle using the
emergency key element. The key is faulty.
X Lock (Y page 90) or unlock (Y page 90) the vehicle using the
emergency key element.
X Have the key checked at a qualified specialist workshop. You can no longer lock
or unlock the vehicle
using KEYLESS-GO. The key battery is discharged or nearly discharged.
X Check the key battery (Y page 85) and replace it if necessary
(Y page 86).
If this does not work: X Lock (Y page 90) or unlock (Y page 90) the vehicle using the
emergency key element. There is interference from a powerful source of radio waves.
X Lock (Y page 90) or unlock (Y page 90) the vehicle using the
emergency key element. There is a fault with KEYLESS-GO.
X Lock/unlock the vehicle using the remote control function of
the key.
X Have the vehicle and key checked at a qualified specialist work-
shop.
If the vehicle can also not be locked/unlocked using the remote
control function:
X Lock (Y page 90) or unlock (Y page 90) the vehicle using the
emergency key element.
X Have the vehicle and key checked at a qualified specialist work-
shop. You have lost a key. X
Have the key deactivated at a qualified specialist workshop.
X Report the loss immediately to the vehicle insurers.
X If necessary, have the locks changed as well. You have lost the emer-
gency key element. X
Report the loss immediately to the vehicle insurers.
X If necessary, have the locks changed as well. Key
87Opening and closing Z