2014 MERCEDES-BENZ CLS COUPE height
[x] Cancel search: heightPage 236 of 417
If the noseweight used is lower than the min-
imum permissible noseweight, the vehicle/
trailer combination could also become unsta-
ble.
To avoid hazardous situations:
R make sure to check the noseweight before
each journey.
R use a drawbar noseweight as close as pos-
sible to the maximum noseweight.
R do not exceed the maximum permissible
noseweight.
R do not use a noseweight lower than the
minimum permissible trailer drawbar nose-
weight.
When reversing the vehicle towards the
trailer, make sure there is nobody between
the trailer and the vehicle.
Couple and uncouple the trailer carefully. If
you do not couple the trailer to the towing
vehicle correctly, the trailer could become
detached.
Make sure that the following values are not
exceeded:
R the permissible trailer drawbar noseweight
R the permissible trailer load
R the permissible rear axle load of the towing
vehicle
R the maximum permissible gross vehicle
weight of both the towing vehicle and the
trailer
You will find the applicable permissible val-
ues, which must not be exceeded, in the vehi- cle documents.
You will find the values approved by the man-
ufacturer on the vehicle identification plates
and those for the towing vehicle under "Tech- nical data" (Y page 410).
When towing a trailer, your vehicle's handling
characteristics will be different in comparison to when driving without a trailer.
The vehicle/trailer combination:
R is heavier
R is restricted in its acceleration and gradi-
ent-climbing capability R
has an increased braking distance
R is affected more by strong crosswinds
R demands more sensitive steering
R has a larger turning circle
This can impair the vehicle's handling char-
acteristics. Adapt your style of driving accord-
ingly. Maintain a safe distance. Drive care-
fully.
When towing a trailer, always adjust your
speed to the current road and weather con-
ditions. Do not exceed the maximum permis- sible speed for your vehicle/trailer combina-
tion. Notes on towing a trailer
General notes i
When towing a trailer, set the tyre pres-
sure on the rear axle of the towing vehicle
for a maximum load; see the tyre pressure
table in the fuel filler flap (Y page 367).
Please note that when towing a trailer, PARK-
TRONIC (Y page 207), Active Parking Assist
(Y page 210) and Blind Spot Assist
(Y page 223) are only available with limita-
tions, or not at all.
i On vehicles without level control, the
height of the ball coupling will alter accord-
ing to the load placed on the vehicle. If nec- essary, use a trailer with a height-adjusta-
ble drawbar.
You will find fitting dimensions and loads
under "Technical data" (Y page 409).
Driving tips i
Observe the notes on ESP ®
trailer stabi-
lisation (Y page 75).
The maximum permissible speed for vehicle/
trailer combinations depends on the type of
trailer. Before beginning the journey, check
the trailer's documents to see what the max- imum permitted speed is. Observe the legally Towing a trailer
233Driving and parking Z
Page 312 of 417
Always observe the maximum permitted
load of the EASY-PACK boot box. Always
store and secure heavy objects in the boot outside of the EASY-PACK boot box.
The maximum permitted load of the EASY-
PACK boot box is 10 kg. With a load of above approximately 5 kg, the bottom of the box
moves downward until it rests on the mat of
the boot floor. Thus, overloading of the box is
avoided.
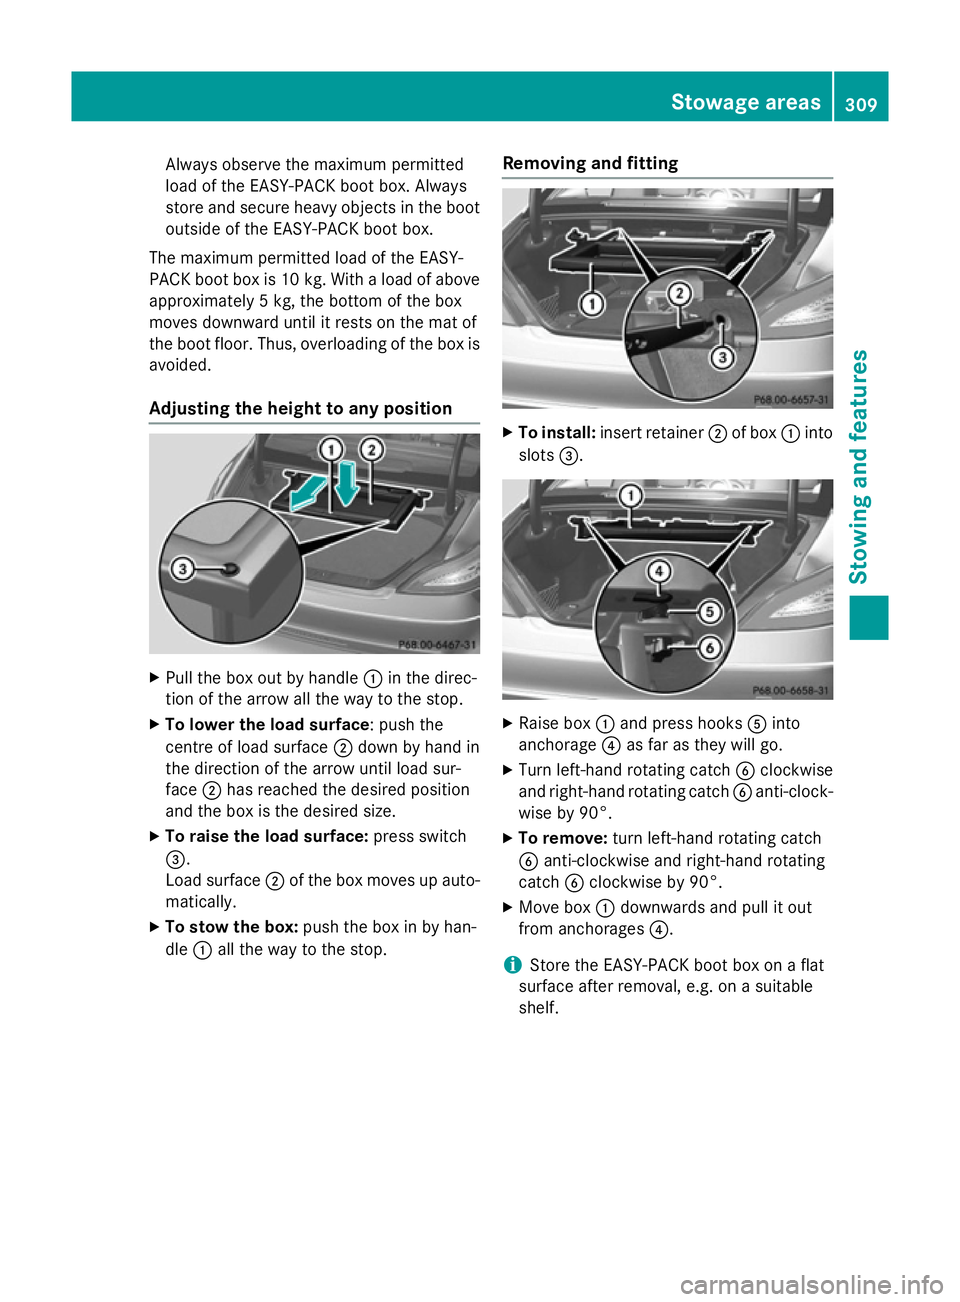
Adjusting the height to any position X
Pull the box out by handle :in the direc-
tion of the arrow all the way to the stop.
X To lower the load surface: push the
centre of load surface ;down by hand in
the direction of the arrow until load sur-
face ;has reached the desired position
and the box is the desired size.
X To raise the load surface: press switch
=.
Load surface ;of the box moves up auto-
matically.
X To stow the box: push the box in by han-
dle :all the way to the stop. Removing and fitting X
To install: insert retainer ;of box :into
slots =. X
Raise box :and press hooks Ainto
anchorage ?as far as they will go.
X Turn left-hand rotating catch Bclockwise
and right-hand rotating catch Banti-clock-
wise by 90°.
X To remove: turn left-hand rotating catch
B anti-clockwise and right-hand rotating
catch Bclockwise by 90°.
X Move box :downwards and pull it out
from anchorages ?.
i Store the EASY-PACK boot box on a flat
surface after removal, e.g. on a suitable
shelf. Stowage areas
309Stowing an d features Z
Page 332 of 417
!
Make sure that the windscreen wipers are
not folded away from the windscreen. Oth-
erwise, you could damage the windscreen
wipers or the bonnet. X
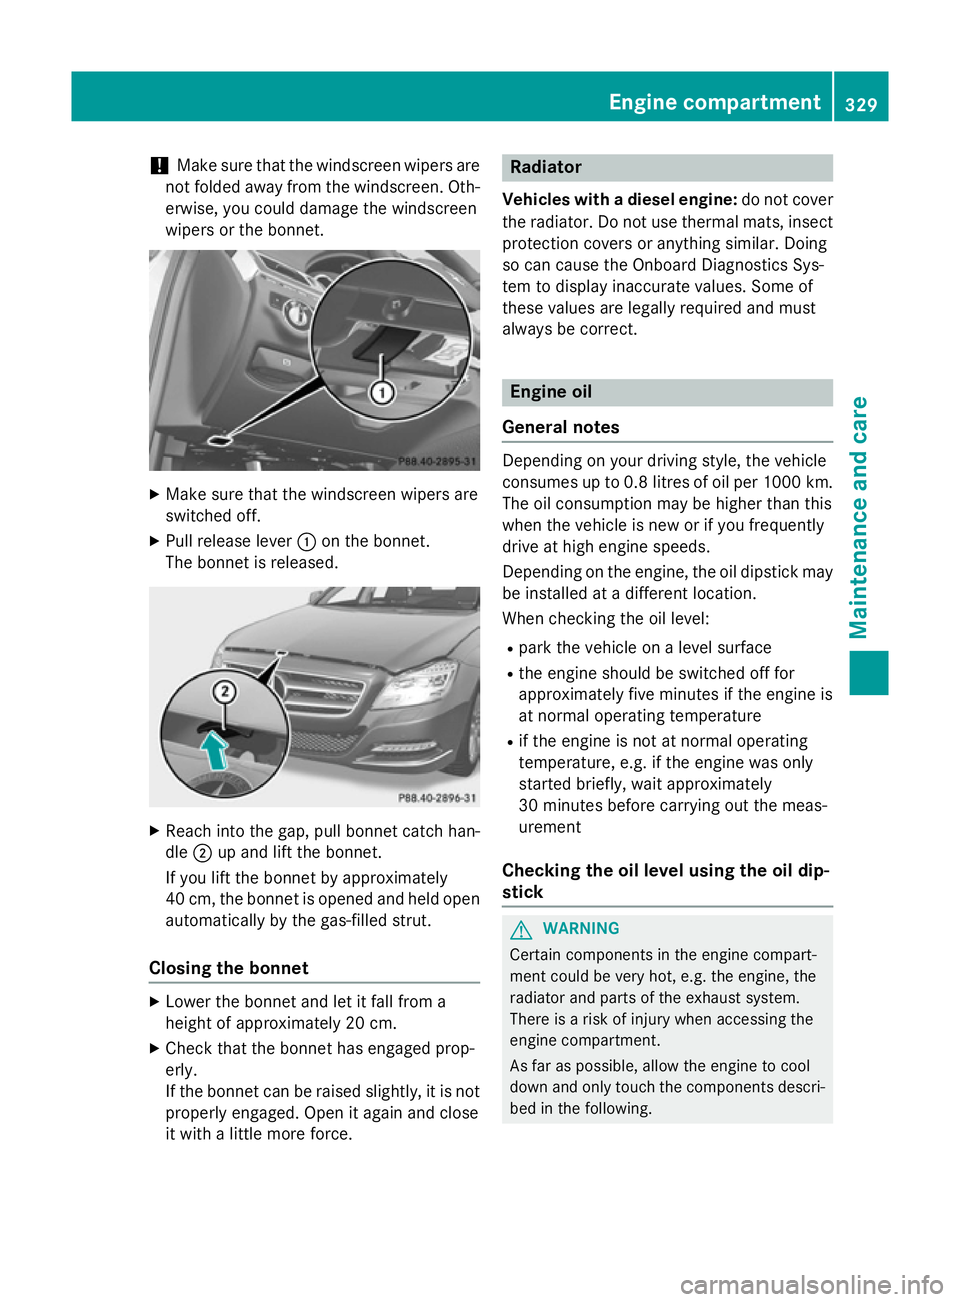
Make sure that the windscreen wipers are
switched off.
X Pull release lever :on the bonnet.
The bonnet is released. X
Reach into the gap, pull bonnet catch han-
dle ;up and lift the bonnet.
If you lift the bonnet by approximately
40 cm, the bonnet is opened and held open automatically by the gas-filled strut.
Closing the bonnet X
Lower the bonnet and let it fall from a
height of approximately 20 cm.
X Check that the bonnet has engaged prop-
erly.
If the bonnet can be raised slightly, it is not
properly engaged. Open it again and close
it with a little more force. Radiator
Vehicles with a diesel engine: do not cover
the radiator. Do not use thermal mats, insect
protection covers or anything similar. Doing
so can cause the Onboard Diagnostics Sys-
tem to display inaccurate values. Some of
these values are legally required and must
always be correct. Engine oil
General notes Depending on your driving style, the vehicle
consumes up to 0.8 litres of oil per 1000 km.
The oil consumption may be higher than this
when the vehicle is new or if you frequently
drive at high engine speeds.
Depending on the engine, the oil dipstick may be installed at a different location.
When checking the oil level:
R park the vehicle on a level surface
R the engine should be switched off for
approximately five minutes if the engine is
at normal operating temperature
R if the engine is not at normal operating
temperature, e.g. if the engine was only
started briefly, wait approximately
30 minutes before carrying out the meas-
urement
Checking the oil level using the oil dip-
stick G
WARNING
Certain components in the engine compart-
ment could be very hot, e.g. the engine, the
radiator and parts of the exhaust system.
There is a risk of injury when accessing the
engine compartment.
As far as possible, allow the engine to cool
down and only touch the components descri- bed in the following. Engine compartment
329Maintenance and care Z
Page 379 of 417
R
before raising the vehicle, secure it from
rolling away by applying the parking brake
and positioning wheel chocks. Never
release the parking brake while the vehicle
is raised.
R the jack must be placed on a firm, flat and
non-slip surface. On a loose surface, a
large, flat load-bearing underlay must be
used. On a slippery surface, a non-slip
underlay must be used, e.g. rubber mats.
R do not use wooden blocks or similar
objects as a jack underlay. Otherwise, the
jack will not be able to achieve its load-
bearing capacity due to the restricted
height.
R make sure that the distance between the
underside of the tyres and the ground does
not exceed 3 cm.
R never place your hands or feet under the
raised vehicle.
R do not lie under the vehicle.
R do not start the engine when the vehicle is
raised.
R do not open or close a door or the boot lid/
tailgate when the vehicle is raised.
R make sure that no persons are present in
the vehicle when the vehicle is raised. X
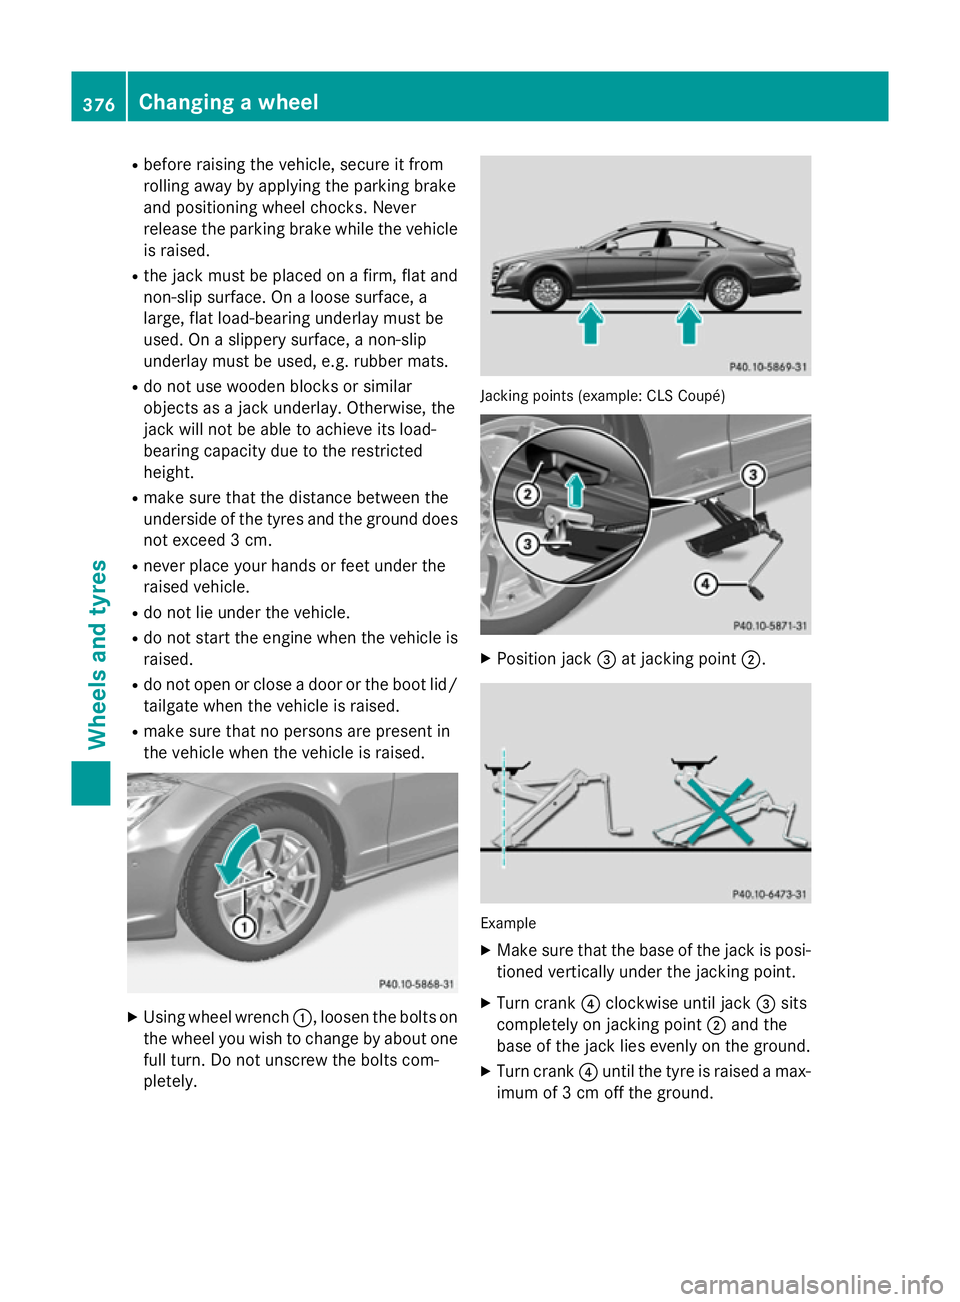
Using wheel wrench :, loosen the bolts on
the wheel you wish to change by about one full turn. Do not unscrew the bolts com-
pletely. Jacking points (example: CLS Coupé)
X
Position jack =at jacking point ;. Example
X Make sure that the base of the jack is posi-
tioned vertically under the jacking point.
X Turn crank ?clockwise until jack =sits
completely on jacking point ;and the
base of the jack lies evenly on the ground.
X Turn crank ?until the tyre is raised a max-
imum of 3 cm off the ground. 376
Changing a wheelWheels and tyres
Page 410 of 417
Vehicle data
General notes
Please note that for the specified vehicle
data:
R the heights specified may vary as a result
of:
- tyres
- load
- condition of the suspension
- optional equipment
R optional equipment reduces the maximum
payload.
R vehicle-specific weight information can be
found on the vehicle identification plate
(Y page 398).
R only for certain countries: you can find vehi-
cle-specific vehicle data in the COC docu-
ments (CERTIFICATE OF CONFORMITY).
These documents are delivered with your
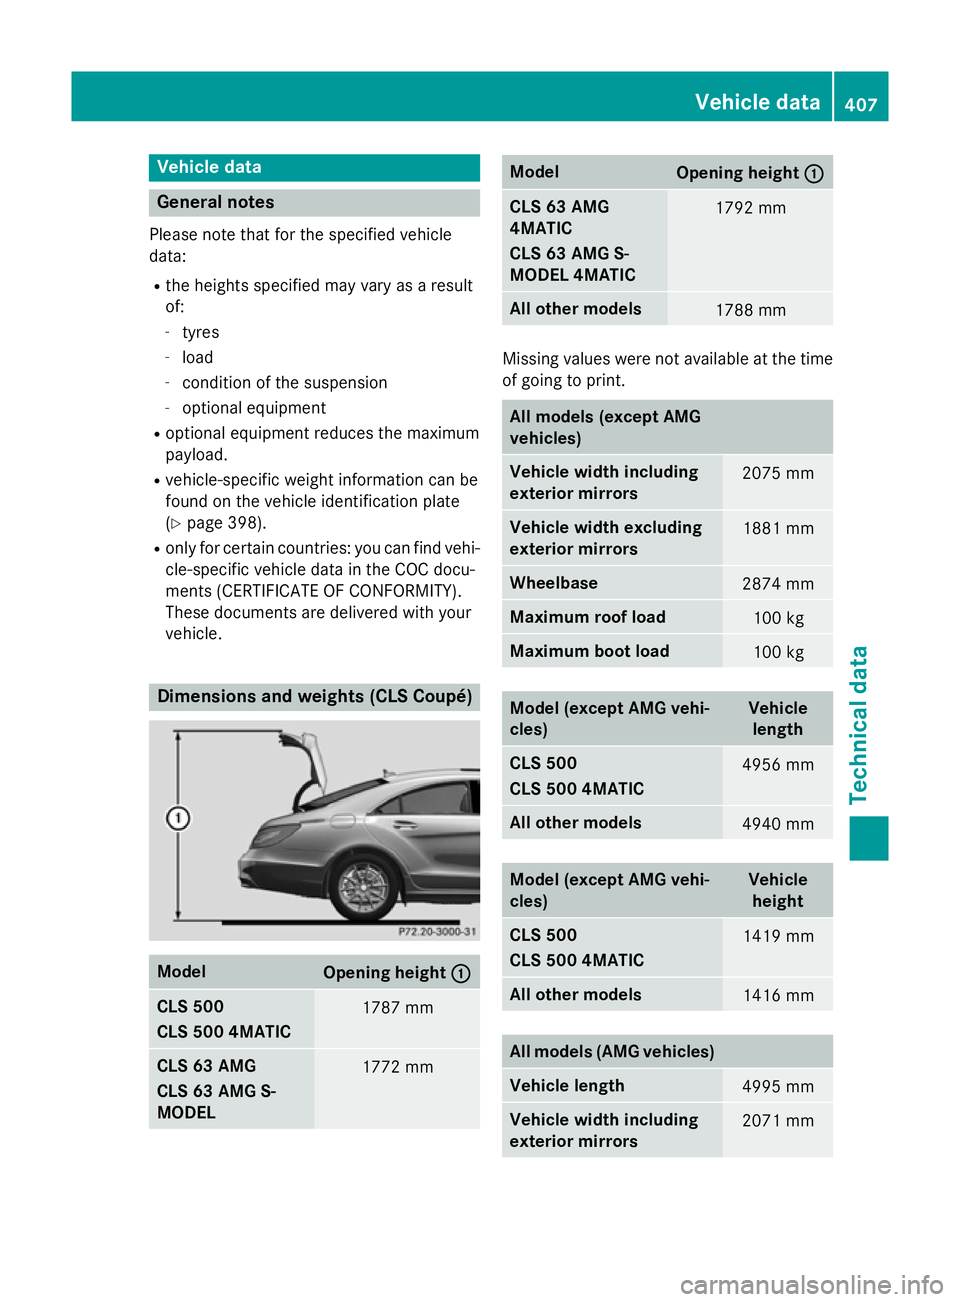
vehicle. Dimensions and weights (CLS Coupé)
Model
Opening height
: : CLS 500
CLS 500 4MATIC
1787 mm
CLS 63 AMG
CLS 63 AMG S-
MODEL
1772 mm Model
Opening height
: : CLS 63 AMG
4MATIC
CLS 63 AMG S-
MODEL 4MATIC
1792 mm
All other models
1788 mm
Missing values were not available at the time
of going to print. All models (except AMG
vehicles)
Vehicle width including
exterior mirrors
2075 mm
Vehicle width excluding
exterior mirrors
1881 mm
Wheelbase
2874 mm
Maximum roof load
100 kg
Maximum boot load
100 kg
Model (except AMG vehi-
cles) Vehicle
length CLS 500
CLS 500 4MATIC
4956 mm
All other models
4940 mm
Model (except AMG vehi-
cles) Vehicle
height CLS 500
CLS 500 4MATIC
1419 mm
All other models
1416 mm
All models (AMG vehicles)
Vehicle length
4995 mm
Vehicle width including
exterior mirrors
2071 mmVehicle data
407Technical data Z
Page 411 of 417
All models (AMG vehicles)
Vehicle width excluding
exterior mirrors
1881 mm
Wheelbase
2874 mm
Maximum roof load
100 kg
Maximum boot load
Model (AMG vehicles) Vehicle
height CLS 63 AMG
CLS 63 AMG S-MODEL
1396 mm
CLS 63 AMG 4MATIC
CLS 63 AMG S-MODEL
4MATIC
1416 mm
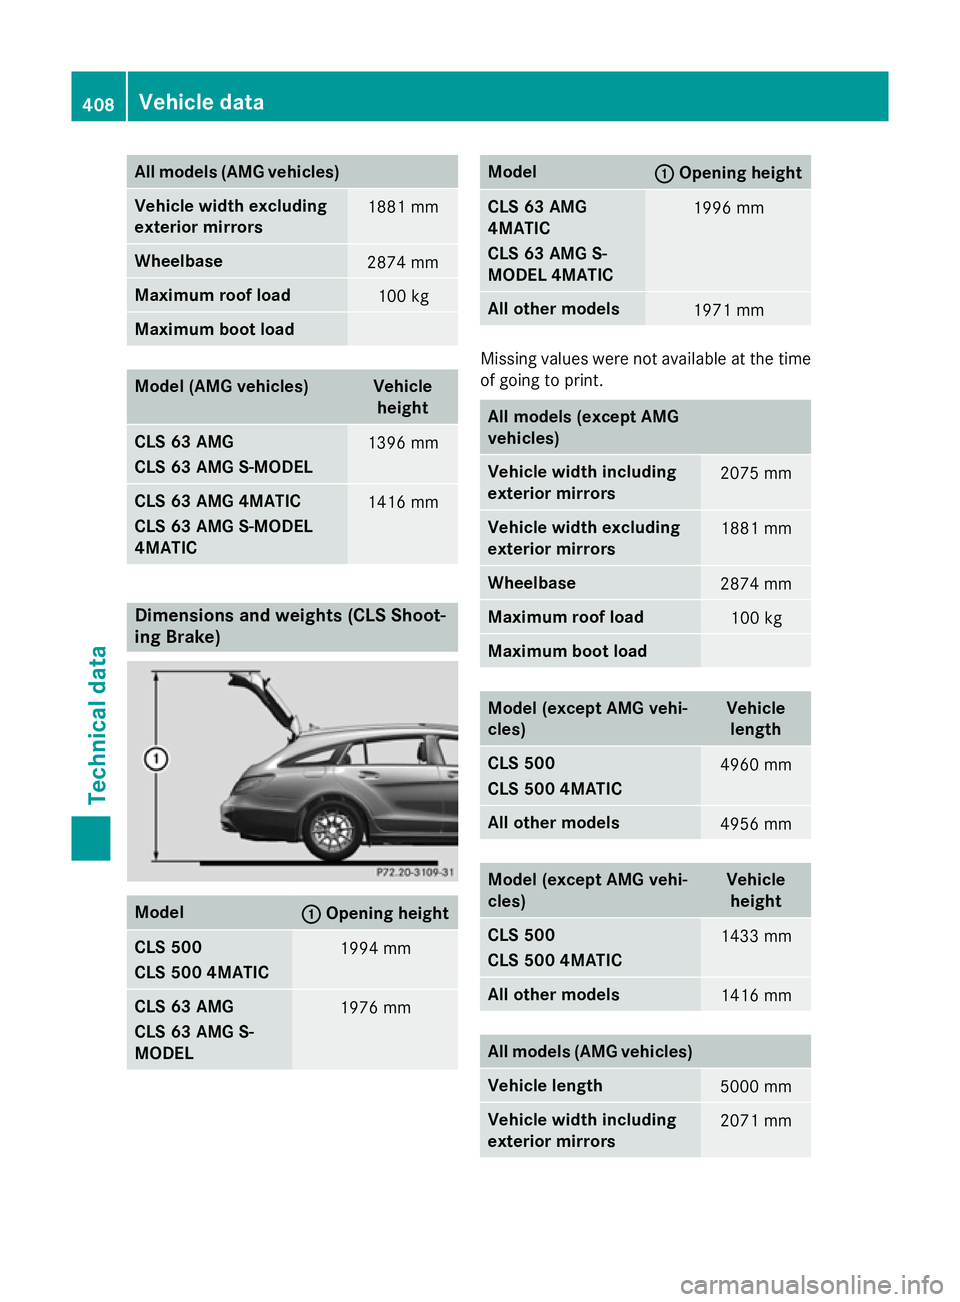
Dimensions and weights (CLS Shoot-
ing Brake)
Model
: :
Opening height CLS 500
CLS 500 4MATIC
1994 mm
CLS 63 AMG
CLS 63 AMG S-
MODEL
1976 mm Model
: :
Opening height CLS 63 AMG
4MATIC
CLS 63 AMG S-
MODEL 4MATIC
1996 mm
All other models
1971 mm
Missing values were not available at the time
of going to print. All models (except AMG
vehicles)
Vehicle width including
exterior mirrors
2075 mm
Vehicle width excluding
exterior mirrors
1881 mm
Wheelbase
2874 mm
Maximum roof load
100 kg
Maximum boot load
Model (except AMG vehi-
cles) Vehicle
length CLS 500
CLS 500 4MATIC
4960 mm
All other models
4956 mm
Model (except AMG vehi-
cles) Vehicle
height CLS 500
CLS 500 4MATIC
1433 mm
All other models
1416 mm
All models (AMG vehicles)
Vehicle length
5000 mm
Vehicle width including
exterior mirrors
2071 mm408
Vehicle dataTechnical data
Page 412 of 417
All models (AMG vehicles)
Vehicle width excluding
exterior mirrors
1881 mm
Wheelbase
2874 mm
Maximum roof load
100 kg
Model (AMG vehicles) Vehicle
height CLS 63 AMG
CLS 63 AMG S-MODEL
1413 mm
CLS 63 AMG 4MATIC
CLS 63 AMG S-MODEL
4MATIC
1436 mm
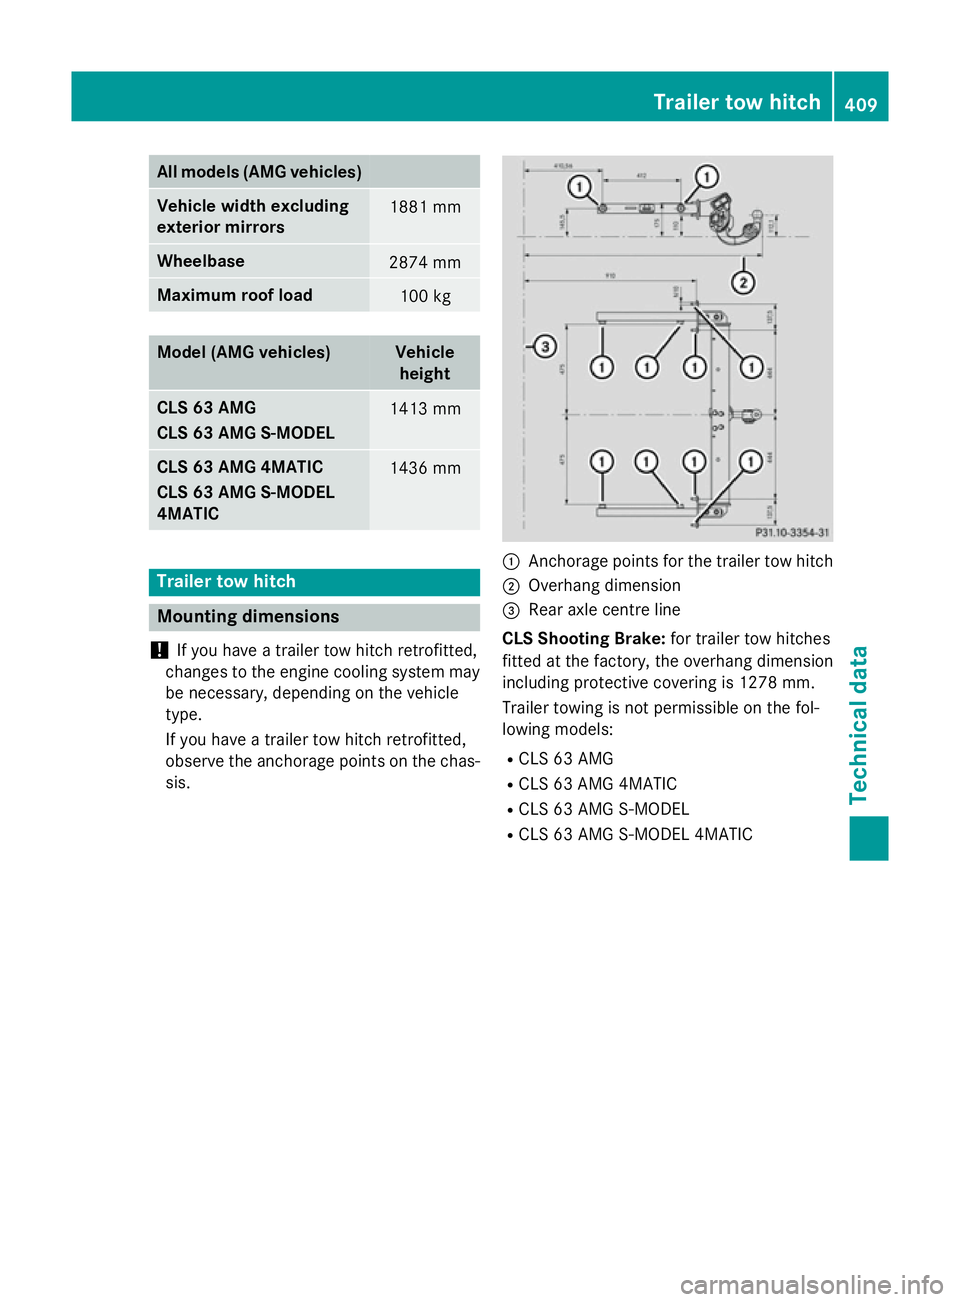
Trailer tow hitch
Mounting dimensions
! If you have a trailer tow hitch retrofitted,
changes to the engine cooling system may
be necessary, depending on the vehicle
type.
If you have a trailer tow hitch retrofitted,
observe the anchorage points on the chas- sis. :
Anchorage points for the trailer tow hitch
; Overhang dimension
= Rear axle centre line
CLS Shooting Brake: for trailer tow hitches
fitted at the factory, the overhang dimension
including protective covering is 1278 mm.
Trailer towing is not permissible on the fol-
lowing models:
R CLS 63 AMG
R CLS 63 AMG 4MATIC
R CLS 63 AMG S-MODEL
R CLS 63 AMG S-MODEL 4MATIC Trailer tow hitch
409Technical data Z