2014 MERCEDES-BENZ CLS COUPE washer fluid
[x] Cancel search: washer fluidPage 21 of 417

Important safety notes .................. 105
Overview ........................................ 105
Seat heating problem .................... 112
Seat ventilation problem ................ 113
Storing settings (memory func-
tion) ............................................... 119
Switching seat heating on/off ....... 111
Switching the seat ventilation on/
off .................................................. 112
Selector lever
Cleaning .........................................3 40
Sensors (cleaning instructions) ....... 337
Service
see ASSYST PLUS
Service Centre
see Qualified specialist workshop
Service menu (on-board com-
puter) ................................................. .251
Service products
AdBlue® special additive s............. 403
Brake fluid ..................................... 405
Coolant (engine) ............................ 405
Engine oil ....................................... 404
Fuel ................................................ 399
Important safety notes .................. 399
Washer fluid ................................... 406
Setting the air distribution ............... 145
Setting the airflow ............................ 146
Settings
Factory (on-board computer) ......... 258
On-board compute r....................... 251
SETUP (on-board computer) ............. 258
Side lamps
Switching on/of f........................... 124
Side windows
Convenience closing ........................ 97
Convenience opening ...................... 97
Important safety notes .................... 96
Opening/closing .............................. 96
Problem (malfunction) ..................... 99
Resetting ......................................... 98
Sidebag ................................................ 50
Sliding sunroof
Important safety information ........... 99
Opening/closing ............................ 100
Problem (malfunction) ................... 102
Rain closing feature ....................... 101 Resetting ....................................... 101
Snow chains ...................................... 367
Socket
Luggage compartment ................... 319
Under the armrest ......................... 318
Sockets
Centre console .............................. 318
General notes ................................ 317
Rear compartment ......................... 318
Spare wheel
Storing ........................................... 392
Specialist workshop ............................ 26
Spectacles compartment ................. 301
Speed Limit Assist
Activating/deactivating the warn-ing function .................................... 249
Display message ............................ 275
Display message in the multifunc- tion display .................................... 220
Important safety notes .................. 219
Speed, controlling
see Cruise control
Speedometer
Digital ............................................ 244
In the Instrument cluster ................. 32
Segments ...................................... 241
Selecting the unit of measure-
ment .............................................. 252
see Instrument cluster
SPEEDTRONIC
Deactivating variable ..................... 191
Display message ............................ 278
Function/note s............................. 189
Important safety notes .................. 189
LIM indicator lamp ......................... 189
Permanent ..................................... 191
Selecting ........................................ 190
Storing the current speed .............. 190
Variabl e......................................... 189
SPORT handling mode
Activating/deactivating (AMG
vehicles) .......................................... 74
Warning lamp ................................. 292
Start/stop function
see ECO start/stop function
Starting (engine) ................................ 161
Steering (display message) .............. 28518
Index
Page 24 of 417

Tyre size (data) .............................. 378
Tyre tread ...................................... 365
Wheel and tyre combinations ........ 380
see Flat tyre U
Unlocking Emergency unlocking ....................... 90
From inside the vehicle (central
unlocking button )............................. 89 V
Vanity mirror (in sun visor) .............. 315
Variable SPEEDTRONIC
see SPEEDTRONIC
Vehicle
Correct use ...................................... 26
Data acquisition ............................... 27
Display message ............................ 282
Electronics ..................................... 396
Equipment ....................................... 24
Implied warranty .............................. 27
Individual settings .......................... 251
Leaving parked up ......................... 182
Locking (in an emergency) ............... 90
Locking (key) ................................... 83
Lowering ........................................ 378
Pulling away ................................... 162
Raising ........................................... 375
Registration ..................................... 26
Securing from rolling away ............ 375
Towing away .................................. 357
Transporting .................................. 359
Unlocking (in an emergency) ........... 90
Unlocking (key) ................................ 83
Vehicle data ................................... 407
Vehicle data ....................................... 407
Vehicle dimensions ........................... 407
Vehicle emergency locking ................ 90
Vehicle identification number
see VIN
Vehicle identification plate .............. 398
Vehicle level
AIRMATIC ...................................... 202
Vehicle level (display message) ....... 274Vehicle maintenance
see ASSYST PLUS
Vehicle tool kit .................................. 345
Vehicle weights ................................. 407
Video
Operating the DVD ......................... 247
VIN ...................................................... 398 W
Warning and indicator lamps ABS ................................................ 289
Brakes ........................................... 288
Distance warning signal ................. 297
ESP® ............................................. 291
ESP® OFF ...................................... 292
LIM (cruise control) ........................ 186
LIM (DISTRONIC PLUS) .................. 193
LIM (variable SPEEDTRONIC) ......... 189
Overview .......................................... 34
PASSENGER AIR BAG OFF ............... 43
Reserve fue l................................... 295
Seat belt ........................................ 287
Tyre pressure monitor ................... 298
Warning triangle ................................ 344
Washer fluid
Display message ............................ 285
Wheel and tyre combinations
see Tyres
Wheel bolt tightening torque ........... 378
Wheel chock ...................................... 375
Wheels
Changing a whee l.......................... 373
Changing/replacing ....................... 373
Checking ........................................ 365
Cleaning ......................................... 336
Cleaning (warning) ......................... 374
Emergency spare wheel ................. 390
Fitting a new wheel ........................ 377
Fitting a wheel ............................... 374
Important safety notes .................. 364
Removing a whee l.......................... 377
Storing ........................................... 374
Tightening torque ........................... 378
Wheel size/tyre size ...................... 378
Windowbag
Operation ......................................... 50 Index
21
Page 25 of 417

Windows
Cleaning ......................................... 337
see Side windows
Windscreen
Demisting ...................................... 146
Windscreen washer fluid
see Windscreen washer system
Windscreen washer system
Notes ............................................. 406
Topping up .................................... .332
Windscreen wipers
Problem (malfunction) ................... 136
Rear window wiper ........................ 134
Replacing the wiper blades ............ 134
Switching on/off ........................... 133
Winter operation
Important safety notes .................. 366
Radiator cover ............................... 329
Slippery road surfaces ................... 185
Snow chains .................................. 367
Winter tyres
Limiting the speed (on-board com-
puter) ............................................. 255
M+S tyres ...................................... 366
Wiper blades
Cleaning ......................................... 337
Important safety notes .................. 134
Replacing ....................................... 134
Replacing (on the rear window) ..... 135
Replacing (windscreen) .................. 134
Wooden load compartment floor
(cleaning instructions) ......................341
Wooden trim (cleaning instruc-
tions) ................................................. .340
Workshop
see Qualified specialist workshop Z
ZONE function Switching on/off ........................... 146 22
Index
Page 130 of 417

The hazard warning lamps switch on auto-
matically if:
R an airbag is deployed or
R the vehicle decelerates rapidly from a
speed of above 70 km/h and comes to a
standstill
The hazard warning lamps switch off auto-
matically if the vehicle reaches a speed of
above 10 km/ha gain after a full brake appli-
cation.
i The hazard warning lamps continue to
operate even if the ignition is switched off. Headlamp cleaning system
The headlamps are cleaned automatically if
the "Wipe with washer fluid" function is oper-
ated five times (Y page 133) while the lights
are on and the engine is running. When you
switch off the ignition, the automatic head-
lamp cleaning system is reset and counting is
resumed from 0. Intelligent Light System
General notes The Intelligent Light System is a system that
adjusts the headlamps automatically to suit
the prevailing driving and weather conditions. It offers advanced functions for improved illu-
mination of the road surface, e.g. depending
on the vehicle speed or weather conditions.
The system includes the active light function, cornering light function, motorway mode and
extended range foglamps. The system is only
active when it is dark.
You can activate or deactivate the "Intelligent Light System" using the on-board computer
(Y page 253). Active light function
The active light function is a system that
moves the headlamps according to the steer-
ing movements of the front wheels. In this
way, relevant areas remain illuminated while
driving. This allows you to recognise pedes-
trians, cyclists and animals.
Active: when the lights are switched on.
Cornering light function The cornering light function improves the illu-
mination of the road over a wide angle in the direction you are turning, enabling better vis-
ibility in tight bends, for example. It can only
be activated when the dipped-beam head-
lamps are switched on.
Active:
R if you are driving at speeds below 40 km/h
and switch on the turn signal or turn the
steering wheel
R if you are driving at speeds between
40 km/ha nd 70 km/h and turn the steer-
ing wheel Exterior lighting
127Lights andwindscreen wipers Z
Page 136 of 417

X
Reinsert the lamp cluster.
X Tighten four nuts :.
X Push in connector ;until it engages.
X Insert the side panelling. Windscreen wipers
Switching the windscreen wipers on/
off
! Do not operate the windscreen wipers
when the windscreen is dry, as this could
damage the wiper blades. Moreover, dust
that has collected on the windscreen can
scratch the glass if wiping takes place when the windscreen is dry.
If it is necessary to switch on the wind-
screen wipers in dry weather conditions,
always operate them using washer fluid.
! If the windscreen wipers leave smears on
the windscreen after the vehicle has been
washed in an automatic car wash, this may
be due to wax or other residue. Clean the
windscreen with washer fluid after an auto- matic car wash.
! Intermittent wiping with rain sensor: due
to optical influences and the windscreen
becoming dirty in dry weather conditions,
the windscreen wipers may be activated
inadvertently. This could damage the wind- screen wiper blades or scratch the wind-
screen.
For this reason, you should always switch
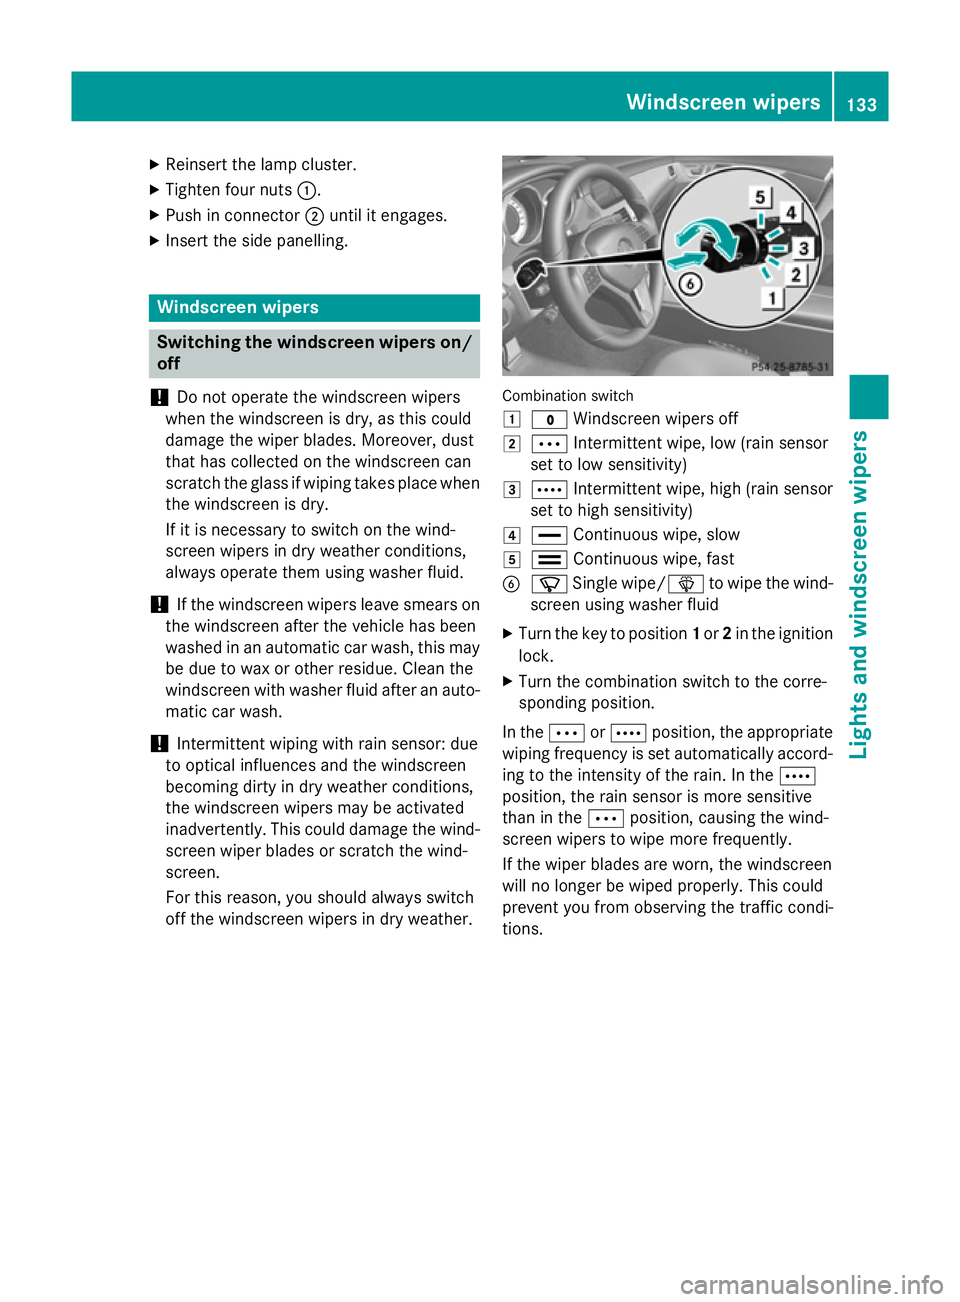
off the windscreen wipers in dry weather. Combination switch
1
$ Windscreen wipers off
2 Ä Intermittent wipe, low (rain sensor
set to low sensitivity)
3 Å Intermittent wipe, high (rain sensor
set to high sensitivity)
4 ° Continuous wipe, slow
5 ¯ Continuous wipe, fast
B í Single wipe/ îto wipe the wind-
screen using washer fluid
X Turn the key to position 1or 2in the ignition
lock.
X Turn the combination switch to the corre-
sponding position.
In the ÄorÅ position, the appropriate
wiping frequency is set automatically accord-
ing to the intensity of the rain. In the Å
position, the rain sensor is more sensitive
than in the Äposition, causing the wind-
screen wipers to wipe more frequently.
If the wiper blades are worn, the windscreen
will no longer be wiped properly. This could
prevent you from observing the traffic condi-
tions. Windscreen wipers
133Lights and windscreen wipers Z
Page 137 of 417

Switching the rear window wiper on/
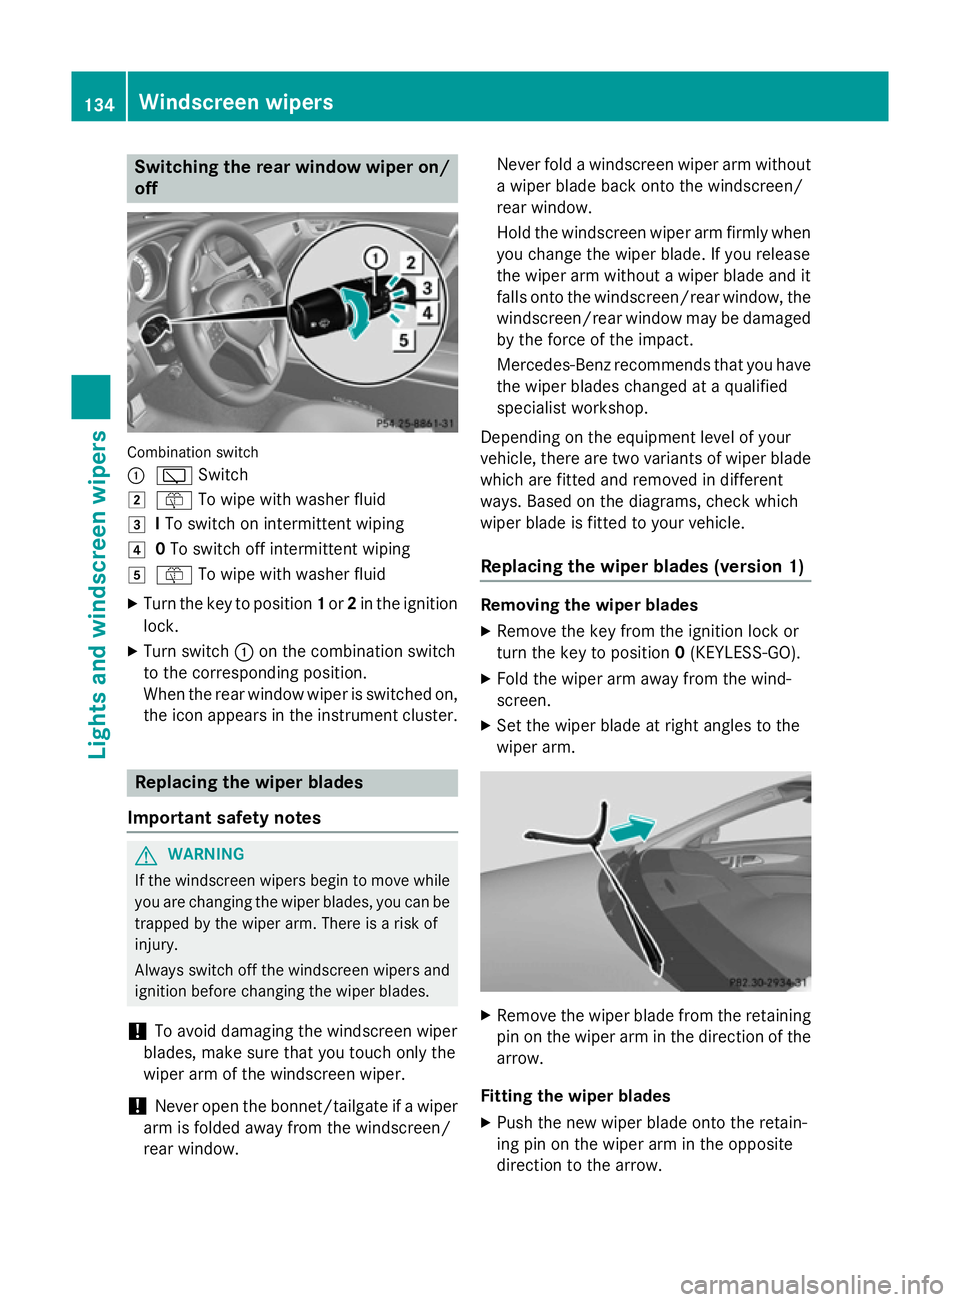
off Combination switch
:
è Switch
2 ô To wipe with washer fluid
3 ITo switch on intermittent wiping
4 0To switch off intermittent wiping
5 ô To wipe with washer fluid
X Turn the key to position 1or 2in the ignition
lock.
X Turn switch :on the combination switch
to the corresponding position.
When the rear window wiper is switched on,
the icon appears in the instrument cluster. Replacing the wiper blades
Important safety notes G
WARNING
If the windscreen wipers begin to move while
you are changing the wiper blades, you can be trapped by the wiper arm. There is a risk of
injury.
Always switch off the windscreen wipers and
ignition before changing the wiper blades.
! To avoid damaging the windscreen wiper
blades, make sure that you touch only the
wiper arm of the windscreen wiper.
! Never open the bonnet/tailgate if a wiper
arm is folded away from the windscreen/
rear window. Never fold a windscreen wiper arm without
a wiper blade back onto the windscreen/
rear window.
Hold the windscreen wiper arm firmly when
you change the wiper blade. If you release
the wiper arm without a wiper blade and it
falls onto the windscreen/rear window, the windscreen/rear window may be damaged
by the force of the impact.
Mercedes-Benz recommends that you have
the wiper blades changed at a qualified
specialist workshop.
Depending on the equipment level of your
vehicle, there are two variants of wiper blade which are fitted and removed in different
ways. Based on the diagrams, check which
wiper blade is fitted to your vehicle.
Replacing the wiper blades (version 1) Removing the wiper blades
X Remove the key from the ignition lock or
turn the key to position 0(KEYLESS-GO).
X Fold the wiper arm away from the wind-
screen.
X Set the wiper blade at right angles to the
wiper arm. X
Remove the wiper blade from the retaining
pin on the wiper arm in the direction of thearrow.
Fitting the wiper blades
X Push the new wiper blade onto the retain-
ing pin on the wiper arm in the opposite
direction to the arrow. 134
Windscreen wipersLights and windscreen wipers
Page 288 of 417

Display messages
Possible causes/consequences and
M
MSolutions Ð
Power Power
steering
steering mal‐
mal‐
function See Own‐
function See Own‐
er's Manual er's Manual The power steering assistance is faulty.
A warning tone also sounds.
G WARNING
You will need to use more force to steer.
There is a risk of an accident. X Check whether you are able to apply the extra force required.
X If you are able to steer safely: carefully drive on to a qualified
specialist workshop.
X If you are unable to steer safely: do not drive on. Contact the
nearest qualified specialist workshop. Telephone No ser‐ Telephone No ser‐
vice vice Your vehicle is outside the network provider's transmitter/
receiver range.
X Wait until the mobile phone operational readiness symbol
appears in the multifunction display. ¥
Top Top
up
upwasher
washer fluid
fluid The washer fluid level in the washer fluid reservoir has dropped
below the minimum.
X Top up the washer fluid (Y page 332).Key
Display messages
Possible causes/consequences and
M MSolutions Â
Key does not Key does not
belong to vehicle belong to vehicle You have put the wrong key in the ignition lock.
X Use the correct key. Â
Replace key Replace key The key needs to be replaced.
X Visit a qualified specialist workshop. Â
Change key batter‐ Change key batter‐
ies ies The batteries of the KEYLESS-GO key are discharged.
X Replace the batteries (Y page 86). Display
messages
285On-board computer and displays Z
Page 335 of 417

For further information on coolant, see
(Y page 405).
Topping up the windscreen washer sys-
tem/headlamp cleaning system G
WARNING
Certain components in the engine compart-
ment could be very hot, e.g. the engine, the
radiator and parts of the exhaust system.
There is a risk of injury when accessing the
engine compartment.
As far as possible, allow the engine to cool
down and only touch the components descri- bed in the following. G
WARNING
If windscreen washer concentrate comes into contact with hot components of the engine or
the exhaust system, it can ignite. There is a
risk of fire and injury.
Make sure the windscreen washer concen-
trate does not come into contact with the filler neck. X
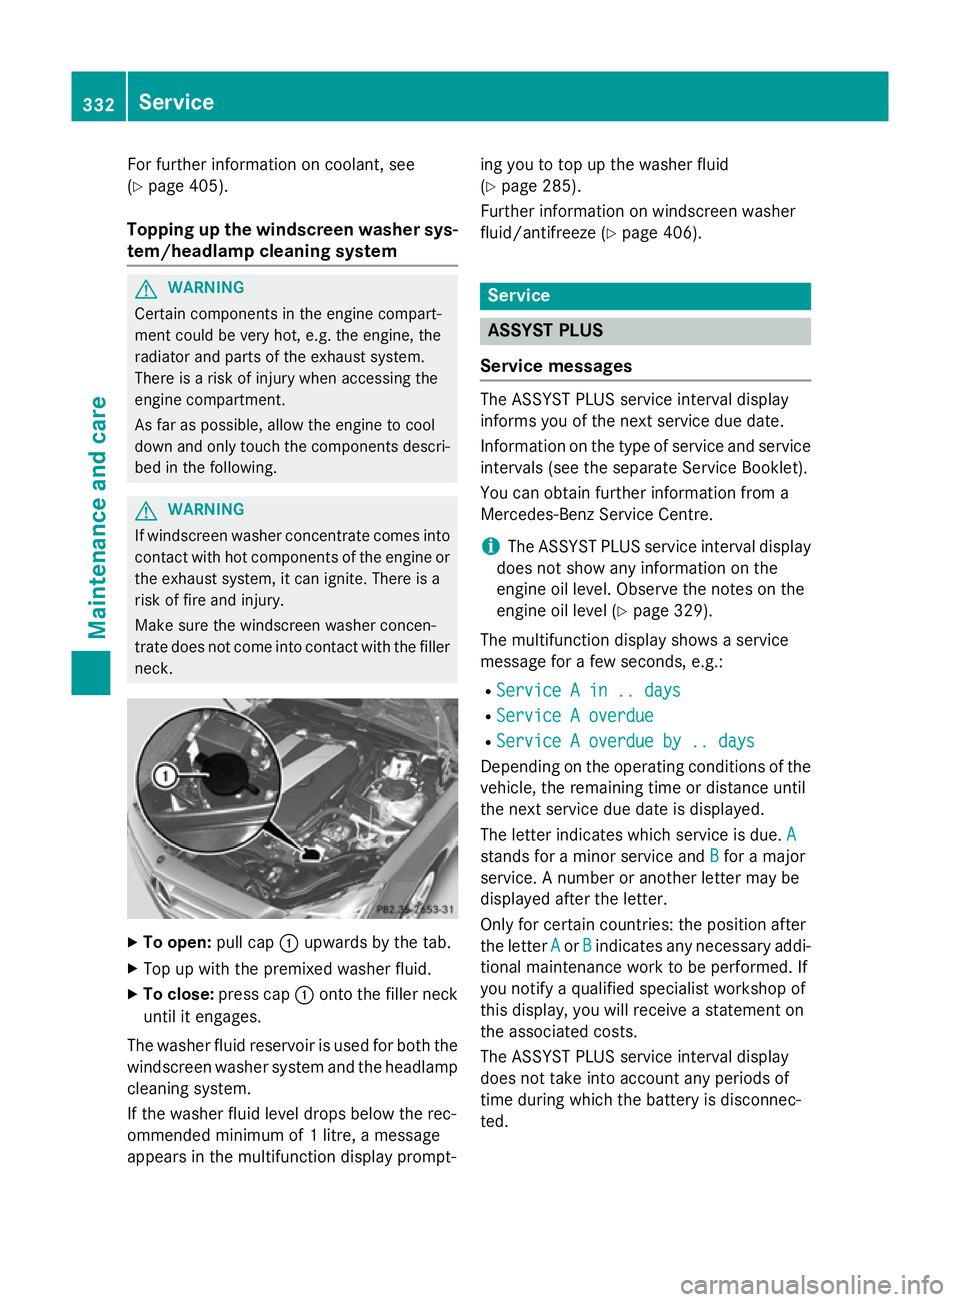
To open: pull cap:upwards by the tab.
X Top up with the premixed washer fluid.
X To close: press cap :onto the filler neck
until it engages.
The washer fluid reservoir is used for both the
windscreen washer system and the headlamp cleaning system.
If the washer fluid level drops below the rec-
ommended minimum of 1 litre, a message
appears in the multifunction display prompt- ing you to top up the washer fluid
(Y
page 285).
Further information on windscreen washer
fluid/antifreeze (Y page 406). Service
ASSYST PLUS
Service messages The ASSYST PLUS service interval display
informs you of the next service due date.
Information on the type of service and service
intervals (see the separate Service Booklet).
You can obtain further information from a
Mercedes-Benz Service Centre.
i The ASSYST PLUS service interval display
does not show any information on the
engine oil level. Observe the notes on the
engine oil level (Y page 329).
The multifunction display shows a service
message for a few seconds, e.g.:
R Service A in .. days
Service A in .. days
R Service A overdue Service A overdue
R Service A overdue by .. days
Service A overdue by .. days
Depending on the operating conditions of the
vehicle, the remaining time or distance until
the next service due date is displayed.
The letter indicates which service is due. A
A
stands for a minor service and B Bfor a major
service. A number or another letter may be
displayed after the letter.
Only for certain countries: the position after
the letter A Aor B
Bindicates any necessary addi-
tional maintenance work to be performed. If
you notify a qualified specialist workshop of
this display, you will receive a statement on
the associated costs.
The ASSYST PLUS service interval display
does not take into account any periods of
time during which the battery is disconnec-
ted. 332
ServiceMaintenance and care