2014 MERCEDES-BENZ CLS COUPE change time
[x] Cancel search: change timePage 177 of 417
R
you are driving slower than 60 km/h
R you are driving faster than 160 km/h
Automatic drive program S Drive program
S(or, in the case of AMG vehi-
cles, drive programs Sand S+) is character-
ised by the following:
R sporty engine and automatic transmission
settings
R the automatic transmission shifting up
later
R as a result of the later automatic transmis-
sion shift points, the fuel consumption pos-sibly being higher
Manual drive program M General notes
In this drive program, you can briefly change
gear yourself by using the steering wheel
gearshift paddles. The transmission must be
in position D.
You can activate manual drive program Min
the E,E+ (CLS 350) and Sautomatic drive
programs.
i In addition to temporary drive program
M,
you can also activate permanent drive pro- gram M(Y page 171).
Further information about permanent drive program M(Y page 175).
Activating
X Shift the transmission to position D.
X Pull the left or right steering wheel gearshift
paddle (Y page 173).
Manual drive program Mis temporarily acti-
vated. The selected gear and Mappear in
the multifunction display.
Shifting gears
If you pull on the left or right steering wheel
gearshift paddle, the automatic transmission switches to manual drive program Mfor a
limited amount of time. Depending on which
gearshift paddle is pulled, the automatic transmission immediately shifts into the next
gear up or down, if permitted.
X To shift up: pull the right-hand steering
wheel gearshift paddle (Y page 173).
The automatic transmission shifts up to the next gear.
i If the maximum engine speed on the cur-
rently engaged gear is reached and you
continue to accelerate, the automatic
transmission automatically shifts up in
order to prevent engine damage.
X To shift down: pull on the left-hand steer-
ing wheel gearshift paddle (Y page 173).
The automatic transmission shifts down to
the next gear.
i If the engine exceeds the maximum
engine speed when shifting down, the auto- matic transmission protects against engine
damage by not shifting down.
i Automatic downshifting occurs when
coasting.
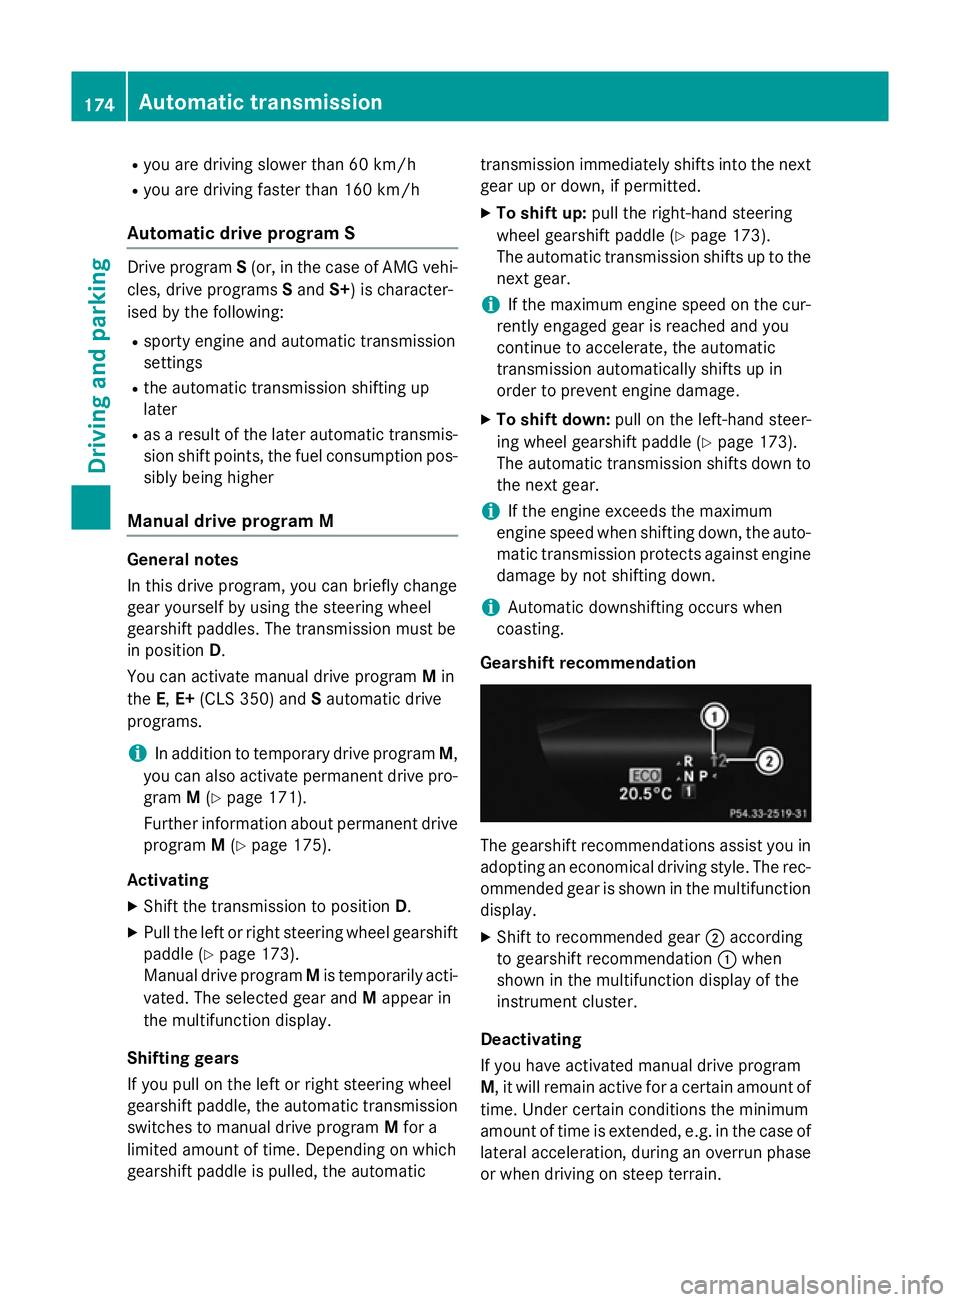
Gearshift recommendation The gearshift recommendations assist you in
adopting an economical driving style. The rec- ommended gear is shown in the multifunction
display.
X Shift to recommended gear ;according
to gearshift recommendation :when
shown in the multifunction display of the
instrument cluster.
Deactivating
If you have activated manual drive program
M, it will remain active for a certain amount of time. Under certain conditions the minimum
amount of time is extended, e.g. in the case oflateral acceleration, during an overrun phase
or when driving on steep terrain. 174
Automatic transmissionDriving and pa
rking
Page 186 of 417
In addition to driving style, the consumption is
affected by many other factors, such as:
R load
R tyre pressure
R cold start
R choice of route
R the use of electrical consumers
These factors are not included in the ECO dis-
play.
The evaluation of your driving style takes the following three categories into consideration:
R Acceleration
Acceleration (evaluation of all accelera-
tion processes):
- the bar fills up: moderate acceleration,
especially at higher speeds
- the bar empties: sporty acceleration
R Constant
Constant (assessment of driving behav-
iour at all times):
- the bar fills up: constant speed and
avoidance of unnecessary acceleration
and deceleration
- the bar empties: fluctuations in speed
R Coasting
Coasting (assessment of all deceleration
processes):
- the bar fills up: anticipatory driving, keep-
ing your distance and early release of the
accelerator. The vehicle can coast with-
out use of the brakes
- the bar empties: frequent braking
i An economical driving style involves driv-
ing at a moderate engine speed.
To achieve a higher value in the categories
Acceleration
Acceleration andConstant Constant:
R observe the gearshift recommendation
R drive the vehicle in drive program E
i On long journeys at a constant speed, e.g.
on the motorway, only the bar for Constant
Constant
will change.
i The ECO display summarises the driving
characteristics from the start of the journey
to its completion. Therefore, there are
dynamic changes in the bars at the start of a journey. During a prolonged driving time,
these changes are smaller. For more
dynamic changes, perform a manual reset.
Further information on the ECO display
(Y page 244). Brakes
Important safety notes G
WARNING
If you shift down on a slippery road surface in an attempt to increase the engine's braking
effect, the drive wheels could lose their grip.
This increases the risk of skidding and having
an accident.
Do not shift down for additional engine brak-
ing on a slippery road surface.
Downhill gradients Do not depress the brake pedal continuously
while the vehicle is in motion, e.g. never
cause the brakes to rub by constantly apply-
ing light pressure to the pedal. This results in
excessive and premature wear to the brake
pads.
Change into a lower gear in good time on long
and steep downhill gradients. Take particular note of this when driving a laden vehicle and
when towing a trailer.
i This also applies if you have activated
cruise control, SPEEDTRONIC or DIS-
TRONIC PLUS.
This will use the braking effect of the engine,
so less braking will be required to maintain
vehicle speed. This relieves the load on the
brake system and prevents the brakes from
overheating and wearing too quickly.
Heavy and light loads G
WARNING
The braking system can overheat if you leave your foot on the brake pedal while driving.
This increases the braking distance and could Driving tips
183Driving and parking
Z
Page 189 of 417
and is therefore unsuitable for that purpose.
Changes in the outside temperature are dis-
played after a short delay.
Indicated temperatures just above the freez-
ing point do not guarantee that the road sur-
face is free of ice. The road may still be icy,
especially in wooded areas or on bridges. The vehicle could skid if you fail to adapt your
driving style. Always adapt your driving style
and drive at a speed to suit the prevailing
weather conditions.
You should pay special attention to road con-
ditions when temperatures are around the
freezing point.
Further information on driving with snow
chains, see (Y page 367).
For more information on driving with summer tyres, see (Y page 366).
Observe the notes in the "Winter operation"
section (Y page 366). Driving systems
Cruise control
General notes Cruise control maintains a constant road
speed for you. It brakes automatically in order to avoid exceeding the set speed. You must
select a low gear in good time on long and
steep downhill gradients, especially if the
vehicle is laden or towing a trailer (CLS Shoot-
ing Brake only). By doing so, you will make use of the braking effect of the engine. This
relieves the load on the brake system and
prevents the brakes from overheating and
wearing too quickly.
Use cruise control only if road and traffic con-
ditions are appropriate for maintaining a
steady speed for a prolonged period. You can store any road speed above 30 km/h.
Important safety notes If you fail to adapt your driving style, cruise
control can neither reduce the risk of an acci- dent nor override the laws of physics. Cruise
control cannot take into account road,
weather or traffic conditions. Cruise control is
only an aid. You are responsible for the dis-
tance to the vehicle in front, for vehicle speed, for braking in good time, and for staying in thelane.
Do not use cruise control:
R in road and traffic conditions which do not
allow you to maintain a constant speed
(e.g. in heavy traffic or on winding roads)
R on smooth or slippery roads. Braking or
accelerating can cause the drive wheels to lose traction and the vehicle could then
skid
R when there is poor visibility, e.g. due to fog,
heavy rain or snow
If there is a change of drivers, advise the new
driver of the speed stored.
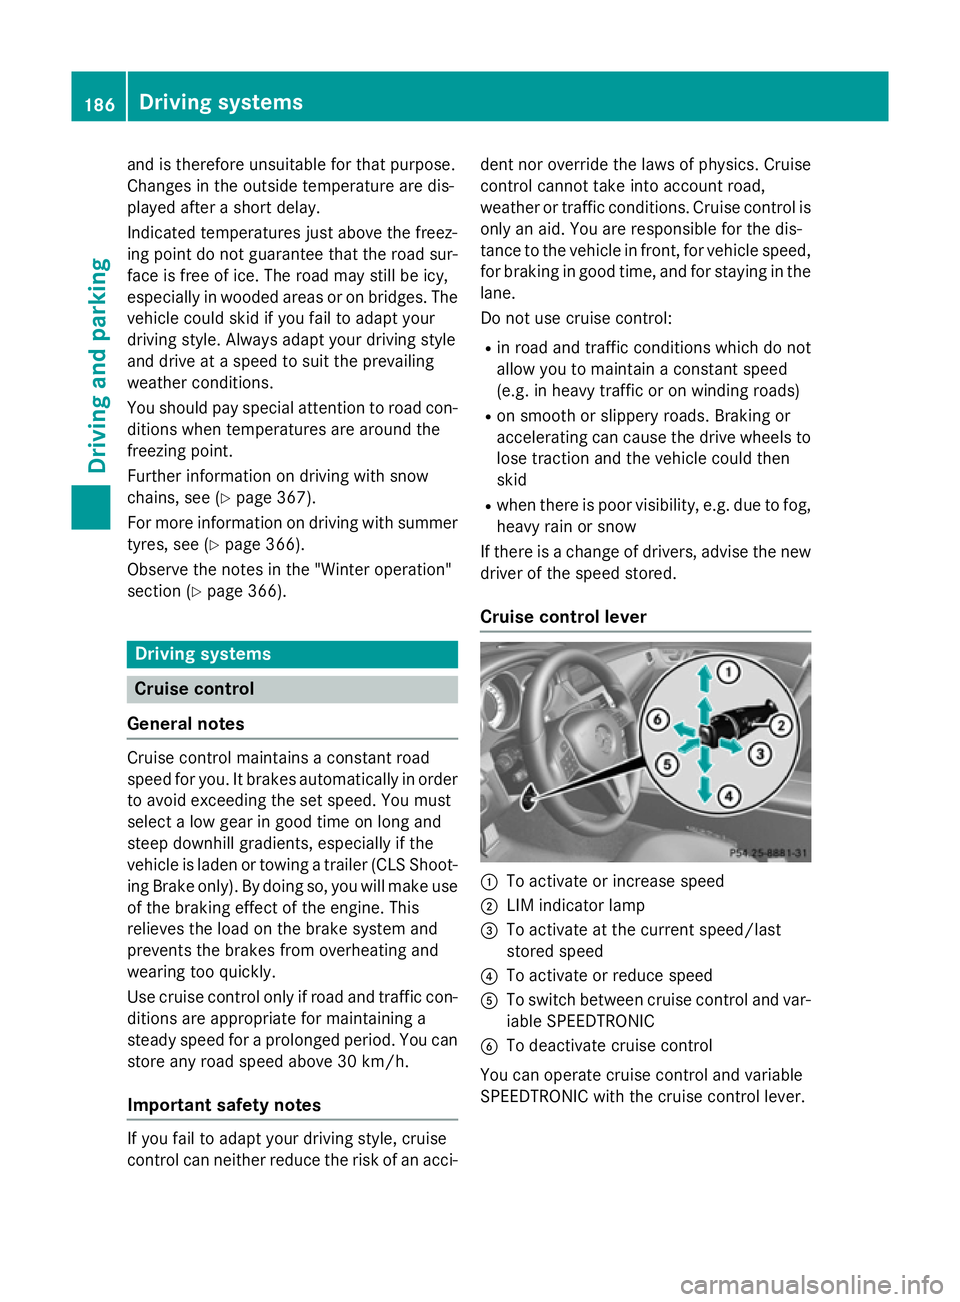
Cruise control lever :
To activate or increase speed
; LIM indicator lamp
= To activate at the current speed/last
stored speed
? To activate or reduce speed
A To switch between cruise control and var-
iable SPEEDTRONIC
B To deactivate cruise control
You can operate cruise control and variable
SPEEDTRONIC with the cruise control lever. 186
Driving systemsDriving and parking
Page 192 of 417
trol off
trol off
message in the multifunction dis-
play for approximately five seconds.
i The last speed stored is cleared when you
switch off the engine. SPEEDTRONIC
Important safety notes SPEEDTRONIC brakes automatically so that
you do not exceed the set speed. Change into
a lower gear in good time on long and steep
downhill gradients. Take particular note of
this when driving a laden vehicle. By doing so, you will make use of the braking effect of the engine. This relieves the load on the brake
system and prevents the brakes from over-
heating and wearing too quickly. If you need
additional braking, depress the brake pedal
repeatedly rather than continuously.
If you fail to adapt your driving style, SPEED-
TRONIC can neither reduce the risk of an
accident nor override the laws of physics.
SPEEDTRONIC cannot take into account
road, weather or traffic conditions. SPEED-
TRONIC is only an aid. You are responsible for
the distance to the vehicle in front, for vehicle
speed, for braking in good time, and for stay- ing in lane.
If there is a change of drivers, advise the new driver of the speed stored.
You can set a variable or permanent limit
speed:
R variable for speed limits, e.g. in built-up
areas
R permanent for long-term speed restric-
tions, e.g. when driving with winter tyres
fitted
i The speed indicated in the speedometer
may differ slightly from the limit speed
stored. Variable SPEEDTRONIC General notes
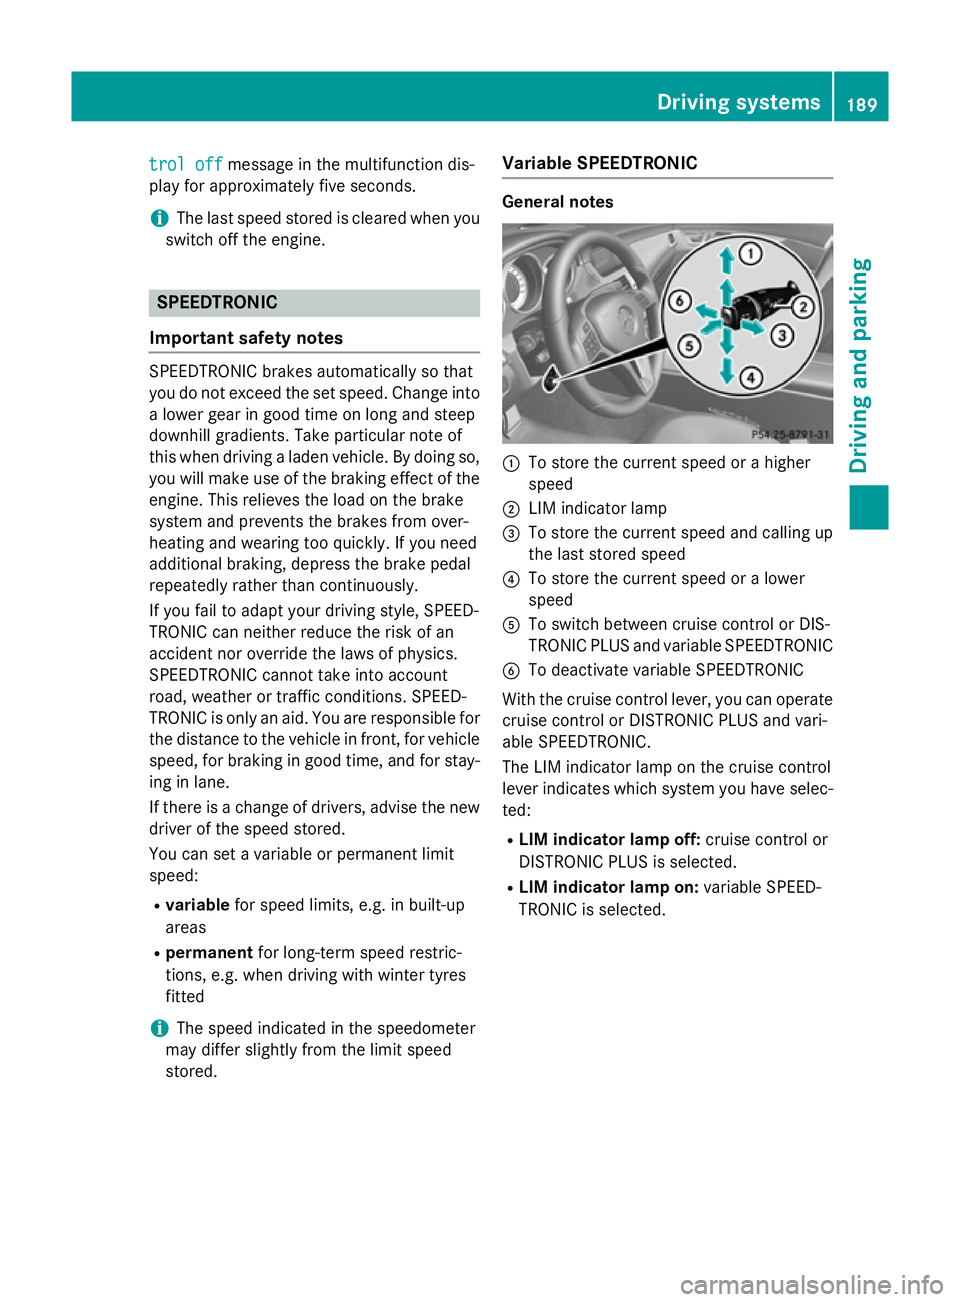
:
To store the current speed or a higher
speed
; LIM indicator lamp
= To store the current speed and calling up
the last stored speed
? To store the current speed or a lower
speed
A To switch between cruise control or DIS-
TRONIC PLUS and variable SPEEDTRONIC
B To deactivate variable SPEEDTRONIC
With the cruise control lever, you can operate
cruise control or DISTRONIC PLUS and vari-
able SPEEDTRONIC.
The LIM indicator lamp on the cruise control
lever indicates which system you have selec-
ted:
R LIM indicator lamp off: cruise control or
DISTRONIC PLUS is selected.
R LIM indicator lamp on: variable SPEED-
TRONIC is selected. Driving systems
189Driving and parking Z
Page 194 of 417
speed is set. Press the cruise control lever
up : for a higher speed or down ;for a
lower speed.
X To adjust the set speed in 1 km/h incre-
ments: briefly press the cruise control
lever up :to the pressure point for a
higher speed or down ;for a lower speed.
or
X Keep the cruise control lever pressed to the
pressure point until the desired speed is
set. Press the cruise control lever up :for
a higher speed or down ;for a lower
speed.
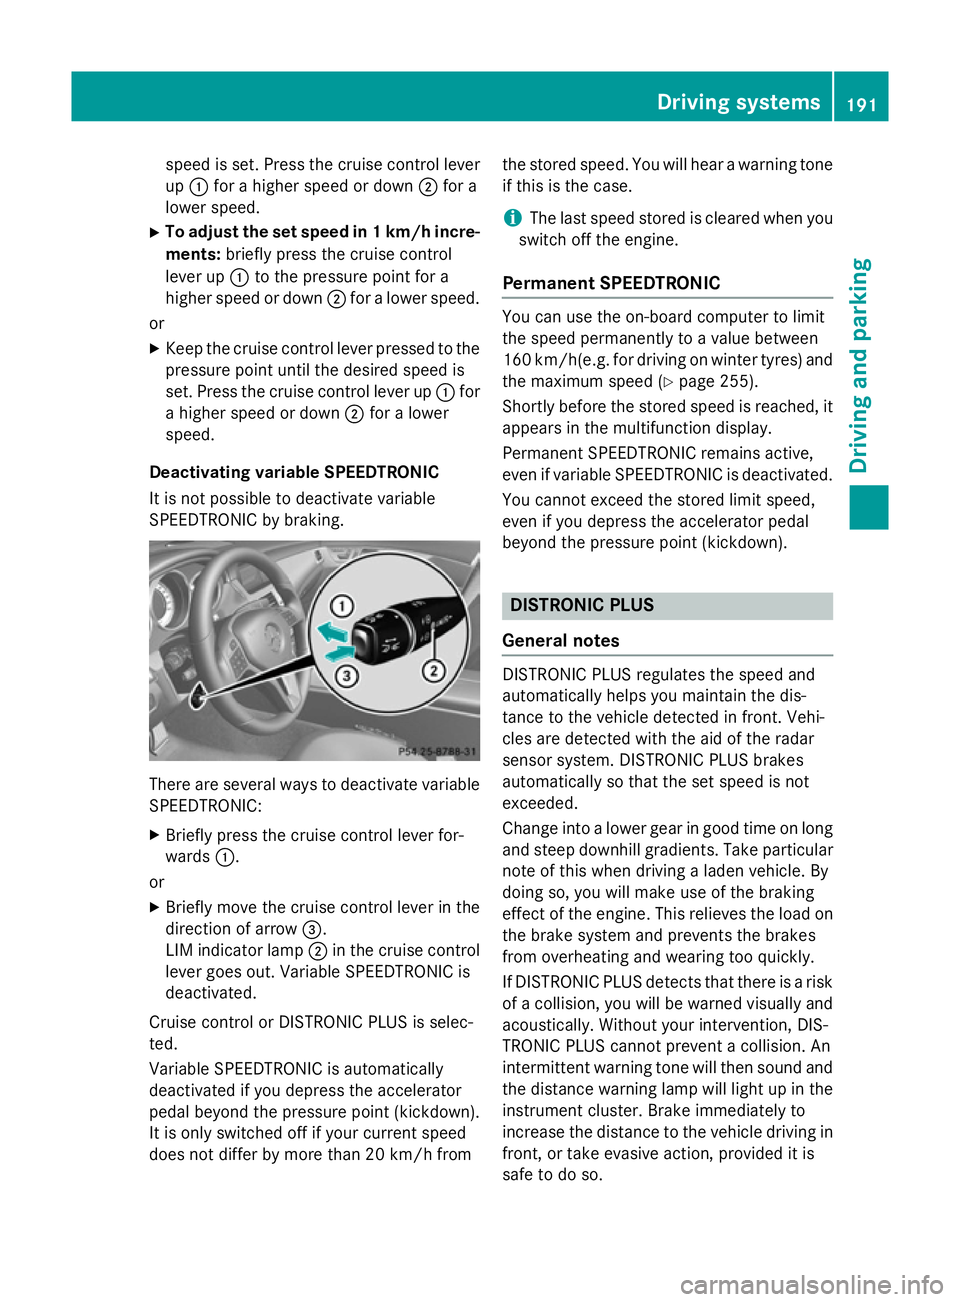
Deactivating variable SPEEDTRONIC
It is not possible to deactivate variable
SPEEDTRONIC by braking. There are several ways to deactivate variable
SPEEDTRONIC:
X Briefly press the cruise control lever for-
wards :.
or X Briefly move the cruise control lever in the
direction of arrow =.
LIM indicator lamp ;in the cruise control
lever goes out. Variable SPEEDTRONIC is
deactivated.
Cruise control or DISTRONIC PLUS is selec-
ted.
Variable SPEEDTRONIC is automatically
deactivated if you depress the accelerator
pedal beyond the pressure point (kickdown).
It is only switched off if your current speed
does not differ by more than 20 km/h from the stored speed. You will hear a warning tone
if this is the case.
i The last speed stored is cleared when you
switch off the engine.
Permanent SPEEDTRONIC You can use the on-board computer to limit
the speed permanently to a value between
160 km/h(e.g. for driving on winter tyres) and
the maximum speed (Y page 255).
Shortly before the stored speed is reached, it
appears in the multifunction display.
Permanent SPEEDTRONIC remains active,
even if variable SPEEDTRONIC is deactivated.
You cannot exceed the stored limit speed,
even if you depress the accelerator pedal
beyond the pressure point (kickdown). DISTRONIC PLUS
General notes DISTRONIC PLUS regulates the speed and
automatically helps you maintain the dis-
tance to the vehicle detected in front. Vehi-
cles are detected with the aid of the radar
sensor system. DISTRONIC PLUS brakes
automatically so that the set speed is not
exceeded.
Change into a lower gear in good time on long
and steep downhill gradients. Take particular note of this when driving a laden vehicle. By
doing so, you will make use of the braking
effect of the engine. This relieves the load on
the brake system and prevents the brakes
from overheating and wearing too quickly.
If DISTRONIC PLUS detects that there is a risk
of a collision, you will be warned visually and acoustically. Without your intervention, DIS-
TRONIC PLUS cannot prevent a collision. An
intermittent warning tone will then sound and
the distance warning lamp will light up in the instrument cluster. Brake immediately to
increase the distance to the vehicle driving in
front, or take evasive action, provided it is
safe to do so. Driving systems
191Driving and parking Z
Page 198 of 417
Driving with DISTRONIC PLUS
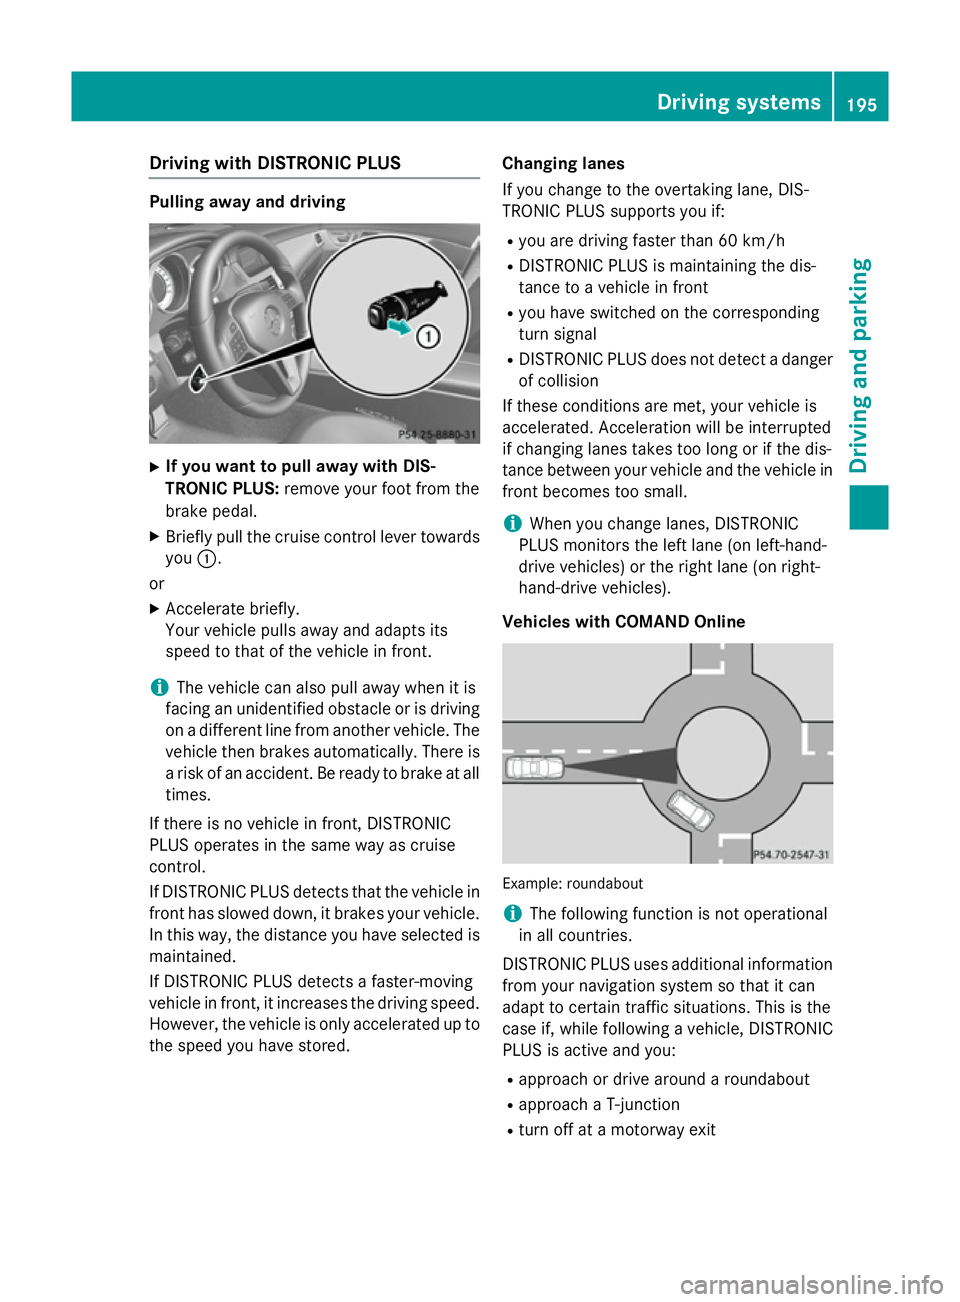
Pulling away and driving
X
If you want to pull away with DIS-
TRONIC PLUS: remove your foot from the
brake pedal.
X Briefly pull the cruise control lever towards
you :.
or
X Accelerate briefly.
Your vehicle pulls away and adapts its
speed to that of the vehicle in front.
i The vehicle can also pull away when it is
facing an unidentified obstacle or is driving
on a different line from another vehicle. The vehicle then brakes automatically. There is
a risk of an accident. Be ready to brake at all
times.
If there is no vehicle in front, DISTRONIC
PLUS operates in the same way as cruise
control.
If DISTRONIC PLUS detects that the vehicle in front has slowed down, it brakes your vehicle.
In this way, the distance you have selected is maintained.
If DISTRONIC PLUS detects a faster-moving
vehicle in front, it increases the driving speed.
However, the vehicle is only accelerated up to the speed you have stored. Changing lanes
If you change to the overtaking lane, DIS-
TRONIC PLUS supports you if:
R you are driving faster than 60 km/h
R DISTRONIC PLUS is maintaining the dis-
tance to a vehicle in front
R you have switched on the corresponding
turn signal
R DISTRONIC PLUS does not detect a danger
of collision
If these conditions are met, your vehicle is
accelerated. Acceleration will be interrupted
if changing lanes takes too long or if the dis-
tance between your vehicle and the vehicle in front becomes too small.
i When you change lanes, DISTRONIC
PLUS monitors the left lane (on left-hand-
drive vehicles) or the right lane (on right-
hand-drive vehicles).
Vehicles with COMAND Online Example: roundabout
i
The following function is not operational
in all countries.
DISTRONIC PLUS uses additional information
from your navigation system so that it can
adapt to certain traffic situations. This is the
case if, while following a vehicle, DISTRONIC
PLUS is active and you:
R approach or drive around a roundabout
R approach a T-junction
R turn off at a motorway exit Driving syste
ms
195Driving an d parking Z
Page 209 of 417
Vehicle level
Important safety notes
G
WARNING
People's limbs may become trapped if they
are located underneath the vehicle or
between the vehicle body and the tyres when the vehicle is lowering. There is a danger of
injury.
When lowering the vehicle, make sure no one
is underneath the vehicle or in the immediate vicinity of the wheel arches.
The vehicle may be lowered if you press the
suspension tuning selector button or the
AMG button. The vehicle is lowered even if the
vehicle is at a standstill.
! If Sport or Sport + suspension tuning has
been selected, the vehicle's ground clear-
ance decreases. Make sure that no objects
become trapped or that the vehicle has not
been damaged, for example, on the kerb.
i The vehicle level at the rear axle may
change visibly if you park the vehicle and
the outside temperature changes. If the
temperature drops, the vehicle level low-
ers; with an increase in temperature, the
vehicle level rises.
Changing the rear axle level
This function is only available for the CLS 63
AMG 4MATIC and CLS 63 AMG Shooting
Brake.
The vehicle level at the rear axle depends on
the selected suspension mode and the vehi-
cle speed.
The vehicle level at the rear axle changes
while driving depending on which suspension mode is selected:
R Comfort: +10 mm
R Sport + and Sport: -15 mm
When changing from Comfort to Sport or
Sport +, the axle is lowered approximately
25 mm. When changing from Sport or Sport +
to Comfort, the axle is raised approximately 25 mm. The level change also occurs when
stationary.
If you drive faster than 170 km/h, the rear
axle level is set to a middle level. This increa- ses road safety and reduces air resistance. If
you then drive slower than 150 km/h, the
level of the rear axle is again adjusted to cor- respond to the selected suspension mode.
Load compensation
The vehicle can compensate differences in
the vehicle level by raising or lowering the
rear axle. This is the case, for example, when
people get out of the vehicle or when luggage is removed.
A load compensation occurs if:
R a door or the boot lid/tailgate is opened
R the parked vehicle is unlocked
The engine needs to be running for larger level
changes. 4MATIC (permanent all-wheel drive)
If you fail to adapt your driving style, 4MATIC
can neither reduce the risk of accident nor
override the laws of physics. 4MATIC cannot
take account of road, weather and traffic con- ditions. 4MATIC is only an aid. You are
responsible for the distance to the vehicle in
front, for vehicle speed, for braking in good
time, and for staying in the lane.
If a drive wheel spins due to insufficient grip:
R when pulling away, only depress the accel-
erator pedal as far as is necessary
R accelerate less when driving
! Never tow the vehicle with one axle
raised. This may damage the transfer case.
Damage of this sort is not covered by the
Mercedes-Benz implied warranty. All
wheels must remain either on the ground or be fully raised. Observe the instructions for
towing the vehicle with all wheels in full
contact with the ground.
i In wintry driving conditions, the maximum
effect of 4MATIC can only be achieved if 206
Driving systemsDriving an
d parking
Page 216 of 417
Additional transmission shifts may be neces-
sary.
As soon as the parking procedure is com-
plete, the Park
Park Assist Assist switched
switched off
offmes-
sage appears in the multifunction display and
you will hear a tone. PARKTRONIC continues
to be available.
X Manoeuvre if necessary.
X Always observe the warning messages dis-
played by PARKTRONIC (Y page 208).
Parking tips: R The way your vehicle is positioned in the
parking space after parking is dependent
on various factors. These include the posi-
tion and shape of the vehicles parked in
front and behind it and the conditions of the
location. It may be the case that Active
Parking Assist guides you too far into a
parking space, or not far enough into it. In
some cases, it may also lead you across or
onto the kerb. If necessary, you should can-
cel the parking procedure with Active Park- ing Assist.
R You can also engage forward gear prema-
turely. The vehicle redirects and does not
drive as far into the parking space. Should a gear be changed too early, the parking pro-
cedure will be cancelled. A sensible parking position can no longer be achieved from
this position.
Cancelling Active Parking Assist You can cancel Active Parking Assist at any
time.
X Stop the movement of the multifunction
steering wheel or steer yourself.
Active Parking Assist will be cancelled at
once. The Park Assist cancelled
Park Assist cancelled mes-
sage appears in the multifunction display.
or X Press the PARKTRONIC button on the
centre console (Y page 209).
PARKTRONIC is switched off and Active
Parking Assist is immediately cancelled. The
Park Assist cancelled Park Assist cancelled message
appears in the multifunction display.
Active Parking Assist is cancelled automati-
cally if:
R the transmission is shifted too early
R the electric parking brake is applied
R transmission position Pis selected
R parking using Active Parking Assist is no
longer possible
R you are driving faster than 10 km/h
R a wheel spins and ESP ®
intervenes or fails.
In such cases the ÷warning lamp lights
up in the instrument cluster.
A warning tone sounds. The parking symbol
goes out and the Park Assist cancelled Park Assist cancelled
message appears in the multifunction dis-
play.
When Active Parking Assist is cancelled, you
must steer again yourself.
Towing a trailer For vehicles with a trailer tow hitch, the min-
imum length for parking spaces is slightly
increased.
If you have attached a trailer to your vehicle,
you should not use Active Parking Assist.
Once the electrical connection is established between your vehicle and the trailer, Active
Parking Assist is no longer available. PARK-
TRONIC is deactivated for the rear area. Driving systems
213Driving and parking Z