2014 MERCEDES-BENZ CLS COUPE length
[x] Cancel search: lengthPage 113 of 417
You can adjust the contour of the front seats
individually so as to provide optimum support
for your back and sides.
X Turn the key to position 2in the ignition
lock (Y page 159). Adjusting the active multicontour
seat
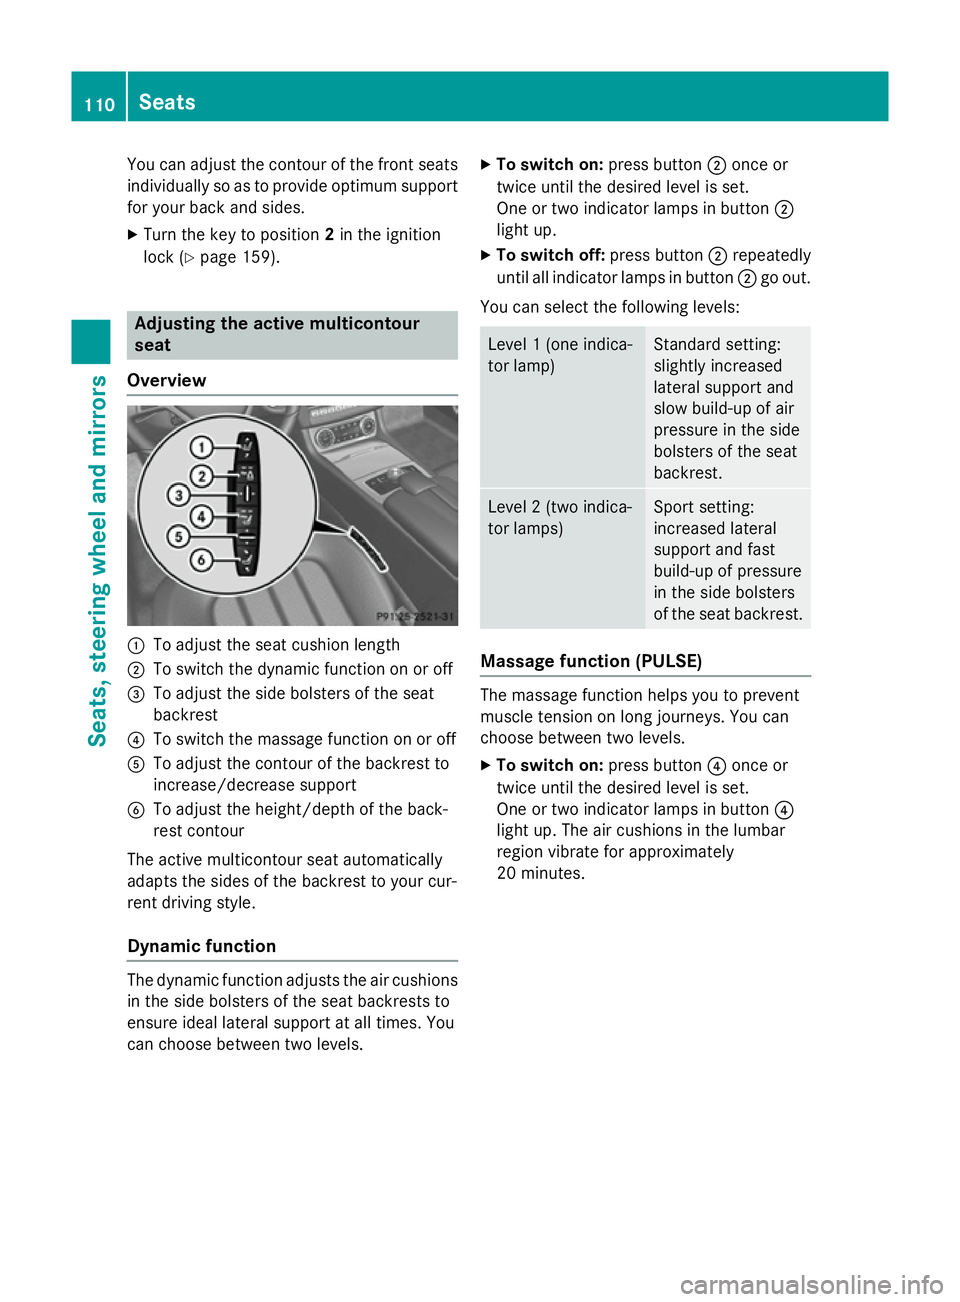
Overview :
To adjust the seat cushion length
; To switch the dynamic function on or off
= To adjust the side bolsters of the seat
backrest
? To switch the massage function on or off
A To adjust the contour of the backrest to
increase/decrease support
B To adjust the height/depth of the back-
rest contour
The active multicontour seat automatically
adapts the sides of the backrest to your cur-
rent driving style.
Dynamic function The dynamic function adjusts the air cushions
in the side bolsters of the seat backrests to
ensure ideal lateral support at all times. You
can choose between two levels. X
To switch on: press button;once or
twice until the desired level is set.
One or two indicator lamps in button ;
light up.
X To switch off: press button;repeatedly
until all indicator lamps in button ;go out.
You can select the following levels: Level 1 (one indica-
tor lamp) Standard setting:
slightly increased
lateral support and
slow build-up of air
pressure in the side
bolsters of the seat
backrest.
Level 2 (two indica-
tor lamps) Sport setting:
increased lateral
support and fast
build-up of pressure
in the side bolsters
of the seat backrest.
Massage function (PULSE)
The massage function helps you to prevent
muscle tension on long journeys. You can
choose between two levels.
X To switch on: press button?once or
twice until the desired level is set.
One or two indicator lamps in button ?
light up. The air cushions in the lumbar
region vibrate for approximately
20 minutes. 110
SeatsSeats, steering wheel and mirrors
Page 216 of 417
Additional transmission shifts may be neces-
sary.
As soon as the parking procedure is com-
plete, the Park
Park Assist Assist switched
switched off
offmes-
sage appears in the multifunction display and
you will hear a tone. PARKTRONIC continues
to be available.
X Manoeuvre if necessary.
X Always observe the warning messages dis-
played by PARKTRONIC (Y page 208).
Parking tips: R The way your vehicle is positioned in the
parking space after parking is dependent
on various factors. These include the posi-
tion and shape of the vehicles parked in
front and behind it and the conditions of the
location. It may be the case that Active
Parking Assist guides you too far into a
parking space, or not far enough into it. In
some cases, it may also lead you across or
onto the kerb. If necessary, you should can-
cel the parking procedure with Active Park- ing Assist.
R You can also engage forward gear prema-
turely. The vehicle redirects and does not
drive as far into the parking space. Should a gear be changed too early, the parking pro-
cedure will be cancelled. A sensible parking position can no longer be achieved from
this position.
Cancelling Active Parking Assist You can cancel Active Parking Assist at any
time.
X Stop the movement of the multifunction
steering wheel or steer yourself.
Active Parking Assist will be cancelled at
once. The Park Assist cancelled
Park Assist cancelled mes-
sage appears in the multifunction display.
or X Press the PARKTRONIC button on the
centre console (Y page 209).
PARKTRONIC is switched off and Active
Parking Assist is immediately cancelled. The
Park Assist cancelled Park Assist cancelled message
appears in the multifunction display.
Active Parking Assist is cancelled automati-
cally if:
R the transmission is shifted too early
R the electric parking brake is applied
R transmission position Pis selected
R parking using Active Parking Assist is no
longer possible
R you are driving faster than 10 km/h
R a wheel spins and ESP ®
intervenes or fails.
In such cases the ÷warning lamp lights
up in the instrument cluster.
A warning tone sounds. The parking symbol
goes out and the Park Assist cancelled Park Assist cancelled
message appears in the multifunction dis-
play.
When Active Parking Assist is cancelled, you
must steer again yourself.
Towing a trailer For vehicles with a trailer tow hitch, the min-
imum length for parking spaces is slightly
increased.
If you have attached a trailer to your vehicle,
you should not use Active Parking Assist.
Once the electrical connection is established between your vehicle and the trailer, Active
Parking Assist is no longer available. PARK-
TRONIC is deactivated for the rear area. Driving systems
213Driving and parking Z
Page 221 of 417
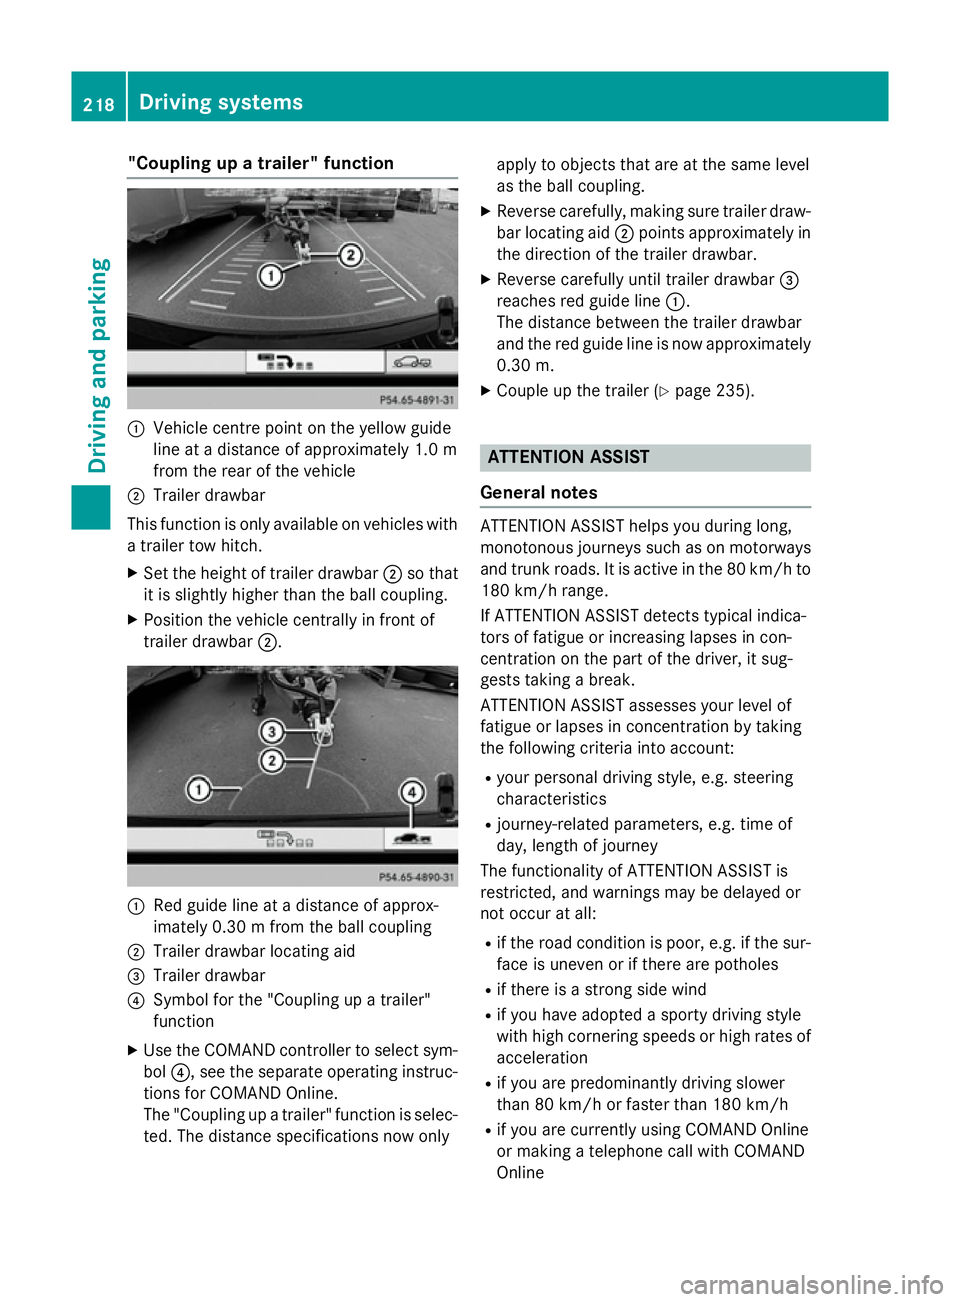
"Coupling up a trailer" function
:
Vehicle centre point on the yellow guide
line at a distance of approximately 1.0 m
from the rear of the vehicle
; Trailer drawbar
This function is only available on vehicles with
a trailer tow hitch.
X Set the height of trailer drawbar ;so that
it is slightly higher than the ball coupling.
X Position the vehicle centrally in front of
trailer drawbar ;. :
Red guide line at a distance of approx-
imately 0.30 m from the ball coupling
; Trailer drawbar locating aid
= Trailer drawbar
? Symbol for the "Coupling up a trailer"
function
X Use the COMAND controller to select sym-
bol ?, see the separate operating instruc-
tions for COMAND Online.
The "Coupling up a trailer" function is selec- ted. The distance specifications now only apply to objects that are at the same level
as the ball coupling.
X Reverse carefully, making sure trailer draw-
bar locating aid ;points approximately in
the direction of the trailer drawbar.
X Reverse carefully until trailer drawbar =
reaches red guide line :.
The distance between the trailer drawbar
and the red guide line is now approximately
0.30 m.
X Couple up the trailer (Y page 235). ATTENTION ASSIST
General notes ATTENTION ASSIST helps you during long,
monotonous journeys such as on motorways and trunk roads. It is active in the 80 km/h to
180 km/h range.
If ATTENTION ASSIST detects typical indica-
tors of fatigue or increasing lapses in con-
centration on the part of the driver, it sug-
gests taking a break.
ATTENTION ASSIST assesses your level of
fatigue or lapses in concentration by taking
the following criteria into account:
R your personal driving style, e.g. steering
characteristics
R journey-related parameters, e.g. time of
day, length of journey
The functionality of ATTENTION ASSIST is
restricted, and warnings may be delayed or
not occur at all:
R if the road condition is poor, e.g. if the sur-
face is uneven or if there are potholes
R if there is a strong side wind
R if you have adopted a sporty driving style
with high cornering speeds or high rates of
acceleration
R if you are predominantly driving slower
than 80 km/h or faster than 180 km/h
R if you are currently using COMAND Online
or making a telephone call with COMAND
Online 218
Driving systemsDriving and pa
rking
Page 263 of 417
Deleting all laps
If you switch off the engine, the RACETIMER is
reset to "0" after 30 seconds. All laps are
deleted.
You cannot delete individual stored laps. If
you have stopped 16 laps, the current lap
does not have to be reset.
X Reset the current lap.
X Press ato confirm Reset Reset.
Reset Race Timer?
Reset Race Timer? appears in the multi-
function display.
X Press the :button to select Yes
Yes and
press the abutton to confirm.
All laps are deleted.
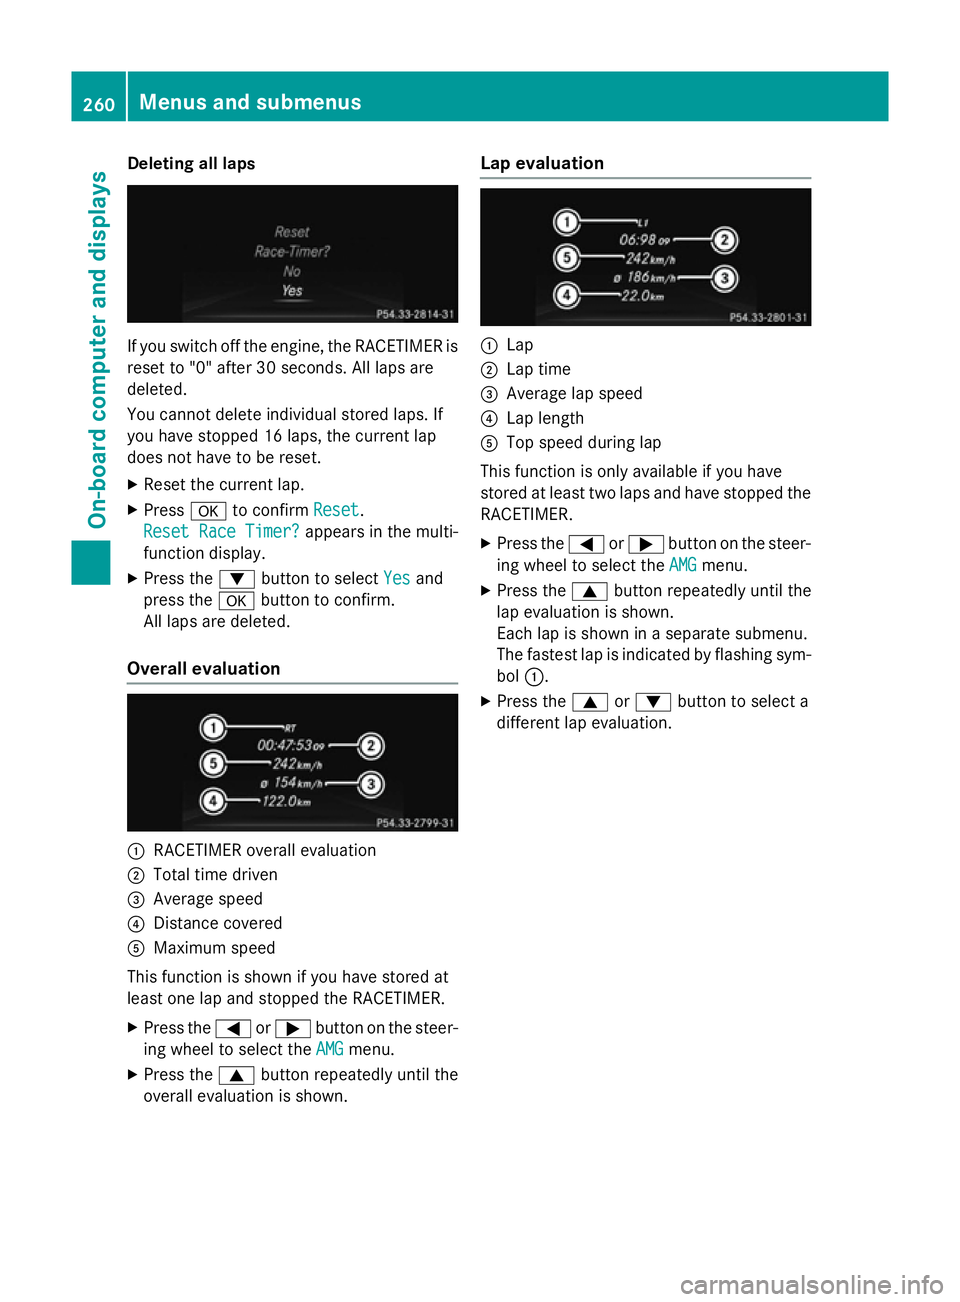
Overall evaluation :
RACETIMER overall evaluation
; Total time driven
= Average speed
? Distance covered
A Maximum speed
This function is shown if you have stored at
least one lap and stopped the RACETIMER.
X Press the =or; button on the steer-
ing wheel to select the AMG
AMGmenu.
X Press the 9button repeatedly until the
overall evaluation is shown. Lap evaluation :
Lap
; Lap time
= Average lap speed
? Lap length
A Top speed during lap
This function is only available if you have
stored at least two laps and have stopped the
RACETIMER.
X Press the =or; button on the steer-
ing wheel to select the AMG
AMG menu.
X Press the 9button repeatedly until the
lap evaluation is shown.
Each lap is shown in a separate submenu.
The fastest lap is indicated by flashing sym- bol :.
X Press the 9or: button to select a
different lap evaluation. 260
Menus and sub
menusOn-board computer and displays
Page 356 of 417
The battery and the cover of the positive
terminal clamp must be fitted securely dur-
ing operation.
Comply with safety precautions and take pro-
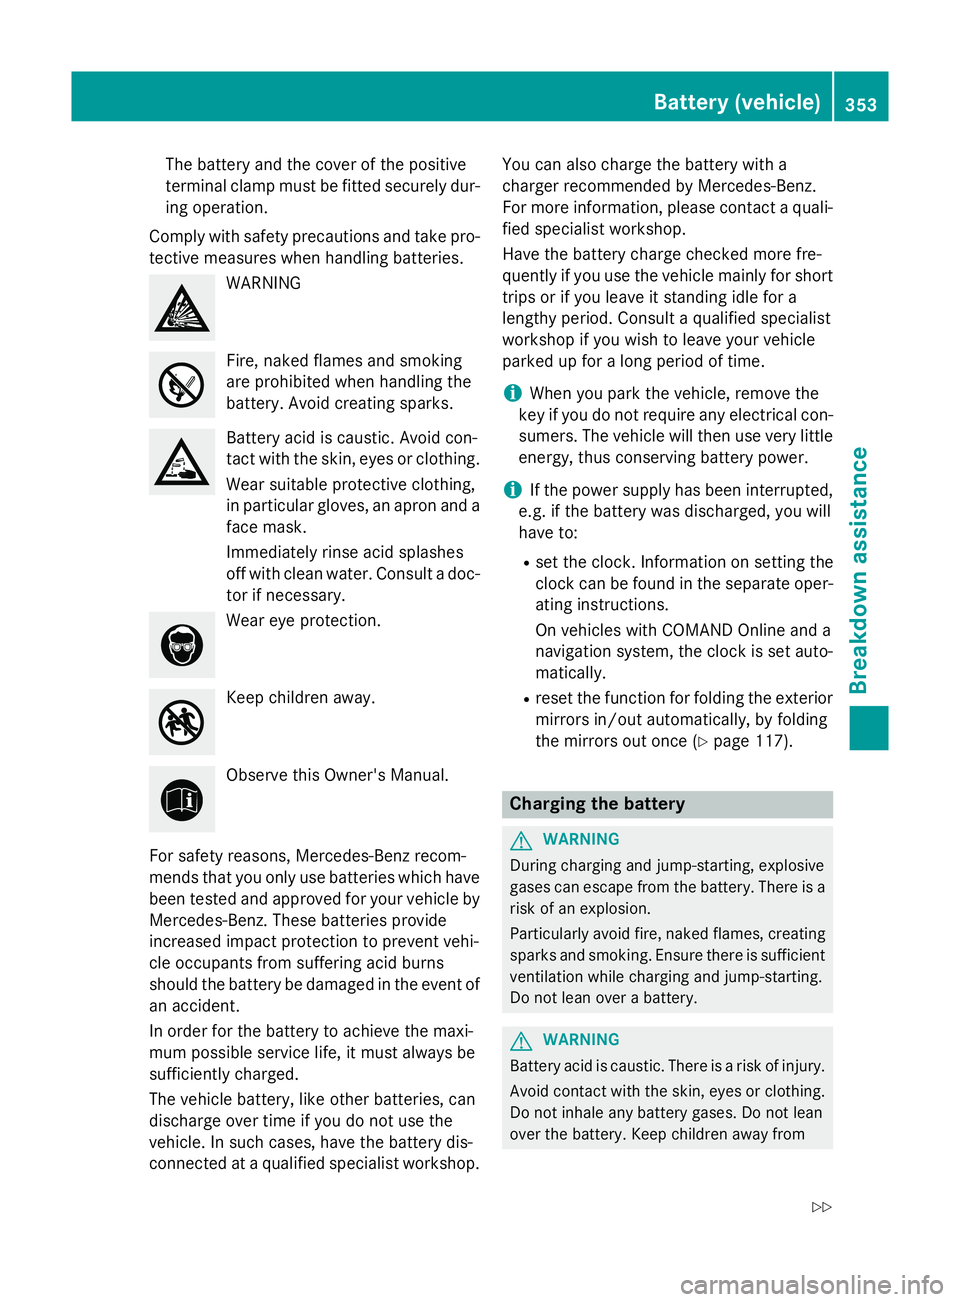
tective measures when handling batteries. WARNING
Fire, naked flames and smoking
are prohibited when handling the
battery. Avoid creating sparks.
Battery acid is caustic. Avoid con-
tact with the skin, eyes or clothing.
Wear suitable protective clothing,
in particular gloves, an apron and a
face mask.
Immediately rinse acid splashes
off with clean water. Consult a doc-
tor if necessary. Wear eye protection.
Keep children away.
Observe this Owner's Manual.
For safety reasons, Mercedes-Benz recom-
mends that you only use batteries which have been tested and approved for your vehicle by
Mercedes-Benz. These batteries provide
increased impact protection to prevent vehi-
cle occupants from suffering acid burns
should the battery be damaged in the event of
an accident.
In order for the battery to achieve the maxi-
mum possible service life, it must always be
sufficiently charged.
The vehicle battery, like other batteries, can
discharge over time if you do not use the
vehicle. In such cases, have the battery dis-
connected at a qualified specialist workshop. You can also charge the battery with a
charger recommended by Mercedes-Benz.
For more information, please contact a quali-
fied specialist workshop.
Have the battery charge checked more fre-
quently if you use the vehicle mainly for short
trips or if you leave it standing idle for a
lengthy period. Consult a qualified specialist
workshop if you wish to leave your vehicle
parked up for a long period of time.
i When you park the vehicle, remove the
key if you do not require any electrical con-
sumers. The vehicle will then use very little energy, thus conserving battery power.
i If the power supply has been interrupted,
e.g. if the battery was discharged, you will
have to:
R set the clock. Information on setting the
clock can be found in the separate oper-
ating instructions.
On vehicles with COMAND Online and a
navigation system, the clock is set auto- matically.
R reset the function for folding the exterior
mirrors in/out automatically, by folding
the mirrors out once (Y page 117). Charging the battery
G
WARNING
During charging and jump-starting, explosive
gases can escape from the battery. There is a risk of an explosion.
Particularly avoid fire, naked flames, creating
sparks and smoking. Ensure there is sufficient
ventilation while charging and jump-starting.
Do not lean over a battery. G
WARNING
Battery acid is caustic. There is a risk of injury. Avoid contact with the skin, eyes or clothing.
Do not inhale any battery gases. Do not lean
over the battery. Keep children away from Battery (vehicle)
353Breakdown assistance
Z
Page 358 of 417
Jump-starting
For the jump-starting procedure, use only the jump-starting connection point, consisting of a positive terminal and an earth point, in the engine compartment. G
WARNING
Battery acid is caustic. There is a risk of injury.
Avoid contact with the skin, eyes or clothing. Do not inhale any battery gases. Do not lean over the battery. Keep children away from batteries. Wash battery acid immediately with water and seek
medical attention. G
WARNING
During charging and jump-starting, explosive gases can escape from the battery. There is a risk of an explosion.
Particularly avoid fire, naked flames, creating sparks and smoking. Ensure there is sufficient
ventilation while charging and jump-starting. Do not lean over a battery. G
WARNING
During the charging process, a battery produces hydrogen gas. If a short circuit occurs or sparks
are created, the hydrogen gas can ignite. There is a risk of an explosion.
R Make sure that the positive terminal of a connected battery does not come into contact with
vehicle parts.
R Never place metal objects or tools on a battery.
R It is important that you observe the described order of the battery terminals when connecting
and disconnecting a battery.
R When jump-starting, make sure that the battery poles with identical polarity are connected.
R It is particularly important to observe the described order when connecting and disconnecting
the jump leads.
R Never connect or disconnect the battery terminals while the engine is running. G
WARNING
A discharged battery can freeze at temperatures below freezing point. When jump-starting the
vehicle or charging the battery, gases can escape from the battery. There is a risk of an explosion.
Allow the frozen battery to thaw out before charging it or jump-starting.
! Vehicles with a petrol engine:
avoid repeated and lengthy starting attempts. Otherwise,
the non-combusted fuel may damage the catalytic converter.
Do not use a rapid charging device to start the vehicle. If your vehicle's battery is discharged, the engine can be jump-started from another vehicle or from a second battery using jump
leads. Observe the following points:
R The battery is not accessible in all vehicles. If the other vehicle's battery is not accessible,
jump-start the vehicle using a second battery or a jump-starting device.
R Vehicles with a petrol engine: only jump-start the vehicle when the engine and exhaust
system are cold.
R Do not start the engine if the battery is frozen. Let the battery thaw first. Jump-starting
355Breakdown assistance Z
Page 410 of 417
Vehicle data
General notes
Please note that for the specified vehicle
data:
R the heights specified may vary as a result
of:
- tyres
- load
- condition of the suspension
- optional equipment
R optional equipment reduces the maximum
payload.
R vehicle-specific weight information can be
found on the vehicle identification plate
(Y page 398).
R only for certain countries: you can find vehi-
cle-specific vehicle data in the COC docu-
ments (CERTIFICATE OF CONFORMITY).
These documents are delivered with your
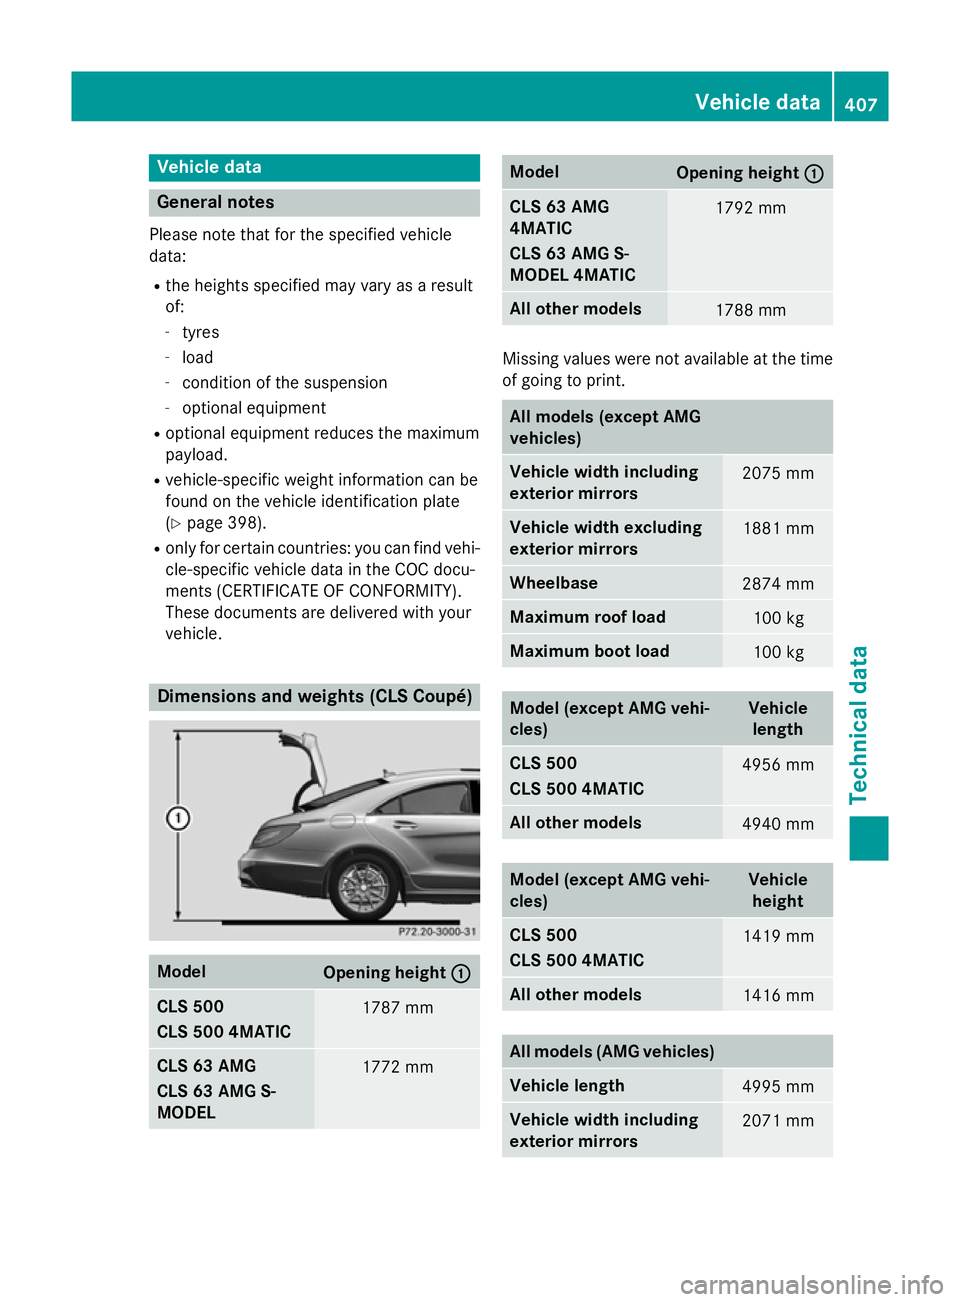
vehicle. Dimensions and weights (CLS Coupé)
Model
Opening height
: : CLS 500
CLS 500 4MATIC
1787 mm
CLS 63 AMG
CLS 63 AMG S-
MODEL
1772 mm Model
Opening height
: : CLS 63 AMG
4MATIC
CLS 63 AMG S-
MODEL 4MATIC
1792 mm
All other models
1788 mm
Missing values were not available at the time
of going to print. All models (except AMG
vehicles)
Vehicle width including
exterior mirrors
2075 mm
Vehicle width excluding
exterior mirrors
1881 mm
Wheelbase
2874 mm
Maximum roof load
100 kg
Maximum boot load
100 kg
Model (except AMG vehi-
cles) Vehicle
length CLS 500
CLS 500 4MATIC
4956 mm
All other models
4940 mm
Model (except AMG vehi-
cles) Vehicle
height CLS 500
CLS 500 4MATIC
1419 mm
All other models
1416 mm
All models (AMG vehicles)
Vehicle length
4995 mm
Vehicle width including
exterior mirrors
2071 mmVehicle data
407Technical data Z
Page 411 of 417
All models (AMG vehicles)
Vehicle width excluding
exterior mirrors
1881 mm
Wheelbase
2874 mm
Maximum roof load
100 kg
Maximum boot load
Model (AMG vehicles) Vehicle
height CLS 63 AMG
CLS 63 AMG S-MODEL
1396 mm
CLS 63 AMG 4MATIC
CLS 63 AMG S-MODEL
4MATIC
1416 mm
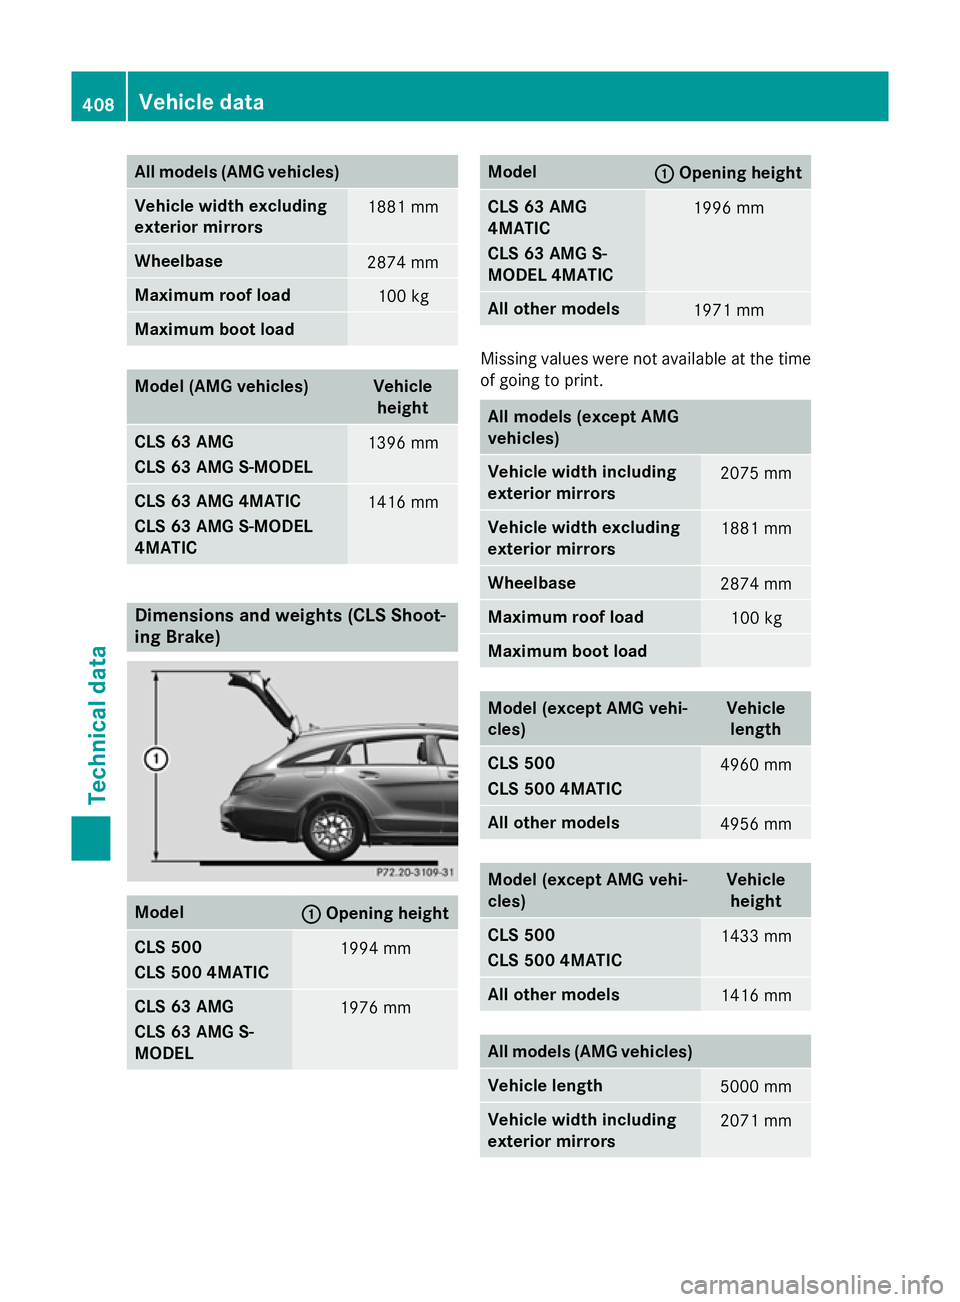
Dimensions and weights (CLS Shoot-
ing Brake)
Model
: :
Opening height CLS 500
CLS 500 4MATIC
1994 mm
CLS 63 AMG
CLS 63 AMG S-
MODEL
1976 mm Model
: :
Opening height CLS 63 AMG
4MATIC
CLS 63 AMG S-
MODEL 4MATIC
1996 mm
All other models
1971 mm
Missing values were not available at the time
of going to print. All models (except AMG
vehicles)
Vehicle width including
exterior mirrors
2075 mm
Vehicle width excluding
exterior mirrors
1881 mm
Wheelbase
2874 mm
Maximum roof load
100 kg
Maximum boot load
Model (except AMG vehi-
cles) Vehicle
length CLS 500
CLS 500 4MATIC
4960 mm
All other models
4956 mm
Model (except AMG vehi-
cles) Vehicle
height CLS 500
CLS 500 4MATIC
1433 mm
All other models
1416 mm
All models (AMG vehicles)
Vehicle length
5000 mm
Vehicle width including
exterior mirrors
2071 mm408
Vehicle dataTechnical data