2014 MERCEDES-BENZ CL-Class navigation system
[x] Cancel search: navigation systemPage 108 of 274

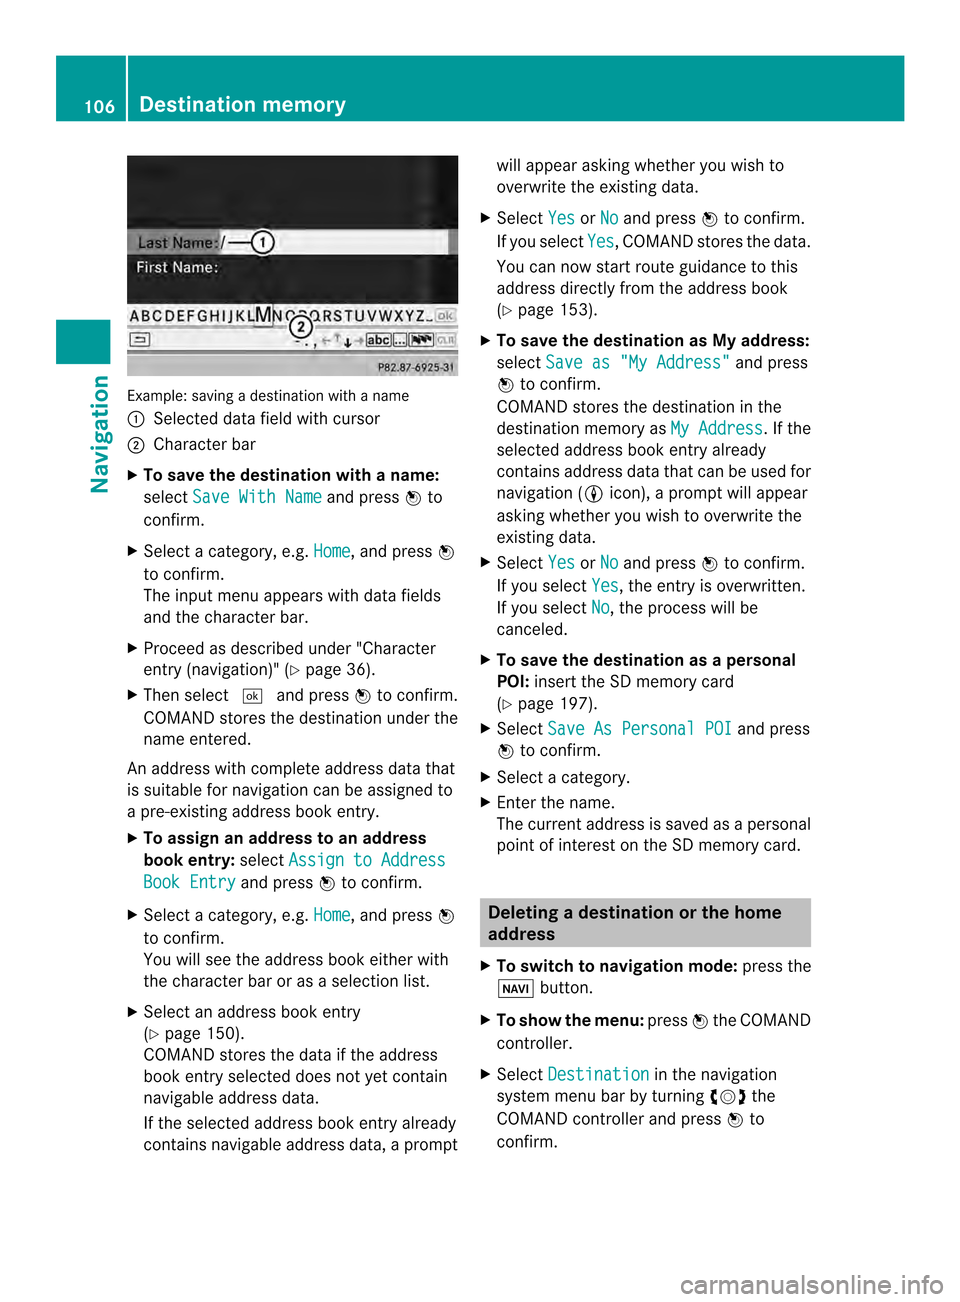
Example: saving a destination with a name
0001
Selected data field with cursor
0002 Characte rbar
X To save the destination with a name:
select Save With Name and press
0037to
confirm.
X Select a category, e.g. Home , and press
0037
to confirm.
The input menu appears with data fields
and the character bar.
X Proceed as described unde r"Character
entry (navigation)" ( Ypage 36).
X Then select 0004and press 0037to confirm.
COMAND stores the destination under the
name entered.
An address with complete address data that
is suitable for navigation can be assigned to
a pre-existing address book entry.
X To assign an address to an address
book entry: selectAssign to Address Book Entry and press
0037to confirm.
X Selec tacategory, e.g. Home , and press
0037
to confirm.
You will see the address boo keithe rwith
the character bar or as a selection list.
X Selec tana ddress book entry
(Y page 150).
COMAND stores the data if the address
book entry selected does not yet contain
navigable address data.
If the selected address book entry already
contains navigable address data, a prompt will appear asking whether you wish to
overwrite the existing data.
X Select Yes or
No and press
0037to confirm.
If you select Yes , COMAND stores the data.
You can now start route guidance to this
address directly from the address book
(Y page 153).
X To save the destination as My address:
select Save as "My Address" and press
0037 to confirm.
COMAND stores the destination in the
destination memory as My Address . If the
selected address book entry already
contains address data that can be used for
navigation (0006 icon), a prompt will appear
asking whether you wish to overwrite the
existing data.
X Select Yes or
No and press
0037to confirm.
If you select Yes , the entry is overwritten.
If you select No , the process will be
canceled.
X To save the destination as a personal
POI: insert the SD memory card
(Y page 197).
X Select Save As Personal POI and press
0037 to confirm.
X Select a category.
X Enter the name.
The curren taddress is saved as a personal
point of interest on the SD memory card. Deleting
adestination or the home
address
X To switch to navigation mode: press the
0012 button.
X To show the menu: press0037the COMAND
controller.
X Select Destination in the navigation
system menu bar by turning 003C0012003Dthe
COMAND controller and press 0037to
confirm. 106
Destination memoryNavigation
Page 109 of 274

X
Select From Memory and press
0037to
confirm.
You will see the destination memory list
either with the characte rbar (option 1) or
as a selectio nlist (option 2).
X Option 1: destination memory list with
th ec haracter bar: enter characters using
the character bar (Y page 36).
X Option 2: destination memory lis tas
selection list: select a destination by
turning 003C0012003Dthe COMAND controller and
press 0037to confirm.
You see the address data of the selected
entry.
X Select Delete and press
0037to confirm.
Ap rompt appears asking whethe ryou wish
to delete the destination.
X Select Yes or
No and press
0037to confirm.
If you select Yes , COMAND deletes the
destination .You will see amessage to this
effect.
If you select No , the process will be
canceled.
i If the navigable address data for the
destination being deleted is also assigned
to an address book entry, COMAND will
also delete this data from there. If the
corresponding address book entry does
not contain any further data, such as
telephone numbers, COMAND deletes the
entire address book entry. Previous destinations
Introduction
COMAND automatically stores the previous
destinations for which route calculation has
been started. If the memory is full, COMAND
deletes the oldest destination. You can also
save a destination from the list of previous
destinations in the destination memory. It will
be stored there permanently. Storing
adestination permanently in
the destination memory
X Proceed as described in the "From the list
of previous destinations" section
(Y page 71). Storing the vehicle position in the list
of previous destinations
X To switch on navigation mode: press the
0012 function button.
X To show the menu: press0037the COMAND
controller.
X Select Position in the navigation system
menu bar by turning 003C0012003Dthe COMAND
controller and press 0037to confirm.
X Select Save Vehicle Position and press
0037 to confirm.
COMAND stores the current vehicle
position as a destination in the list of
previous destinations. Storing the crosshair position in the
list of previous destinations
Ac rosshair appears on the map if you have
moved the map manually (Y page 108). You
can store the crosshair position as a
destination in the list of previous
destinations.
X To show the menu: press0037the COMAND
controller.
X Select Position in the navigation system
menu bar by turning 003C0012003Dthe COMAND
controller and press 0037to confirm.
X Select Save Crosshair Position and
press 0037to confirm. Previous destinations
107Navigation Z
Page 110 of 274

Deleting one of the previous
destinations
X To switch on navigation mode: press the
0012 function button.
X To show the menu: press0037the COMAND
controller.
X Select Destination in the navigation
system menu bar by turning 003C0012003Dthe
COMAN Dcontroller and press 0037to
confirm.
X Select From Last Destinations and
press 0037to confirm.
The list of last destinations appears.
X Select the desired destination and press
0037 to confirm.
The destination address appears.
X Select Delete and press
0037to confirm.
Ap rompt appears asking whethe rthe entry
should be deleted.
X Select Yes or
No and press
0037to confirm.
If you select Yes , the entry is deleted.
If you select No , the process will be
canceled. Map operation and map settings
General notes
Company logos displayed on the map are
trademarks of the respective companies and
used solely for the purpose of indicating the
locations of these companies. The use of such
logos on the map does not indicate approval
of, support of or advertising by these
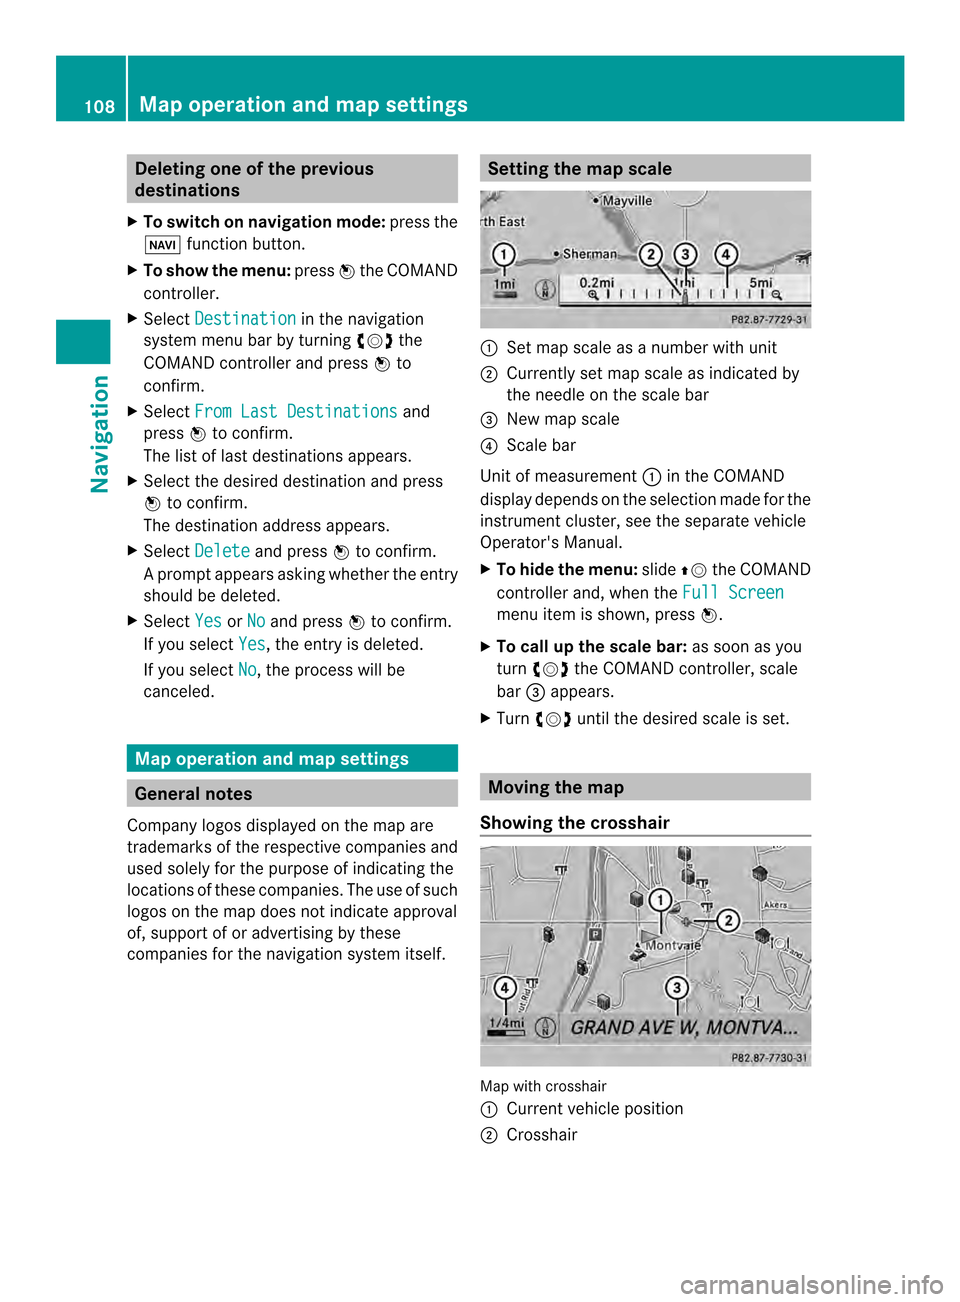
companies for the navigation system itself. Setting the map scale
0001
Set map scale as a number with unit
0002 Currently set map scale as indicated by
the needle on the scale bar
0014 New map scale
0013 Scale bar
Unit of measurement 0001in the COMAND
display depends on the selection made for the
instrumentc luster, see the separate vehicle
Operator's Manual.
X To hid ethe menu: slide00360012the COMAND
controlle rand, when the Full Screen menu ite
mis shown, press 0037.
X To call up the scale bar: as soon as you
turn 003C0012003D the COMAND controller, scale
bar 0014appears.
X Turn 003C0012003D until the desired scale is set. Moving the map
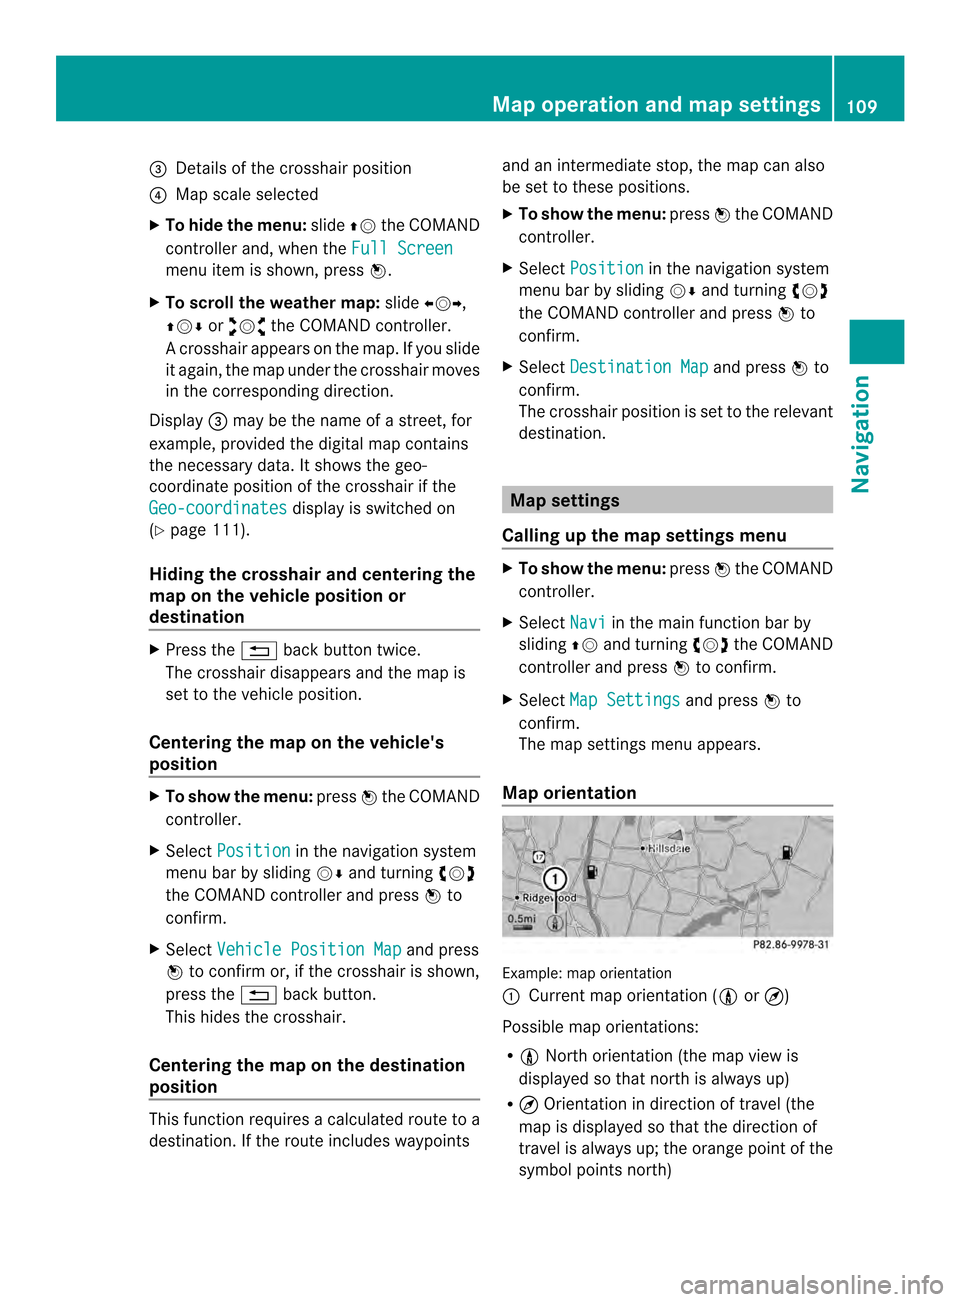
Showing the crosshair Map with crosshair
0001
Current vehicle position
0002 Crosshair 108
Map operation and map settingsNavigation
Page 111 of 274

0014
Details of the crosshair position
0013 Map scale selected
X To hid ethe menu: slide00360012the COMAND
controlle rand, when the Full Screen menu ite
mis shown, press 0037.
X To scroll the weather map: slide003400120035,
003600120008 or00320012003B the COMAND controller.
Ac rosshair appears on the map. If you slide
it again, the map under the crosshair moves
in the corresponding direction.
Display 0014may be the name of a street, for
example, provided the digital map contains
the necessary data .Itshows the geo-
coordinate position of the crosshair if the
Geo-coordinates display is switched on
(Y page 111).
Hiding the crosshair and centering the
map on the vehicle position or
destination X
Press the 001Eback button twice.
The crosshair disappears and the map is
set to the vehicle position.
Centering the map on the vehicle's
position X
To show the menu: press0037the COMAND
controller.
X Select Position in the navigation system
menu bar by sliding 00120008and turning 003C0012003D
the COMAND controller and press 0037to
confirm.
X Select Vehicle Position Map and press
0037 to confirm or, if the crosshair is shown,
press the 001Eback button.
This hides the crosshair.
Centering the map on the destination
position This function requires a calculated route to a
destination. If the route includes waypoints and an intermediate stop, the map can also
be set to these positions.
X
To show the menu: press0037the COMAND
controller.
X Select Position in the navigation system
menu bar by sliding 00120008and turning 003C0012003D
the COMAND controller and press 0037to
confirm.
X Select Destination Map and press
0037to
confirm.
The crosshair position is set to the relevant
destination. Map settings
Calling up the map settings menu X
To show the menu: press0037the COMAND
controller.
X Select Navi in the main function bar by
sliding 00360012and turning 003C0012003Dthe COMAND
controller and press 0037to confirm.
X Select Map Settings and press
0037to
confirm.
The map settings menu appears.
Map orientation Example: map orientation
0001
Current map orientation (001A or¤)
Possible map orientations:
R 001A North orientation (the map view is
displayed so that north is always up)
R ¤ Orientation in direction of travel (the
map is displayed so that the direction of
travel is always up; the orange point of the
symbol points north) Map operation and map settings
109Navigation Z
Page 114 of 274

0014
Curren tvehicle position :longitude
coordinates
0013 Number of GPS satellites currently being
used
There must be sufficient GPS reception for all
displays to be shown. If this is not the case,
the display will be grayed out. Height
display 0001may vary from the actual value,
because the navigation system uses the GPS
signals for the calculation.
During the "Move map" function, you will see
the geo-coordinates of the crosshair position.
Height display 0001and number of satellites
used 0013are not displayed. Display switched off
0001
Current map orientation
While moving the map, you will see additional
data, depending on the crosshair position, if
the digital map supports this data. Astreet
name, for example, can be shown here
(Y page 108).
Coordinates on the map X
To show the menu: press0037the COMAND
controller.
X Select Navi in the main function bar by
sliding 00360012and turning 003C0012003Dthe COMAND
controlle rand press 0037to confirm.
X Select Map Settings and press
0037to
confirm.
The map settings menu appears.
X Select Compass On Map and press
0037to
confirm.
Am enu appears. X
Select Never ,
When Off-Road or
When Route Guidance Inactive and press
0037
to confirm.
The selected setting is accepted.
Switching additional information on/
off Switching the topographic map on/off
X
To show the menu: press0037the COMAND
controller.
X Select Navi in the main function bar by
sliding 00360012and turning 003C0012003Dthe COMAND
controller and press 0037to confirm.
X Select Map Settings and press
0037to
confirm.
The map settings menu appears.
X Select Topographic Map and press
0037to
confirm.
Depending on the previous status, switch
the option on 0010or off 0003.
The topographical map uses differen tcolors
to depict elevation. The color key generally
reflects the topography's dominant
vegetation or the ground's perceived color
when seen from the air, for example:
R green (grass) for lowland
R yellow, brown (woodland) for hills
R gray (stone) and white (snow) for
mountains. Example: highway information
Switching highway information on/off112
Map operation and map settingsNavigation
Page 119 of 274

X
To adjust the size of the area: turn
003C0012003D the COMAND controller.
The area is enlarged or reduced.
X To confirm the change: press0037the
COMAND controller.
The list appears and the change is entered.
Deleting aset area X
Call up the area list ( Ypage 116).
X Select an entry in the list by turning 003C0012003D
the COMAND controller.
X Slide 00120035the COMAND controller and
press 0037to confirm.
X Select Delete and press
0037to confirm.
Aq uery appears asking whether the entry
should be deleted.
X Select Yes or
No .
If you select Yes , the entry is deleted.
If you select No , the process will be
canceled. SIRIUS XM service
Displaying SIRIUS XM service
information You can display the SIRIUS XM service
information.
X To show the menu: press0037the COMAND
controller.
X Select Navi in the main function bar by
sliding 00360012and turning 003C0012003Dthe COMAND
controller and press 0037to confirm.
X Select SIRIUS Service and press
0037to
confirm.
The window on the right half of the display
shows the telephone number of the
provide r(SIRIUS XM) and the serial number
of your service module. Registering for the SIRIUS XM traffic
report service X
Call the traffic report provider's phone
number shown on the screen.
i You can also have the satellite service
activated online .To do so, visit the SIRIUS
XM Radio website at
http://www.sirius.com (USA).
Once the connection has been established:
X Follow the instructions of the operator.
The activation process may take up to ten
minutes.
If registration is not included when
purchasing the system, your credit card
details will be required to activate your
account. Compass function
You can view the current direction of travel,
the current height and the coordinates of the
current vehicle position in the compass view.
X To switch to navigation mode: press the
0012 button.
X To show the menu: press0037the COMAND
controller.
X Select Position in the navigation system
menu bar by sliding 00120008and turning 003C0012003D
the COMAND controller and press 0037to
confirm.
X Select Compass and press
0037to confirm. Additional settings
117Navigation Z
Page 120 of 274

Example: compass
0001 Current direction of travel
0002 Current height above average sea level
(rounded)
0014 Current vehicle position: longitude
coordinates
0013 Numbe rofGPS satellites currently being
used
0011 Current vehicle position: latitude
coordinates
0012 Currently set steering angle of the front
wheels
i To display curren televation 0002, the
system must be able to receive at least four
satellites .Steering angle 0012can be a
maximum of 35° in both directions.
X To exit the display: confirmBack by
pressing 0037or press the 001Eback button. Country-specific information
You can call up information on the traffic
conditions in the country you are currently
driving in via the COMAND Online Internet
function.
The availability of information is country-
dependent. Information can include
maximum speeds, driving with low-beam
headlamps or legal alcohol limits, for
example.
X To switc hto navigation mode: press the
0012 button. X
To show the menu: press0037the COMAND
controller.
X Select Position in the navigation system
menu bar by sliding 00120008and turning 003C0012003D
the COMAND controller and press 0037to
confirm.
X Select Country Information and press
0037 to confirm.
When the connectio nhas been made, the
available country informatio nappears.
X To return to navigation: press the001E
button. Displaying the map data version
X
To show the map data menu: press0037
the COMAND controller.
X Select Navi in the main function bar by
sliding 00360012and turning 003C0012003Dthe COMAND
controller and press 0037to confirm.
X Select Map Version and press
0037to
confirm.
The number of the map data version is
shown. Information about new versions of
the digital map can be obtained from an
authorized Mercedes-Benz Center. 118
Additional settingsNavigation
Page 121 of 274

Updating the digital map
Introduction The digital maps generated by the map
software become outdated in the same way
as conventional road maps. Optimal route
guidance can only be provided by
the navigation system in conjunction with the
most up-to-date map software.
Information about new versions of the digital
map can be obtained from an authorized
Mercedes-Benz Center. You can have the
digital map updated there with a DVD, or you
can update it yourself.
Important safety notes G
WARNING
Never leave the engine running in an enclosed
space. The exhaust gases contain carbon
monoxide. Inhaling exhaust gases constitutes
a health hazard and could lead to loss of
consciousness or even death.
Carrying out a manual update i
The update process can tak ealong time
(over an hour), depending on the size of the
digital map. During this time, you will only
be able to switch on radio mode and to
accept incoming calls. The update will be
completed more quickly if the vehicle is
stationary.
If you start the update with the engine
switched off and the starter battery has
insufficient power, COMAND may
automatically switch off .This protects the
battery. If this occurs, restart the update
with the engine running.
X Insert the DVD:
R
in the single DVD drive (Y page 194)
R in the DVD changer (Y page 194)
COMAND checks whether the digital map
on the DVD is compatible with the
navigation system and system software. Ap
rompt then appears asking if you want
to install the database. Versions of the
database currently installed and the
database that is to be installed are
displayed.
X Select Yes or
No and press
0037to confirm.
After selecting Yes , an activation code
must be entered when installing a database
for the first time. You will receive the
activation code when you buy the
navigation DVD.
If you select No , the process will be
canceled.
X Enter the activation code.
After entering the activation code
correctly, COMAND starts updating the
digital map. Once the update is finished,
you will see a message.
X To confirm the message: press0037the
COMAND controller.
X Take the DVD out of the slot.
While the update is running, you will see a
message to this effect and a progress bar.
The navigation system is not operational
until the update is complete.
i You cannot eject the DVD during the
update. If you switch off COMAND during
the update, the update is interrupted. It
then continues from where it was
interrupted when the system is restarted.
COMAND may prompt you to change the DVD
during the update.
X Press the 0009(for DVD changer) or
0007 (for single DVD drive) load/eject
button.
X Take the DVD out of the slot.
X Insert the requested DVD.
Once the update has been successfully
completed, you will see a message to this
effect.
X To confirm the message: press0037the
COMAND controller.
X Take the DVD out of the slot.
The update is complete. Additional settings
119Navigation Z