Page 25 of 106
X
To select a setting: slide009700520064or turn
00790052007Athe controller.
X To save a setting: press0098the controller.
The setting is stored and you exit the menu.
i The balance setting is automatically reset
to the default value (0) when Logic 7 ®
is
switched on or off.
i Please bear the following in mind:
R To provide the optimum audio experi-
ence for all passengers when Logic 7 ®
is
switched on, the balance should be set
to the center of the passenger compart-
ment.
R MP3 tracks should have a bit rate of at
least 128 kbit/s.
R Surround-sound playback does not func-
tion for mono signal sources, such as the
medium wave range (MW) in radio mode.
R If radio reception is poor, e.g. in a tunnel,
you should switch off Logic 7 ®
. Other-
wise, it may switch between stereo and
mono and cause temporary sound dis-
tortions.
R On some stereo recordings, the sound
characteristics may differ from conven-
tional stereo playback. Basic functions of Audio 20
23At a glance
Page 26 of 106
Rear Seat Entertainment
Components
Overview The Rear Seat Entertainment System includes:
R two rear-compartment screens behind the front-seat head restraints
R a remote control
R a CD/DVD drive
R AUX jacks on both screens (display AUX) and on the CD/DVD drive (drive AUX)
R two sets of cordless headphones
Rear-compartment screens 0043
AUX jacks, detailed view in the "CD/DVD drive and AUX jacks" section (Y page 26)
0044 Display 24
Rear Seat EntertainmentAt a glance
Page 27 of 106

Remote control
Overview 0043
Switches the screen on/off
0044 Switches the button lighting on/off
0087 Selects the screen for the remote control
0085 Selects a menu or menu item
0083 Confirms a selection or setting
0084 Switches the sound on/off (for corded
headphones)
006B Adjusts the volume (for corded head-
phones)
006C Skips to a track, fast-forward/fast-rewind
006D Selects a track; direct entry
006E Exits a menu (back) Selecting the screen for the remote
control You can use the remote control to operate
one of the two rear screens at a time. To do
so, you must switch the remote control to the
desired screen.
X
To select the left-hand screen: turn
thumbwheel 0087until "L REAR" is high-
lighted in the window.
X To select the right-hand screen: turn
thumbwheel 0087until "R REAR" is high-
lighted in the window.
Switching the screen on/off i
If the SmartKey is in position 0or 1in the
ignition lock (see the vehicle Operator's
Manual), or the SmartKey is not inserted,
the screens in the rear will switch off after
30 minutes.
Before the screens switch off, they show a
message to this effect.
You can switch the screens back on. How-
ever, this will discharge the starter battery.
X Point the remote control at the rear-com-
partment screen which has been selected
for remote operation.
X Press button 0043on the remote control.
The respective rear screen switches on or
off.
i You can only switch the screens on using
the remote control if the ignition is
switched on.
Switching the button lighting on/off X
Press button 0044on the remote control.
Depending on the previous status, the but-
ton lighting is switched on or off.
i If you do not use the remote control for
about 15 seconds, the button lighting
switches off automatically. Rear Seat Entertainment
25At a glance
Page 28 of 106
Switching the sound on or off
X
Press button 0084on the remote control.
The sound is on or off.
Selecting a menu/menu item and con-
firming your selection X
Select a menu/menu item using the
0059006500630064 buttons on the
remote control and press the 008Bbutton to
confirm. CD/DVD drive and AUX jacks
The CD/DVD drive is located in the center
behind the front seats. 0043
CD/DVD slot
0044 AUX, right-hand (R) jack for audio signal
0087 AUX, left-hand (L) jack for audio signal
0085 AUX, jack for video signal (V)
0083 CD/DVD eject button
The AUX jacks shown are for the AUX drive.
Identical jacks can be found on the right-hand
side of the rear-compartment screens (AUX
display) (Y page 24). 26
Rear Seat EntertainmentAt a glance
Page 29 of 106

Cordless headphones
Overview 0043
Volume control
0044 Selects a screen for the headphones
0087 Battery compartment cover
0085 Switches the cordless headphones on/off
0083 Indicator lamp with various displays (Y page 27)
X Open both sides of the headphones and adjust the fit of the headphones by pulling the
headphone band in the direction of the arrow.
Switching the cordless headphones
on/off X
Press button 0085.
Depending on the previous status, the
headphones are switched on or off.
To save the battery, the headphones are
switched off automatically if they do not
receive an audio signal within three
minutes.
Adjusting the volume of the head-
phones X
Turn volume control 0043until the desired
volume has been set.
i If you have connected corded head-
phones to a rear-compartment screen, you can adjust the volume by pressing buttons
006B on the remote control (Y page 25).
Selecting a screen for the headphones X
Move push slider 0044toL(left-hand screen)
or R(right-hand screen).
Indicator lamp displays The color of the indicator lamp shows
whether the headphones are switched on or
off and indicates the charge level of the bat-
teries inserted. Rear Seat Entertainment
27At a glance
Page 30 of 106
LED dis-
play Status
Green The batteries are fine.
Red The batteries are almost dis-
charged.
Lit contin-
uously The headphones are switched
on and connected to a screen.
Flashing The headphones are search-
ing for the connection to a
screen.
No display
(dark) The headphones are switched
off or the batteries are dis-
charged.
Connecting additional headphones
You can connect one additional set of corded
headphones to each of the two rear screens
(Y
page 24). The socket is designed for head-
phones with a 3.5 mm stereo jack plug and
an impedance of 32 ohms. Changing batteries
Batteries are required for the remote control
and for the two sets of cordless headphones.
For changing batteries, see (Y page 88).28
Rear Seat EntertainmentAt a glance
Page 31 of 106
Audio system features
.......................30
System menu ...................................... 30
Switching the display on/off .............30
Display settings .................................. 31
Time settings ....................................... 31
Favorites button (asterisk key) .........32
Bluetooth ®
settings ............................ 32
System language settings ..................33
Reset function ..................................... 33 29System settings
Page 32 of 106

Audio system features
i These Operating Instructions describe all
standard and optional equipment available
for your audio device at the time of going
to print. Country-specific deviations are
possible. Please note that your audio equip-
ment may not offer all the features descri-
bed. System menu
Calling up the System basic menu
X Press 0066.
or
X Select System
System from the main function bar
using the controller (slide 00520064,009500520096or
turn 00790052007A ) and press 0098to confirm. Full screen display
X With the menu item Full Screen Full Screenhigh-
lighted, press 0098the controller.
The main function bar and the submenu bar
disappear.
X To make the main function bar and sub-
menu bar reappear: press0098the control-
ler. Changing the screen
You can change the screen to display either
the clock or the consumption indicator.
X Slide 009500520096or turn 00790052007Athe controller.
The display changes. Switching the display on/off
X To call up the basic menu: press0066.
X Switch to the submenu bar by sliding 00520064
the controller.
X Select Display Display Off
Offby sliding 00520096the con-
troller and press 0098to confirm.
X To switch the display on again: press
0098.
or
X Press 0041.
i You can also press one of the function
buttons, such as the 003Abutton, to dis-
play the relevant basic menu. 30
Switching the display on/offSystem settings
 1
1 2
2 3
3 4
4 5
5 6
6 7
7 8
8 9
9 10
10 11
11 12
12 13
13 14
14 15
15 16
16 17
17 18
18 19
19 20
20 21
21 22
22 23
23 24
24 25
25 26
26 27
27 28
28 29
29 30
30 31
31 32
32 33
33 34
34 35
35 36
36 37
37 38
38 39
39 40
40 41
41 42
42 43
43 44
44 45
45 46
46 47
47 48
48 49
49 50
50 51
51 52
52 53
53 54
54 55
55 56
56 57
57 58
58 59
59 60
60 61
61 62
62 63
63 64
64 65
65 66
66 67
67 68
68 69
69 70
70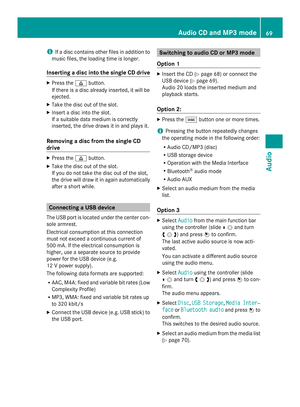 71
71 72
72 73
73 74
74 75
75 76
76 77
77 78
78 79
79 80
80 81
81 82
82 83
83 84
84 85
85 86
86 87
87 88
88 89
89 90
90 91
91 92
92 93
93 94
94 95
95 96
96 97
97 98
98 99
99 100
100 101
101 102
102 103
103 104
104 105
105


