2014 MERCEDES-BENZ B-CLASS SPORTS fold seats
[x] Cancel search: fold seatsPage 17 of 360
Restraint system
see SRS (Supplemental Restraint
System)
Reversin gfeature
Panorama sliding sunroof ................86
Roller sunblinds ............................... 87
Side windows ................................... 83
Roadside Assistanc e(breakdown) ....23
Roller sunblind Opening/closing .............................. 88
Panorama roof with power tilt/
sliding pane l..................................... 87
Roof carrier ........................................ 261
Roof lining and carpets (cleaning
guidelines) ......................................... 291
Roof load (maximum) ........................353
Route (navigation) see Route guidance (navigation)
Route guidance (navigation) ............195 S
Safety Childre ninthe vehicle ..................... 56
Child restraint systems ....................56
Occupant Classification System
(OCS) ............................................... 47
Safety system
see Driving safety systems
Seat
Folding the backres t(rear
compartment) forwards/back
(vehicles withou tthe EASY-
VARIO-PLUS system) .....................254
Folding the backres t(rear
compartment) forwards/back
(vehicles with the EASY-VARIO-
PLUS system) ................................ 255
Seat belts
Adjusting the height ......................... 54
Belt force limiters ............................ 55
center rear-compartment sea t......... 54
Cleaning ......................................... 291
Correct usage .................................. 52
Emergency Tensioning Devices ....... .55
Fastening ......................................... 53
Important safety guidelines .............52
Releasing ......................................... 54Safety guidelines
............................. 42
Warning lamp ................................. 237
Warning lamp (function) ................... 55
Seats
Adjusting (electrically). ....................95
Adjusting (manually). .......................94
Adjusting the 4-way lumbar
support ............................................ 96
Adjusting the hea drestraint ............ 95
Cleaning the cover .........................291
Correct driver's sea tposition ........... 92
Important safety notes ....................93
Seat heating problem ......................98
Storing settings (memory function) 101
Switching sea theating on/off .........97
Sensors (cleaning instructions) .......289
Service menu (on-board computer) .202
Service products Brake fluid ..................................... 350
Coolant (engine) ............................ 351
Engine oil ....................................... 349
Fuel ................................................ 348
Important safety notes ..................347
Refrigerant (air-conditioning
system) .......................................... 352
Washer fluid .................................. .352
Service work
see ASSYST PLUS
Settings
Factory (on-board computer) .........206
On-board computer .......................202
Settin gthe air distribution ...............129
Settin gthe airflow ............................ 129
Side impact air bag .............................46
Side marker lamp (display
message) ............................................ 222
Side windows Cleaning ......................................... 288
Convenience closing feature ............84
Convenience opening feature ..........84
Important safety information ...........83
Opening/closing .............................. 83
Problem (malfunction) .....................85
Resetting ......................................... 85
Sliding sunroof
see Panorama roof with power
tilt/sliding panel Index
15
Page 39 of 360
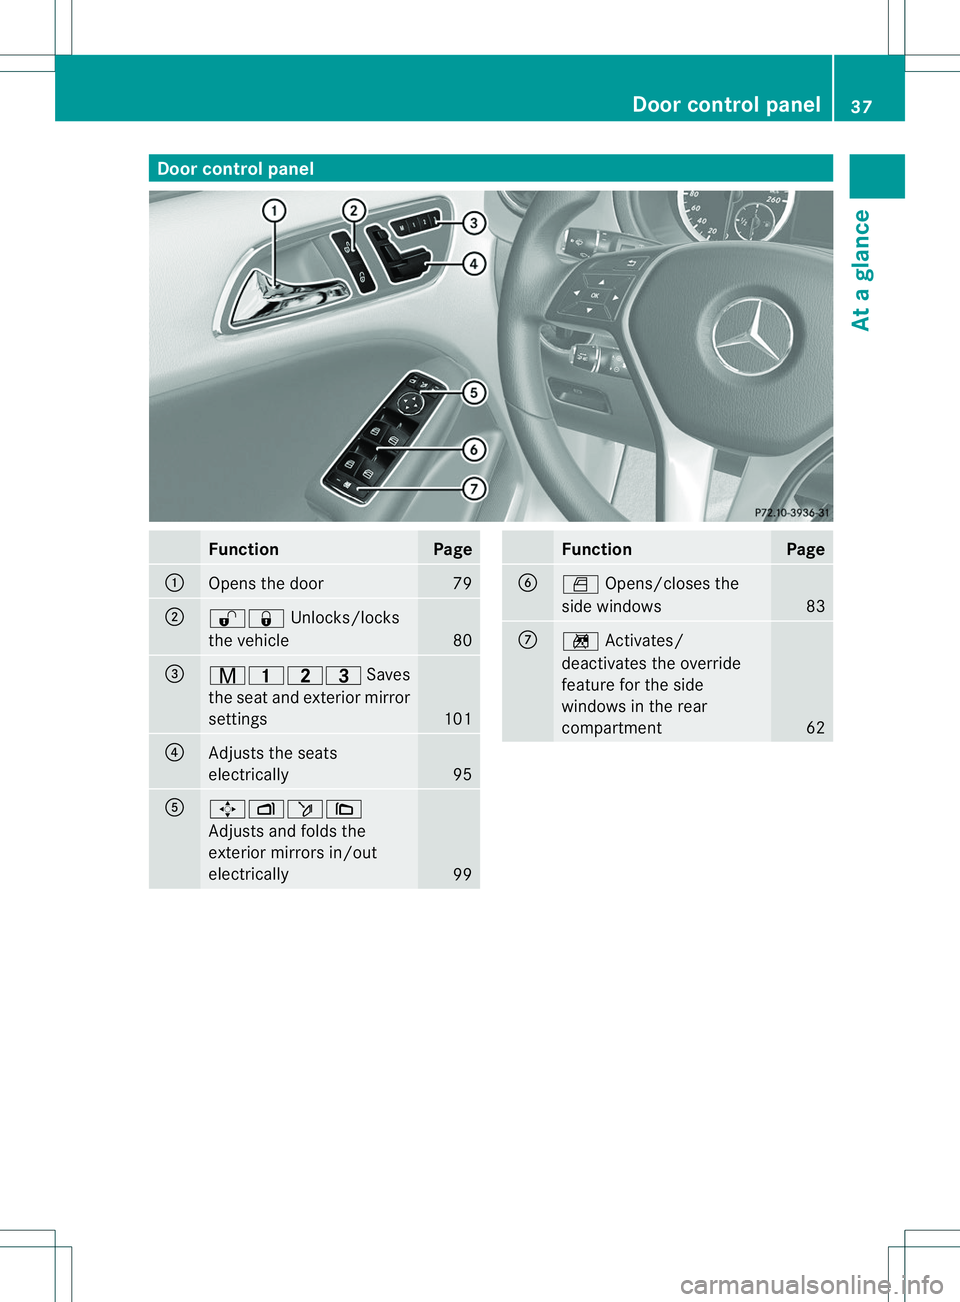
Door contro
lpanel Function Page
001A
Opens th
edoor 79
0010
00090010
Unlocks/locks
th ev ehicle 80
0023
000C000B000F
Saves
th es eat and exterio rmirror
settings 101
0021
Adjusts the seats
electrically
95
001E
000500030006000A
Adjusts and folds the
exterior mirrors in/out
electrically
99 Function Page
0024
0007
Opens/closes the
side windows 83
0007
000D
Activates/
deactivates the override
feature for the side
windows in the rear
compartment 62Door control panel
37Atag lance
Page 56 of 360
X
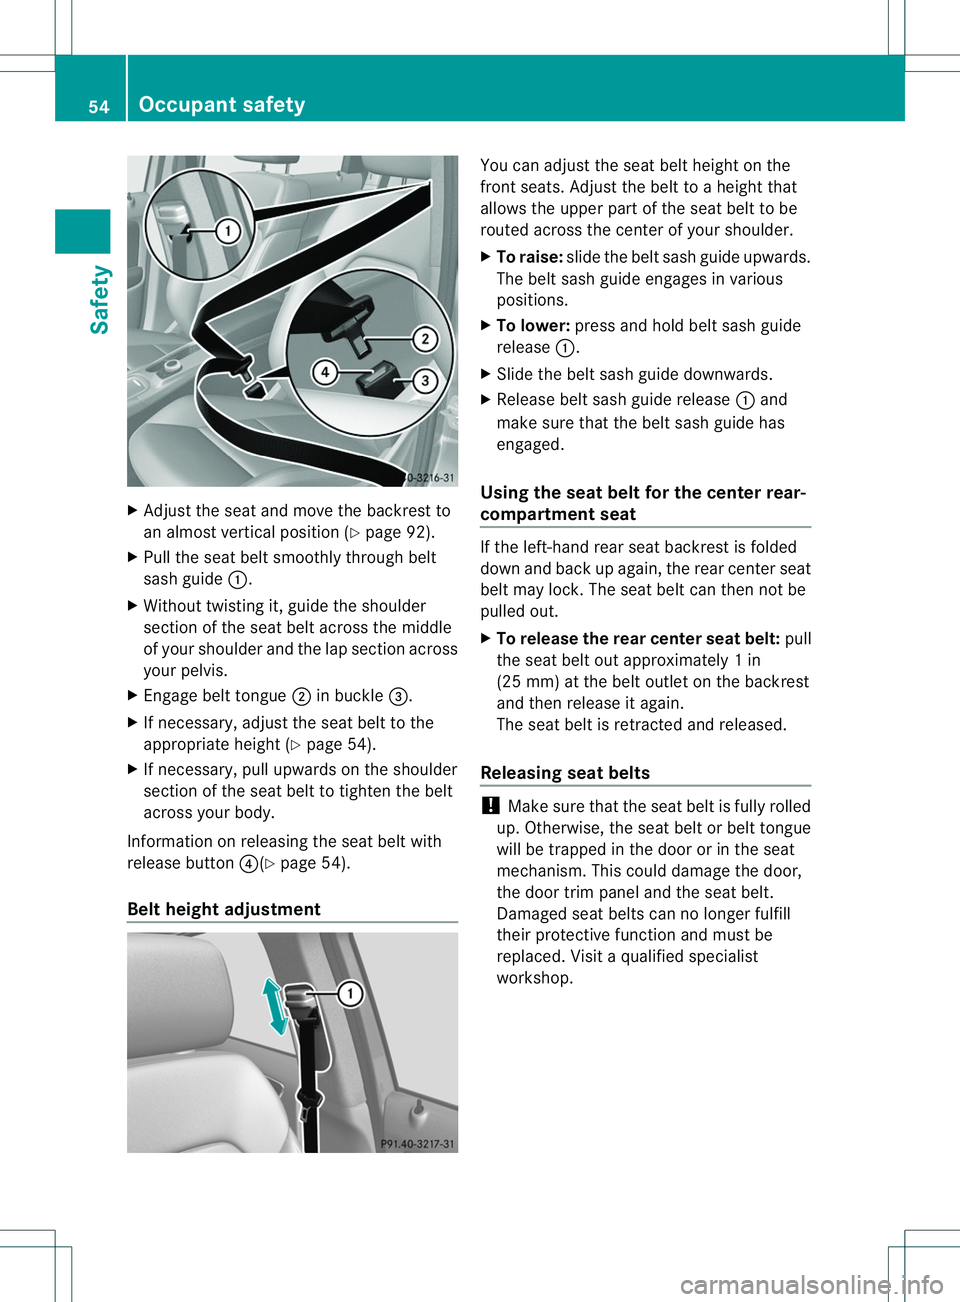
Adjust the sea tand mov ethe backres tto
an almos tvertical position (Y page 92).
X Pull the seat belt smoothly through belt
sash guide 001A.
X Without twisting it, guide the shoulder
section of the seat belt across the middle
of your shoulder and the lap section across
your pelvis.
X Engage belt tongue 0010in buckle 0023.
X If necessary, adjust the seat belt to the
appropriate height (Y page 54).
X If necessary, pull upwards on the shoulder
section of the seat belt to tighten the belt
across your body.
Information on releasing the seat belt with
release button 0021(Ypage 54).
Belt height adjustment You can adjust the seat belt height on the
fron
tseats. Adjust the belt to aheight that
allows the upper part of the seat belt to be
routed across the center of your shoulder.
X To raise: slide the belt sash guide upwards.
The belt sash guide engages in various
positions.
X To lower: press and hold belt sash guide
release 001A.
X Slide the belt sash guide downwards.
X Release belt sash guide release 001Aand
make sure that the belt sash guide has
engaged.
Using the seat belt for the center rear-
compartment seat If the left-hand rear seat backrest is folded
down and back up again, the rear center seat
belt may lock. The seat belt can then not be
pulled out.
X
To release the rear center seat belt: pull
the seat belt out approximately 1in
(25 mm) at the belt outlet on the backrest
and then release it again.
The seat belt is retracted and released.
Releasing seat belts !
Make sure that the seat belt is fully rolled
up. Otherwise, the seat belt or belt tongue
will be trapped in the door or in the seat
mechanism. This could damage the door,
the door trim panel and the seat belt.
Damaged seat belts can no longer fulfill
their protective function and must be
replaced. Visit aqualified specialist
workshop. 54
Occupant safetySafety
Page 62 of 360
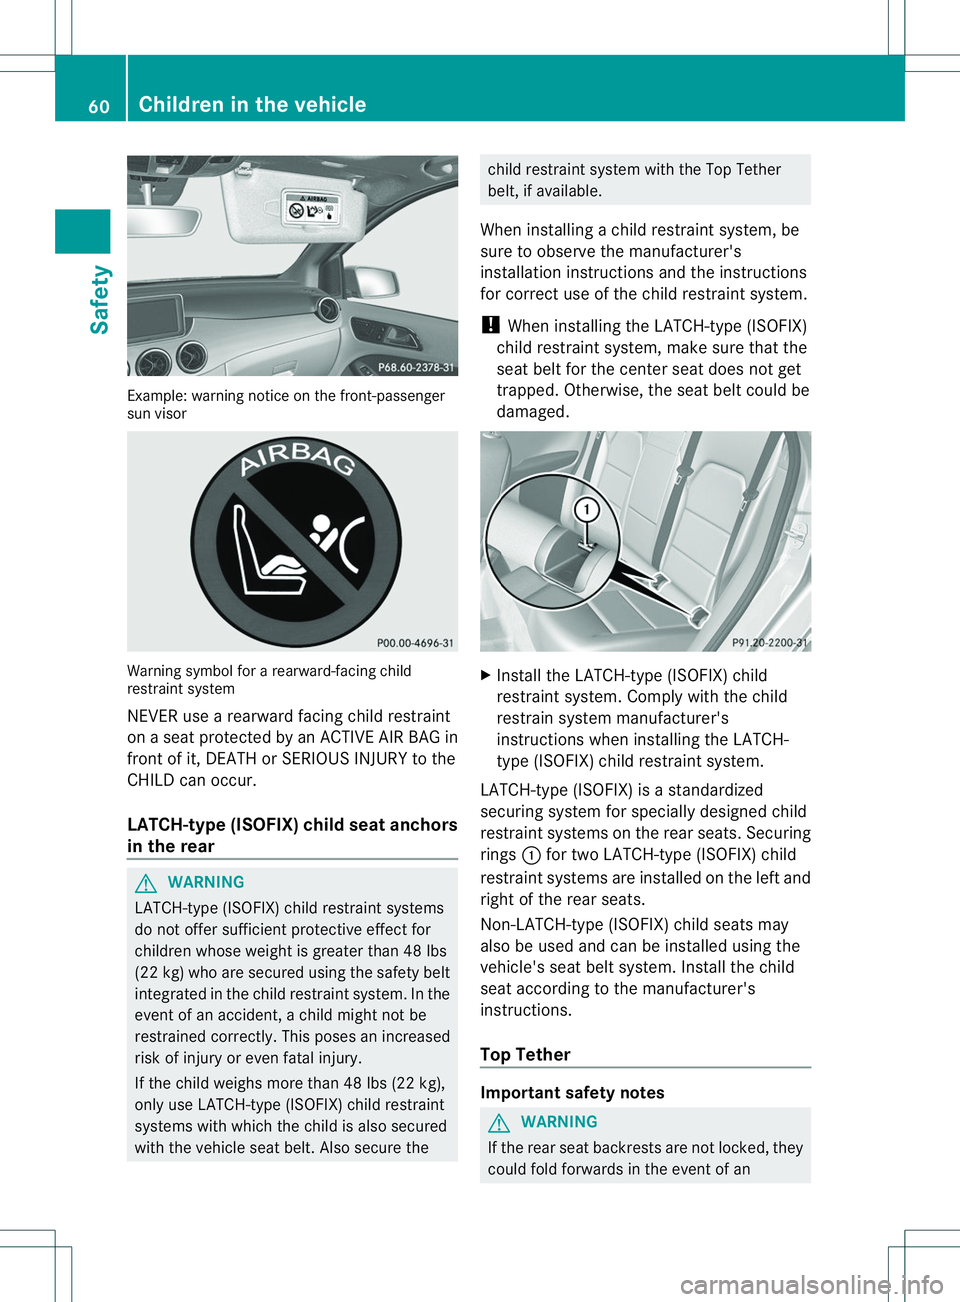
Example: warning notice on the front-passenger
su
nv isor Warning symbol for
arearward-facin gchild
restraint system
NEVER use arearward facin gchild restraint
on aseat protected by an ACTIV EAIR BAG in
front of it, DEATH or SERIOUS INJURYtot he
CHILD can occur.
LATCH-type (ISOFIX) childs eat anchors
in th erear G
WARNING
LATCH-type (ISOFIX) child restraint systems
do not offer sufficient protective effect for
children whose weight is greater than 48 lbs
(22 kg )who are secured usin gthe safety belt
integrated in th echild restraint system. In the
even tofana ccident, achild migh tnot be
restrained correctly. This poses an increased
risk of injury or even fatal injury.
If th echild weighs mor ethan48l bs (22 kg),
onl yuse LATCH-type (ISOFIX) child restraint
systems with whic hthe child is also secured
with th evehicle seat belt .Also secur ethe child restraint system with the Top Tether
belt, if available.
When installing achild restraint system, be
sure to observe the manufacturer's
installation instructions and the instructions
for correc tuse of the child restraint system.
! When installing the LATCH-type (ISOFIX)
child restraint system, make sure that the
seat belt for the center seat does not get
trapped. Otherwise, the seat belt could be
damaged. X
Install the LATCH-type (ISOFIX) child
restraint system. Comply with the child
restrain system manufacturer's
instructions when installing the LATCH-
type (ISOFIX) child restraint system.
LATCH-type (ISOFIX) is astandardized
securing system for specially designed child
restraint systems on the rear seats .Securing
rings 001Afor two LATCH-type (ISOFIX) child
restraint systems are installed on the left and
right of the rear seats.
Non-LATCH-type (ISOFIX) child seats may
also be used and can be installed using the
vehicle's seat belt system. Install the child
seat according to the manufacturer's
instructions.
Top Tether Important safet
ynotes G
WARNING
If the rear seat backrests are not locked, they
could fold forwards in the event of an 60
Children in thev
ehicleSafety
Page 96 of 360
recommended for the size and weight of the
child
.For additional information, see the
"Children in the vehicle" section.
Ac hild's risk of serious or fatal injuries is
significantly increased if the child restraints
are not properly secured in the vehicle and/
or the child is not properly secured in the child
restraint.
! To avoid damage to the seats and the seat
heating, observe the following information:
R keep liquids from spilling on the seats. If
liquidiss pilled on the seats, dry them as
soon as possible.
R if the seat covers are damp or wet, do not
switch on the seat heating. The seat
heating should also not be used to dry
the seats.
R clean the seat covers as recommended;
see the "Interior care" section.
R do not transport heavy loads on the
seats. Do not place sharp objectsont he
seat cushions, e.g. knives, nails or tools.
The seats should only be occupied by
passengers, if possible.
R when the seat heating is in operation, do
not cover the seats with insulating
materials, e.g. blankets, coats, bags,
seat covers, child seats or booster seats.
! Make sure that there are no objectsint he
footwell or behind the seats when resetting
the seats. There is arisk that the seats
and/or the objectsc ould be damaged.
i The head restraintsint he front and rear
seats can be removed. 1
For more information ,contact aqualified
specialist workshop.
i Further related subjects:
R Luggage compartmente nlargement
(folding down the rea rseats)
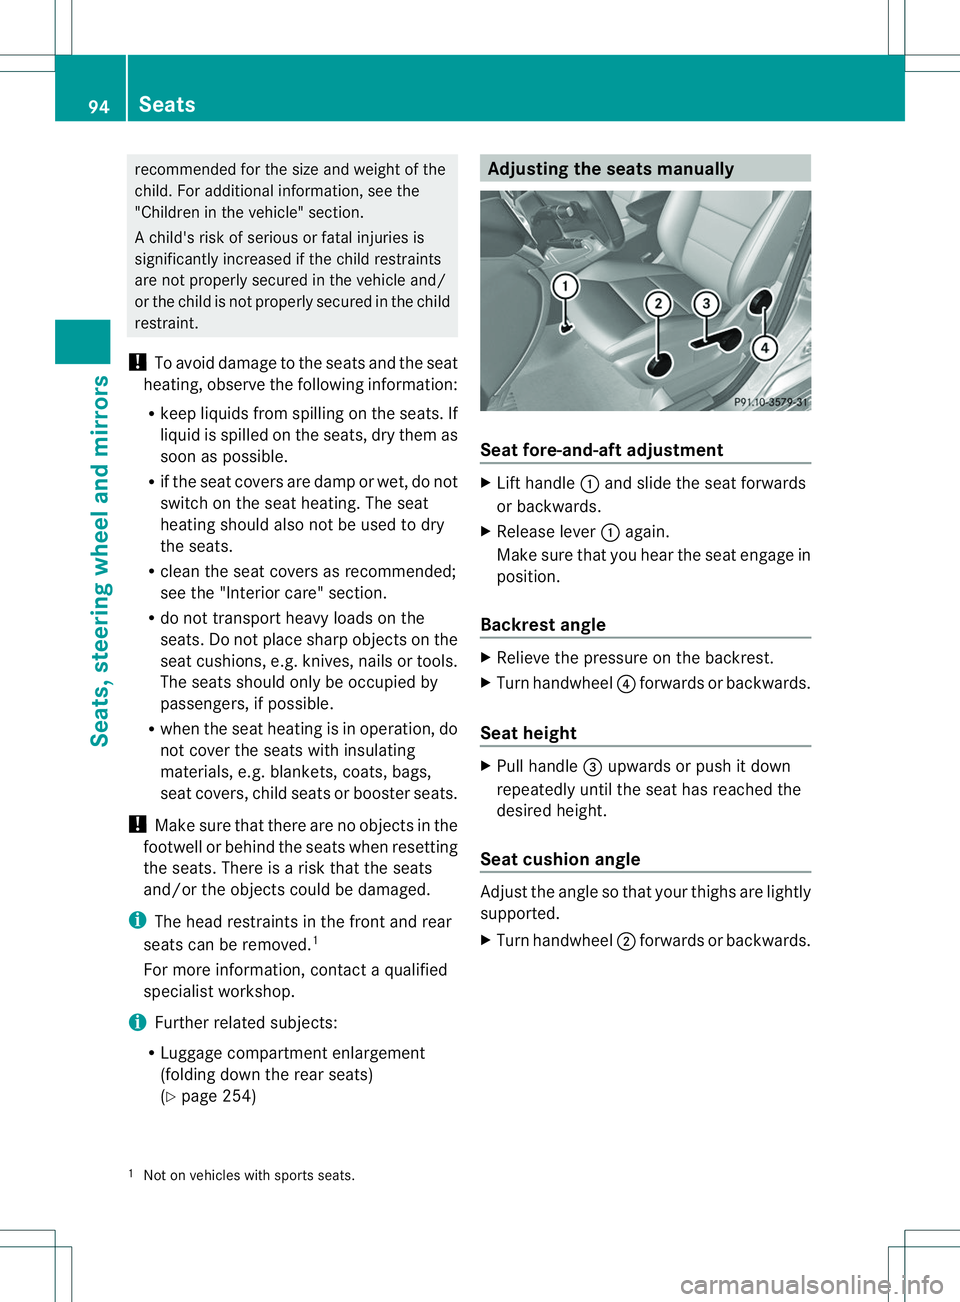
(Y page 254) Adjusting the seats manually
Seat fore-and-aft adjustment
X
Lift handle 001Aand slide the seat forwards
or backwards.
X Release lever 001Aagain.
Make sure that you hear the seat engage in
position.
Backrest angle X
Relieve the pressure on the backrest.
X Turn handwheel 0021forwards or backwards.
Seat height X
Pull handle 0023upwards or push it down
repeatedly until the seat has reached the
desired height.
Seat cushion angle Adjust the angle so that your thighs are lightly
supported.
X
Turn handwheel 0010forwards or backwards.
1 Not on vehicles with sport sseats. 94
SeatsSeats, steering wheel and mirrors
Page 98 of 360
With this function you can adjust the distance
between the head restraint and the back of
the seat occupant's head.
X
To adjust forwards: pull the head restraint
forwards in the direction of the arrow until
it engages.
There are several notches.
X To move backwards: press and hold
release button 001Aand push the head
restraint backwards.
X When the head restraint is in the desired
position ,release the button and make sure
that the head restraint is engaged in
position.
Adjusting the height of the head
restraints electrically X
To adjust the head restraint height: slide
the switch for head restraint adjustment
(Y page 95) up or down in the direction of
the arrow.
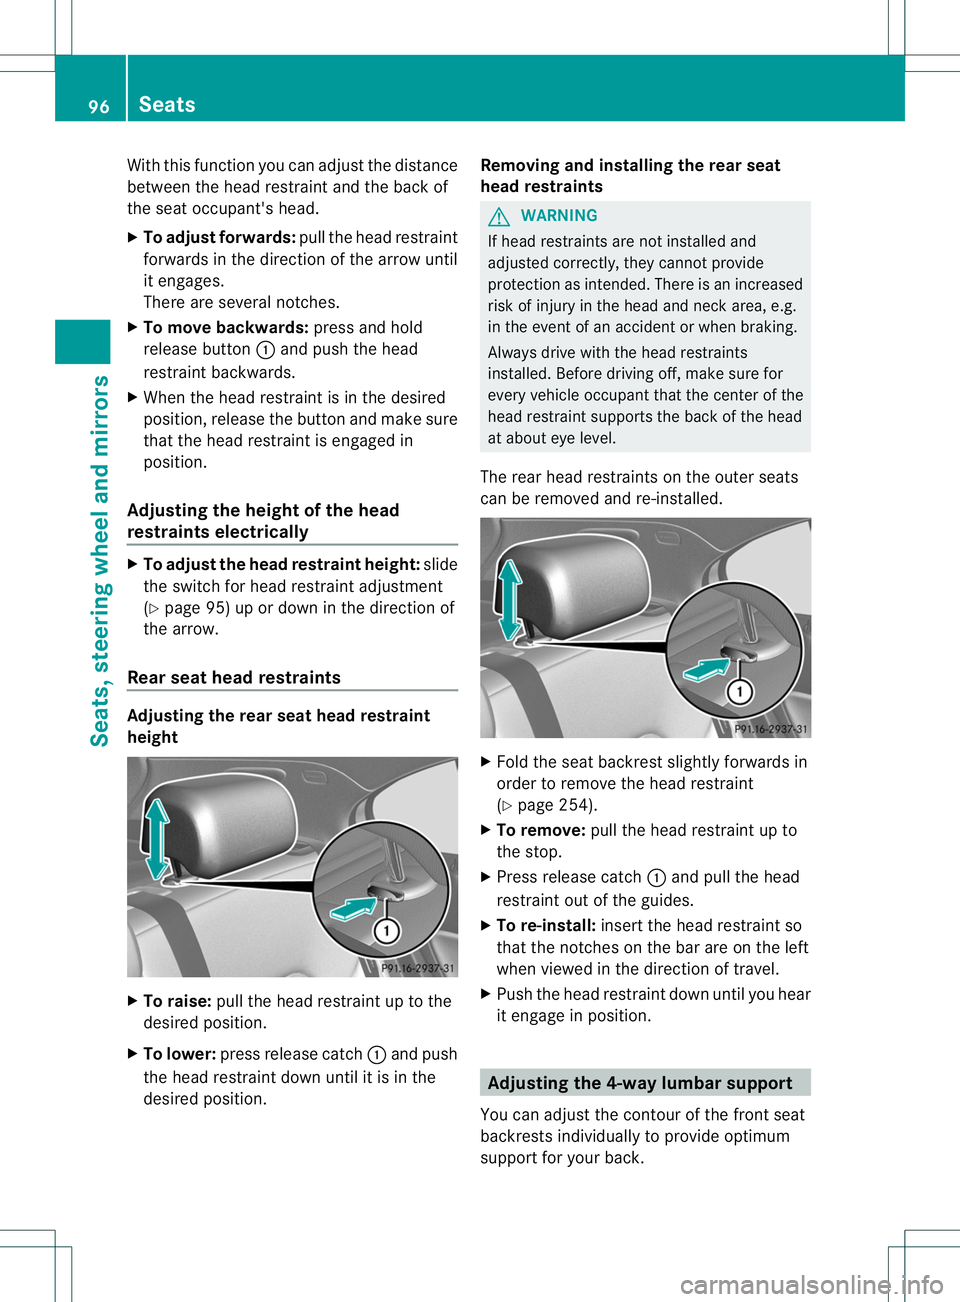
Rear seat head restraints Adjusting the rear seat head restraint
height
X
To raise: pull the head restraint up to the
desired position.
X To lower: press release catch 001Aand push
the head restraint down until it is in the
desired position. Removing and installing the rear seat
head restraints G
WARNING
If head restraints are not installed and
adjusted correctly, they cannot provide
protection as intended. There is an increased
risk of injury in the head and neck area, e.g.
in the event of an accident or when braking.
Always drive with the head restraints
installed. Befor edriving off, make sure for
every vehicle occupant that the center of the
head restraint supports the back of the head
at about eye level.
The rear head restraints on the outer seats
can be removed and re-installed. X
Fold the seat backres tslightly forwards in
order to remove the head restraint
(Y page 254).
X To remove: pull the head restraint up to
the stop.
X Press release catch 001Aand pull the head
restraint out of the guides.
X To re-install: insert the head restraint so
that the notches on the bar are on the left
when viewed in the direction of travel.
X Push the head restraint down until you hear
it engage in position. Adjusting th
e4-way lumbar support
You can adjust the contour of the front seat
backrest sindividually to provide optimum
support for your back. 96
SeatsSeats, steering wheel and mirrors
Page 101 of 360
Mirrors
Rear-view mirror
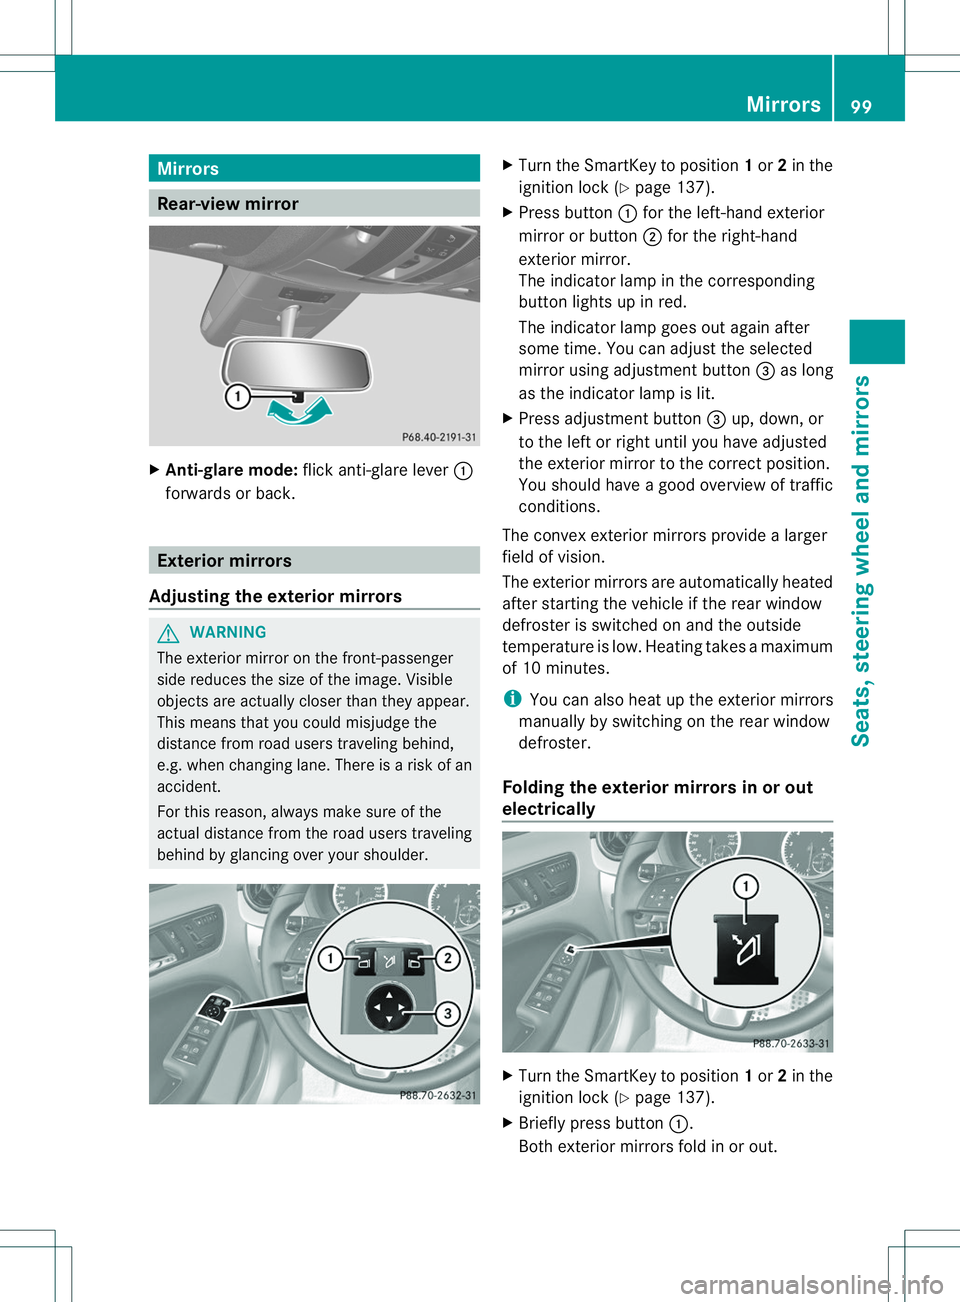
X
Anti-glare mode: flick anti-glare lever 001A
forwards or back. Exterior mirrors
Adjusting the exterior mirrors G
WARNING
The exterior mirror on the front-passenger
side reduces the size of the image. Visible
objects are actually closer than they appear.
This means that you coul dmisjudge the
distance from road users traveling behind,
e.g. when changing lane .There is arisk of an
accident.
For this reason, always make sure of the
actual distance from the road users traveling
behind by glancing over your shoulder. X
Turn the SmartKey to position 1or 2in the
ignition lock (Y page 137).
X Press button 001Afor the left-hand exterior
mirror or button 0010for the right-hand
exterior mirror.
The indicator lamp in the corresponding
button lights up in red.
The indicator lamp goes out again after
some time. You can adjust the selected
mirror using adjustment button 0023as long
as the indicator lamp is lit.
X Press adjustment button 0023up, down, or
to the left or right until you have adjusted
the exterior mirror to the correct position.
You should have agood overview of traffic
conditions.
The convex exterior mirrors provide alarger
field of vision.
The exterior mirrors are automatically heated
after startingt he vehicle if the rear window
defroster is switched on and the outside
temperature is low. Heating takes amaximum
of 10 minutes.
i You can also heat up the exterior mirrors
manually by switching on the rear window
defroster.
Folding the exterior mirrors in or out
electrically X
Turn the SmartKey to position 1or 2in the
ignition lock (Y page 137).
X Briefly press button 001A.
Both exterior mirrors fold in or out. Mirrors
99Seats, steering wheela nd mirrors Z
Page 102 of 360
i
Make sure that the exterior mirrors are
always folded out fully while driving. They
could otherwise vibrate.
i If you are driving faster than 30 mph
(47 km/h), you can no longer fold in the
exterior mirrors.
Setting the exterior mirrors If the battery has been disconnected or
completely discharged, the exterior mirrors
must be reset. The exterior mirrors will
otherwise not fold in when you select the
"Fold in mirrors when locking" function in the
on-board computer (Y page 206).
X Turn the SmartKey to position 1in the
ignition lock (Y page 137).
X Briefly press button 001A.
Folding the exterior mirrors in or out
automatically If the "Fold in mirrors when locking" function
is activated in the on-board computer
(Y page 206):
R the exterior mirrors fold in automatically as
soon as you lock the vehicle from the
outside.
R the exterior mirrors fold out again
automatically as soon as you unlock the
vehicle and then open the driver's or front-
passenger door.
i If the exterior mirrors have been folded in
manually,t hey do not fold out.
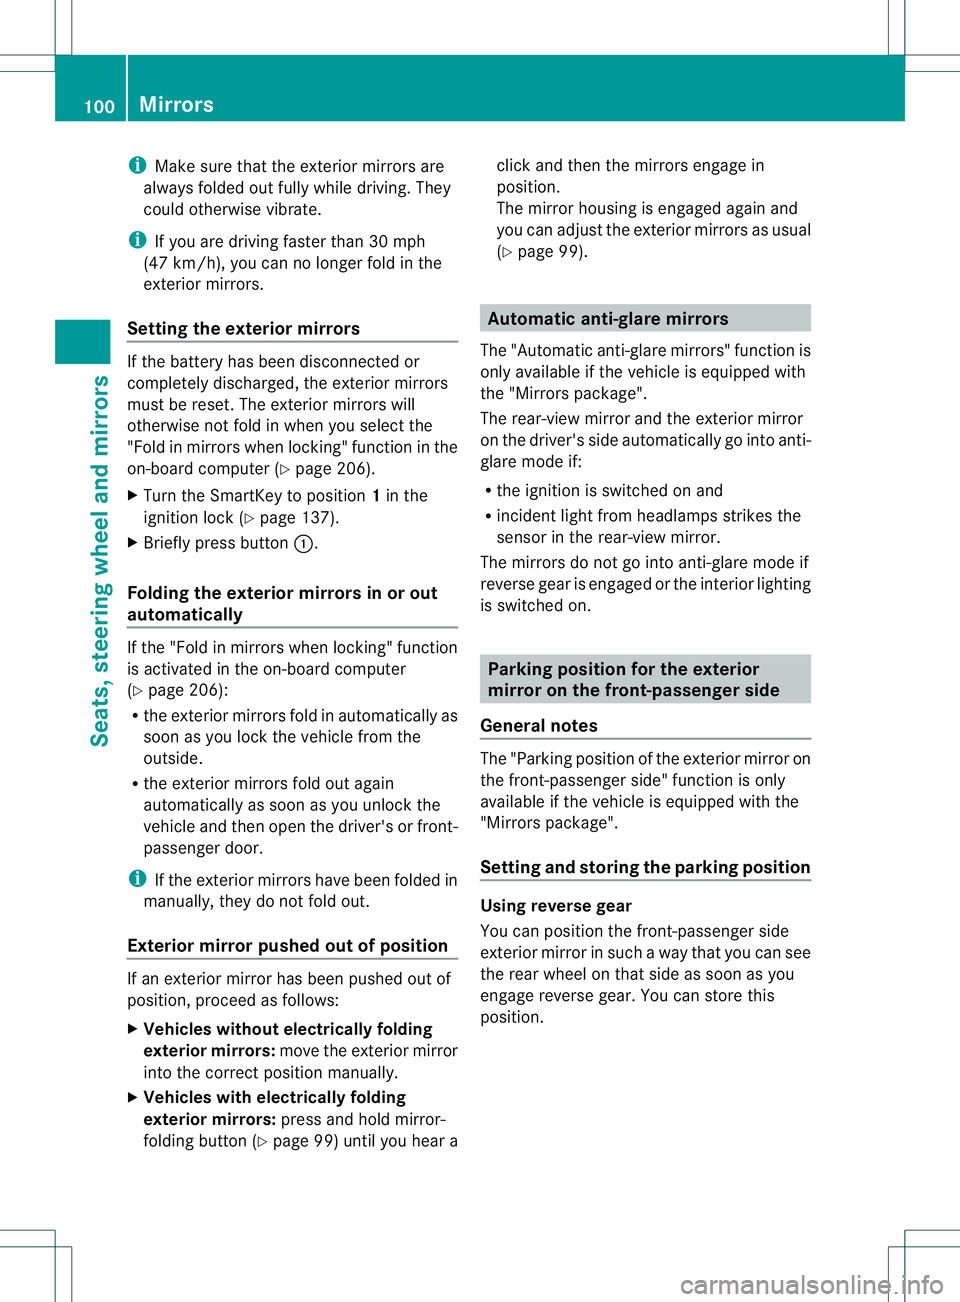
Exterior mirror pushed out of position If an exterior mirror has been pushed out of
position, proceed as follows:
X Vehicles without electrically folding
exterior mirrors: move the exterior mirror
into the correct position manually.
X Vehicles with electrically folding
exterior mirrors: press and hold mirror-
folding button (Y page 99) until you hear a click and then the mirrors engage in
position.
The mirror housing is engaged again and
you can adjust the exterior mirrors as usual
(Y
page 99). Automatic anti-glarem
irrors
The "Automatic anti-glare mirrors" function is
only available if the vehicle is equipped with
the "Mirrors package".
The rear-view mirror and the exterior mirror
on the driver's side automatically go into anti-
glare mode if:
R the ignition is switched on and
R incident light from headlamps strikes the
sensor in the rear-view mirror.
The mirrors do not go into anti-glare mode if
reverse gear is engaged or the interior lighting
is switched on. Parking position for the exterior
mirror on the front-passenger side
General notes The "Parking position of the exterior mirror on
the front-passenger side" function is only
available if the vehicle is equipped with the
"Mirrors package".
Setting and storing the parking position
Using reverse gear
You can position the front-passenger side
exterior mirror in such
away that you can see
the rear wheel on that side as soon as you
engage reverse gear. You can store this
position. 100
MirrorsSeats, steering wheela
nd mirrors