Page 25 of 42
24
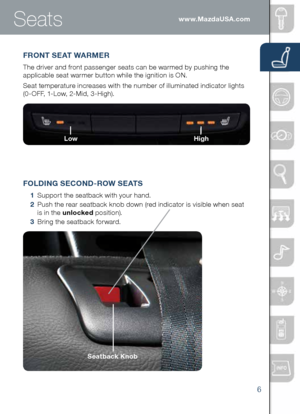
INFO (Type b Instrument Cluster )
Refer to Owners Manual for Type A instrument cluster.
Push INFO button on steering wheel to display the following (actual displayed
information will vary on your vehicle):
Average MPH
Current MPG
Average MPG
Remaining Miles
NOTE: To clear Average MPH or Average MPG, push and hold INFO button when
selected screen is displayed.
INFO
b utton
Information Display
Page 26 of 42
 Manual Climate Control
25
Temperature
Control Dial
R otat e the dial for
temperature control.
NOTE:
When set
to MA X A /C with
dashboard vents or
dashboard and floor
vents, the A /")
Manual Climate Control
25
Temperature
Control Dial
R otat e the dial for
temperature control.
NOTE:
When set
to MA X A /C with
dashboard vents or
dashboard and floor
vents, the A /C will
turn on, and
recirculated air will
be selected for
maximum cooling.
Fan Control Dial
Rotate the dial to set desire d
fan speed (1-4).
Push to recirculate
cabin air to reduce
outside odors and
improve cooling.
Push for fresh
air circulation.
Push to manually turn
air conditioning on or off.
Push to defrost the
rear window.Mode Selector Dial
Rotat e the dial to
select airflow mode.
D ashboard
vents
Dashboard
and floor vents
Floor vents
Defroster and
floor vents
Windshield
defroster
b est Cooling Settings best Heating Settings
Indicator ON (automatically)
NOTE:
•
When selecting either defroster mode ( or ), the air conditioner and
fresh air mode are automatically turned on by the system. This helps defrost
the windows more efficiently by dehumidifying the air. Manually set the fan
control and temperature control dials as desired.
•
In either defroster mode (
or ), air will blow from the side dashboard vents.
To defrost the side windows faster, point the vents toward the side windows.
Page 27 of 42
 Automatic Climate Control
26
Driver Temperature
Control DialAUTO ON: Push dial
to turn Automatic Air
Conditioning system on
(indicator light on). Rotate
dial to select your desired
set temp")
Automatic Climate Control
26
Driver Temperature
Control DialAUTO ON: Push dial
to turn Automatic Air
Conditioning system on
(indicator light on). Rotate
dial to select your desired
set temperature (shown
above). The airflow mode
and the amount of airflow
will be automatically
controlled in accordance
with the set temperature.
Push to defrost
the windshield.
Push to defrost
the rear window.
Push to
manually turn
air conditioning
on or off.Passenger
Temperature
Control Dial
Push to turn DUAL
mode ON/OFF.
• With DUAL mode
ON (indicator on),
rotate the dial to
set passenger
side temperature
separate from
the driver’s side
(shown above).
•
With DUAL mode
OFF (indicator off),
driver controls the
temperature setting
on both sides.
Push to select the
following airflow mode:
NOTE: Automatic climate
control will allow you to
maintain individual preset
cabin temperatures for the
driver and passenger when
DUAL mode is selected.
Push to recirculate
cabin air to reduce
outside odors and
improve cooling.
Push for fresh
air circulation.
Dashboard vents
Dashboard
and floor vents
Floor vents
Defroster and
floor vents
NOTE: Automatic
temperature control
always works even
if the AUTO indicator
turns off by changing
the fan speed or the
airflow mode.
Fan Control Dial
• Rotate the dial to
select the desired
fan speed.
• Push OFF to turn
climate control
system off.
Page 28 of 42
 27
CD SlotAUDIO CONTROLS
Audio Controls (without 5.8” LCD screen)
POWER ON
Push the Volume/Power dial to turn
the audio system on.
M EDIA SELECTION
FM/AM: Push FM/AM button to
select the FM1,")
27
CD SlotAUDIO CONTROLS
Audio Controls (without 5.8” LCD screen)
POWER ON
Push the Volume/Power dial to turn
the audio system on.
M EDIA SELECTION
FM/AM: Push FM/AM button to
select the FM1, FM2, or AM band.
The selected band will be indicated
in the display.
CD: Push CD button to select the
CD player when inserting a CD.
US b/iPod: Push USB/AUX button to
select the USB or iPod player when
connecting USB or iPod.
AUX: Push USB/AUX button to
switch to AUX jack input.
T UNING
The radio has the following
tuning controls:
M anual: Turn the TUNE dial to
manually change the frequency. S
eek: Push the SEEK
tuning buttons to automatically
seek a higher or lower frequency
with a station.
S can: Push the SCAN button
to automatically sample strong
stations for seconds each. Push
again to cancel.
Preset Channel: Push 1/2/3/4/5/6
button to select a station stored in
memory. To store a station, push
and hold 1/2/3/4/5/6 until station
is displayed.
Auto Memory Tuning: Push and
hold the AUTO-M button to store
an additional 6 stations on each FM
and AM band without disturbing the
previously stored stations. To return
to the previously stored stations,
push FM or AM button. Refer to the
Owner’s Manual for complete details.
Page 29 of 42
 28
Eject CD
FOLDER SEARCH
(during MP3/WMA/AAC
CD or USb playback)
• To change to the
previous folder, push the
folder down button
,
or push the folder up
button
to advance to
the")
28
Eject CD
FOLDER SEARCH
(during MP3/WMA/AAC
CD or USb playback)
• To change to the
previous folder, push the
folder down button
,
or push the folder up
button
to advance to
the next folder.
Audio Controls (without 5.8” LCD screen)www.MazdaUSA.com
T E X T: For files with a file name
and other information that have
been input. The display switches
between display of the file name
and other information each time
the text button (TEXT) is pushed
during playback.
L OADING A CD
•
Insert the CD into the slot,
label-side up. The auto
loading mechanism will load
the CD and begin to play it.
i P O D P L AY E R
•
Select CATEGORY: Push
pre-set button 5 (down) or
6 (up) to select Playlist/Artist/
Album/Song/Podcast/Genre/
Composer/Audiobook.
•
Select a desired list: Push
FOLDER Up/Down to select a
desired list from the list menu.
•
Tr a c k U p / D o w n : To change
to the previous track, push
SEEK
or turn the FILE dial
to the left. To change to the
next track, push SEEK
or
turn the FILE dial to the right.
Page 30 of 42
 29
POWER ON
Push the Power/ Volume dial to
turn the audio system on.
M EDIA SELECTION
Push the AUDIO button to select the
appropriate on-screen button:
Radio: Select FM/AM button for FM1,
FM")
29
POWER ON
Push the Power/ Volume dial to
turn the audio system on.
M EDIA SELECTION
Push the AUDIO button to select the
appropriate on-screen button:
Radio: Select FM/AM button for FM1,
FM2, or AM band.
CD: Select for CD player.
b luetooth
®: Select for BT Audio.
Pandora: Select to play Pandora from
Bluetooth device (with Pandora app).
US b: Select to play iPod/iPhone
®
through USB port.
AUX: Select to switch to AUX input.
SIRIUS: Select for SiriusXM Satellite
Radio
®. If your vehicle is equipped
with SiriusXM Satellite Radio® (satellite
radio antenna on roof ), your new
Mazda includes a free introductory
subscription with a limited term trial
offer. Call 888-539-7474 to activate. See
the Owner’s Manual and/or dealer for
details, or contact your dealer about
adding SiriusXM Satellite Radio
®.
See your Owner’s Manual for further
information on:
• Pandora audio application
•
Audio me nu voice-command T
UNING
M anual: Turn the TUNE/FILE dial to
manually change the frequency.
S eek: Push the SEEK
button or
touch and hold the
on-screen button, to automatically seek
a higher or lower frequency or track,
depending on media selected.
NOTE:
If you continue to push and
hold the button, the frequency will
continue changing without stopping.
S can: Touch the SCAN on-screen
button to automatically sample strong
stations for seconds each. Touch again
to cancel.
Auto Memory Tuning:
1 Touch the
Auto Memory on-screen
button. The auto memory preset list
is displayed and the previously tuned
frequency is received.
2 Touch the
Update List on-screen
button to display the frequencies of
up to ten radio stations on the auto
memory preset list.
3 Touch the desired frequency.
Refer to the Owner’s Manual for
complete details.
Preset Channel: Can be used to store
6 AM or 12 FM stations.
Eject CD
Audio Controls (with 5.8” LCD screen)
PLAYING b LUETOOTH® (bT) AUDIO
1 Make sure BT audio device is paired to
your vehicle.
2
Turn on BT audio device.
3
Touch the Bluetooth
® on-screen tab.
4
Select the BT-Audio option.
GRACENOTE
The Gracenote media database is used to improve
voice recognition of artist and album names with the
Mazda Hands Free system. To make best use of the
voice recognition, install the most recent database.
1 Load the Gracenote update on a memory stick
from www.MazdaUSA.com/USB. Insert memory
stick into the USB port.
2 Push the PHONE button.
3
Select Setup and scroll down to Gracenote Update.
Page 31 of 42
 30
Audio Controls (with 5.8” LCD screen)
HD RADIO
HD radio has a special receiver
which allows it to receive digital
broadcasts (where available)
in addition to the analog
broadcasts it alre")
30
Audio Controls (with 5.8” LCD screen)
HD RADIO
HD radio has a special receiver
which allows it to receive digital
broadcasts (where available)
in addition to the analog
broadcasts it already receives.
Digital broadcasts have better
sound quality than analog
broadcasts as digital broadcasts
provide free, crystal clear audio.
When the HD radio button is
ON (illuminated), there could
be a noticeable difference in
sound quality and volume when
a change from digital to analog
signals occurs. If the sound
quality and volume becomes
noticeably diminished or cuts
off, touch the HD button to turn
OFF HD radio (not illuminated).
1 To set a channel, first select AM,
FM1 or FM2.
2 Tune to the desired station.
3 Long-push any of the preset on-
screen buttons. The reception
frequency is programmed and
displayed on the preset button. 4
Repeat this operation for the other
stations and bands you want to
store. When receiving a programmed
frequency, select AM, FM1, or FM2
and touch the preset on-screen button.
The station frequency will be displayed.
AUDIO OPERATION
USING VOICE
Audio operation and media selection
can be done using voice. Push the
“Talk” button, wait for a beep, then say
a command in a clear, natural voice (not
too fast or too slow). A list of available
commands will be displayed on the
screen, and if you do not say anything,
the system will read the commands.
Commands will only work when in the
correct mode (Radio, CD, BT, USB, or
Pandora). To change modes, push the
“Talk” button and say “Change mode.”
Some commands are:
Radio: Seek up/down, Preset #
CD: Play track #
b T: Next/Previous folder
CD, US b, b T: Play, Repeat, Shuffle
CD,US b,b T, Pandora: Pause, Resume
Pandora: Skip song, Thumbs up/down
www.MazdaUSA.com
bLUETOOTH® AUDIO
Bluetooth® enabled phones
and audio players provide
an opportunity to play music
through the audio system with
no wires attached.
Some phone models do not
support all features. Go to
www.MazdaUSA.com/bluetooth
or contact (800) 430-0153 for
further assistance or to report a
phone /MP3 device concern.
I NSERTING THE CD
Insert CD, label-side up.
Page 32 of 42
 31
Audio
NOTE: You will need an audio cable with an 1/8 inch (3.5 mm) mini stereo plug
(available as a Genuine Mazda accessory) to connect your portable audio player
into the AUX jack.
Refer to t")
31
Audio
NOTE: You will need an audio cable with an 1/8 inch (3.5 mm) mini stereo plug
(available as a Genuine Mazda accessory) to connect your portable audio player
into the AUX jack.
Refer to the Owner’s Manual for additional information.
1 Locate the AUX jack inside the center console.
2
Plug 1/8 inch mini stereo plug into the portable
audio player and into the AUX jack. Turn portable
audio player on.
3 Turn the vehicle audio system on.
4 •
Audio Controls (without 5.8” LCD screen): Push the USB/AUX
button on the audio unit to switch to the AUX mode.
•
Audio Controls (with 5.8” LCD screen): Push AUDIO button on
audio system, then touch AUX on-screen button.
5 Use the portable audio player controls to play music.
I M P O R TA N T:
Set the volume level on your portable audio player to the highest
level before distortion starts, then use the vehicle’s audio system to adjust
the volume.
PORTA bLE AUDIO PLAYER INTEGRATION USING THE AUX JACK
Your vehicle is equipped with an AUX or auxiliary jack that will allow you to
play your portable audio player through the vehicle’s audio system. Learn
the system when parked and do not let it distract you while driving.
AUX Jack


 24
INFO (Type b Instrument Cluster )
Refer to Owners Manual for Type A instrument cluster.
Push INFO button on steering wheel to display the following (actual displayed
information will vary on yo")