Page 17 of 42
 16
www.MazdaUSA.com
FORWARD O BST RUC TION WAR NING (FOW)
Forward Obstruction Warning (FOW) is a system which
alerts the driver of a possible collision using an indicator
and warning sound in the i")
16
www.MazdaUSA.com
FORWARD O BST RUC TION WAR NING (FOW)
Forward Obstruction Warning (FOW) is a system which
alerts the driver of a possible collision using an indicator
and warning sound in the instrument cluster while the
vehicle is being driven at about 10 mph or faster (15 km/h
or faster) and the system’s radar sensor determines that
your vehicle may hit a vehicle or obstruction ahead.
HOW TO SET THE SPEE D
1 Adjust the vehicle speed to the desired setting using the
acce lerator pedal.
2 Hea dway control begins when the SET + or SET – switch is pushed.
The set speed and the inter-vehicle distance display flled with white
lines is displayed. The Mazda Radar Cruise Control (MRCC) indicator
light (green) is indicated simultaneously.
Travel StatusDuring travel at
constant speed During travel under
headway control
Display
50 mph50 mph
HOW TO SET THE DIST ANCE BETW EEN VE HICLES
The distance between vehicles is set to a shorter distance each time the\
switch is pushed. The distance between vehicles is set to a longer dista\
nce
by pushing the
switch. The distance-between-vehicles can be set to 4
levels; Long, medium, short, and extremely short distance.
Distance between
vehicles guideline
(at 50mph
(80km/h)Long (a\bout
164ft (50m)) Medium (a\bout
131ft (40m)) Short (a\bout
98ft (30m)) Extremely
short (a\bout 82ft (25m))
Display
50 mph50 mph50 mph50 mph
CAUTION: Do not rely completely on the MRCC system and always
drive carefully. Mazda does not encourage driving over the posted
speed limit.
Page 18 of 42
 17
LDWS
LANE DE PA RTU R E WARNING SYSTE M (LDWS) (if equipped)
The Lane Departure Warning System (LDWS) recognizes painted lane
lines on a road using the forward sensing camera (FSC) installed t")
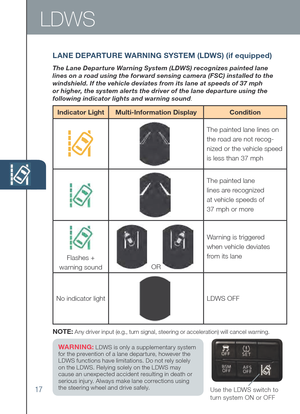
17
LDWS
LANE DE PA RTU R E WARNING SYSTE M (LDWS) (if equipped)
The Lane Departure Warning System (LDWS) recognizes painted lane
lines on a road using the forward sensing camera (FSC) installed to the
windshield. If the vehicle deviates from its lane at speeds of 37 mph
or higher, the system alerts the driver of the lane departure using the
following indicator lights and warning sound .
Use the LDWS switch to
turn system ON or OFF
NOTE: Any driver input (e.g., turn signal, steering or acceleration) will cancel warning.
Indicator Light Multi-Information Display Condition
The painted lane lines on
the road are not recog-
nized or the vehicle speed
is less than 37 mph
The painted lane
lines are recognized
at vehicle speeds of
37 mph or more
Flashes +
warning sound
OR
Warning is triggered
when vehicle deviates
from its lane
No indicator light
LDWS OFF
WARNING: LDWS is only a supplementary system
for the prevention of a lane departure, however the
LDWS functions have limitations. Do not rely solely
on the LDWS. Relying solely on the LDWS may
cause an unexpected accident resulting in death or
serious injury. Always make lane corrections using
the steering wheel and drive safely.
Page 19 of 42
 18
Tireswww.MazdaUSA.com
TIRE PRESSURE MONI TORING SYSTE M (TP MS)
Your vehicle is equipped with a Tire Pressure Monitoring System (TPMS)
that detects low tire pressure in one or more tires. In th")
18
Tireswww.MazdaUSA.com
TIRE PRESSURE MONI TORING SYSTE M (TP MS)
Your vehicle is equipped with a Tire Pressure Monitoring System (TPMS)
that detects low tire pressure in one or more tires. In the following cases,
the TPMS must be “initialized” so the system can operate normally.
• The tire pressure is adjusted (up or down) in one or more tires.
• A tire ro tation is pe rformed.
• Any ti re or wh eel is re placed.
•
The ve hicle’s ba tter y is di sconnected, re placed or co mpletely de ad.
Initialization Process (TPMS Warning Light is Illuminated):
1 Park the vehicle in a safe place and frmly apply the parking brake.
2 Let t he tires cool, then adjust the tire pressure to the specifed
pressure (S ee ti re la bel lo cated on th e dr i ve r’s si de B- pillar or ed ge
of dr iver’s door frame for specifcation) on all four (4) tires.
3 Swi tch the ignition ON, but leave the vehicle parked.
4 Pus h and hold the TPMS “Set Switch” (left side of dash)
until the TPMS warning light
in the
instrument cluster fashes twice and a
beep sound is heard once.
PERSONALI ZE YOU R MAZD A6
WI TH G ENUINE MAZD A A CCES SORIES
Go to www.MyMazda.com, then select “Accessories” below the MyMazda
Home header for a complete listing of available accessories for your Maz\
da6.
NOTE: See Page 7 for TPMS switch location.
CAUTION: If the TPMS “Set Switch” is pushed without adjusting the tire
pressure, the system cannot detect the normal tire pressure. The TPMS
warning light may not illuminate, even if the tire pressure is low, or it may
illuminate if the tire pressure is normal.
Page 20 of 42
 19
Transmission
MANUAL SHIFT MODE (if eq uipped)
The Manual Shift Mode gives you the feel of driving a manual transmission
by allowing you to manually shift to control engine rpm and torque when
mor")
19
Transmission
MANUAL SHIFT MODE (if eq uipped)
The Manual Shift Mode gives you the feel of driving a manual transmission
by allowing you to manually shift to control engine rpm and torque when
more control is desired.
To Use Steering Shift Switches:
• Shift the lever from D or M.
To Shift Up To A
Higher Gear:
• Pull the steering
UP switch (+) once.
To Shift D own To A
Lower Gear:
• Pull the steering
DOWN switch (-) once.
- D OWN Shift
Switch+ UP Shift Switch
NOTE: Steering Shift Switches
can be used in “D” or “M”.
ACTIVE A DAPTI VE SHIFT (A AS) CONTROL
A AS will automatically adjust how and when the transmission shifts gears
based on road conditions and your driving style.
The transmission may stay in a lower gear longer than usual when going up or
down hills or driving around corners. This feature gives you better control and
a more connected driving experience.
(if equipped)
SPORT MOD E (if equipped)
SPORT mode allows greater response and
control when driving on mountain roads
as well as on freeways by adjusting the
transmission shift schedule.
Fuel consumption increases slightly because
higher engine speeds (i.e., lower gear position) are used in
Sports mode compared to normal mode. Use Sports mode
and normal mode depending on the road conditions and
situation. The SPORT mode indicator light in the instrument
cluster is illuminated while in SPORT mode and is not illuminated
while in normal mode.
Page 21 of 42
 20
www.MazdaUSA.com
ACCELERATOR PEDAL K ICKDOW N SWITCH*
The accelerator pedal is equipped with a
kickdown switch to give the driver more
control and to improve fuel economy.
When you depress the a")
20
www.MazdaUSA.com
ACCELERATOR PEDAL K ICKDOW N SWITCH*
The accelerator pedal is equipped with a
kickdown switch to give the driver more
control and to improve fuel economy.
When you depress the accelerator 95% of the
way, you will feel an increase in resistance.
Push harder, and you will feel a click as you
activate the kickdown switch. The transmission
will usually downshift (depending on engine
speed) and the engine will switch to maximum
power mode. This kickdown switch function is
the same in both Manual mode and in “D”.
*Available on vehicles with automatic transmission only.
NOTE: The HL A system will hold the vehicle for a maximum of 2.0 seconds
while the driver is changing from the brake pedal to the accelerator pedal.
H ILL LAUNCH ASSI ST (H LA)
HL A helps assist you when
accelerating the vehicle from
a stop while on a hill or slope.
When the brake pedal is released
and the accelerator pedal is pushed, HLA prevents the vehicle from rolling
forward or backward. It operates on a downward slope when the shift lever
is in the reverse (R) position, and on an upward slope when the shift lever is
in a position other than the reverse (R) position.
Page 22 of 42
21
HomeLink®
Refer to your Owner’s Manual for programming details.NOTE:
Genuine Mazda Accessory Auto-Dimming Mirror with Compass and
Homelink is available at your Authorized Mazda Dealer.
A UTO -DIMMING MIRROR AN D H OME LINK® (if equipped)
Auto- Dimming
In dicator LightAuto- Dimming
On
Hom
eLinkRear
Light
SensorAuto- Dimming
Off
Mirrors
R EAR VIEW MONI TOR (if eq uipped)
Placing the gearshift lever into Reverse automatically operates the Rear
View Parking Camera and is viewable via the 5.8” LCD screen.
Rear View Parking Camera
Rear View Monitor
NOTE: When using the Rear View Parking Camera, please check your
surroundings as objects may be closer than they appear.
Page 23 of 42
22
Commander Switch
1 Tilt and/or turn the commander
kn ob to move the cursor to the
desired on-screen location.2 Push the commander ENTER
bu tton to select your choice on
the screen.
COMMAN DER SWI TCH (if equipped)
Select a button around the commander knob to operate the desired system.
SELECTIN G SCREEN BUTT ON
AUDIO:
Audio screen
is displayed.
NAV:
Navigation
screen is
displayed. PHONE:
Bluetooth®
dial screen
is displayed.
SETUP:
Setup setting
screen is
displayed.
: Same operations such as on-screen button.
ENTER
UTTON
ENTER
CAUTION: Damage to the Commander Switch may occur if heavy objects are
placed on top of it.
Page 24 of 42
 23
i-ELOOP
i-ELOOP (if eq uipped)
The Mazda-unique regenerative braking system (i-ELOOP) generates and
stores electrical energy in a capacitor during deceleration. Through ef�cient
energy regenerat")
23
i-ELOOP
i-ELOOP (if eq uipped)
The Mazda-unique regenerative braking system (i-ELOOP) generates and
stores electrical energy in a capacitor during deceleration. Through ef�cient
energy regeneration, storage, and usage, fuel economy is improved.
i-ELOOP Pre-Charge Mode
If the capacitor is discharged because of vehicle storage (the vehicle \
is parked
for long periods of time), the Multi-Information Display will display t\
he following
i-ELOOP warning message after engine startup:
Multi-Information
Display
Regenerative
braking power
Capacitor power
storage
Capacitor
charge Capacitor
discharge
In Pre-charge mode Driving in Pre-charge mode
i-ELOOP
warning alarm sound
When the warning message is displayed, do not drive the vehicle. Allow the
engine to idle until the warning message is no longer displayed. This time is
needed for normal generator operation.
NOTE:
• If the vehicle is jump started, leave the jumper cables connected
until the warning message is no longer displayed.
•
If the vehicle is driven while the warning is displayed, a warning
sound will be heard and power steering assist will be limited.


 21
HomeLink®
Refer to your Owner’s Manual for programming details.NOTE:
Genuine Mazda Accessory Auto-Dimming Mirror with Compass and
Homelink is available at your Authorized Mazda Dealer.
A UTO -")
 22
Commander Switch
1 Tilt and/or turn the commander
kn ob to move the cursor to the
desired on-screen location.2 Push the commander ENTER
bu tton to select your choice on
the screen.
COMMAN")