Page 265 of 445

2. Press the locking buttons together.
3. Rotate and remove the wiper blade.
4. Install in the reverse order.
Note:
Make sure that the wiper blade
locks into place. Lower the wiper arm and
blade back to the windshield. The wiper
arms will automatically return to their
normal position when the ignition is turned
on.
Replace wiper blades at least once per
year for optimum performance.
Poor wiper quality can be improved by
cleaning the wiper blades and the
windshield.
ADJUSTING THE HEADLAMPS
Vertical Aim Adjustment
The headlamps on your vehicle are
properly aimed at the assembly plant. If
your vehicle has been in an accident, the
alignment of your headlamps should be
checked by your authorized dealer. Headlamp Aiming Target 8 feet (2.4 meters)
A
Center height of lamp to ground
B
25 feet (7.6 meters)
C
Horizontal reference line
D
Vertical Aim Adjustment Procedure
1. Park the vehicle directly in front of a wall or screen on a level surface,
approximately 25 feet (7.6 meters)
away.
2. Measure the height of the headlamp bulb center from the ground and mark
an 8 foot (2.4 meter) horizontal
reference line on the vertical wall or
screen at this height.
Note: To see a clearer light pattern for
adjusting, you may want to block the light
from one headlamp while adjusting the
other.
3. Turn on the low beam headlamps to illuminate the wall or screen and open
the hood.
263
MKZ (CC9) MaintenanceE142592
Page 266 of 445

4.
On the wall or screen you will observe
a flat zone of high intensity light
located at the top of the right hand
portion of the beam pattern. If the top
edge of the high intensity light zone is
not at the horizontal reference line, the
headlamp will need to be adjusted. 5. Locate the vertical adjuster on each
headlamp. Using a Phillips #2
screwdriver, turn the adjuster either
clockwise or counterclockwise in order
to adjust the vertical aim of the
headlamp. The horizontal edge of the
brighter light should touch the
horizontal reference line.
6. Close the hood and turn off the lamps. Horizontal Aim Adjustment
Horizontal aim is not required for this
vehicle and is not adjustable.
CHANGING A BULB
Lamp Assembly Condensation
Exterior lamps are vented to accommodate
normal changes in pressure. Condensation
can be a natural by-product of this design.
When moist air enters the lamp assembly
through the vents, there is a possibility that
condensation can occur when the
temperature is cold. When normal
condensation occurs, a thin film of mist
can form on the interior of the lens. The
thin mist eventually clears and exits
through the vents during normal operation.
Clearing time may take as long as 48
hours under dry weather conditions.
Examples of acceptable condensation are:
•
Presence of thin mist (no streaks, drip
marks or droplets).
• Fine mist covers less than 50% of the
lens.
Examples of unacceptable moisture
(usually caused by a lamp water leak) are:
• Water puddle inside the lamp.
• Large water droplets, drip marks or
streaks present on the interior of the
lens.
Take your vehicle to a dealer for service
if any of the above conditions of
unacceptable moisture are present.
264
MKZ (CC9) MaintenanceE142465 E150095
Page 267 of 445
Replacing Bulbs
For replacing bulbs, see your authorized
dealer.
BULB SPECIFICATION CHART
Replacement bulbs are specified in the
chart below. Headlamp bulbs must be
marked with an authorized “D.O.T.
” for
North America to make sure they have the
proper lamp performance, light brightness,
light pattern, and safe visibility. The correct
bulbs will not damage the lamp assembly
or void the lamp assembly warranty and
will provide quality bulb illumination time. Trade name
Function
LED
Headlamp high beam
LED
Headlamp low beam
LED
Side marker lamp - front
LED
Park lamp - front
LED
Turn lamp - front
LED
Tail and brake lamp - high series
LED
Tail and brake lamp - low series
LED
Reverse lamp
LED
Turn lamp - rear - high series
LED
Turn lamp - rear - low series
LED
Side marker lamp - rear
LED
License plate lamp
LED
Trunk lamp
LED
High-mount brake lamp
LED
Side repeater lamp
265
MKZ (CC9) Maintenance
Page 268 of 445
Trade name
Function
LED
Glove compartment lamp
LED
Interior lamp
To replace any bulb, see your authorized dealer.
266
MKZ (CC9) Maintenance
Page 269 of 445
CHANGING THE ENGINE AIR
FILTER
WARNING
To reduce the risk of vehicle damage
and/or personal burn injuries do not
start your engine with the air cleaner
removed and do not remove it while the
engine is running. When changing the air filter element, use
only the air filter element listed. See
Capacities and Specifications (page 302).
Change the air filter element at the proper
interval.
See Scheduled Maintenance
(page 412).
Note: Failure to use the correct air filter
element may result in severe engine
damage. The customer warranty may be
void for any damage to the engine if the
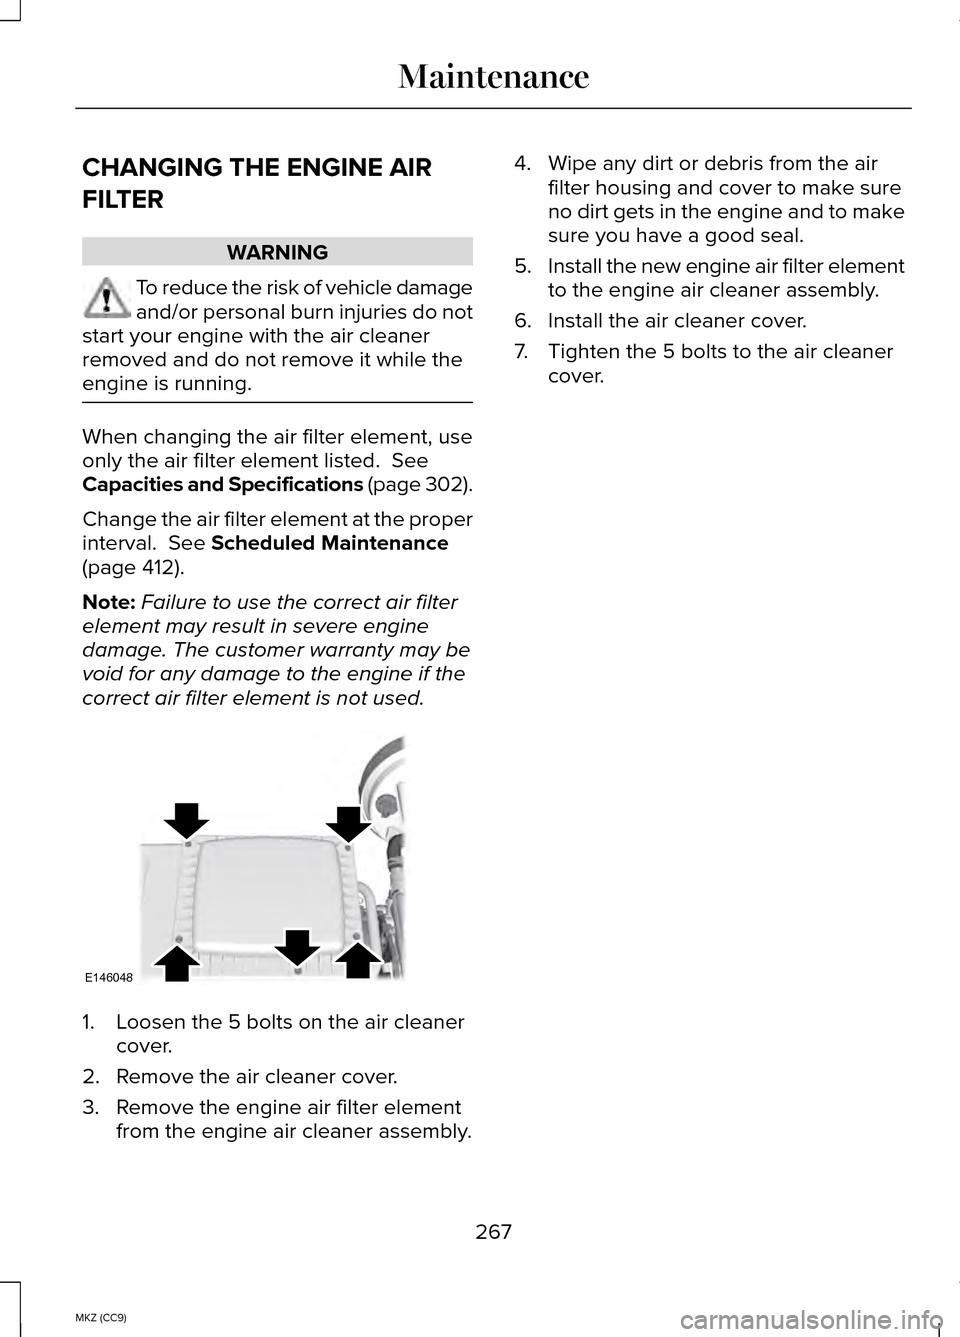
correct air filter element is not used. 1. Loosen the 5 bolts on the air cleaner
cover.
2. Remove the air cleaner cover.
3. Remove the engine air filter element from the engine air cleaner assembly. 4. Wipe any dirt or debris from the air
filter housing and cover to make sure
no dirt gets in the engine and to make
sure you have a good seal.
5. Install the new engine air filter element
to the engine air cleaner assembly.
6. Install the air cleaner cover.
7. Tighten the 5 bolts to the air cleaner cover.
267
MKZ (CC9) MaintenanceE146048
Page 275 of 445
Note:
If you intend parking your vehicle
for an extended period after cleaning the
wheels with a wheel cleaner, drive your
vehicle for a few minutes before doing so.
This will reduce the risk of increased
corrosion of the brake discs.
Alloy wheels and wheel covers are coated
with a clear coat paint finish. To maintain
their condition we recommend that you:
• Clean the wheels weekly using
Motorcraft Wheel and Tire Cleaner.
Apply using manufacturer's
instructions.
• Use a sponge to remove heavy
deposits of dirt and brake dust
accumulation.
• Rinse thoroughly with a strong stream
of water when you have completed the
cleaning process.
• To remove tar and grease, use
Motorcraft Bug and Tar Remover.
VEHICLE STORAGE
If you plan on storing your vehicle for an
extended period of time (30 days or more),
read the following maintenance
recommendations to make sure your
vehicle stays in good operating condition.
All motor vehicles and their components
were engineered and tested for reliable,
regular driving. Long term storage under
various conditions may lead to component
degradation or failure unless specific
precautions are taken to preserve the
components. General
•
Store all vehicles in a dry, ventilated
place.
• Protect from sunlight, if possible.
• If vehicles are stored outside, they
require regular maintenance to protect
against rust and damage.
Body
• Wash your vehicle thoroughly to
remove dirt, grease, oil, tar or mud
from exterior surfaces, rear-wheel
housing and underside of front
fenders.
• Periodically wash your vehicle stored
in exposed locations.
• Touch-up exposed or primed metal to
prevent rust.
• Cover chrome and stainless steel parts
with a thick coat of auto wax to prevent
discoloration. Re-wax as necessary
when your vehicle is washed.
• Lubricate all hood, door and trunk lid
hinges, and latches with a light grade
oil.
• Cover interior trim to prevent fading.
• Keep all rubber parts free from oil and
solvents.
273
MKZ (CC9) Vehicle Care
Page 293 of 445
Note:
Some spare tires operate at a
higher inflation pressure than the
other tires. For T type mini-spare tires
(refer to the Dissimilar spare wheel
and tire assembly information for a
description): Store and maintain at 60
psi (4.15 bar). For full-size and
dissimilar spare tires (refer to the
Dissimilar spare wheel and tire
assembly information for a
description): Store and maintain at the
higher of the front and rear inflation
pressure as shown on the Tire Label.
6. Visually inspect the tires to make
sure there are no nails or other
objects embedded that could poke
a hole in the tire and cause an air
leak.
7. Check the sidewalls to make sure there are no gouges, cuts or
bulges.
Inspecting Your Tires and Wheel
Valve Stems
Periodically inspect the tire treads for
uneven or excessive wear and remove
objects such as stones, nails or glass
that may be wedged in the tread
grooves. Check the tire and valve
stems for holes, cracks, or cuts that
may permit air leakage and repair or
replace the tire and replace the valve
stem. Inspect the tire sidewalls for
cracking, cuts, bruises and other signs
of damage or excessive wear. If
internal damage to the tire is
suspected, have the tire demounted and inspected in case it needs to be
repaired or replaced. For your safety,
tires that are damaged or show signs
of excessive wear should not be used
because they are more likely to blow
out or fail.
Improper or inadequate vehicle
maintenance can cause tires to wear
abnormally. Inspect all your tires,
including the spare, frequently, and
replace them if one or more of the
following conditions exist:
Tire Wear
When the tread is worn down to one
sixteenth of an inch (2 mm), tires must
be replaced to help prevent your
vehicle from skidding and
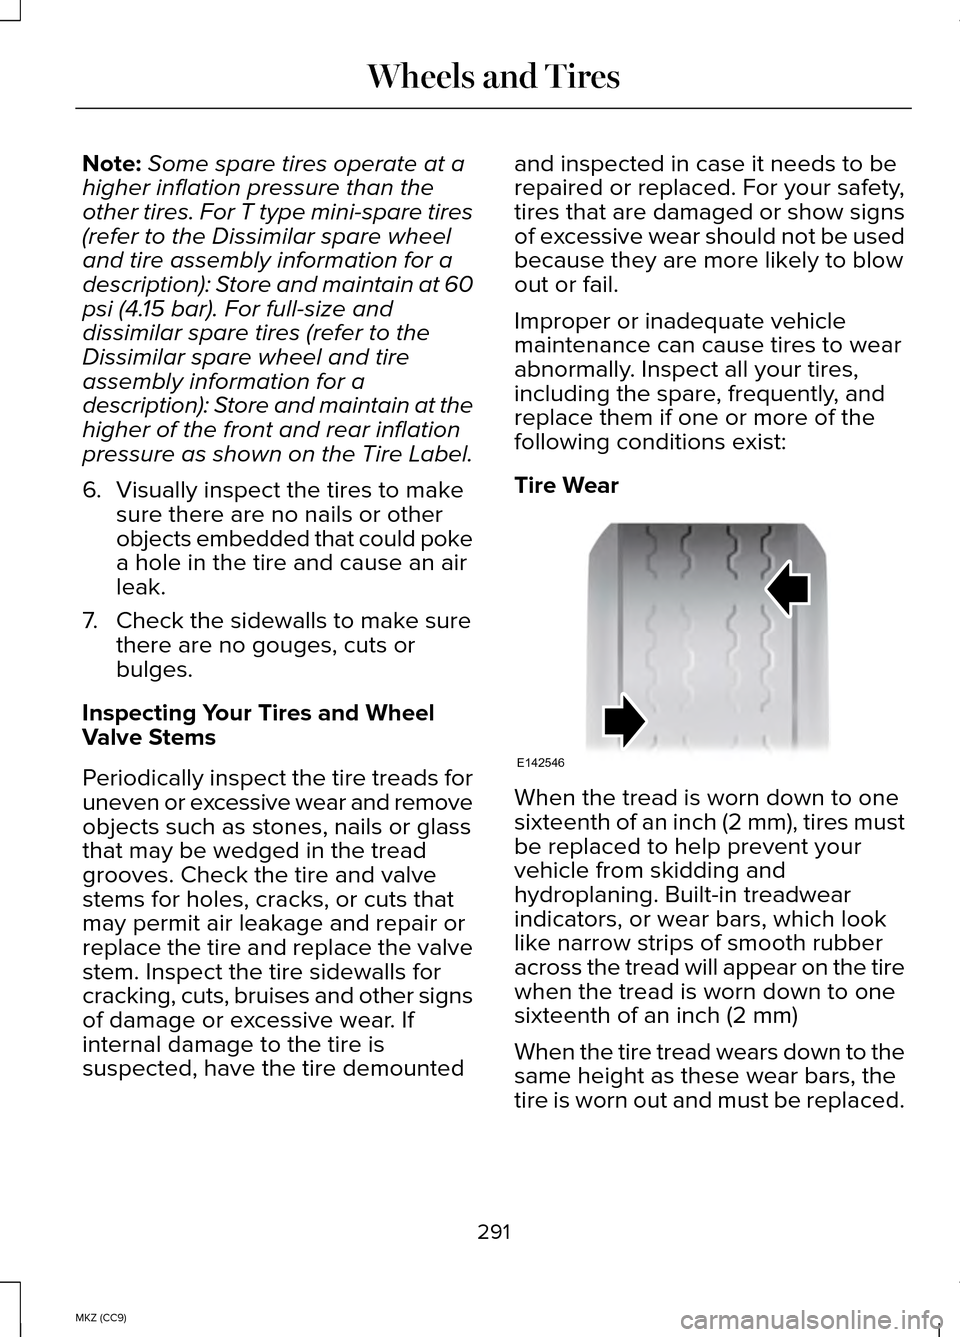
hydroplaning. Built-in treadwear
indicators, or wear bars, which look
like narrow strips of smooth rubber
across the tread will appear on the tire
when the tread is worn down to one
sixteenth of an inch (2 mm)
When the tire tread wears down to the
same height as these wear bars, the
tire is worn out and must be replaced.
291
MKZ (CC9) Wheels and TiresE142546
Page 297 of 445
Wheel misalignment in the front or the
rear can cause uneven and rapid
treadwear of your tires and should be
corrected by an authorized dealer.
Front-wheel drive vehicles and those
with an optional independent rear
suspension may require alignment of
all four wheels.
You should balance the tires
periodically. An unbalanced tire and
wheel assembly may result in irregular
tire wear.
Tire Rotation
Note:
If your tires show uneven wear
ask an authorized dealer to check for
and correct any wheel misalignment,
tire imbalance or mechanical problem
involved before tire rotation.
Note: Your vehicle may be equipped
with a dissimilar spare wheel and tire
assembly. A dissimilar spare wheel
and tire assembly is defined as a
spare wheel and tire assembly that is
different in brand, size or appearance
from the road tires and wheels. If you
have a dissimilar spare wheel and tire
assembly it is intended for temporary
use only and should not be used in a
tire rotation.
Note: After having your tires rotated,
inflation pressure must be checked
and adjusted to the vehicle
requirements. Rotating your tires at the
recommended interval (as indicated
in the Scheduled Maintenance
chapter) will help your tires wear more
evenly, providing better tire
performance and longer tire life.
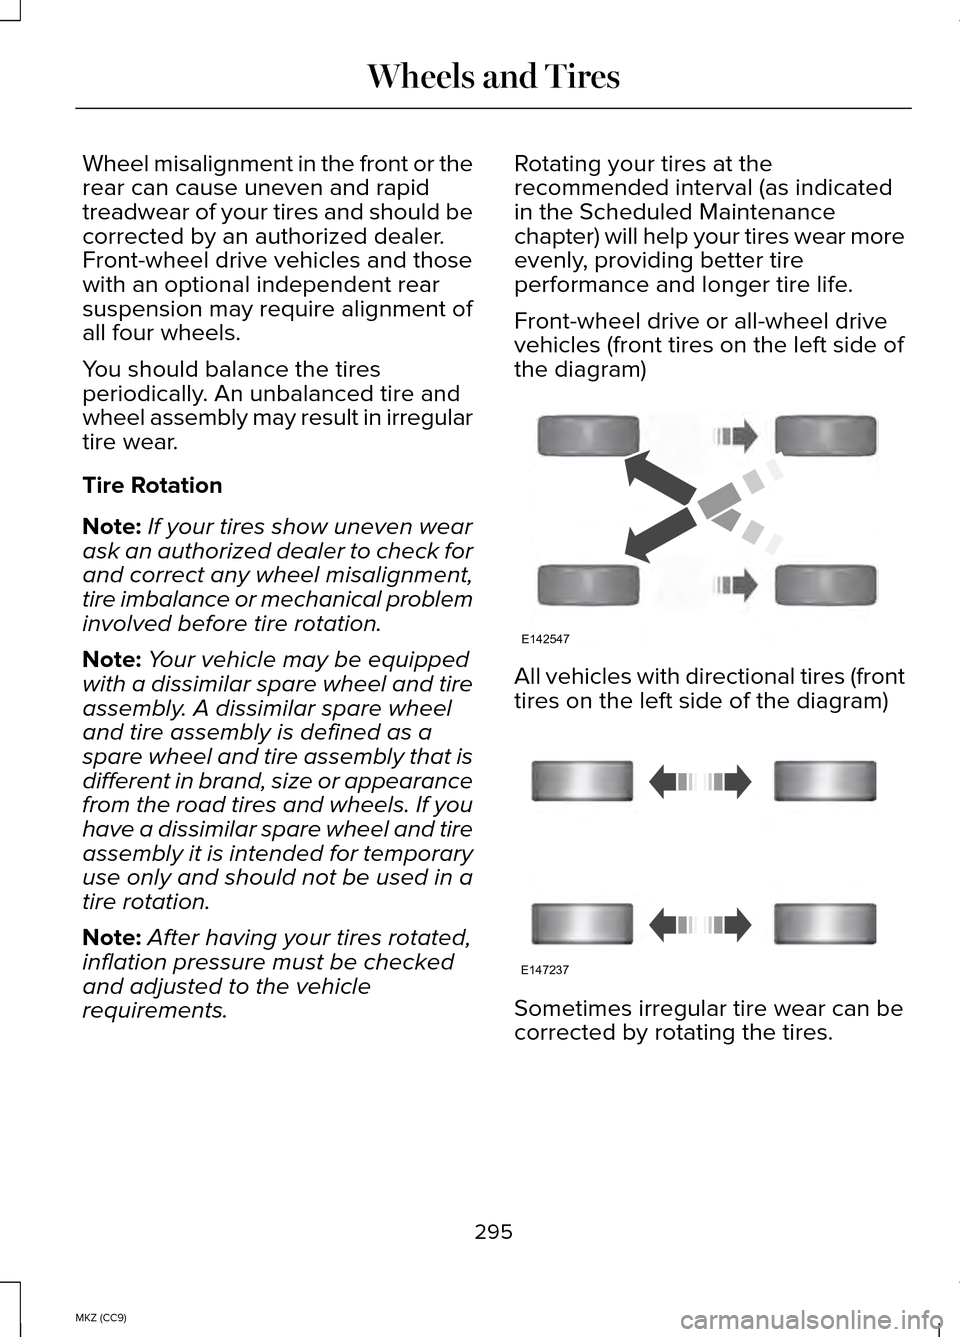
Front-wheel drive or all-wheel drive
vehicles (front tires on the left side of
the diagram)
All vehicles with directional tires (front
tires on the left side of the diagram)
Sometimes irregular tire wear can be
corrected by rotating the tires.
295
MKZ (CC9) Wheels and TiresE142547 E147237