2014 Lexus CT200h Manual
[x] Cancel search: ManualPage 327 of 622

327
5
5-11. Basic Operations (Lex
us Display Audio System)
Audio system
CT200h_OM_OM76135E_(EE)
Steering wheel audio switches
Volume switch
• Increases/decreases volume
• Press and hold: Continuously increases/decreases volume
Radio mode: • Press (except manual mode):
Select a radio station
• Press (manual mode): Seek up/
down
• Press and hold (manual mode): Continuously seek up/down
CD, MP3/WMA/AAC disc, Bluetooth
®, iPod or USB mode:
• Press: Select a track/file/song/video
• Press and hold: Select a folder/album (MP3/WMA/AAC disc or USB)
“MODE” switch • Turns the power on, selects audio source
• Press and hold this switch to mute or pause the current operation. To can- cel the mute or pause, press and hold.
Some audio features can be controlled using the switches on the steering
wheel.
Operation may differ depending on the type of audio system or navigation
system. For details, refer to the manual provided with the audio system or nav-
igation system.
Operating the audio system us ing the steering wheel switches
1
2
WA R N I N G
■To reduce the risk of an accident
Exercise care when operating the audio switches on the steering wheel.
3
CT200h_OM_OM76135E_(EE).book Page 327 Friday, May 30, 2014 1 1:14 AM
Page 342 of 622

3425-13. Using the audio system (Lexus Display Audio System)
CT200h_OM_OM76135E_(EE)
Audio menu screen operation
To display the audio menu screen, move the controller to the left while on an
audio top screen.
�XFM or AM radio
Seek a station of the nearest fre-
quency (stops when a station is
found) (manual mode)
Change FM radio settings
( → P. 3 3 9 )
Change DAB settings ( →P. 3 4 0 )
�XDAB
Adjust the playback offset time on
time shift mode
Cancel time shift operation
Select an ensemble (manual mode)
Select a service (manual mode)
Change FM radio settings
(→ P. 3 3 9 )
Change DAB settings ( →P. 3 4 0 )
You can change the settings and cont rol functions for each audio source.
Audio menu screen
1
2
3
1
2
3
4
5
6
CT200h_OM_OM76135E_(EE).book Page 342 Friday, May 30, 2014 1 1:14 AM
Page 345 of 622

345
5
5-14. Using the radio (Lexus Display Audio System)
Audio system
CT200h_OM_OM76135E_(EE)
Radio operation
Pressing the “RADIO” button displays the radio top screen from any screen of
the selected source.
■Menu screen
→
P. 3 4 2
Move the controller to the right to display the right menu screen. Change the radio top screen to the
preset selection screen.
Change the radio top screen to the
station list selection screen. (FM and
DAB)
Change the radio top screen to the
manual selection screen.
Change the radio top screen to the
time shift operation screen. (DAB)
(→ P. 3 4 6 )
Tune in to the desired station using one of the following methods.
■Seek tuning
Manual screen: Press or press and hold “ <” or “ >” button.
Preset or station list screen: Press and hold “ <” or “ >” button.
Seek turning can also be operated on the menu screen. ( →P. 3 4 2 )
The radio will begin seeking up or down for a station of the nearest frequency
and will stop when a station is found.
Select “AM”, “FM” or “DAB” on the “Source” screen to begin listening to the
radio.
Radio top screen
Changing the top screen mode
1
2
3
4
Selecting a station
CT200h_OM_OM76135E_(EE).book Page 345 Friday, May 30, 2014 1 1:14 AM
Page 346 of 622

3465-14. Using the radio (Lexus Display Audio System)
CT200h_OM_OM76135E_(EE)
■Manual tuning (manual screen)
Turn the “TUNE•SCROLL” knob or turn the controller.
■Station list (preset or station list screen)
Select the desired station by pressing “<” or “>”, turn the “TUNE•SCROLL”
knob or controller.
Radio stations can be preset. Search for desired stations.
Turn the controller to select one of the stations and then press the controller
until you hear a beep while on the preset selection screen.
The broadcast you are currently listening to can be re-listened to at any time. Move the controller to the right and then select “Time shift”.
Turn the “TUNE•SCROLL” knob to set the desired offset.
An offset playback time can also be set on the menu screen. ( →P. 3 4 2 )
To cancel the time shift operation while in time shift mode, move the controller to the
left and select “Time shift off”. If the time shift display is left showing “-0’ 00”” for 6
seconds without any operation, the time shift operation will be canceled.
■Reception sensitivity
●Maintaining perfect radio reception at all time s is difficult due to the continually chang-
ing position of the antenna, differences in si gnal strength and surrounding objects, such
as trains, transmitters, etc.
●The radio antenna is mounted inside the rear window. To maintain clear radio reception,
do not attach metallic window tinting or other metallic objects to the antenna wire
mounted inside the rear window.
■Traffic announcement operation
When traffic announcement is set to on, “TP” will appear on the screen and the radio will
begin seeking a TP station. If the radio s eeks out a TP station, the program name will
appear on the screen. If a traffic announcement station is received, the radio will be
switched to the traffic information program automatically. When the program ends, the
initial operation will resume.
Setting station presets (preset screen)
Time shift operation (DAB)
1
2
1
2
CT200h_OM_OM76135E_(EE).book Page 346 Friday, May 30, 2014 1 1:14 AM
Page 355 of 622

355
5
Audio system
CT200h_OM_OM76135E_(EE)5-16. Using an external device (Lexus Display Audio System)
■Error messages
If the following error messages appear on the screen, refer to the table and take the
appropriate measures. If the problem is not rectified, take the vehicle to any authorized
Lexus dealer or repairer, or another duly qualified and equipped professional.
■iPod problems
To resolve most problems encountered when using your iPod, disconnect your iPod from
the vehicle iPod connection and reset it. For instructions on how to reset your iPod, refer
to your iPod Owner’s Manual.
MessageCause/Correction procedures
“Connection error. Consult
your owner’s manual for
instructions on how to
reconnect the iPod.”
This indicates a problem in the iPod or its connection.
“There are no songs available
for playback. Add compatible
songs to your iPod.”
This indicates that there is no music data in the iPod.
“No items available.”This indicates that songs are not found in a selected
playlist.
“Check the iPod firmware
version.”This indicates that the software version is not com-
patible.
Please check the compatible models. ( →P. 3 5 6 )
“iPod authorization failed.”This indicates that the Lexus Display Audio system
failed to authorize the iPod.
Please check your iPod.
CT200h_OM_OM76135E_(EE).book Page 355 Friday, May 30, 2014 1 1:14 AM
Page 358 of 622

3585-16. Using an external device (Lexus Display Audio System)
CT200h_OM_OM76135E_(EE)
Moving the controller to the right and selecting “Play video” while the USB video
screen is displayed changes to USB video mode.
This function cannot be used while USB photo or MirrorLink™ is in use.
■Menu screen
→P. 3 4 2
■Selecting a file
Press the “ <” or “ >” button, turn the “TUNE•SCROLL” knob to select the
desired file number.
To fast-forward or reverse, press and hold the “ <” or “ >” button.
■Selecting a folder
Move the controller to the right and select “Browse”.
Select the desired folder, then select a file to begin using the selected
folder.
■Displaying the now playing list
Move the controller to the right and select “Now playing list”.
■USB memory functions
●Depending on the USB memory device that is connected to the system, the device
itself may not be operable and certain functions may not be available. If the device is
inoperable or a function is unavailable du e to a malfunction (as opposed to a system
specification), disconnecting the device and reconnecting it may resolve the problem.
●If the USB memory device still does not begin operation after being disconnected and
reconnected, format the device.
■Error messages for USB memory
If the following error messages appear on the screen, refer to the table and take the
appropriate measures. If the problem is not rectified, take the vehicle to any authorized
Lexus dealer or repairer, or another duly qualified and equipped professional.
USB video
MessageCause/Correction procedures
“Connection error. Consult your
owner’s manual for instructions
on how to reconnect the USB
device.”
This indicates a problem with the USB memory
device or its connection.
“There are no files available for
playback. Add compatible files
to your USB device.”This indicates that no MP3/WMA/AAC files are
included on the USB memory device.
1
2
CT200h_OM_OM76135E_(EE).book Page 358 Friday, May 30, 2014 1 1:14 AM
Page 365 of 622

365
5
5-17. Connecting Bluetooth
® (Lexus Display Audio System)
Audio system
CT200h_OM_OM76135E_(EE)
Registering a Bluetooth® device
Turn the Bluetooth® connection setting of your device set to on.
Go to “Bluetooth
* setup”: “MENU” button → “Setup” → “Bluetooth*”
Move the controller to the left and then select “Add device”
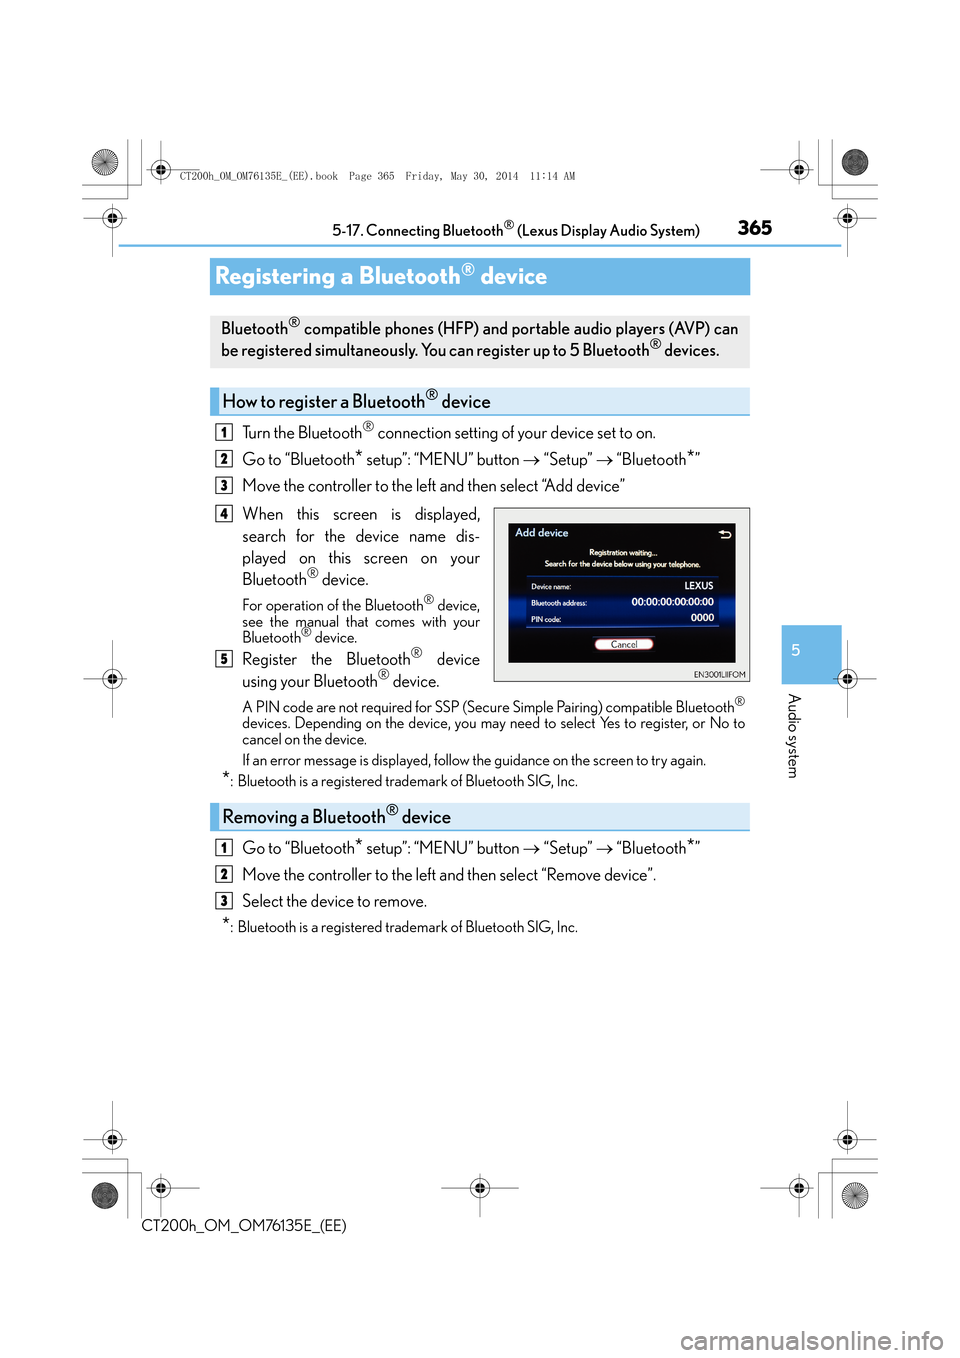
When this screen is displayed,
search for the device name dis-
played on this screen on your
Bluetooth
® device.
For operation of the Bluetooth® device,
see the manual that comes with your
Bluetooth
® device.
Register the Bluetooth® device
using your Bluetooth® device.
A PIN code are not required for SSP (Secur e Simple Pairing) compatible Bluetooth®
devices. Depending on the device, you may need to select Yes to register, or No to
cancel on the device.
If an error message is displayed, follow the guidance on the screen to try again.
*: Bluetooth is a registered trademark of Bluetooth SIG, Inc.
Go to “Bluetooth* setup”: “MENU” button → “Setup” → “Bluetooth*”
Move the controller to the left and then select “Remove device”.
Select the device to remove.
*: Bluetooth is a registered trademark of Bluetooth SIG, Inc.
Bluetooth® compatible phones (HFP) and portable audio players (AVP) can
be registered simultaneously. You can register up to 5 Bluetooth® devices.
How to register a Bluetooth® device
1
2
3
4
5
Removing a Bluetooth® device
1
2
3
CT200h_OM_OM76135E_(EE).book Page 365 Friday, May 30, 2014 1 1:14 AM
Page 368 of 622

3685-17. Connecting Bluetooth® (Lexus Display Audio System)
CT200h_OM_OM76135E_(EE)
Connecting a Bluetooth® phone
When you register a phone, auto connection will be activated. Always set it to
this mode and leave the Bluetooth® phone in a place where a connection can be
established.
When the power switch is turned to ACCESSORY or ON mode, the system will
search for a nearby cellular phone you have registered.
The system automatically connects with the most recent phone that was con-
nected. The connected result is displayed.
When auto connection has failed or “Bluetooth
* power” is turned off, you must
connect the Bluetooth® device manually.
Go to “Bluetooth
* setup”: “MENU” button → “Setup” → “Bluetooth*”
Select the device to connect.
Select “Connect all”, “Connect as a telephone” or “Connect as audio player”.
If the desired Bluetooth
® device is not displayed, register the device.
( → P. 3 6 5 )
*: Bluetooth is a registered trademark of Bluetooth SIG, Inc.
■Reconnecting a Bluetooth® phone
If the system cannot connect due to poor signal strength with the power switch in
ACCESSORY or ON mode, the system will automatically attempt to reconnect.
If the phone is turned off, the system will no t attempt to reconnect. In this case, the con-
nection must be made manually, or the phone must be reselected.
■Connecting a phone while Bluetooth® audio is playing
●Bluetooth® audio will stop temporarily.
●It may take time to connect.
There are two connecting methods available: automatic and manual.
Auto connection
Manual connection
1
2
3
CT200h_OM_OM76135E_(EE).book Page 368 Friday, May 30, 2014 1 1:14 AM